
Restoring my '79 LWB F100 - Build Thread
#16
 03-04-2012, 03:33 PM

#17
03-04-2012, 05:56 PM
Join Date: Mar 2012
Location: Geelong, Australia
Posts: 68
Likes: 0
Received 0 Likes
on
0 Posts
Hey all, thanks for the replies and interest. I'll do my best to keep this thread updated as I update my Australian Ford Forum thread.
kevin316, everyone over here calls their utilites utes, it's a very common term that's been around forever.
And it looks just as strange to me to see a vehicle with an interior that I know so well with the steering wheel on the other side!
Oldstyle, the heater box and controls are mounted on the other side and that hole in my ute's firewall has just been plugged up.
#18
03-14-2012, 06:29 AM
Join Date: Mar 2012
Location: Geelong, Australia
Posts: 68
Likes: 0
Received 0 Likes
on
0 Posts
Restoring my '79 LWB F100 - Build Thread
There hasn't been a whole lot going lately as far as progress.
I did try and get some firewood in my ute the other day and it didn't take much of a load before the rear end was nearly sitting on the bump stops. I knew when I lowered it that I'd have to eventually come up with a solution that would allow me to have the ride height I want and still be able to carry a reasonable load.
I'm thinking about replacing the stock leaves, my reasoning being that they must have lost some of their load carrying capacity after 33 years or so. When I do that I'll probably get an extra leaf added plus they'll have to be reset to drop the rear end another inch or two to get the rear end sitting where I want it.
Once I unloaded it I crawled underneath to take some measurements and I've now got about 75mm of suspension travel. That makes sense, I had about 170mm to start with and I've put a 4 inch shackle/hanger kit in it since.
I've been trying to find out what is a decent amount of suspension travel to have given that I do want to still carry a bit of load in the back. I'm figuring on 4 inches, I want the rear end to come down another 2 inches so at the moment that will only leave me with 1 inch of travel. Obviously that's not enough so I'm figuring on a 2 inch chassis notch and also fitting lower profile rebound rubbers to try and gain another inch there.
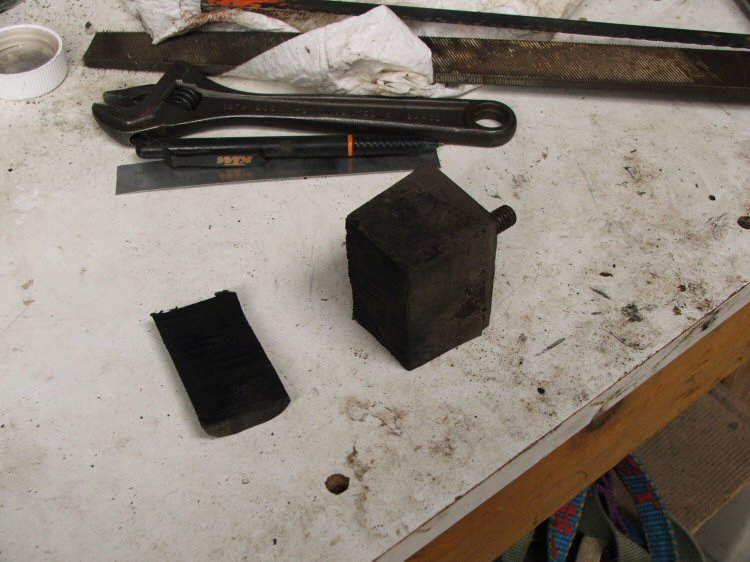
For now to try and give me just a little more travel I took the stock rebound rubbers out and sliced 10mm off them.
I don't know if it will make much difference but I have to get my firewood sorted for the winter and I'll be making a lot of trips if I can only put a third of a load in the back each time!
With the rear end loaded I also found I had some serious clearance issues with the rear tyres/guard lips. I decided to roll the lips up, similar to what I'd done to the front guards, to give me some room between tyre and guard.
I'm planning on fitting new rims down the track and there's plenty of room for the tyres to sit further in so I'll get the correct offset to overcome the clearance problem but for now I needed to do something.
It didn't go particularly well, I was about halfway through doing the driver's side when I could see the metal above the guard lip starting to distort. The guards are double skinned so I was obviously pulling on something by beating the lips up. I made a phone call to my buddy who is going to do the paint and panel work for me and he advised to keep going and he'd straighten it out when we took the body off.
So I kept banging away and got both sides done.
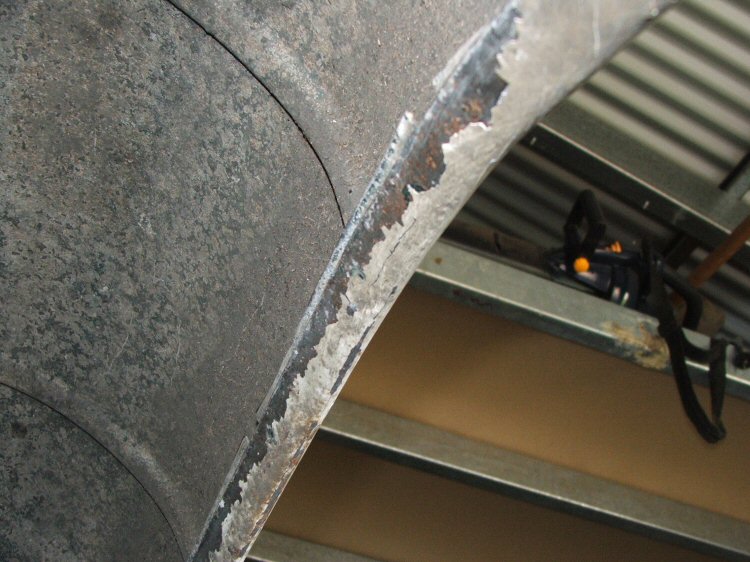
I also made a mess of the panels in the meantime, on the passenger side it didn't distort above the lip so much but it pulled the lip in. Kind of defeated the purpose of doing it in the first place. Lucky my buddy has some serious panel beating skills but I have to say he wasn't super impressed when I drove around to show him.

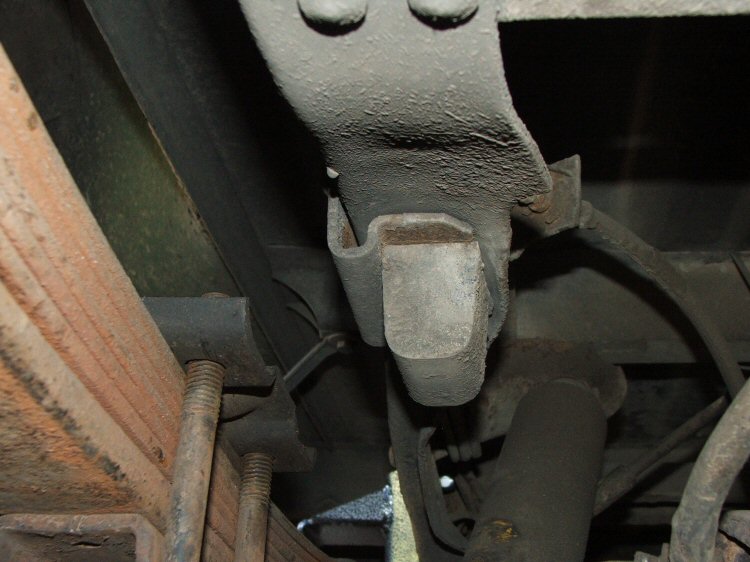
While I was fiddling around with the bump stops I had a good look at the retainer type plate that the bump stop bolts through to the chassis rail. It is riveted to the side of the chassis rail and has a curled section that hangs below the bottom edge of the rail by about 20mm. If I fit shorter bump stops then the diff tube will end up very close to the overhang section of the bracket if the suspension was to bottom out. I'm wondering if I can remove the bracket and just bolt the rubber directly to the chassis rail? Also, if I have a notch kit installed then the bracket may have to removed anyway or maybe it's just re-installed further up the side of the chassis rail.
Don't know at this point.
I posted in these forums earlier about possible set ups for the rear and a few of the guys are saying that fitting air bags would be a solution. I can pump them up when I'm carrying a load and let them down when I'm not. I'm still planning on getting new/beefed up springs though.
I did try and get some firewood in my ute the other day and it didn't take much of a load before the rear end was nearly sitting on the bump stops. I knew when I lowered it that I'd have to eventually come up with a solution that would allow me to have the ride height I want and still be able to carry a reasonable load.
I'm thinking about replacing the stock leaves, my reasoning being that they must have lost some of their load carrying capacity after 33 years or so. When I do that I'll probably get an extra leaf added plus they'll have to be reset to drop the rear end another inch or two to get the rear end sitting where I want it.
Once I unloaded it I crawled underneath to take some measurements and I've now got about 75mm of suspension travel. That makes sense, I had about 170mm to start with and I've put a 4 inch shackle/hanger kit in it since.
I've been trying to find out what is a decent amount of suspension travel to have given that I do want to still carry a bit of load in the back. I'm figuring on 4 inches, I want the rear end to come down another 2 inches so at the moment that will only leave me with 1 inch of travel. Obviously that's not enough so I'm figuring on a 2 inch chassis notch and also fitting lower profile rebound rubbers to try and gain another inch there.
For now to try and give me just a little more travel I took the stock rebound rubbers out and sliced 10mm off them.
I don't know if it will make much difference but I have to get my firewood sorted for the winter and I'll be making a lot of trips if I can only put a third of a load in the back each time!
With the rear end loaded I also found I had some serious clearance issues with the rear tyres/guard lips. I decided to roll the lips up, similar to what I'd done to the front guards, to give me some room between tyre and guard.
I'm planning on fitting new rims down the track and there's plenty of room for the tyres to sit further in so I'll get the correct offset to overcome the clearance problem but for now I needed to do something.
It didn't go particularly well, I was about halfway through doing the driver's side when I could see the metal above the guard lip starting to distort. The guards are double skinned so I was obviously pulling on something by beating the lips up. I made a phone call to my buddy who is going to do the paint and panel work for me and he advised to keep going and he'd straighten it out when we took the body off.
So I kept banging away and got both sides done.
I also made a mess of the panels in the meantime, on the passenger side it didn't distort above the lip so much but it pulled the lip in. Kind of defeated the purpose of doing it in the first place. Lucky my buddy has some serious panel beating skills but I have to say he wasn't super impressed when I drove around to show him.
While I was fiddling around with the bump stops I had a good look at the retainer type plate that the bump stop bolts through to the chassis rail. It is riveted to the side of the chassis rail and has a curled section that hangs below the bottom edge of the rail by about 20mm. If I fit shorter bump stops then the diff tube will end up very close to the overhang section of the bracket if the suspension was to bottom out. I'm wondering if I can remove the bracket and just bolt the rubber directly to the chassis rail? Also, if I have a notch kit installed then the bracket may have to removed anyway or maybe it's just re-installed further up the side of the chassis rail.
Don't know at this point.
I posted in these forums earlier about possible set ups for the rear and a few of the guys are saying that fitting air bags would be a solution. I can pump them up when I'm carrying a load and let them down when I'm not. I'm still planning on getting new/beefed up springs though.
#19
04-21-2012, 07:11 AM
Join Date: Mar 2012
Location: Geelong, Australia
Posts: 68
Likes: 0
Received 0 Likes
on
0 Posts
Restoring my '79 LWB F100 - Build Thread
There hasn't been a whole lot going on with ute for the last couple of months, I'm renovating a caravan at the moment so have been busy with that and have had a few other things on the go.
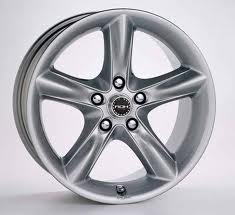
Since completing the first stage of lowering the ute I've been looking around for some wheels that I like. I want to fit 18 inch wheels and I've got an idea what style I'd like (see pic below) but I can't find anything suitable to suit. There are quite a few wheels available in 15 inch but in 18's it seems that it's only the newer style 4WD wheels (which seem to be all the powder coated/machined highlights type of wheels that you see everywhere at the moment) but I want the old style 5 spoke type.
Once I find the wheels I'm after I can fit them and then finish lowering the vehicle. The front end will be pretty straightforward, just cut the coils a little to drop it about an inch. The rear needs to come down another two inches and with only about 80mm of travel left now that presents a problem.
To that end I've gotten some prices for a 2 inch chassis notch, I spoke to a local engineering business locally and also a couple of rod shops an hour up the road and they're all telling me about $2000 to do the job. It's a bit of cash but I'm thinking if the ute is going to be my daily driver and still be used to carry stuff around then a chassis notch with air bag helpers will still allow me to use the vehicle similar to what I was at the standard ride height. Function over form and all that.
I have spent a bit of time lately giving my old alloys a good clean up and polish, I also lashed out and got some new center caps and wheel nuts. I gave the front bar and the exhaust tip a polish too. I rolled the old girl onto the front lawn and took some pics.
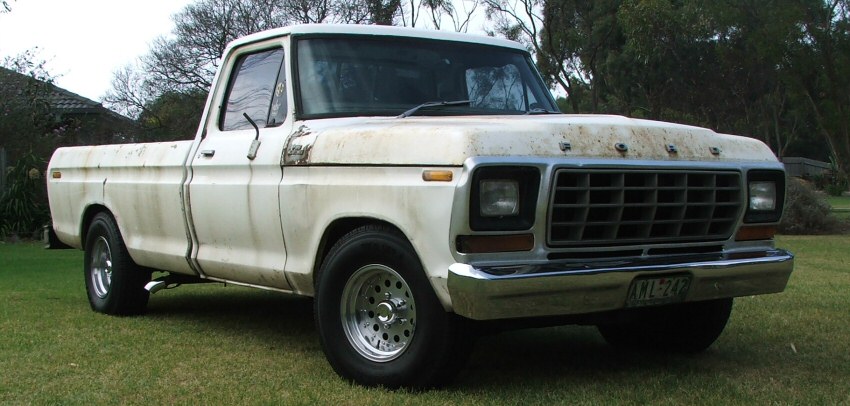
A couple of confessions - I've only done the driver's side so far so from the other side it still looks pretty ordinary. Also, if you think the exhaust dump pipe looks to be hanging a bit low you'd be right, it's held on at the moment with a bent up coat hanger. Must do something about that, I'll put it on the list.
Next up I'm going to pull the fuel tank out and see about getting the LPG tank mounted under the vehicle, I'm also going to move the gas mixer off the inner guard onto the firewall in preparation for tidying up the engine bay.
I'm going to need another vehicle to drive around shortly when I take the ute off the road. I've heard word of a clean '76 LWB F100 that a local bloke has for sale so I'm going to have a look at it when I've got a minute. It might do to get me around while I complete this project and then become the vehicle for the next project. We'll see.
Slightly off topic but one little job I did recently was on my son's bike. He'd inherited his big sister's bike but he wasn't super keen on the mermaid and seashell scheme on it. I stripped the frame and put on 4 coats of the local hardware store's finest flat black and then got my panel beater/spay painter buddy to airbrush on some flames. I then fitted some new black pedals and black hand grips and voila! a rat style custom bike to impress all his little mates at school (except for the purple front brake cable, he'll just have to learn to live with that).

Cheers.
Since completing the first stage of lowering the ute I've been looking around for some wheels that I like. I want to fit 18 inch wheels and I've got an idea what style I'd like (see pic below) but I can't find anything suitable to suit. There are quite a few wheels available in 15 inch but in 18's it seems that it's only the newer style 4WD wheels (which seem to be all the powder coated/machined highlights type of wheels that you see everywhere at the moment) but I want the old style 5 spoke type.
Once I find the wheels I'm after I can fit them and then finish lowering the vehicle. The front end will be pretty straightforward, just cut the coils a little to drop it about an inch. The rear needs to come down another two inches and with only about 80mm of travel left now that presents a problem.
To that end I've gotten some prices for a 2 inch chassis notch, I spoke to a local engineering business locally and also a couple of rod shops an hour up the road and they're all telling me about $2000 to do the job. It's a bit of cash but I'm thinking if the ute is going to be my daily driver and still be used to carry stuff around then a chassis notch with air bag helpers will still allow me to use the vehicle similar to what I was at the standard ride height. Function over form and all that.
I have spent a bit of time lately giving my old alloys a good clean up and polish, I also lashed out and got some new center caps and wheel nuts. I gave the front bar and the exhaust tip a polish too. I rolled the old girl onto the front lawn and took some pics.
A couple of confessions - I've only done the driver's side so far so from the other side it still looks pretty ordinary. Also, if you think the exhaust dump pipe looks to be hanging a bit low you'd be right, it's held on at the moment with a bent up coat hanger. Must do something about that, I'll put it on the list.
Next up I'm going to pull the fuel tank out and see about getting the LPG tank mounted under the vehicle, I'm also going to move the gas mixer off the inner guard onto the firewall in preparation for tidying up the engine bay.
I'm going to need another vehicle to drive around shortly when I take the ute off the road. I've heard word of a clean '76 LWB F100 that a local bloke has for sale so I'm going to have a look at it when I've got a minute. It might do to get me around while I complete this project and then become the vehicle for the next project. We'll see.
Slightly off topic but one little job I did recently was on my son's bike. He'd inherited his big sister's bike but he wasn't super keen on the mermaid and seashell scheme on it. I stripped the frame and put on 4 coats of the local hardware store's finest flat black and then got my panel beater/spay painter buddy to airbrush on some flames. I then fitted some new black pedals and black hand grips and voila! a rat style custom bike to impress all his little mates at school (except for the purple front brake cable, he'll just have to learn to live with that).
Cheers.
#20
04-21-2012, 09:05 AM
Hotshot
#21
04-22-2012, 06:21 AM
Join Date: Mar 2012
Location: Geelong, Australia
Posts: 68
Likes: 0
Received 0 Likes
on
0 Posts
Restoring my '79 LWB F100 - Build Thread
Earthquake, I just had a bloke on the Aussie Ford Forums suggest some whitewalls as well. I'm going to chase some up because I agree they'd look the part but like I pointed out to him I'm kinda defeating the purpose of a hand me down bike when I've already spent nearly $50 on new grips, pedals, cross bar pad and seat post!
#22
12-18-2012, 06:05 PM
Join Date: Mar 2012
Location: Geelong, Australia
Posts: 68
Likes: 0
Received 0 Likes
on
0 Posts
Hey all,
There hasn't been a whole lot going on with the restoration of my truck this year, the caravan renovation turned into a drawn out, labour sapping PITA. Anyways, it's nearly finished and just as well because I'm taking my family away for a holiday in it on Boxing Day.
Because of that I thought I'd better take a look at doing some work on my truck to make sure it's right to do some towing.
It had been running rough and missing under load so I went through the ignition system and started replacing components. I'd fitted a Pertronix Igniter I module to replace the points many years ago so I suspected it may be malfunctioning. I purchased an Igniter II and also got the Flamethrower coil to suit. I also replaced the plugs, leads, rotor button and the dizzy cap too. Just as well because part of my problem was the distributor cap, it must have had a hair line crack in it causing the engine to mis-fire.
So with the ignition sorted I also put new inlet manifold gaskets on, the rear manifold seal had been leaking for a while and had recently gotten worse. That was a bit of a job, I had to sit on the radiator with my feet on either chassis rail and lower the manifold back in. Those cast iron manifolds are heavy!
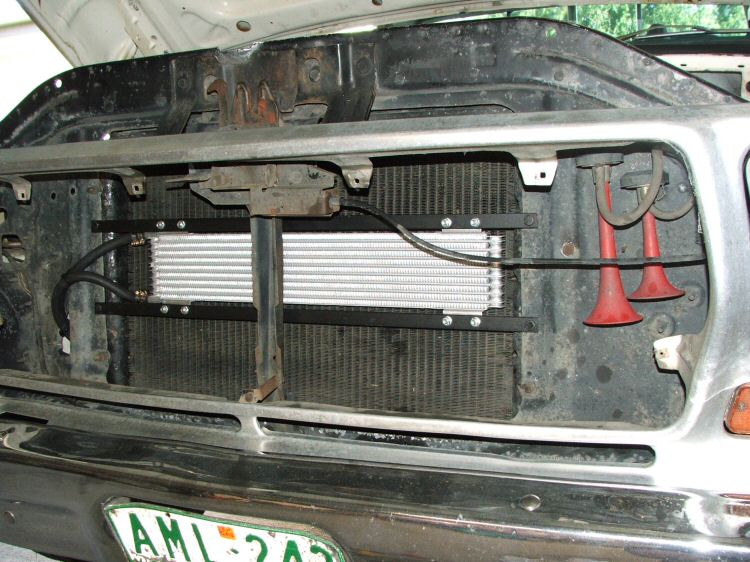
I purchased a transmission cooler and installed that too, it's probably something I should have done a long time ago.
I replaced the shock absorbers because the old ones were completely shot, I didn't realise just how bad they were until I felt the difference in compressing an old one compared to a new one. They've made a big difference to how the truck rides, I can drive over a rough bit of road without the truck wanting to get all loose and spear off into a tree!
The rear brakes have had some attention, I put a new spring kit in them and also replaced the linings. While I was under there I also took the front brakes apart and gave the calipers and pads a clean and regreased the slides.
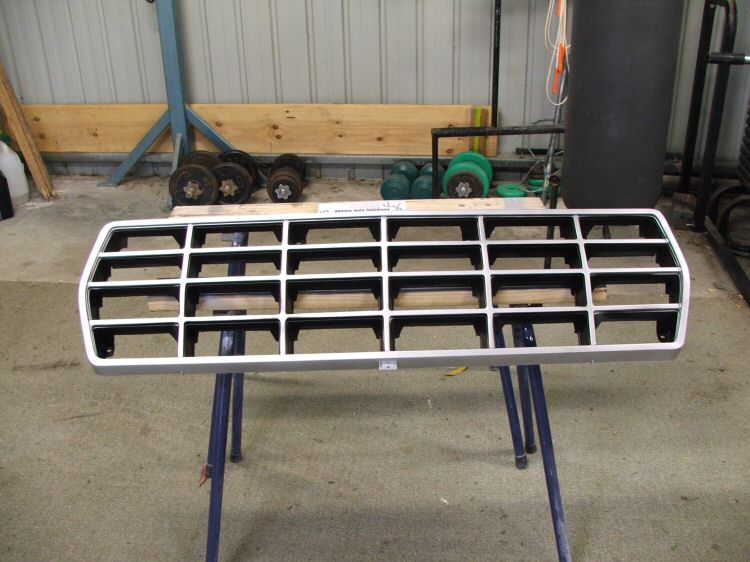
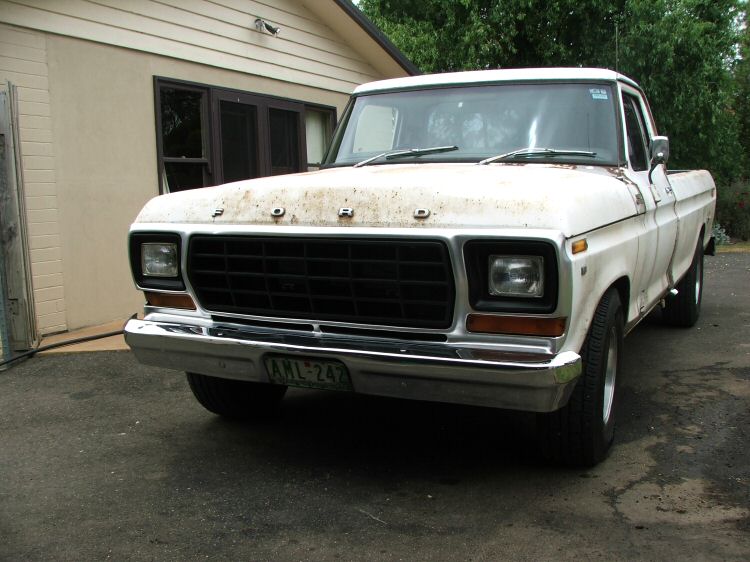
I also splashed out on a new grille, the old one was cracked and held together with bits of tin and rivets. I gave it a spray with some flat black paint and also sprayed the headlight surrounds while I was at it. I thought it came up pretty well for an hours work.
My radiator was in pretty ordinary shape, it must have been fairly well clogged because the engine was running hotter than it should and I couldn't see much coolant flow when I looked into the top of the radiator. I picked up a new radiator on Ebay for $100, it had a little bit of damage to the core where it had fallen over which cost me $65 to be repaired so for $165 it was all good. It's not particularly good quality but it will do for now. I'm chasing up a thermo fan for it and will fit that in a couple of weeks time.
There hasn't been a whole lot going on with the restoration of my truck this year, the caravan renovation turned into a drawn out, labour sapping PITA. Anyways, it's nearly finished and just as well because I'm taking my family away for a holiday in it on Boxing Day.
Because of that I thought I'd better take a look at doing some work on my truck to make sure it's right to do some towing.
It had been running rough and missing under load so I went through the ignition system and started replacing components. I'd fitted a Pertronix Igniter I module to replace the points many years ago so I suspected it may be malfunctioning. I purchased an Igniter II and also got the Flamethrower coil to suit. I also replaced the plugs, leads, rotor button and the dizzy cap too. Just as well because part of my problem was the distributor cap, it must have had a hair line crack in it causing the engine to mis-fire.
So with the ignition sorted I also put new inlet manifold gaskets on, the rear manifold seal had been leaking for a while and had recently gotten worse. That was a bit of a job, I had to sit on the radiator with my feet on either chassis rail and lower the manifold back in. Those cast iron manifolds are heavy!
I purchased a transmission cooler and installed that too, it's probably something I should have done a long time ago.
I replaced the shock absorbers because the old ones were completely shot, I didn't realise just how bad they were until I felt the difference in compressing an old one compared to a new one. They've made a big difference to how the truck rides, I can drive over a rough bit of road without the truck wanting to get all loose and spear off into a tree!
The rear brakes have had some attention, I put a new spring kit in them and also replaced the linings. While I was under there I also took the front brakes apart and gave the calipers and pads a clean and regreased the slides.
I also splashed out on a new grille, the old one was cracked and held together with bits of tin and rivets. I gave it a spray with some flat black paint and also sprayed the headlight surrounds while I was at it. I thought it came up pretty well for an hours work.
My radiator was in pretty ordinary shape, it must have been fairly well clogged because the engine was running hotter than it should and I couldn't see much coolant flow when I looked into the top of the radiator. I picked up a new radiator on Ebay for $100, it had a little bit of damage to the core where it had fallen over which cost me $65 to be repaired so for $165 it was all good. It's not particularly good quality but it will do for now. I'm chasing up a thermo fan for it and will fit that in a couple of weeks time.
#23
01-02-2013, 05:18 AM
Join Date: Mar 2012
Location: Geelong, Australia
Posts: 68
Likes: 0
Received 0 Likes
on
0 Posts
Well, the truck did the job pulling my caravan (which is finally finished!). It ran reasonably well, handled well with the new shocks and got us there and back.
Fuel consumption was interesting though. My usual figures are about 30 litres of LPG per 100km. Putting the van on the back increased that to between 42 and 45 litres per 100km! I'm guessing my Cleveland is getting very tired.
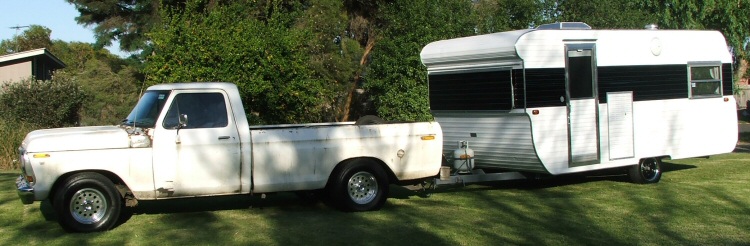
Here's a pic of the truck and van just before we headed off Boxing Day morning.
The caravan will be sold off shortly to finance my shed/workshop extension and then I can finally take the ute off the road and get things underway.
Fuel consumption was interesting though. My usual figures are about 30 litres of LPG per 100km. Putting the van on the back increased that to between 42 and 45 litres per 100km! I'm guessing my Cleveland is getting very tired.
Here's a pic of the truck and van just before we headed off Boxing Day morning.
The caravan will be sold off shortly to finance my shed/workshop extension and then I can finally take the ute off the road and get things underway.
#24
01-02-2013, 10:43 AM
Senior User
Join Date: Jun 2012
Location: South Africa, Cape Town
Posts: 174
Likes: 0
Received 0 Likes
on
0 Posts
 Whats your plans for the paint scheme?
#25
01-03-2013, 04:24 PM
Join Date: Mar 2012
Location: Geelong, Australia
Posts: 68
Likes: 0
Received 0 Likes
on
0 Posts
#26
01-31-2013, 04:16 AM
Join Date: Mar 2012
Location: Geelong, Australia
Posts: 68
Likes: 0
Received 0 Likes
on
0 Posts
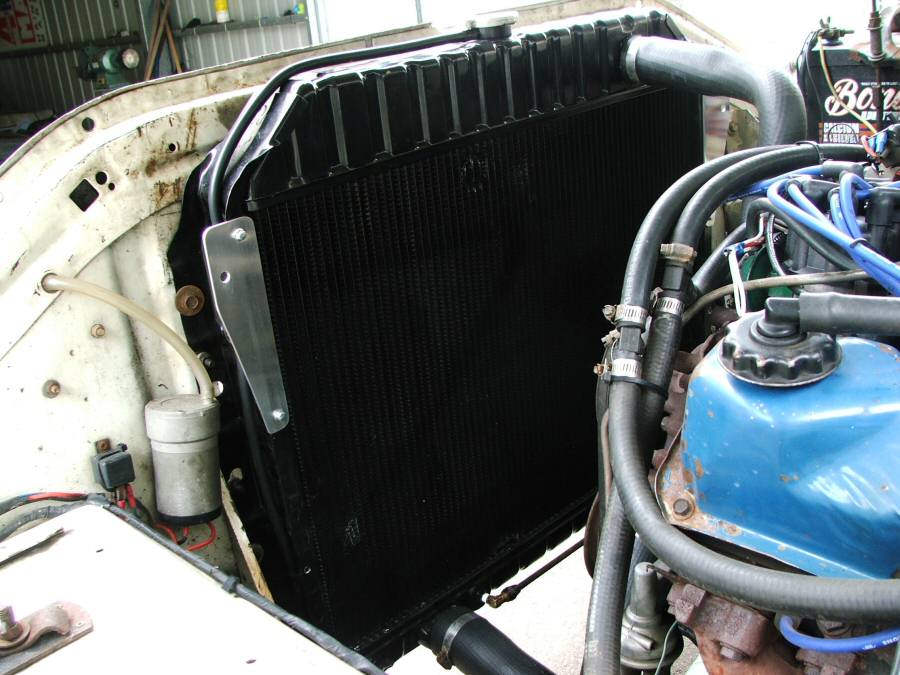
I've been working on the thermo fan conversion for my truck and it's almost done. I ended up buying some fans that suit EF/EL Falcons, after doing some research it seemed they were the go.

The only trimming of the fan shroud I had to do was the horizontal right angled section that runs across the top of the shroud, the top mounting holes were a bit wider than the edges of the radiator but I had an old rad behind the shed so I was able to use that as a template to make the mounting brackets. That allowed me to make up whatever I needed and fit the fans to the radiator without having to remove the radiator from the truck.

I made the brackets up and bolted them to the radiator so I could then sling the fans in and mark up the mounting holes.
Fans hung in place, note the high tech cable locating system.
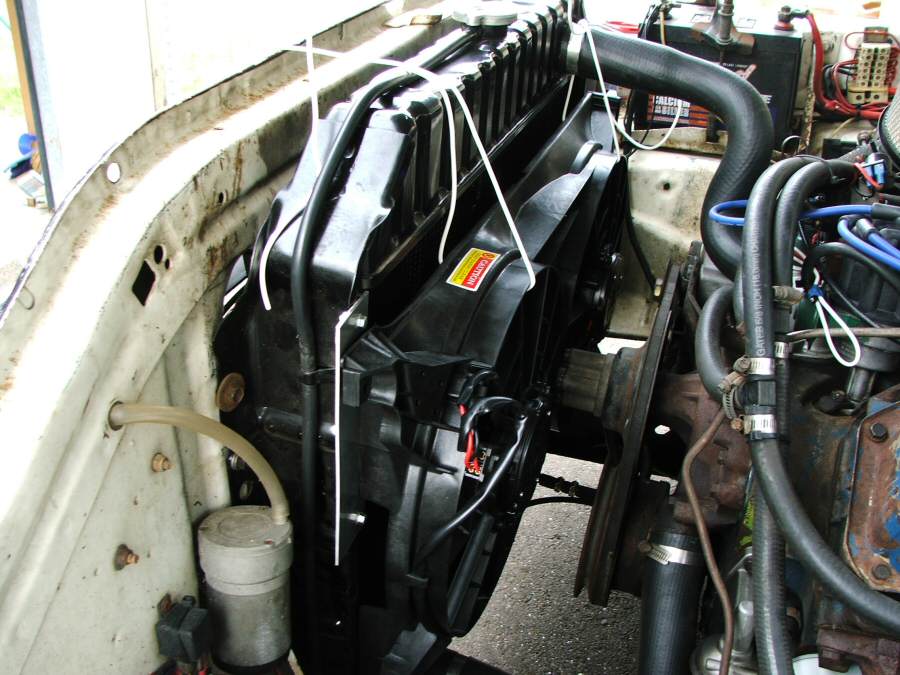
The lower mounts on the fan shroud are a tapered plastic wedge so I drilled a hole through each and they just lined up with either side of the radiator. The wedges sit away away from the face of the radiator so I made up a couple of crush tubes and used 8mm bolts to fasten the bottom of the assembly.
Fan bolted into place and the loom I made up about to be temporarily connected until I could get the right plug from the wreckers.

While I'm on the subject of wreckers, why are all those dudes such surly, grotty ******? I went in and explained to the bloke that I was fitting some EF/EL Falcon thermos to my F100. He then asks me which plug type it is, EF or EL and then makes me feel like an idiot because I couldn't tell him off the top of my head. How would I know? I told him I'd bought the fans new and I wasn't fitting them to a Falcon so why give me the attitude? He tells me 'mate, you'll have to bring them in so I can see what type you've got' and starts to walk away, I then suggested that one of his workers come out and have a look because my truck was parked in front of his door. By his response you'd reckon I'd just asked him to give me one of his kidneys!
They make a good dollar selling junk, pay their workers next to nothing, so why are they all so surly and miserable?
Anyway I'll end the rant here.
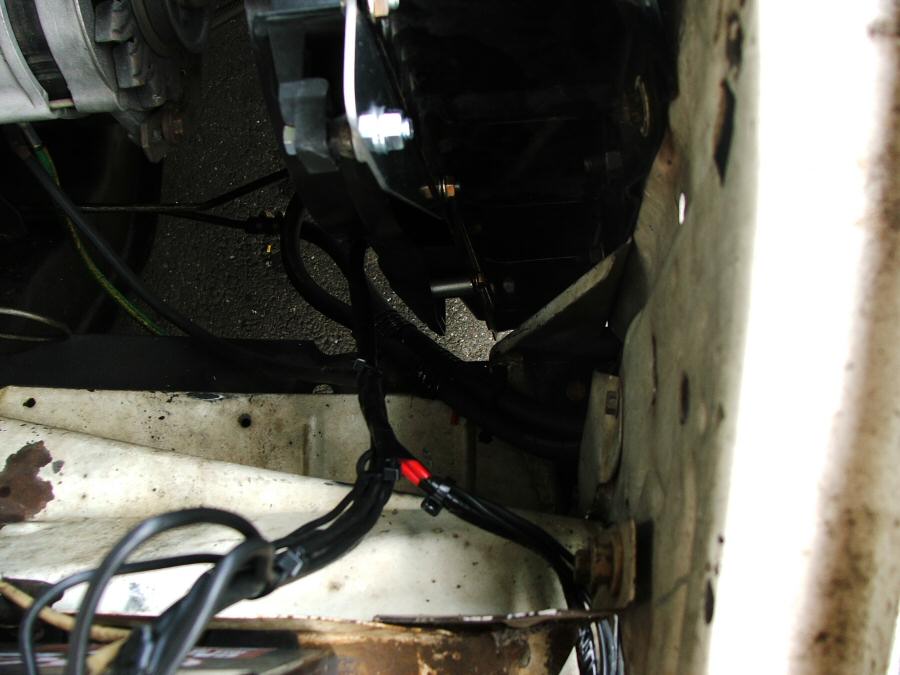
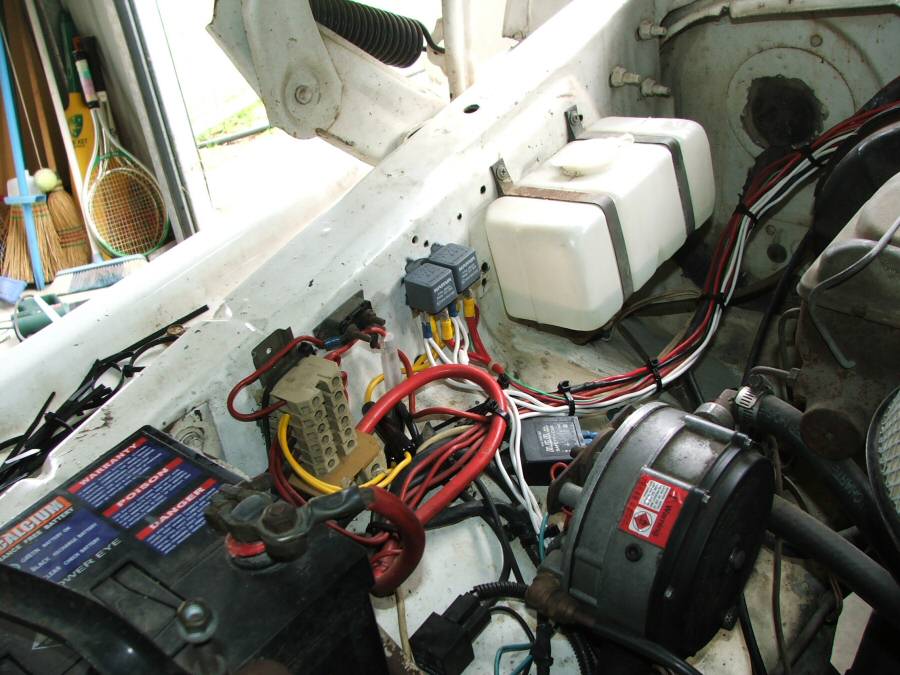
Got the fans bolted up and the relays wired in. The fans can be wired in series for low speed and in parallel for high speed. I decided to run two temp. switches, a cooler range and then a hotter range switch, and have each switch pull in a separate relay for each fan running at full speed.
Relays mounted on the inner guard.
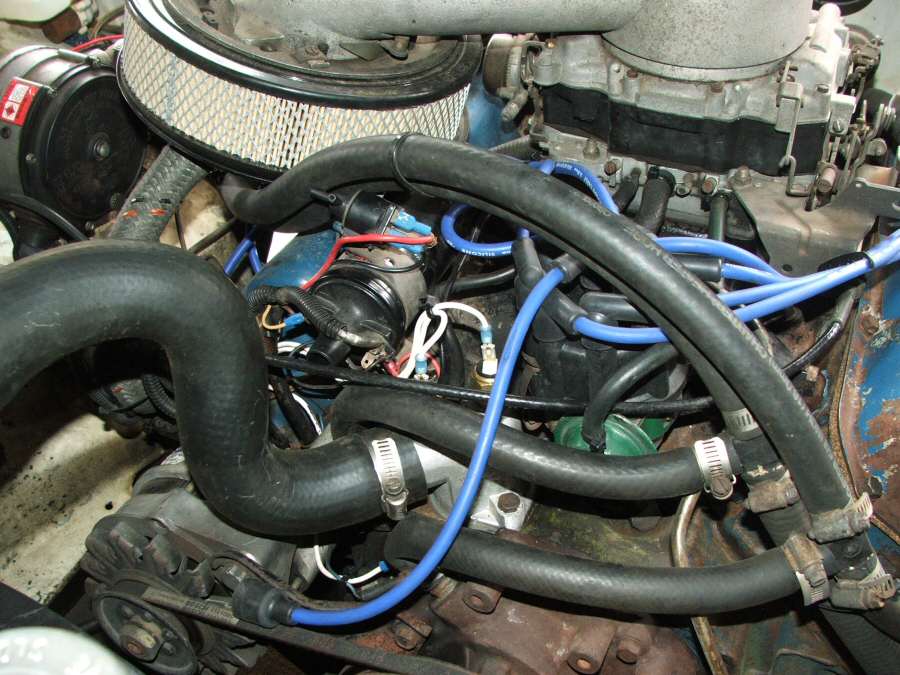
The two temp. switches screwed into the thermostat housing.
I've also wired in a double pole toggle switch in the cab to act as a manual override to turn the fans on manually if I need to.
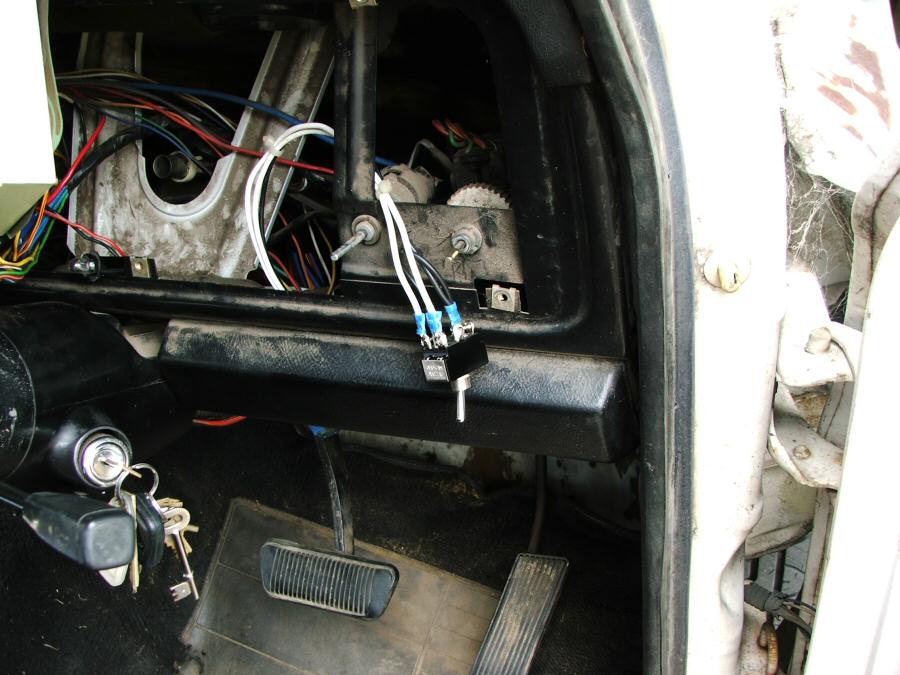
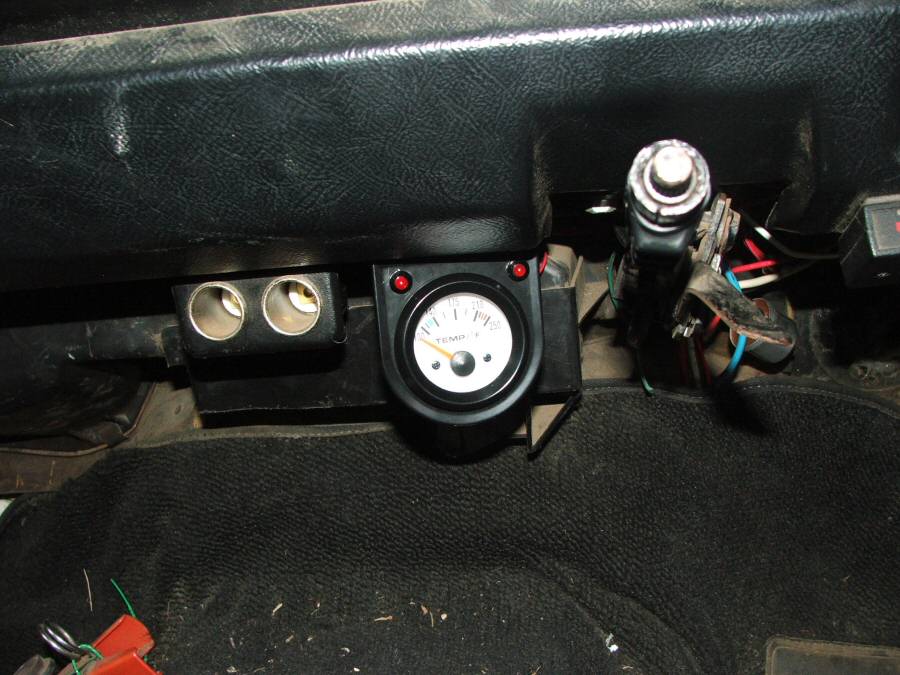
The stock temp gauge in the truck doesn't actually show the temp, just a range, so I bought a cheap gauge and fitted it under the dash. I've also wired in two LED's, one each for each fan so I can see when either fan is running.
Now for the problems:
- The LEDs light up when I'm driving at speed regardless of whether the fans are on. I couldn't figure out why so I asked an auto elect. and he explained that the air flow through the fans is turning them and they become generators and back feed each fan's power circuit and therefore the LEDs.
I wired the LEDs into the load side of the two relays so I would know when the relays were pulled in but that's no good so I'm going to have to wire them in parallel with either relay coil. That's not as good because if the temp. switch for either relay closes the LED will light up but the relay may have failed, the fan won't be on, and I wouldn't know.
I've left the LED wiring out of my schematic below until I figure out a better way to wire them.
- The feed for the fan control circuit needs to be a hot-in-RUN feed but not be on when the engine is cranking so if I start the vehicle when the engine is hot the fans won't be on and drawing current from the battery while the engine is cranking over. I had found a circuit that seemed to be right for what I wanted but it turned out to be the feed for the brake fail circuit and was no good because when the fans were turning on it was grounding the circuit through the relays and turning the Brake Fail light on because the relays were mimicking the brake fail switch.
So for now I've just run the feed directly from the battery. I saw a workaround in another forum while I was researching the problem, I'll wire another relay into the fan control circuit using a normally closed contact and hook the relay coil up to a starter wire so that when the started motor is cranking the relay will be energised and hold the fan control circuit open momentarily. I'm having a lot of trouble finding wiring schematics/diagrams for my ute so that's making things harder as well.
- The temp. switches I'm using are a Tridon switch but I'm not happy with the temperature ranges. The cooler switch closes at 87 Celsius (189F) and opens at 82 Celsius (180F) and the hotter switch closes at 95 Celsius (203F) and open at 90 Celsius (194F). After driving the vehicle for a couple of weeks I reckon the first fan is coming on too hot, I'd be happier if the cooler fan cut in around 80 Celsius. I know modern cars with pressurised cooling systems can run around 100 Celsius but there's no way I want my engine running anywhere near that. The problem is I can't find a temp. switch of a similar type in that heat range. It's been suggested to me that I install an adjustable temp. controller, there are ones available that can handle two fans separately, so maybe that will be the way I have to go.
Here is my schematic for what I've got wired in at the moment.

So there's just a few bugs to work out, the fans themselves do an awesome job of cooling the engine so it shouldn't be too hard to get it all working the way I want.
The only trimming of the fan shroud I had to do was the horizontal right angled section that runs across the top of the shroud, the top mounting holes were a bit wider than the edges of the radiator but I had an old rad behind the shed so I was able to use that as a template to make the mounting brackets. That allowed me to make up whatever I needed and fit the fans to the radiator without having to remove the radiator from the truck.
I made the brackets up and bolted them to the radiator so I could then sling the fans in and mark up the mounting holes.
Fans hung in place, note the high tech cable locating system.
The lower mounts on the fan shroud are a tapered plastic wedge so I drilled a hole through each and they just lined up with either side of the radiator. The wedges sit away away from the face of the radiator so I made up a couple of crush tubes and used 8mm bolts to fasten the bottom of the assembly.
Fan bolted into place and the loom I made up about to be temporarily connected until I could get the right plug from the wreckers.
While I'm on the subject of wreckers, why are all those dudes such surly, grotty ******? I went in and explained to the bloke that I was fitting some EF/EL Falcon thermos to my F100. He then asks me which plug type it is, EF or EL and then makes me feel like an idiot because I couldn't tell him off the top of my head. How would I know? I told him I'd bought the fans new and I wasn't fitting them to a Falcon so why give me the attitude? He tells me 'mate, you'll have to bring them in so I can see what type you've got' and starts to walk away, I then suggested that one of his workers come out and have a look because my truck was parked in front of his door. By his response you'd reckon I'd just asked him to give me one of his kidneys!
They make a good dollar selling junk, pay their workers next to nothing, so why are they all so surly and miserable?
Anyway I'll end the rant here.
Got the fans bolted up and the relays wired in. The fans can be wired in series for low speed and in parallel for high speed. I decided to run two temp. switches, a cooler range and then a hotter range switch, and have each switch pull in a separate relay for each fan running at full speed.
Relays mounted on the inner guard.
The two temp. switches screwed into the thermostat housing.
I've also wired in a double pole toggle switch in the cab to act as a manual override to turn the fans on manually if I need to.
The stock temp gauge in the truck doesn't actually show the temp, just a range, so I bought a cheap gauge and fitted it under the dash. I've also wired in two LED's, one each for each fan so I can see when either fan is running.
Now for the problems:
- The LEDs light up when I'm driving at speed regardless of whether the fans are on. I couldn't figure out why so I asked an auto elect. and he explained that the air flow through the fans is turning them and they become generators and back feed each fan's power circuit and therefore the LEDs.
I wired the LEDs into the load side of the two relays so I would know when the relays were pulled in but that's no good so I'm going to have to wire them in parallel with either relay coil. That's not as good because if the temp. switch for either relay closes the LED will light up but the relay may have failed, the fan won't be on, and I wouldn't know.
I've left the LED wiring out of my schematic below until I figure out a better way to wire them.
- The feed for the fan control circuit needs to be a hot-in-RUN feed but not be on when the engine is cranking so if I start the vehicle when the engine is hot the fans won't be on and drawing current from the battery while the engine is cranking over. I had found a circuit that seemed to be right for what I wanted but it turned out to be the feed for the brake fail circuit and was no good because when the fans were turning on it was grounding the circuit through the relays and turning the Brake Fail light on because the relays were mimicking the brake fail switch.
So for now I've just run the feed directly from the battery. I saw a workaround in another forum while I was researching the problem, I'll wire another relay into the fan control circuit using a normally closed contact and hook the relay coil up to a starter wire so that when the started motor is cranking the relay will be energised and hold the fan control circuit open momentarily. I'm having a lot of trouble finding wiring schematics/diagrams for my ute so that's making things harder as well.
- The temp. switches I'm using are a Tridon switch but I'm not happy with the temperature ranges. The cooler switch closes at 87 Celsius (189F) and opens at 82 Celsius (180F) and the hotter switch closes at 95 Celsius (203F) and open at 90 Celsius (194F). After driving the vehicle for a couple of weeks I reckon the first fan is coming on too hot, I'd be happier if the cooler fan cut in around 80 Celsius. I know modern cars with pressurised cooling systems can run around 100 Celsius but there's no way I want my engine running anywhere near that. The problem is I can't find a temp. switch of a similar type in that heat range. It's been suggested to me that I install an adjustable temp. controller, there are ones available that can handle two fans separately, so maybe that will be the way I have to go.
Here is my schematic for what I've got wired in at the moment.
So there's just a few bugs to work out, the fans themselves do an awesome job of cooling the engine so it shouldn't be too hard to get it all working the way I want.
#27
07-22-2013, 06:18 AM
Join Date: Mar 2012
Location: Geelong, Australia
Posts: 68
Likes: 0
Received 0 Likes
on
0 Posts
Just an update on my thermo fan project.
As mentioned earlier in this thread I wasn't happy with the temp. switch settings/arrangement and I didn�t want to use an adjustable fan controller because temp. switches keep everything simpler. So after some more research I decided on a Tridon TFS214 dual circuit temp. switch. The only hiccup was that they are a 22mm thread so I was going to have to modify my thermostat housing.
I bought myself a 22mm tap and a brand new thermostat housing and one of my machinist comrades at my work drilled out and then tapped one of the ports in the housing. He also ran a milling machine over both ports to clean up the sealing surface.

The finish of the housing itself was pretty ordinary so I then spent some time lapping the bottom of it so that the machined surface was nice and smooth and I also sanded the sand cast finish off it so I could give it a buff to shine it up some.
After 20 minutes on the buffer in my shed it came up looking pretty fancy.

I fitted the switch and then the thermostat housing and then rewired my control circuit (the new switch closes to each relay instead of closing to ground like the first switches did) to suit. So far it seems to work OK, being winter at the moment the motor hasn�t gotten hot enough to bring in the second fan while driving but I did disconnect the first fan so the motor could get hot enough for the temp. switch to bring in the second fan. It worked fine.
I�ve drawn up the circuit as it is now with the temp. switch details in it as well just in case anyone is interested.

My local auto elec. worded me up on why the LED's were coming on on their own, the fans were back generating into the power circuit when the air flow from the truck moving was making them spin. Felt kinda of silly that I didn't think of it.
Even though I didn't really want to I've wired the LED's in parallel with the wiring for each relay.
The whole setup is pretty close to what I originally envisaged so I'm happy enough with it.
I�ve also been doing some work on the suspension, the front end is now lowered to where I want it. Next up is to get the rear leaves reset to the right ride height but before I do that I want to get an airbag helper system organised.
I�ll post some pics up of it when it�s all done and lowered.
As mentioned earlier in this thread I wasn't happy with the temp. switch settings/arrangement and I didn�t want to use an adjustable fan controller because temp. switches keep everything simpler. So after some more research I decided on a Tridon TFS214 dual circuit temp. switch. The only hiccup was that they are a 22mm thread so I was going to have to modify my thermostat housing.
I bought myself a 22mm tap and a brand new thermostat housing and one of my machinist comrades at my work drilled out and then tapped one of the ports in the housing. He also ran a milling machine over both ports to clean up the sealing surface.
The finish of the housing itself was pretty ordinary so I then spent some time lapping the bottom of it so that the machined surface was nice and smooth and I also sanded the sand cast finish off it so I could give it a buff to shine it up some.
After 20 minutes on the buffer in my shed it came up looking pretty fancy.
I fitted the switch and then the thermostat housing and then rewired my control circuit (the new switch closes to each relay instead of closing to ground like the first switches did) to suit. So far it seems to work OK, being winter at the moment the motor hasn�t gotten hot enough to bring in the second fan while driving but I did disconnect the first fan so the motor could get hot enough for the temp. switch to bring in the second fan. It worked fine.
I�ve drawn up the circuit as it is now with the temp. switch details in it as well just in case anyone is interested.
My local auto elec. worded me up on why the LED's were coming on on their own, the fans were back generating into the power circuit when the air flow from the truck moving was making them spin. Felt kinda of silly that I didn't think of it.
Even though I didn't really want to I've wired the LED's in parallel with the wiring for each relay.
The whole setup is pretty close to what I originally envisaged so I'm happy enough with it.
I�ve also been doing some work on the suspension, the front end is now lowered to where I want it. Next up is to get the rear leaves reset to the right ride height but before I do that I want to get an airbag helper system organised.
I�ll post some pics up of it when it�s all done and lowered.
Last edited by Chocko; 07-22-2013 at 06:20 AM. Reason: Typo
#28
08-16-2013, 06:56 AM
Join Date: Mar 2012
Location: Geelong, Australia
Posts: 68
Likes: 0
Received 0 Likes
on
0 Posts
Have been picking up a few bits and pieces lately.
Got a pile of parts from a bloke, he had them loaded into the back of his ute and was on his way to the scrap metal yard when I found out and rang him.
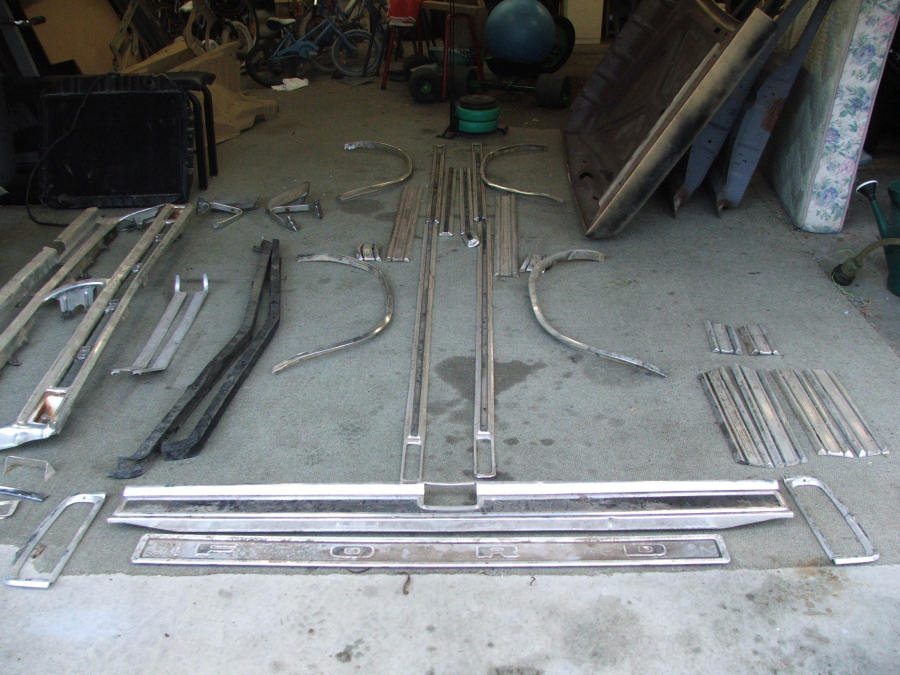
There's a good rust free bonnet in primer over the back as well as two doors, two inner guards, two outer guards, a nearly full set of XLT trims (just missing a rear cab molding) and a pile of other bits and pieces.
He said he'd probably get about 50 dollars from the scrap yard. I don't understand why he wouldn't spend a little bit of time and sell the parts individually, he could have made five times the amount I paid him.
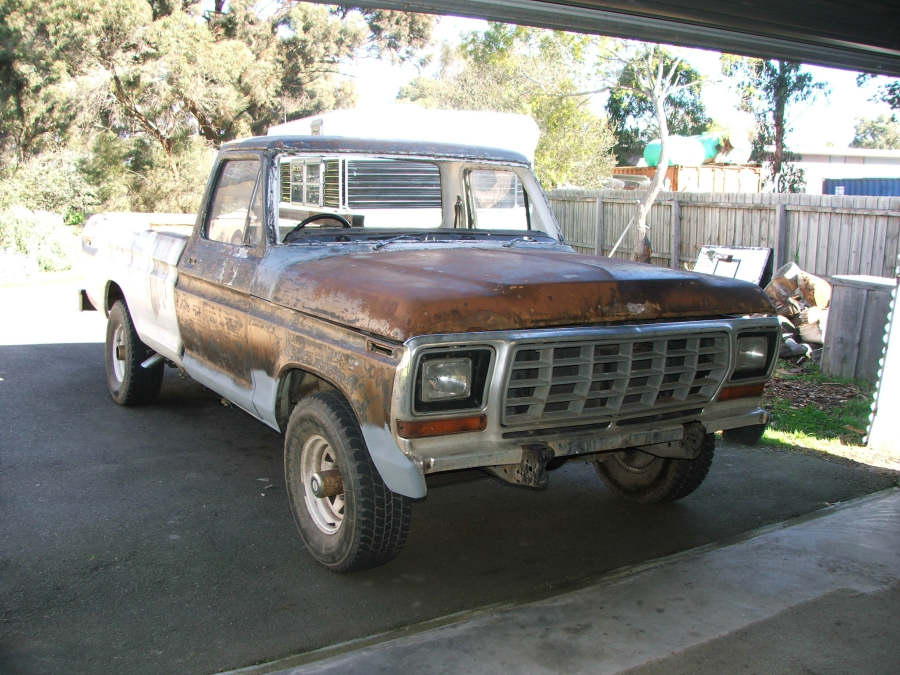
Then I picked up a '78 LWB F100 on Ebay. It's got a reasonable LPG 351 Cleveland, Top Loader gearbox and disc brake nine inch diff. The cab is suprisingly rust free, just a bit in the rear corners of the cab but the firewall and floor pans are good.
It came with quite a few extra bits and pieces as well, a Cortina GT dash cluster and also a full air conditioning set up. The motor will be going into my ute shortly to replace my tired 351, the A/C will be making its way in there too before the warmer weather comes!

The plan now is to keep driving my ute and strip the second vehicle and restore it. Then it will be just a matter of swapping over the suspension at the end.
That's the plan at the moment anyway.
Got a pile of parts from a bloke, he had them loaded into the back of his ute and was on his way to the scrap metal yard when I found out and rang him.
There's a good rust free bonnet in primer over the back as well as two doors, two inner guards, two outer guards, a nearly full set of XLT trims (just missing a rear cab molding) and a pile of other bits and pieces.
He said he'd probably get about 50 dollars from the scrap yard. I don't understand why he wouldn't spend a little bit of time and sell the parts individually, he could have made five times the amount I paid him.
Then I picked up a '78 LWB F100 on Ebay. It's got a reasonable LPG 351 Cleveland, Top Loader gearbox and disc brake nine inch diff. The cab is suprisingly rust free, just a bit in the rear corners of the cab but the firewall and floor pans are good.
It came with quite a few extra bits and pieces as well, a Cortina GT dash cluster and also a full air conditioning set up. The motor will be going into my ute shortly to replace my tired 351, the A/C will be making its way in there too before the warmer weather comes!
The plan now is to keep driving my ute and strip the second vehicle and restore it. Then it will be just a matter of swapping over the suspension at the end.
That's the plan at the moment anyway.
#29
08-16-2013, 02:00 PM
Posting Guru
Join Date: Jul 2012
Location: Southern Illinois
Posts: 1,119
Likes: 0
Received 0 Likes
on
0 Posts
