
Front axle complete seal replacement
#1
 02-08-2012, 12:19 PM

Front axle complete seal replacement
Here are some pics from an overhaul I did of my front axle recently. I found some slop in the stub shaft bearing (needle bearing), my vacuum seals were leaking, my inner axle seals were leaking, and one hub bearing ended up being bad mostly from water intrusion through the seal.
I had greased the bearings through the abs hole a couple of years back, but this grease accumulated behind the bearing in front of the seal. I believe some of it got sucked into the vacuum line for the 4x4 at some point. The dirt and grease clogged the line.
The vacuum solenoid on the passenger fender wasn't working properly to unlock the hubs when i was finished. I tried to inspect and disassemble it but it's not really serviceable. I sprayed some lube through it (I think it was silicone spray) and that got it working properly again. 4x4 works perfectly! Yes the ESOF has more maintenance and points of failure, but as long as I can manually lock in my hubs I'm going to keep it. It's never let me down, and its super convenient.
http://www.flickr.com/photos/cmaldridge/6841497907/http://www.flickr.com/photos/cmaldridge/6841497907/ by http://www.flickr.com/people/cmaldridge/, on Flickr
Basic disassembly of axle to remove axle shafts. It would be possible to remove the shafts and the bearings together, but because of the size and the fact that the bearings can be stuck, I did it separately. I used a large two jaw puller to pull the flange of the bearing by pressing on the axle stub. The bearing came off easily with no hammering needed.
http://www.flickr.com/photos/cmaldridge/6841499205/http://www.flickr.com/photos/cmaldridge/6841499205/ by http://www.flickr.com/people/cmaldridge/, on Flickr
Pic of oil soaked axle tube. You can see the seal guide in this shot.
http://www.flickr.com/photos/cmaldridge/6841500599/http://www.flickr.com/photos/cmaldridge/6841500599/ by http://www.flickr.com/people/cmaldridge/, on Flickr
Shot with front cover removed. As a Dana axle, the shims are behind the bearings. Removal wasn't too difficult using a large pry bar to pull the carrier out.
http://www.flickr.com/photos/cmaldridge/6841504041/http://www.flickr.com/photos/cmaldridge/6841504041/ by http://www.flickr.com/people/cmaldridge/, on Flickr
http://www.flickr.com/photos/cmaldridge/6841502301/http://www.flickr.com/photos/cmaldridge/6841502301/ by http://www.flickr.com/people/cmaldridge/, on Flickr
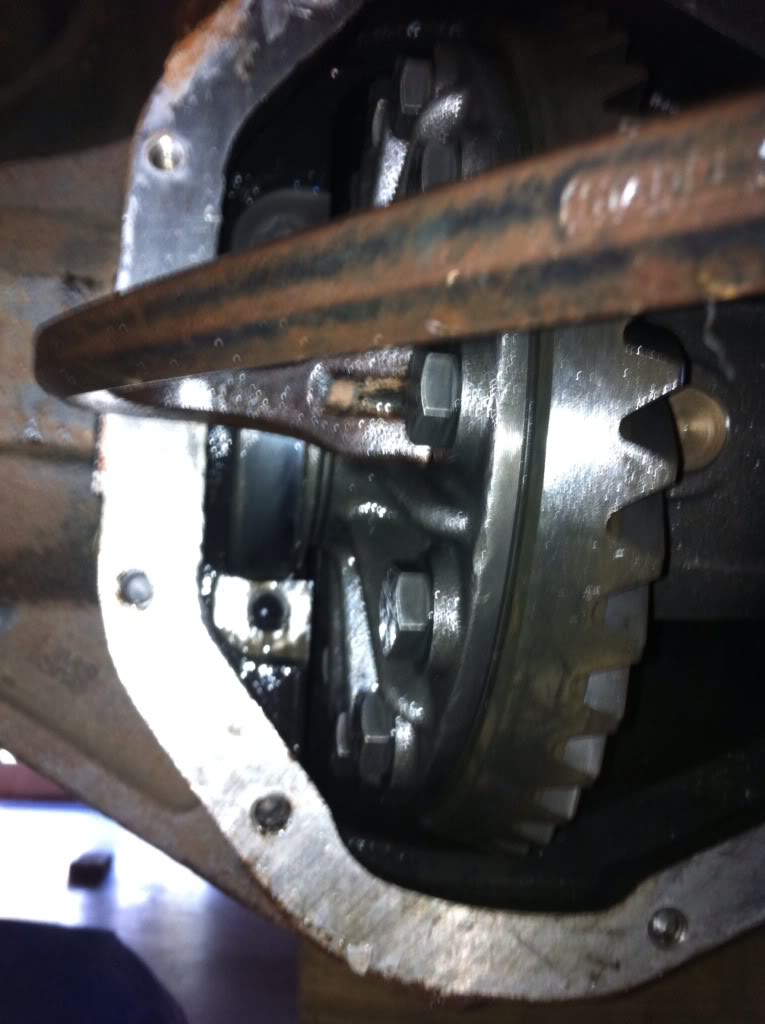
Front differential housing showing pinion gear and seal placement. Because of the size of this housing i was able to remove the seal and reinstall with conventional tools.
http://www.flickr.com/photos/cmaldridge/6841505595/http://www.flickr.com/photos/cmaldridge/6841505595/ by http://www.flickr.com/people/cmaldridge/, on Flickr
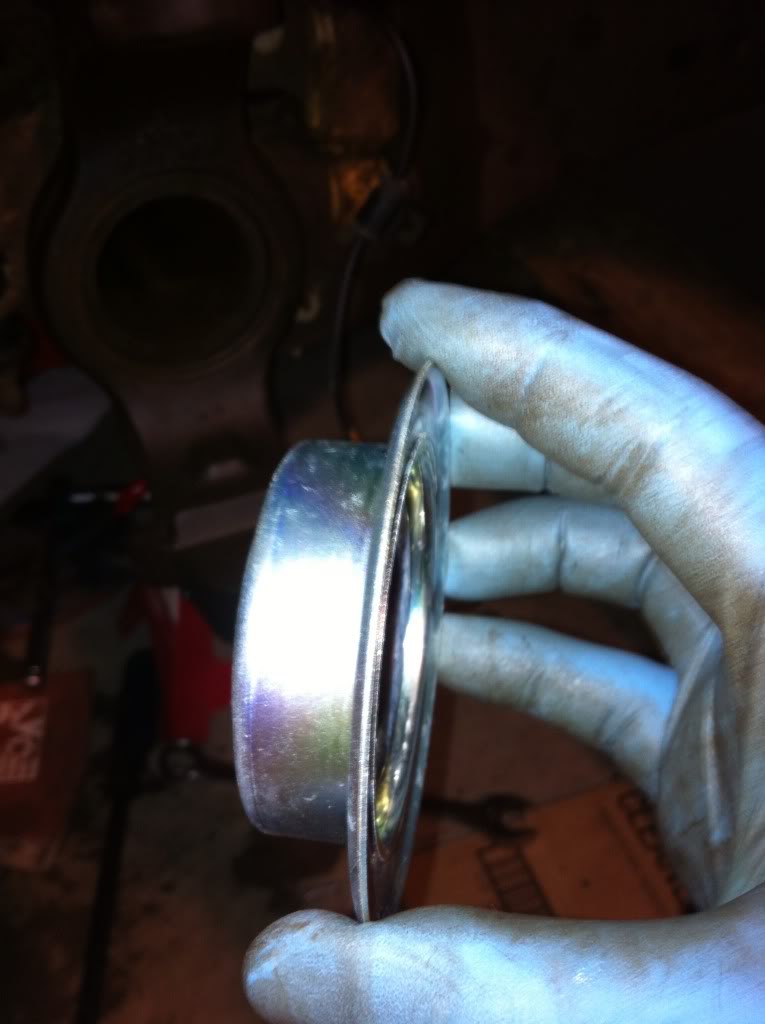
This is the complex rotating inner axle seal. The axle shaft doesn't spin in the seal. The inner part of the seal rotates inside the outer part.
http://www.flickr.com/photos/cmaldridge/6841511351/http://www.flickr.com/photos/cmaldridge/6841511351/ by http://www.flickr.com/people/cmaldridge/, on Flickr
This is the plastic cone that guides the axle shaft into the seal. I removed this to clean out crud that builds up between it and the seal itself.
http://www.flickr.com/photos/cmaldridge/6841509481/http://www.flickr.com/photos/cmaldridge/6841509481/ by http://www.flickr.com/people/cmaldridge/, on Flickr
Threaded rod with washer on end to help clean out axle tube and assist with seal removal. Used this to tap out guide cones
http://www.flickr.com/photos/cmaldridge/6841514579/http://www.flickr.com/photos/cmaldridge/6841514579/ by http://www.flickr.com/people/cmaldridge/, on Flickr
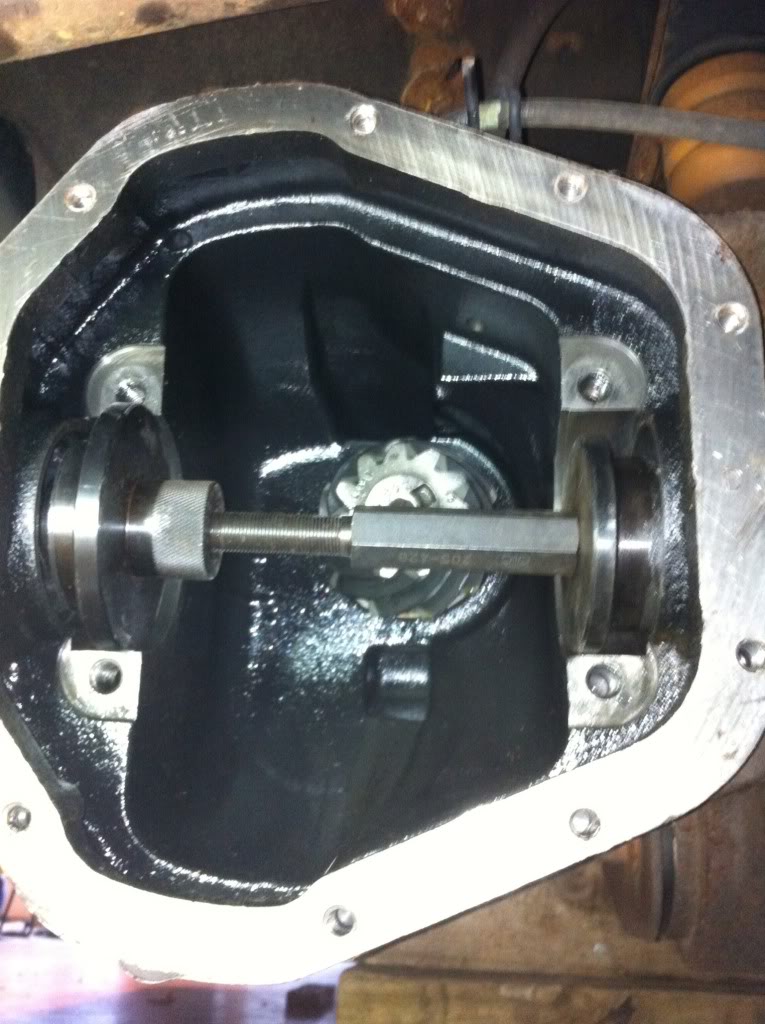
Official vacuum seal installer tool. Sets depth correctly. Takes a fair amount of hammering to get seal set in place.
http://www.flickr.com/photos/cmaldridge/6841515951/http://www.flickr.com/photos/cmaldridge/6841515951/ by http://www.flickr.com/people/cmaldridge/, on Flickr
Final installation of vacuum seal with proper tool. There is a slight offset of the seal to the thrust washer surface in the center.
I had greased the bearings through the abs hole a couple of years back, but this grease accumulated behind the bearing in front of the seal. I believe some of it got sucked into the vacuum line for the 4x4 at some point. The dirt and grease clogged the line.
The vacuum solenoid on the passenger fender wasn't working properly to unlock the hubs when i was finished. I tried to inspect and disassemble it but it's not really serviceable. I sprayed some lube through it (I think it was silicone spray) and that got it working properly again. 4x4 works perfectly! Yes the ESOF has more maintenance and points of failure, but as long as I can manually lock in my hubs I'm going to keep it. It's never let me down, and its super convenient.
http://www.flickr.com/photos/cmaldridge/6841497907/http://www.flickr.com/photos/cmaldridge/6841497907/ by http://www.flickr.com/people/cmaldridge/, on Flickr
Basic disassembly of axle to remove axle shafts. It would be possible to remove the shafts and the bearings together, but because of the size and the fact that the bearings can be stuck, I did it separately. I used a large two jaw puller to pull the flange of the bearing by pressing on the axle stub. The bearing came off easily with no hammering needed.
http://www.flickr.com/photos/cmaldridge/6841499205/http://www.flickr.com/photos/cmaldridge/6841499205/ by http://www.flickr.com/people/cmaldridge/, on Flickr
Pic of oil soaked axle tube. You can see the seal guide in this shot.
http://www.flickr.com/photos/cmaldridge/6841500599/http://www.flickr.com/photos/cmaldridge/6841500599/ by http://www.flickr.com/people/cmaldridge/, on Flickr
Shot with front cover removed. As a Dana axle, the shims are behind the bearings. Removal wasn't too difficult using a large pry bar to pull the carrier out.
http://www.flickr.com/photos/cmaldridge/6841504041/http://www.flickr.com/photos/cmaldridge/6841504041/ by http://www.flickr.com/people/cmaldridge/, on Flickr
http://www.flickr.com/photos/cmaldridge/6841502301/http://www.flickr.com/photos/cmaldridge/6841502301/ by http://www.flickr.com/people/cmaldridge/, on Flickr
Front differential housing showing pinion gear and seal placement. Because of the size of this housing i was able to remove the seal and reinstall with conventional tools.
http://www.flickr.com/photos/cmaldridge/6841505595/http://www.flickr.com/photos/cmaldridge/6841505595/ by http://www.flickr.com/people/cmaldridge/, on Flickr
This is the complex rotating inner axle seal. The axle shaft doesn't spin in the seal. The inner part of the seal rotates inside the outer part.
http://www.flickr.com/photos/cmaldridge/6841511351/http://www.flickr.com/photos/cmaldridge/6841511351/ by http://www.flickr.com/people/cmaldridge/, on Flickr
This is the plastic cone that guides the axle shaft into the seal. I removed this to clean out crud that builds up between it and the seal itself.
http://www.flickr.com/photos/cmaldridge/6841509481/http://www.flickr.com/photos/cmaldridge/6841509481/ by http://www.flickr.com/people/cmaldridge/, on Flickr
Threaded rod with washer on end to help clean out axle tube and assist with seal removal. Used this to tap out guide cones
http://www.flickr.com/photos/cmaldridge/6841514579/http://www.flickr.com/photos/cmaldridge/6841514579/ by http://www.flickr.com/people/cmaldridge/, on Flickr
Official vacuum seal installer tool. Sets depth correctly. Takes a fair amount of hammering to get seal set in place.
http://www.flickr.com/photos/cmaldridge/6841515951/http://www.flickr.com/photos/cmaldridge/6841515951/ by http://www.flickr.com/people/cmaldridge/, on Flickr
Final installation of vacuum seal with proper tool. There is a slight offset of the seal to the thrust washer surface in the center.
The following 3 users liked this post by aldridgec:


#3
03-03-2012, 11:42 AM
Elder User


#6
05-08-2013, 08:51 PM


#7
05-08-2013, 10:01 PM


Trending Topics
#8
05-26-2013, 07:28 PM
Since you seem motivated to keep your ESOF I'm not sure I'm barking up the right tree, but the hands on from the rebuild might be enough experience to know. I have manual (Warn) hubs and am pretty sure the passenger wheel bearing assembly is starting to go for me. Are any of the seals related to a front wheel bearing assembly replacement important for manual locking hubs (eg: do they function to protect and not just seal vacuum)? Obviously the hub locker unit itself has the o-ring seal, but beyond that are any like the yellow or the knuckle seal worth replacing "just to be safe"?
#10
08-25-2013, 04:16 PM

Thanks to the info here I was able to tackle this job, the only thing I would add is have a puller for the wheel hubs makes life easier and lots of WD-40.
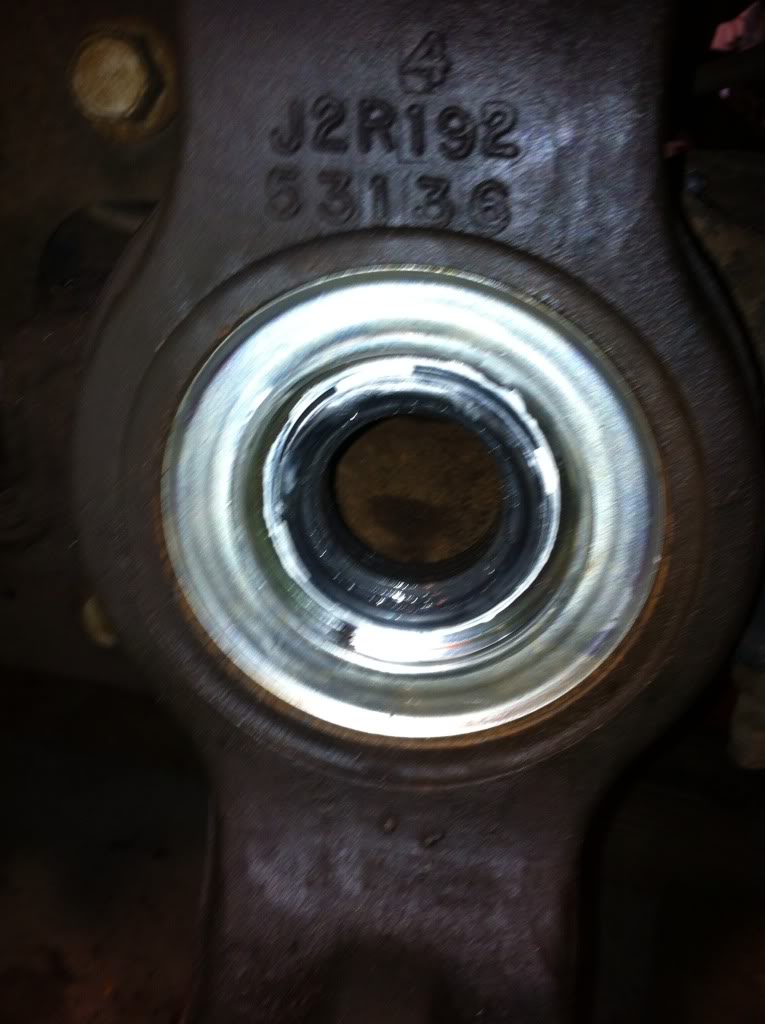
The hardest part was trying to figure out where to pry on the knuckle to get it out. Having never done it and not knowing how much force to use it took about a half hour to get a handle on it. So here is a pic of what I found to be the perfect spot to pry. I was able to ease it out very slowly about halfway and then I put the bar down and gently removed it. Nice and simple when you know what bar to use and were to apply leverage. Hope the photo helps some other first timer.
The hardest part was trying to figure out where to pry on the knuckle to get it out. Having never done it and not knowing how much force to use it took about a half hour to get a handle on it. So here is a pic of what I found to be the perfect spot to pry. I was able to ease it out very slowly about halfway and then I put the bar down and gently removed it. Nice and simple when you know what bar to use and were to apply leverage. Hope the photo helps some other first timer.

#11
08-27-2013, 06:12 PM

Im about to tackle this repair on my own truck, and that last photo I think will be invaluable, as that part of removing the carrier is what had me worried the most!
Just a question about installing the inner seals. Would a rented bearing and race installer rented from an auto parts store be sufficient?
About how much force does it require to remove? And will the whole carrier come out prying from just that location? Or is prying on the opposite side to sort of wiggle it out also required?
#12
08-27-2013, 06:28 PM
#13
08-27-2013, 10:49 PM
Just stopped by FTE and saw I had some new comments on this thread. I usually use a large pry bar from the center of the bottom of the axle housing, into the center where the spider gears are and right up against the ring gear to get and even pull on it. This also traps the diff so it doesn't come flying out. Using the crow bar in the above picture can work, but it can also sideload the differential and cause it to get stuck needing it to be walked out. However, I've always had a lift and 3-4 feet of clearance below the vehicle to use a large pry bar from below, so the crow bar is an excellent alternative. Leverage is the key to controlling the removal of the diff.
The seals all work to protect the bearing from water/debris intrusion, so as in the case with my personal truck, and other trucks that have had manual hubs (they use the same seal from what I remember), the seals are important to protect the bearing, but not for the manual hub to work (of course)
I don't remember exactly how I installed the inner seals. May have just been two ball peen hammers. But there was no special installer needed as it states in the book. The seal installer will probably be too long to swing the hammer and hit it inside the differential.
#14
08-28-2013, 08:05 PM
Here are some more pics ( truck- 2005 f-350 fx with auto hubs)
Seal spreader tool I picked up off eBay worth every penny ( 75.00)
Ford special tool numbers
205-428 spreader bar
205-426 RH seal installer
205-427 LH seal installer
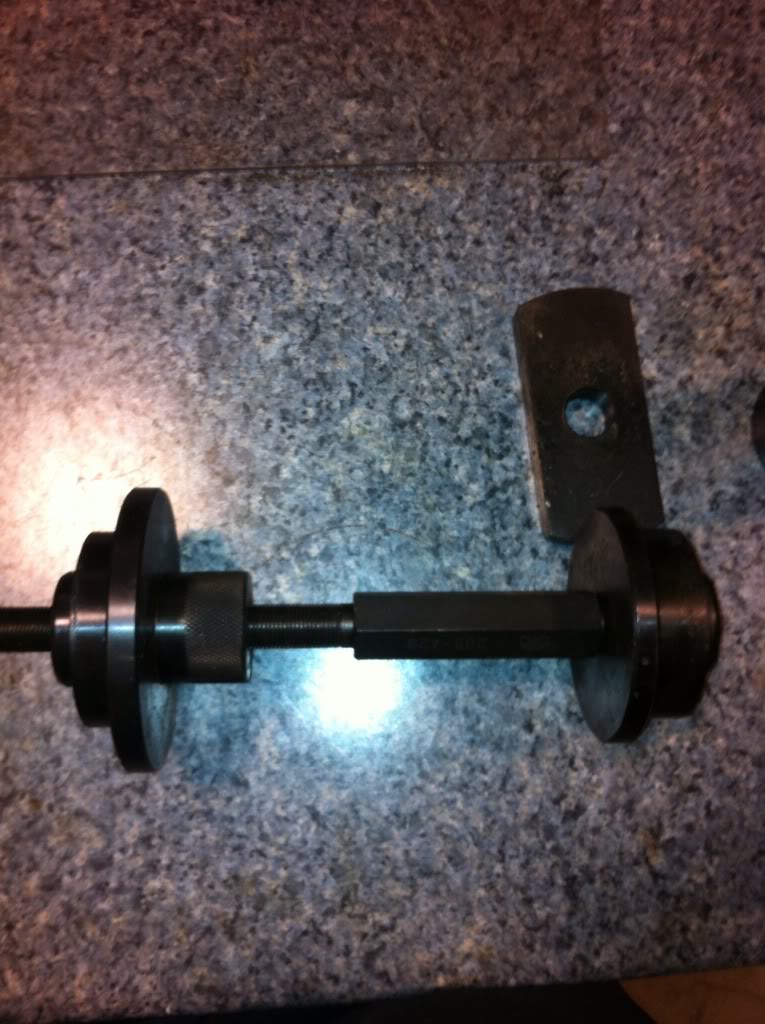
New version of the dust seal
Updated dust seal number
Seal spreader tool I picked up off eBay worth every penny ( 75.00)
Ford special tool numbers
205-428 spreader bar
205-426 RH seal installer
205-427 LH seal installer


New version of the dust seal


Updated dust seal number

Last edited by Ken05; 08-28-2013 at 08:22 PM. Reason: Truck year
#15
08-28-2013, 08:18 PM

Tool used for the big outer seal (aaa battery next to it for size reference )I picked up off amazon for 65.00 yes the tools were exspensive but I wouldn't want to gamble with the inner axle seals.
The tool seats them perfectly and I don't have to wonder if I was at the correct depth or if they were damaged with a homemade tool ( done that plenty)