2005 F350 V10 Exhaust Manifold leak - Need help
#1
 12-23-2011, 03:12 PM


2005 F350 V10 Exhaust Manifold leak - Need help
Hi Guys,
I have read now for hours and cannot find the info on the 3 valve V10. Tons of prior 2005 2 valve V10 exhaust on EX's with exhaust manifold issues and pics but have not found on the 3 valve and on a F350.
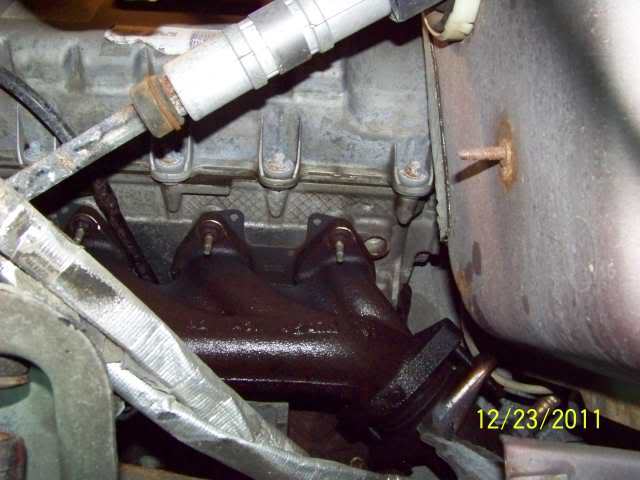
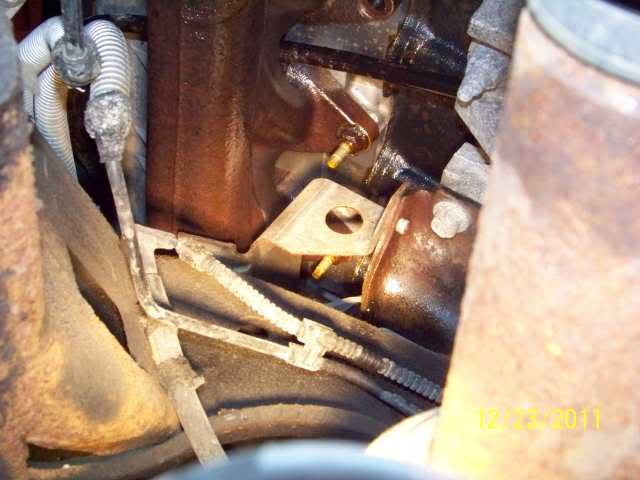
Here's the problem. What you are looking at is a 0.005 feeler gage stuffed up between the head and the manifold.
The back cylinder on the left side.

The 2nd to the back cylinder on the left side
All studs are still showing intact, at least the nuts have not fallen off "yet"
So I have an exhaust manifold leak. This explains the tick tick tick and the massive gas knock sound towing my camper down the road at 55 mph...
I have a few days off from work now and I have started into this. Either the studs are loose or cracked and rusted in and not fallen out yet. I have the fender well out so I can get to them and BP blaster soaked them. I'm going back out now to start into this trying to get the studs out. The question right now is:
On this 05 F350 V10 on the driver side (left) how do you get to the stud nuts on the bottom of the 1st 2 cylinders back from the front of the engine?
Do you have to jack up the motor? I can barely even see them... to shoot BP blaster on the nuts not alone get a wrench in there....
I have the Ford shop manual but it says nothing about this. I'm sure someone has been into this before, just trying to find ya.
Any help greatly appreciated.
Thanks
John
I have read now for hours and cannot find the info on the 3 valve V10. Tons of prior 2005 2 valve V10 exhaust on EX's with exhaust manifold issues and pics but have not found on the 3 valve and on a F350.
Here's the problem. What you are looking at is a 0.005 feeler gage stuffed up between the head and the manifold.
The back cylinder on the left side.
The 2nd to the back cylinder on the left side
All studs are still showing intact, at least the nuts have not fallen off "yet"
So I have an exhaust manifold leak. This explains the tick tick tick and the massive gas knock sound towing my camper down the road at 55 mph...
I have a few days off from work now and I have started into this. Either the studs are loose or cracked and rusted in and not fallen out yet. I have the fender well out so I can get to them and BP blaster soaked them. I'm going back out now to start into this trying to get the studs out. The question right now is:
On this 05 F350 V10 on the driver side (left) how do you get to the stud nuts on the bottom of the 1st 2 cylinders back from the front of the engine?
Do you have to jack up the motor? I can barely even see them... to shoot BP blaster on the nuts not alone get a wrench in there....
I have the Ford shop manual but it says nothing about this. I'm sure someone has been into this before, just trying to find ya.
Any help greatly appreciated.
Thanks
John
#2
12-23-2011, 07:43 PM
Here is an update, I'm gaining but not there yet. To help someone else in the future I'll post pics of how to get to the manifold. Then I'll post where I am at and the last issue I'm having.
This is for the drivers side manifold. Start here:
Jack truck up and support with a stand under the axle. I used a 6 ton stand to be more stable.
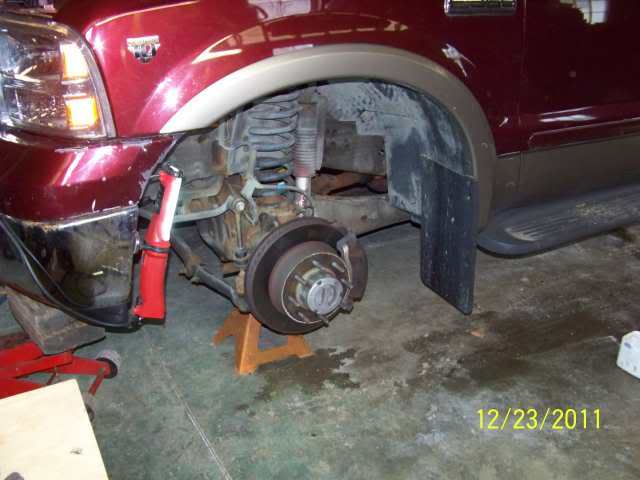
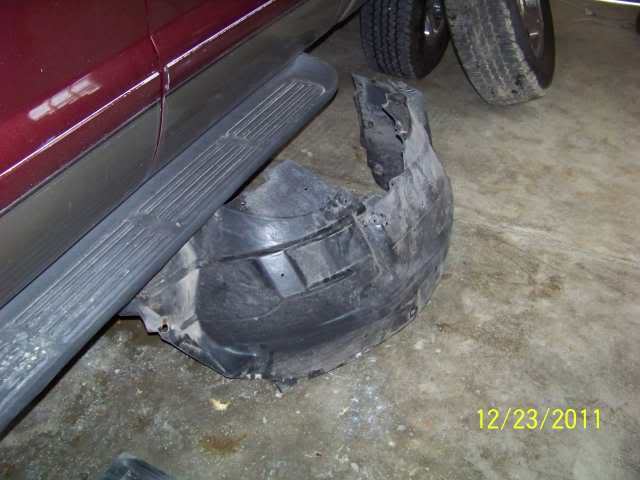
Remove the plastic fender liner. Take out the screws and push the cable holding plastic rivets through the liner. Then fender well come out towards you. Just push the well up by the body fender until it pops loose.
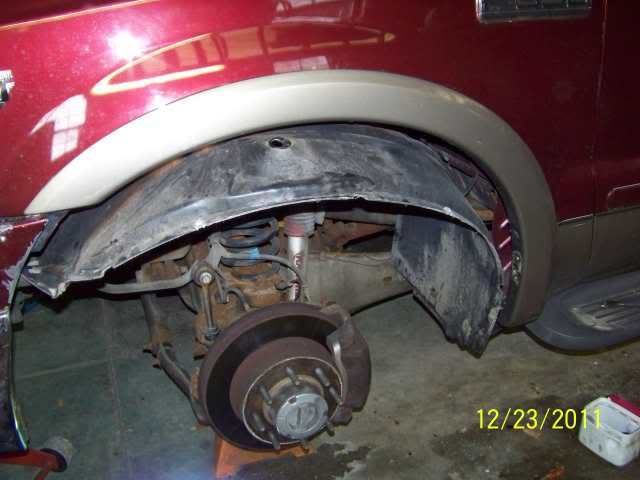
Then take it out
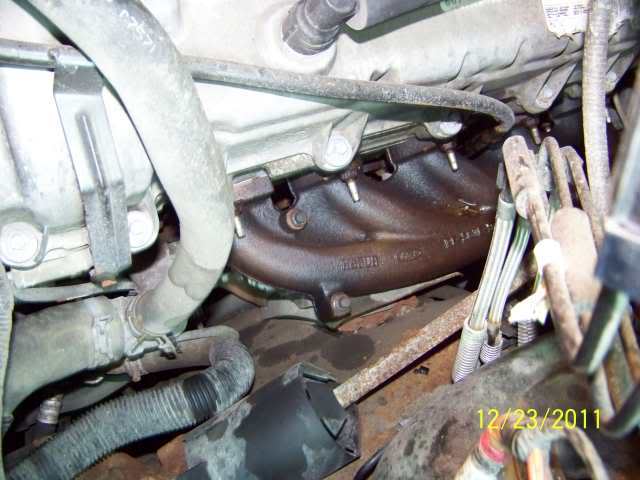
Now you can see straight in.
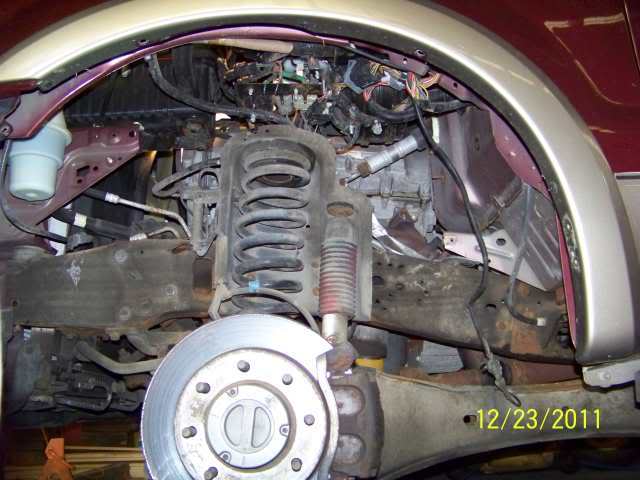
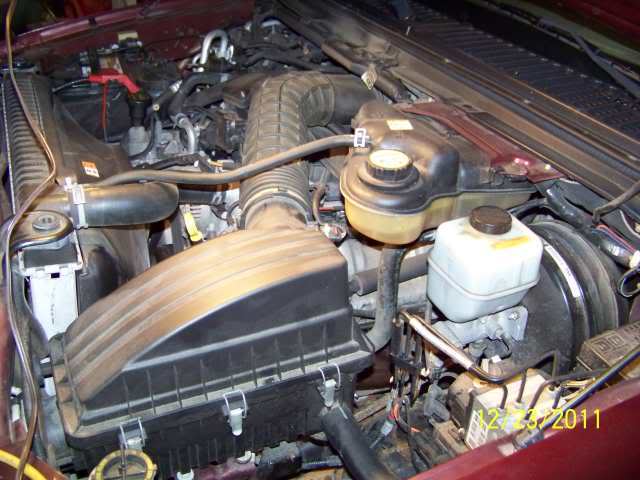
Then go up top and remove the air cleaner and unbolt and move the radiator overflow out of the way.
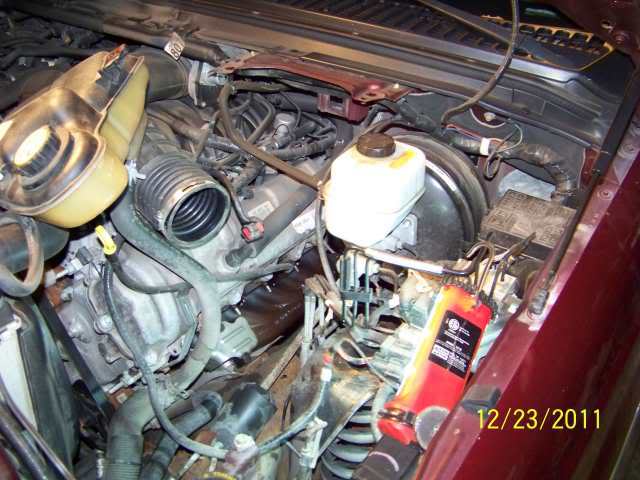
Now you can get to the studs
Take the small heat shield off the front
Use a good quantity of penetrating oil on the studs and let it soak in. Then good luck.... and start undoing the manifold nuts
This is for the drivers side manifold. Start here:
Jack truck up and support with a stand under the axle. I used a 6 ton stand to be more stable.
Remove the plastic fender liner. Take out the screws and push the cable holding plastic rivets through the liner. Then fender well come out towards you. Just push the well up by the body fender until it pops loose.
Then take it out
Now you can see straight in.
Then go up top and remove the air cleaner and unbolt and move the radiator overflow out of the way.
Now you can get to the studs
Take the small heat shield off the front
Use a good quantity of penetrating oil on the studs and let it soak in. Then good luck.... and start undoing the manifold nuts
#3
12-23-2011, 08:00 PM
I "think" my main issue of the leak was 3 of the rear studs where loose. I put the socket on them and with very little effort the stud and all come right out. 2 on the bottom and 1 on top this way. All where I could push the feeler in.
Now I'm thinking, well do I just tighten them up or keep going as you really do not want to do this again... So I kept going. I have 8 of the 10 studs out. 7 of them studs and all came out. Only 1 nut came off. So far they are all intact...
 After seeing the nasty pics of the guys working on the 2 valve V10's on the Excursions and all the issues that had, I feeling really lucky so far...
Now here is the latest issue.
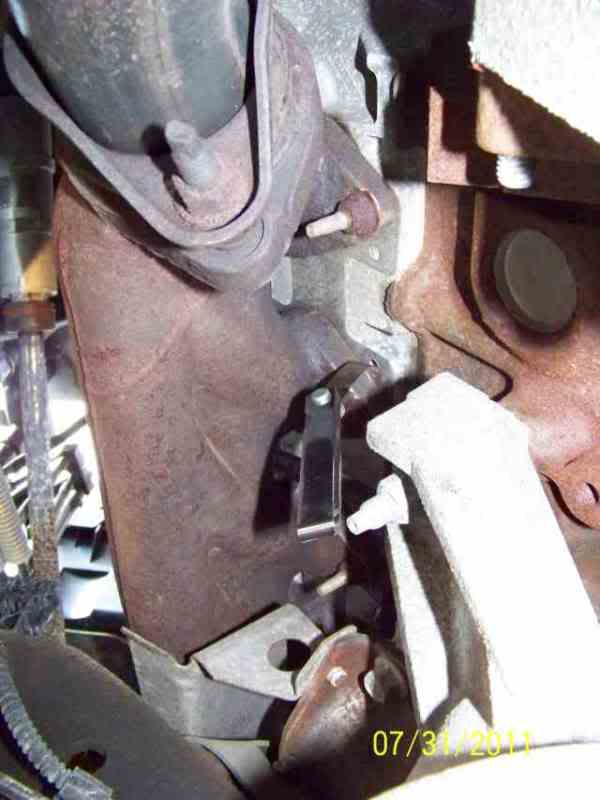
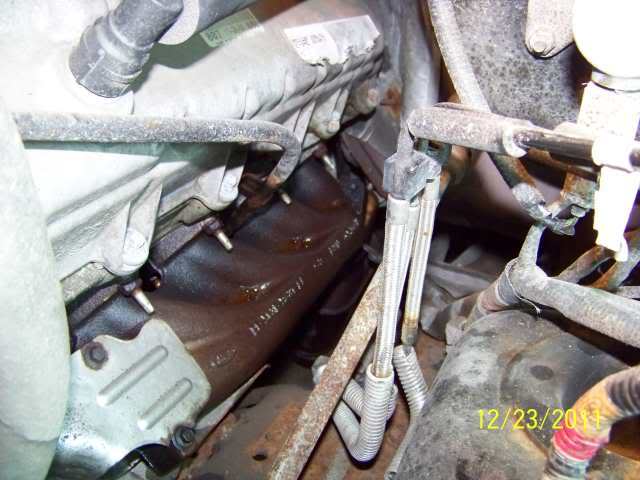
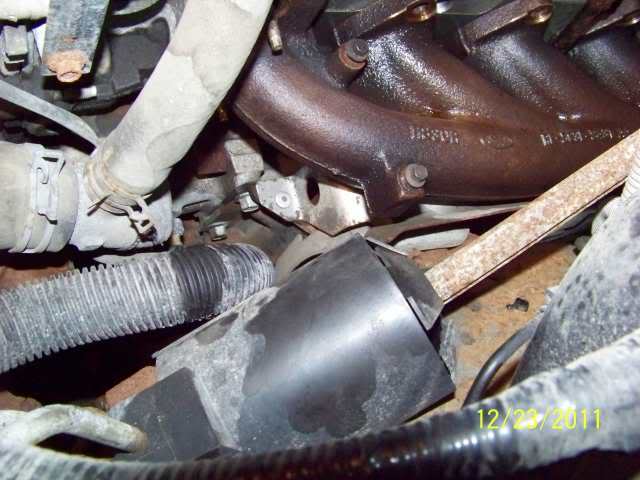
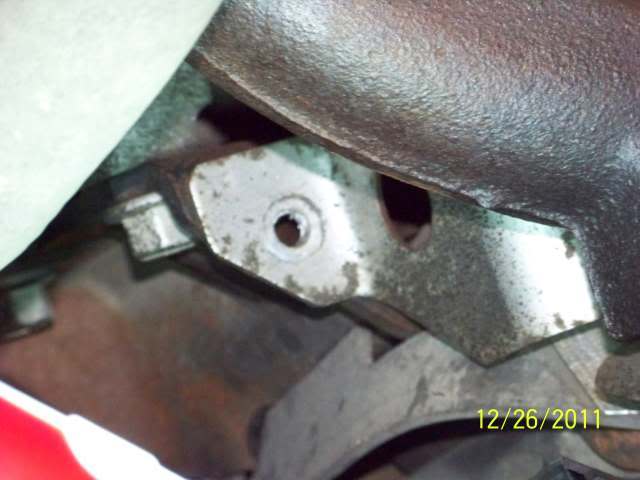
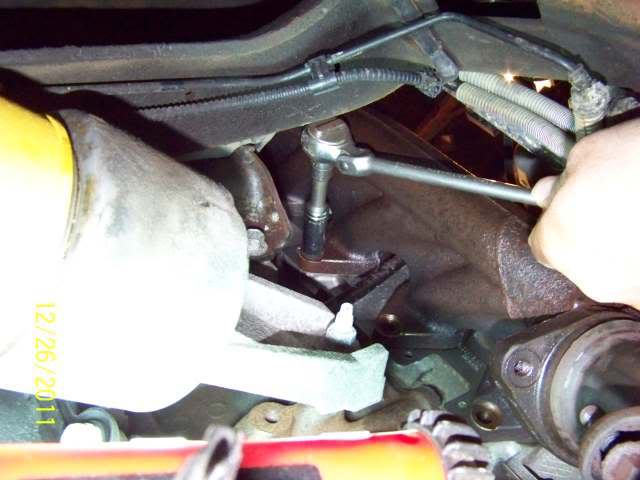
The last 2 studs are on the 2nd and 3rd cylinder in from the front. They are on the bottom and there is a heat shield (I believe it is) that is riveted to the motor mount right over those 2 studs.
See here on the bottom: You can see the silver colored shield just below the last 2 studs
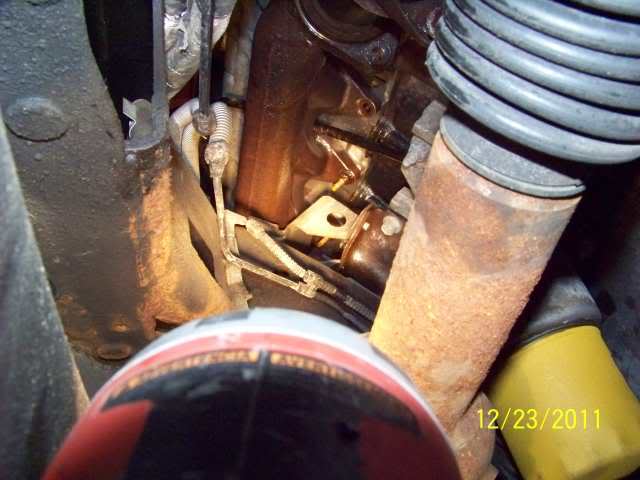
And closer
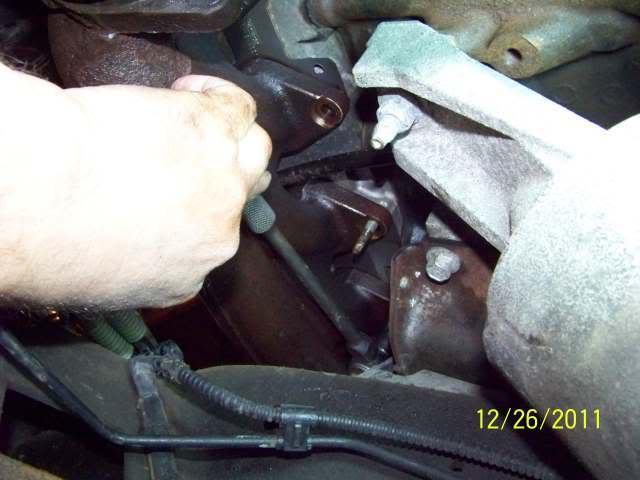
And closer yet. See the rivet holding it to the motor mount.

Now the top. You can see the top head of the 2nd rivet up front.
Any one done this before and how do you get a socket in there to get those last 2 studs out? And while I may be able to skin my knuckles to death using a wrench to get them off how do you then torque them back on?
I'm thinking I need to deal with that heat shield. The front one I can use a long drill bit extension and drill out the rivet. Not too bad to do.
The one in the rear, only thing I can think of is to use a cut off wheel on an air die grinder type of cut off wheel. Once of the shield is out of there then a socket should be able to get in there.
Anyone been here before or have other ideas?
Thanks
John
Now I'm thinking, well do I just tighten them up or keep going as you really do not want to do this again...
So I kept going. I have 8 of the 10 studs out. 7 of them studs and all came out. Only 1 nut came off. So far they are all intact... After seeing the nasty pics of the guys working on the 2 valve V10's on the Excursions and all the issues that had, I feeling really lucky so far...Now here is the latest issue.
The last 2 studs are on the 2nd and 3rd cylinder in from the front. They are on the bottom and there is a heat shield (I believe it is) that is riveted to the motor mount right over those 2 studs.
See here on the bottom: You can see the silver colored shield just below the last 2 studs
And closer
And closer yet. See the rivet holding it to the motor mount.
Now the top. You can see the top head of the 2nd rivet up front.
Any one done this before and how do you get a socket in there to get those last 2 studs out? And while I may be able to skin my knuckles to death using a wrench to get them off how do you then torque them back on?
I'm thinking I need to deal with that heat shield. The front one I can use a long drill bit extension and drill out the rivet. Not too bad to do.
The one in the rear, only thing I can think of is to use a cut off wheel on an air die grinder type of cut off wheel. Once of the shield is out of there then a socket should be able to get in there.
Anyone been here before or have other ideas?
Thanks
John

#5
12-24-2011, 12:36 PM
I only have experience on the 2V trucks. What throws a wrench into the works on the 3V is the spring buckets for the coil springs. On the leaf spring 2V trucks we just remove the inner fenderwell liner and the shock tower and we have plenty of room to work.
It looks like some thing wall swivel sockets may come in handy for you. If you can get on it with an open wrench give it a shot. At least you didn't break any studs yet.
It looks like some thing wall swivel sockets may come in handy for you. If you can get on it with an open wrench give it a shot. At least you didn't break any studs yet.
#6
12-24-2011, 01:08 PM
Senior User
Join Date: Apr 2004
Location: mt
Posts: 291
Likes: 0
Received 0 Likes
on
0 Posts
good write up, keep us informed on how you got the last ones out. I have a 2008 f350 with the v10 and I have a stud broke off on the front passenger side of the manifold. It only makes a ticking noise when its cold, after it warms up for about 30 seconds the sound goes away. Im guessing its cause it expands and closes the leak off.
Hey I have an idea, come to Montana and do mine, Haha.
Hey I have an idea, come to Montana and do mine, Haha.
#7
12-24-2011, 05:23 PM
Thanks Guys, I have read tons on the 2 valves but have not "yet" been able to find this on the 3 valve on a PU truck. Since the EX's never received the 3 valve upgrade this is mainly the F250,F350 and F450 group.
Hoping someone who has been through this before will chime in. As of right now the only thing I know how to try is to drill/cut out the rivets on the heat shield, take care of the manifold and then bolt the heat shield back in.
I'll let you know how this comes out with pic's too.
Thanks
John
PS while we are on this, any thoughts on the new studs themselves? Did Ford create a better grade stud as part of the fix? Or are studs from NAPA OK?
Trending Topics
#8
12-25-2011, 10:17 AM

Glad to see a write up on the 3V manifold studs. I am also going to be attempting this sometime soon on my '05. I bought the Doorman replacement manifold studs from Summit. I hope they are good enough.
I think that same heat sheild on the motor mount on my truck is cracked. I felt around it and some shield is cracked in that area and makes it a rattling noise around 1850 rpm.
Keep us posted with the progress!
I think that same heat sheild on the motor mount on my truck is cracked. I felt around it and some shield is cracked in that area and makes it a rattling noise around 1850 rpm.
Keep us posted with the progress!
#9
12-25-2011, 03:29 PM
PS while we are on this, any thoughts on the new studs themselves? Did Ford create a better grade stud as part of the fix? Or are studs from NAPA Ok?
#10
12-26-2011, 11:29 AM
Senior User
Join Date: Apr 2004
Location: mt
Posts: 291
Likes: 0
Received 0 Likes
on
0 Posts
I put headers on my 2V so I used bolts instead of studs. The stock studs are kinda soft and the nuts are some kind of powdered metal that rusts fast to the manifold. If I would have kept studs on my truck I would have put something stronger in. ARP makes some crazy strong fasteners, some with around a 200,000 lb yield strength. Maybe contact ARP and see what they have available and recommend. The ARP fasteners are not cheap but there are just some times you get what you pay for.
#11
12-26-2011, 08:32 PM
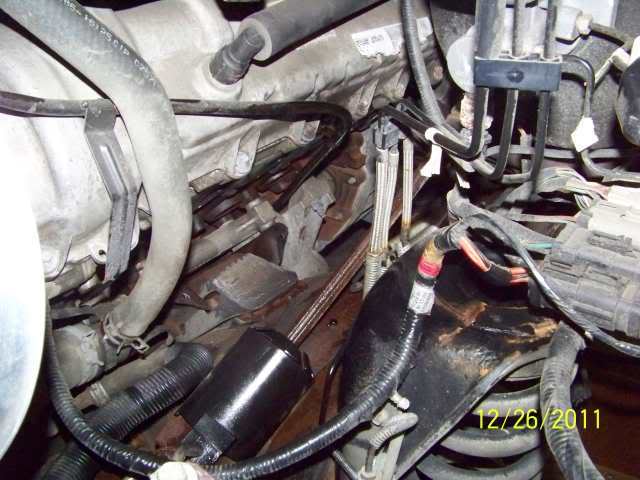
Here is an update:
Today was filled with running from dealer to dealer trying to get parts. Seems findng a stocking dealer of 3 valve 6.8 V10 parts is not that common in this area. Lot's of 5.4 parts... After 3 stops I have all the manifold parts. The gaskets was the hard part, even NAPA did not have any.
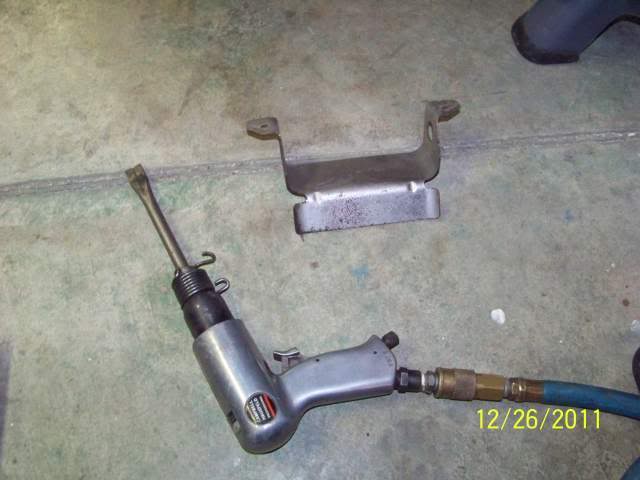
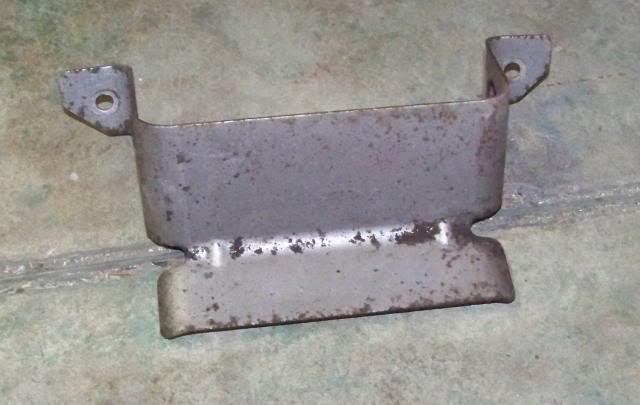
Now back to the truck. After thinking through how to do this, this heat shield is now an easy get it off in 15 minutes and part of that is crawling under the truck. Here is my method, not finding anyone who has done this before this is one method.
The top. Start with a 1/4" drill bit in and extension.
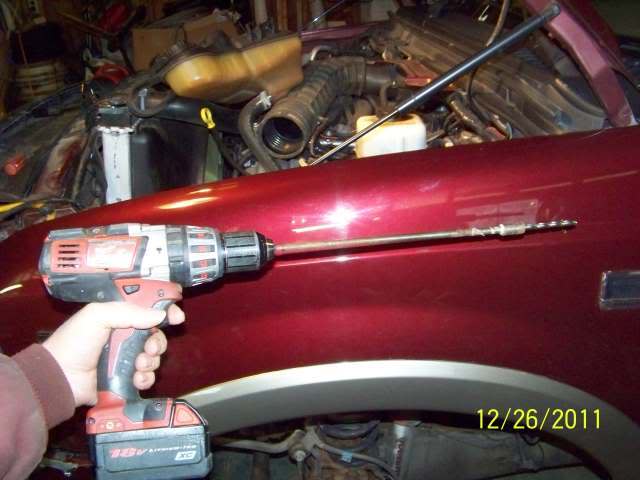
Center on the rivet head
And in about 3 seconds of drilling it's out
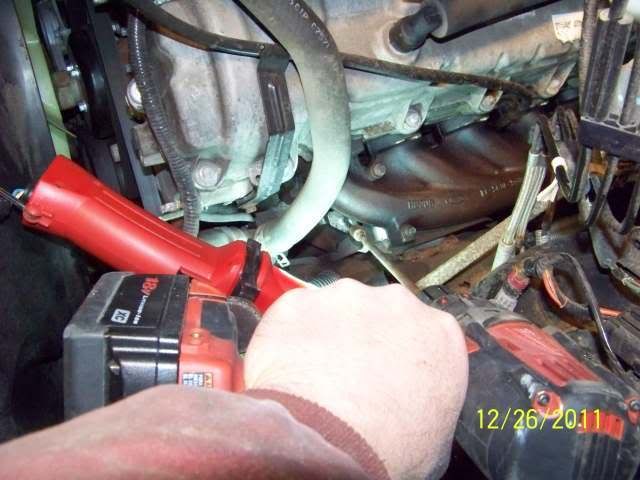
The bottom one.
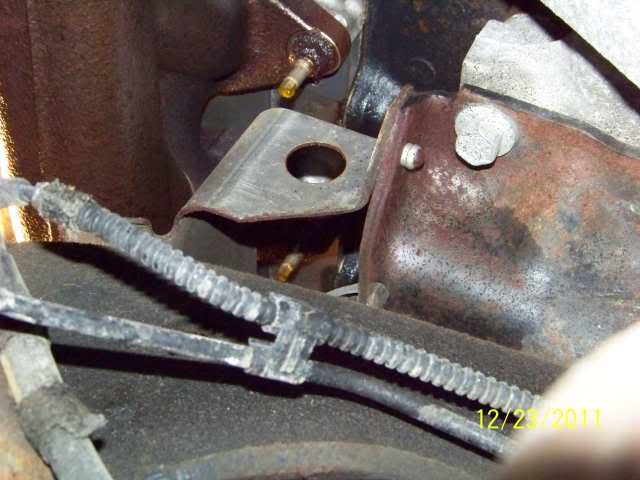
I tried a cut off wheel on a die grinder but could not get it in there. So I went the air chisel route. One zip and the bottom part of the rivet was gone. Then put the chisel between the motor mount and the heat shield and bing, it's loose. You wiggle the heat shield out under the truck towards the back of the engine. I tried pulling it up out the top and it would not go. Here it is.
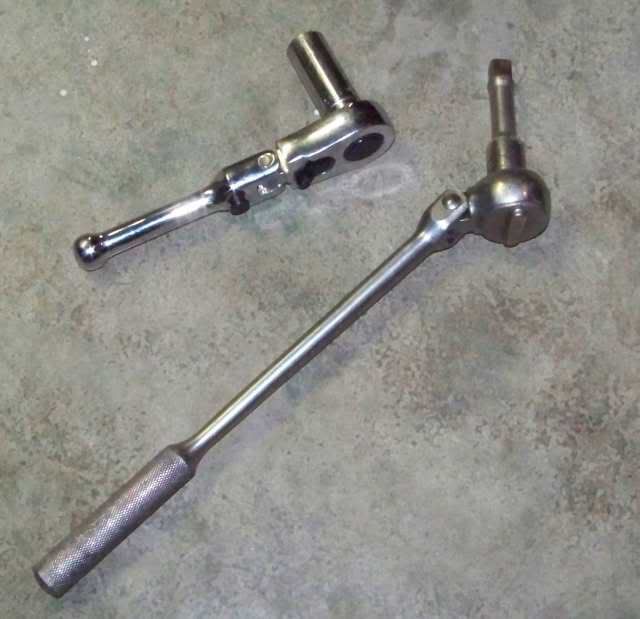
With that shield out of the way those last 2 bolts are exposed, sort of... Here each of us has our own arsenal of tools. I used 2 flex joint ratchets. One to break the nut loose and a shorter one to take it out.
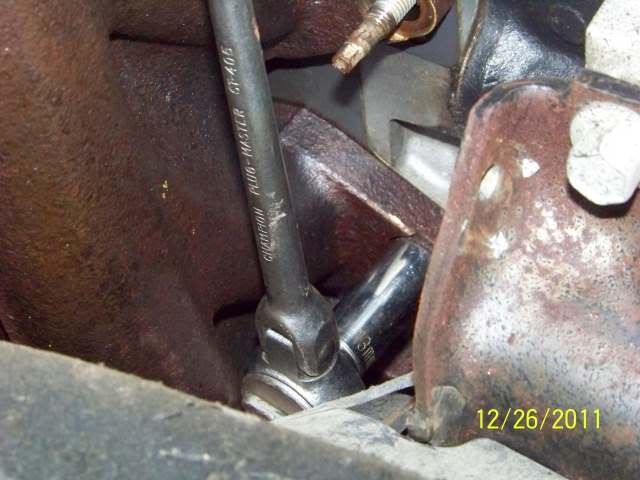
The 3rd cylinder one. This one was straight forward with the heat shield out of the way.
Then the one on the 2nd cylinder. A long reach in.
Once I broke it loose, then I use the stubby ratchet and went up top and hung down and worked it out.
Then out with the manifold. With the exhaust Y pipe still on it is a little bit of fiddling but go up top, tie a wire on the manifold and work it to go down the back of the engine and lower it to the ground. You are using the wire to hold it and lower it as your not long enough unless you have a buddy under the truck holding it.
Here it is
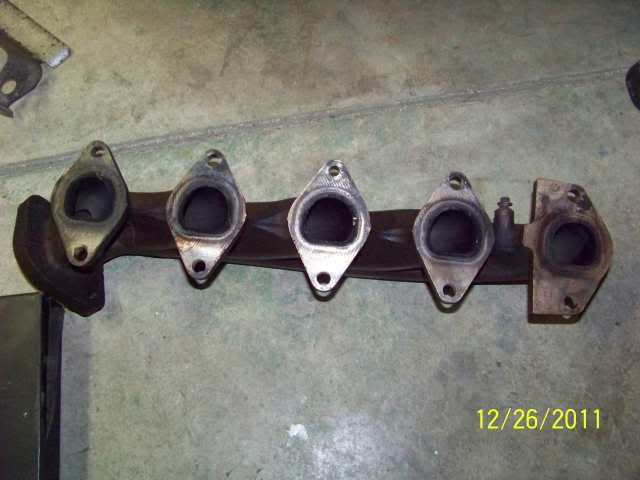
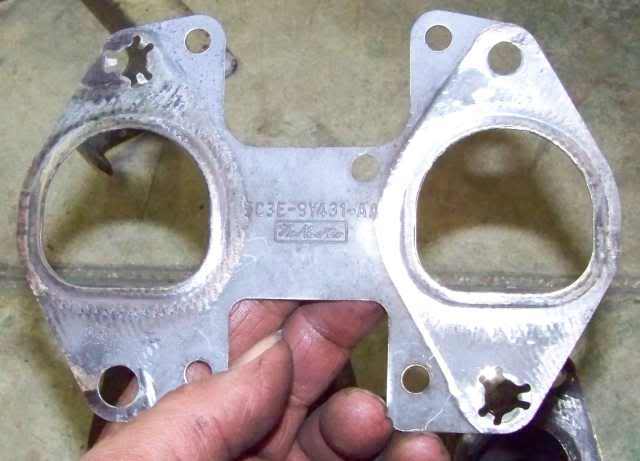
The gasket that had the leak. Not as bad as I would of suspected.
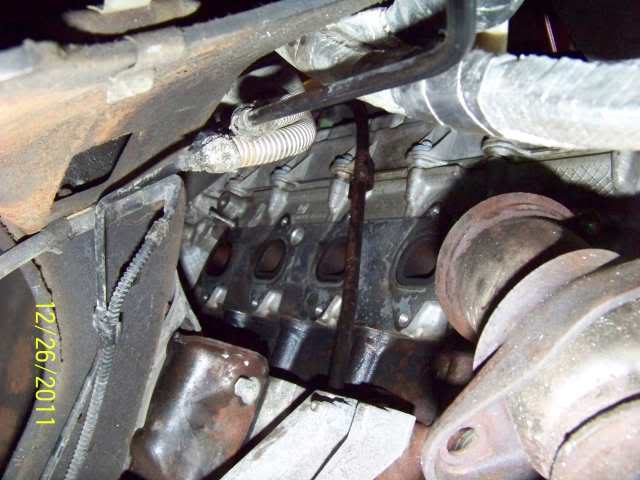
And now the head area with the manifold off.
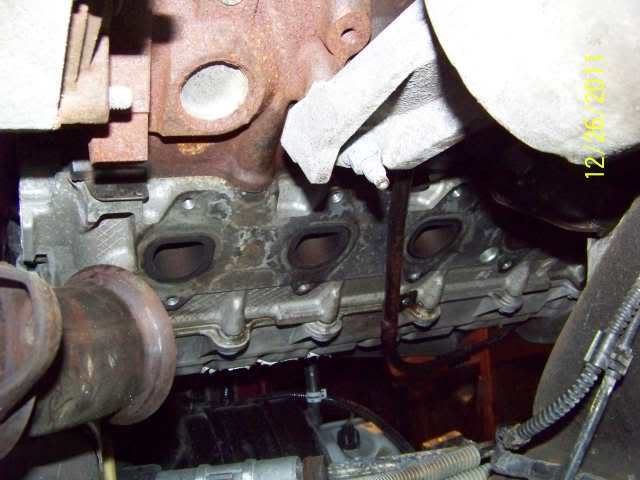
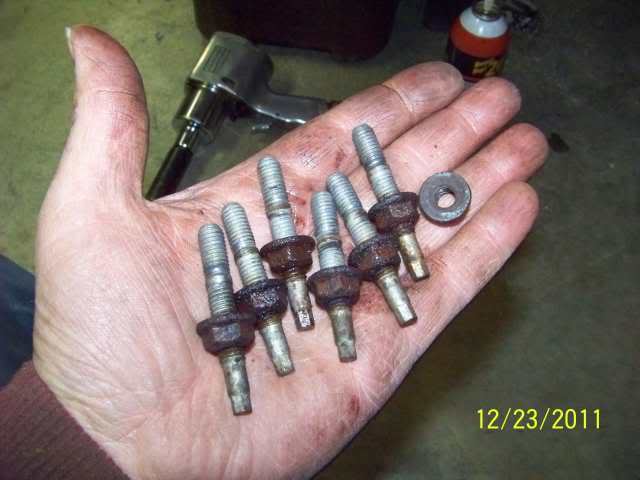
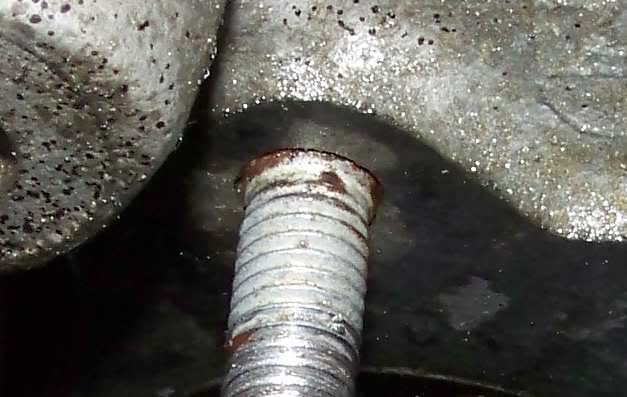
I had 2 studs that stayed in the head. I normal one and one problem child. Put a 3/16" socket (or 5mm) on the stud, PB blaster it, work it back and forth a little and out it comes.
And then there is this one. Someone at the factory must of got carried away installing this one. It is buried in deeper then all the rest were. Like they did not torque it and just wrenched it. The hex end broke off trying to get it to budge. Then vise grips where iffy so I stopped and measured what I was up against.
Here is the problem child
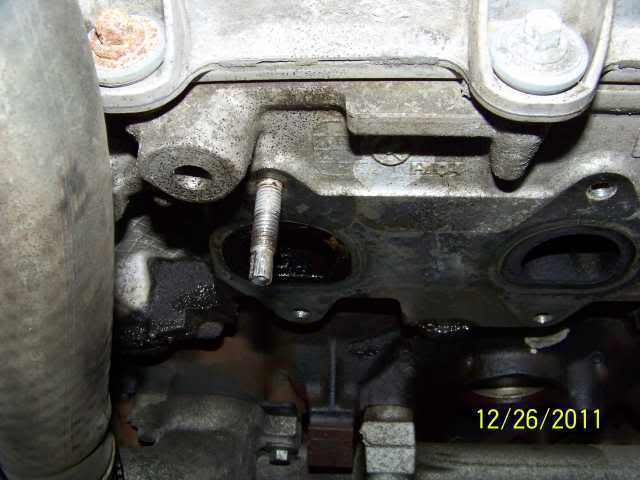
Here you can see how deep it is. The thread start end from the head is a little over 7/8"
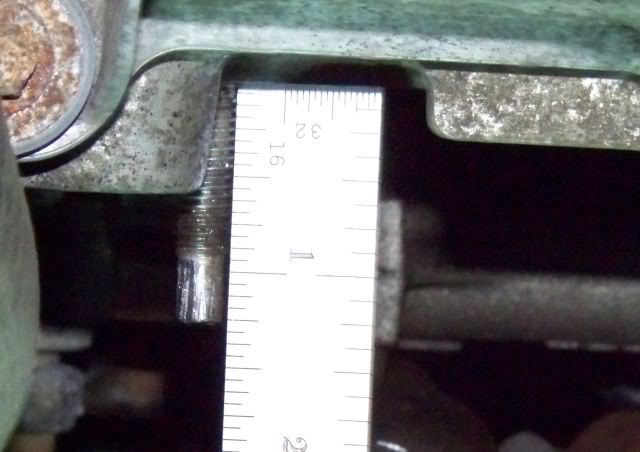
Now to one out on the bench
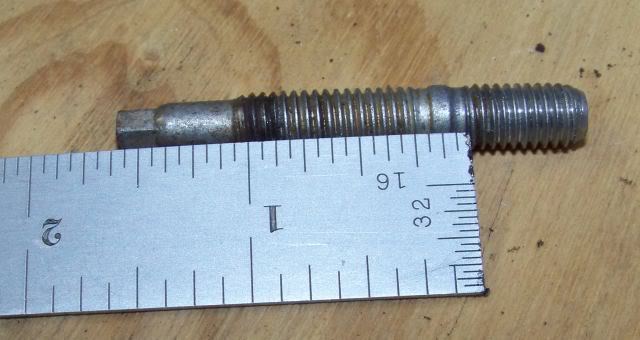
The buried that one in up to and including part of the boss area into the head. All the rest that boss area was totally exposed and ran out on the last thread. Here see a close up.
It is 8mm x 1.25 thread. I ran a die over the threads (not shown in the pics ) and it is now a clean threaded stud at least. There is a cast boss nub on the head that does not allow a stud extractor to get up flush to the head.
I now have 2 choices, leave it as the threads are cleaned up or try getting it out with vise grips and when it breaks off, drill it out. I have to get a 8mm bottom tap and make sure my EZ out set goes that small.
Any thoughts?
Well all for now.
Thanks
John
PS. 5 of the 10 studs where loose when I went to take them out. There was not a lot of pressure holding this manifold on. Heat expansion may help some take up the space but it would not on the rear area as I was towing a 9,200# camper all summer and it was gas knocking sound like crazy from the leaking exhuast. In my case my exhaust leak I'm sure is from loose studs.
Today was filled with running from dealer to dealer trying to get parts. Seems findng a stocking dealer of 3 valve 6.8 V10 parts is not that common in this area. Lot's of 5.4 parts... After 3 stops I have all the manifold parts. The gaskets was the hard part, even NAPA did not have any.
Now back to the truck. After thinking through how to do this, this heat shield is now an easy get it off in 15 minutes and part of that is crawling under the truck. Here is my method, not finding anyone who has done this before this is one method.
The top. Start with a 1/4" drill bit in and extension.
Center on the rivet head
And in about 3 seconds of drilling it's out
The bottom one.
I tried a cut off wheel on a die grinder but could not get it in there. So I went the air chisel route. One zip and the bottom part of the rivet was gone. Then put the chisel between the motor mount and the heat shield and bing, it's loose. You wiggle the heat shield out under the truck towards the back of the engine. I tried pulling it up out the top and it would not go. Here it is.
With that shield out of the way those last 2 bolts are exposed, sort of... Here each of us has our own arsenal of tools. I used 2 flex joint ratchets. One to break the nut loose and a shorter one to take it out.
The 3rd cylinder one. This one was straight forward with the heat shield out of the way.
Then the one on the 2nd cylinder. A long reach in.
Once I broke it loose, then I use the stubby ratchet and went up top and hung down and worked it out.
Then out with the manifold. With the exhaust Y pipe still on it is a little bit of fiddling but go up top, tie a wire on the manifold and work it to go down the back of the engine and lower it to the ground. You are using the wire to hold it and lower it as your not long enough unless you have a buddy under the truck holding it.
Here it is
The gasket that had the leak. Not as bad as I would of suspected.
And now the head area with the manifold off.
I had 2 studs that stayed in the head. I normal one and one problem child. Put a 3/16" socket (or 5mm) on the stud, PB blaster it, work it back and forth a little and out it comes.
And then there is this one. Someone at the factory must of got carried away installing this one. It is buried in deeper then all the rest were. Like they did not torque it and just wrenched it. The hex end broke off trying to get it to budge. Then vise grips where iffy so I stopped and measured what I was up against.
Here is the problem child
Here you can see how deep it is. The thread start end from the head is a little over 7/8"
Now to one out on the bench
The buried that one in up to and including part of the boss area into the head. All the rest that boss area was totally exposed and ran out on the last thread. Here see a close up.
It is 8mm x 1.25 thread. I ran a die over the threads (not shown in the pics ) and it is now a clean threaded stud at least. There is a cast boss nub on the head that does not allow a stud extractor to get up flush to the head.
I now have 2 choices, leave it as the threads are cleaned up or try getting it out with vise grips and when it breaks off, drill it out. I have to get a 8mm bottom tap and make sure my EZ out set goes that small.
Any thoughts?
Well all for now.
Thanks
John
PS. 5 of the 10 studs where loose when I went to take them out. There was not a lot of pressure holding this manifold on. Heat expansion may help some take up the space but it would not on the rear area as I was towing a 9,200# camper all summer and it was gas knocking sound like crazy from the leaking exhuast. In my case my exhaust leak I'm sure is from loose studs.
#12
12-26-2011, 09:04 PM
Heads up on the stainless. The normal stainless fastener is not very strong. The ones you find in a hardware store or even in many industrial supply houses are what they call 18-8 stainless or 304 stainless steel. Some may be 316 stainless and while it is a little stronger it is still a very weak fastener.
The tensile strength of an 18-8 or 316 SS bolt is close to a grade 2 carbon steel bolt. While they do not rust, they are not that strong.
A good question is what tensile and yield studs does Ford use?
My Ford shop manual states to torque these 8mm manifold studs to 9 ft lb and then the nuts to 18 ft lb. That 18 ft lb lines up with a grade 5 bolt or around 120ksi tensile strength. A grade 2 carbon steel fastener or a 304 stainless steel fastener on 8mm has around 74Ksi tensile. A lot weaker bolt.
From the Ford shop manual and the torque they are recommending the studs and nuts are at least a grade 5 or 120,000 psi tensile strength.
Who ever you buy stainless fasteners from ask them what the yield and tensile strength values are. While they do make stainless fasteners better and stronger grades they are special and cost big bucks. As a point of reference I have bought at work for $50 a bolt for a 1/2-13 by 4" long hex head bolts Class 2 B8 Strain hardened stainless. They are close to a grade 5 carbon steel bolt.
While stainless will not rust as fast heads up make sure they are higher grade stainless or you will be going backwards using them as exhaust studs/bolts.
Hope this helps
John
#13
12-26-2011, 09:21 PM
Senior User
Join Date: Apr 2004
Location: mt
Posts: 291
Likes: 0
Received 0 Likes
on
0 Posts
#14
12-26-2011, 09:35 PM
Senior User
Join Date: Apr 2004
Location: mt
Posts: 291
Likes: 0
Received 0 Likes
on
0 Posts
#15
12-26-2011, 10:32 PM
Mine I bit the bullet and went with the Ford ones. At my local dealer was $79 for 10 studs and 10 nuts plus the 2 studs and nuts for the exhaust pipe flange I had to cut them off as the nuts froze on the studs and the studs backed out.
The gaskets where $20.36.
I know I paid big time on these studs just I did not want to redo this again making a wrong choice.... But then again I only have 75K miles and I'm doing this... and yours is even less.... Something is not right with what ever we are using....
Again this was only one side. If you have time, search on line for Ford OEM parts. If I had the time I could of bought them cheaper.
Hope this helps
John