A/c Blower defaulting to the defrosters
#1
 06-22-2011, 01:56 AM


A/c Blower defaulting to the defrosters
This is for the E-series Vans that have this problem of the A/C blowers in the dash defaulting to the defrosters while accelerating, then coming back while going back to normal speed. There is not a lot of information as to what causes this or how to fix it. This is what I did after a lot of research and asking questions. I don't know when Ford did this. But they buried a vacuum tank and a small check valve that controls or feeds the heater/A/C control unit. My van is a 1997. The problem is from the mid 90's to around 2003 or 2004. The check valve and the vacuum tank location is between the inside heater core case and the evaporator case which is under the hood on the right side of the vehicle. According to Ford to replace these two units, you must remove both cases from the vehicle. To remove the inside heater core case and box unit, you have to remove the dash. The evaporator case can be removed after you discharge the A/C, the battery and battery tray and just about everything around the A/C evaporator case. Ford dealers gets about 15 to 17 hours labor to replace the HVAC check valve and the vacuum tank. Crazy, right? !!!!!. The other fix is bypass that whole system with another external check valve and vacuum tank. The problem here is getting the control vacuum lines up to the dash control unit and finding a place to put the vacuum tank
This was my fix after looking at my options. First I popped the cover on top of the dash which uncovered some of the HVAC vacuum lines. The black vacuum line at this location is the one that feeds the HVAC control head in the dash. I disconnected the line and capped it. I then went under the hood and found the black line that gets its vacuum from the engine. I disconnected that line and connected it to a hand held vacuum pump. I gave it a few pumps and could only draw a little vacuum that quickly disappeared. Vacuum Leak !!!??. I removed the lower right side dash panel and the steel reinforcement behind it to get a better look at the heater box that would have to come out if you were to follow Ford procedures. I thought to myself, there's no way I'm going to remove the dash to get this heater box out. Looking at the lower far right corner of the heater box you can see the black vacuum line going thru the firewall. But wait, it goes thru the plastic heater box case.
I then went under the hood to see if I could find the other end of this line coming into the engine compartment. At this time I took the Battery, the battery tray, the blower fan and the front right headlight unit out. To get the blower out, you have to remove the dryer/receiver bolts and pull the unit toward the front as far as possible. I then pulled away the wire harness from the evaporator case as much as possible. I took a mirror with a bright light and tried to get a look at under the evap case. Trying real hard you can see the check valve at this point, but there is no way you can get to it.
Here's the fix. Taking some careful measurement from a given point under the hood on top of the fender well and under the heater. Take the right front tire off and transfer those measurement to the underside of the wheel well. This will put you just about at the 12 O'clock position. I measured out a 5" long (front to back) and a 3" side to side rectangle. I took my wizzor and cut the panel out. Make sure you cut just as deep as to cut thru. You don't want to cut anything on the other side of the cut. Remove the panel and there they are !!!!! the check valve and the flat vacuum tank. The check valve is just push rubber connectors, but the vacuum tank is held in by a small screw.. I checked my vacuum tank and it held vacuum, so I didn't have to take it out. I checked the check valve and it didn't work. I took the old one to Autozone and matched it up with a Dorman check valve for $3.98. I connected the proper vacuum lines to the check valve and installed it back in it's hole.
I have duel batteries, so I switched over to battery 2 and started the vehicle. It worked as it should.
OK !! Now put the panel back in. can't weld it, too much heat. Take the little panel you cut out and weld two small flat flanges on the short sides. Drill some holes in the two flanges. Clean, prime and paint the flange, so it doesn't rust. Put a bead of body panel poly seal around the flange and the hole in the inner fender well. Then stick the panel up into place and using short self tapping screws, screw the panel in place. I then put another thin coating of body seal around the edge and smoothed it out with my finger tip. Final step was 3 or 4 coats of undercoating
Then I put everything back together. If for any reason I have problems with this again, I have a panel that I can open up and gain access. I hope this helps anyone that might have this problem. My 2 cents !! Good Luck
#2
06-22-2011, 07:53 AM

This is good information. I had the same problem and after looking and following the factory vacuum diagrams I concluded that my 1998 E350 Club Wagon did not have the tank and valve. I fabricated a tank and installed a valve and it now works much better. My guess is I do have this and it is hidden like you state. It is most likely still leaking vacuum. Where did you cut the hole in the body? Any chance you can post a picture?
Thanks,
Michael
Thanks,
Michael
#3
06-22-2011, 01:26 PM
This is good information. I had the same problem and after looking and following the factory vacuum diagrams I concluded that my 1998 E350 Club Wagon did not have the tank and valve. I fabricated a tank and installed a valve and it now works much better. My guess is I do have this and it is hidden like you state. It is most likely still leaking vacuum. Where did you cut the hole in the body? Any chance you can post a picture?
Thanks,
Michael
Thanks,
Michael

Last edited by ydaveitsu; 06-22-2011 at 01:28 PM. Reason: need additional info
The following users liked this post:

#7
08-16-2012, 11:57 AM

I wanted to say thank you ydaveitsu for posting your solution. Based on your info I cut hole and found my hose had fallen off the canister. The hose was dry rotted and expanding so I replaced with new hose and all works fine.
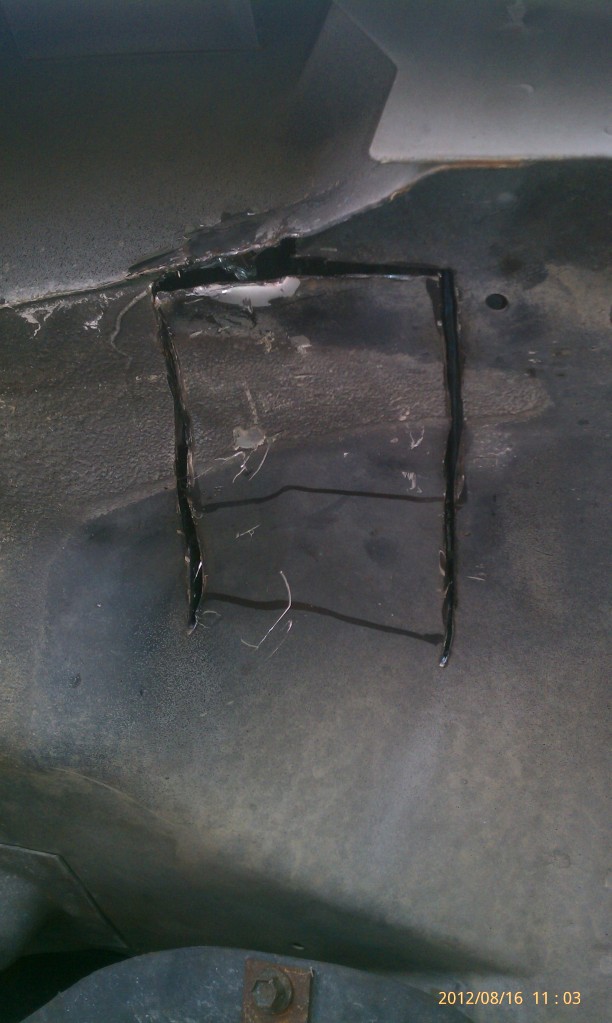
I used small metal cutting wheel. Metal is pretty strong. You won't cut it with tin snips. You'll need cutting tool.
I only cut three sides of the square hole and bent the metal down. Then bent it back into place and sealed with 3M marine adheasive. Then painted.
Took a total of 2 hr. start to finish in my drive way and I'm not a mechanic. I couldn't have done this without your info ydaveitsu on where to cut. I've been looking for a fix over a year. Ford dealers told me $350 to $450. Made me feel good I didn't pay that when I was able to fix myself in such a short period of time with little parts.
Once you see a picture of this, it's very easy to do.
Picture showing location of hole. 4" by 6" approx.
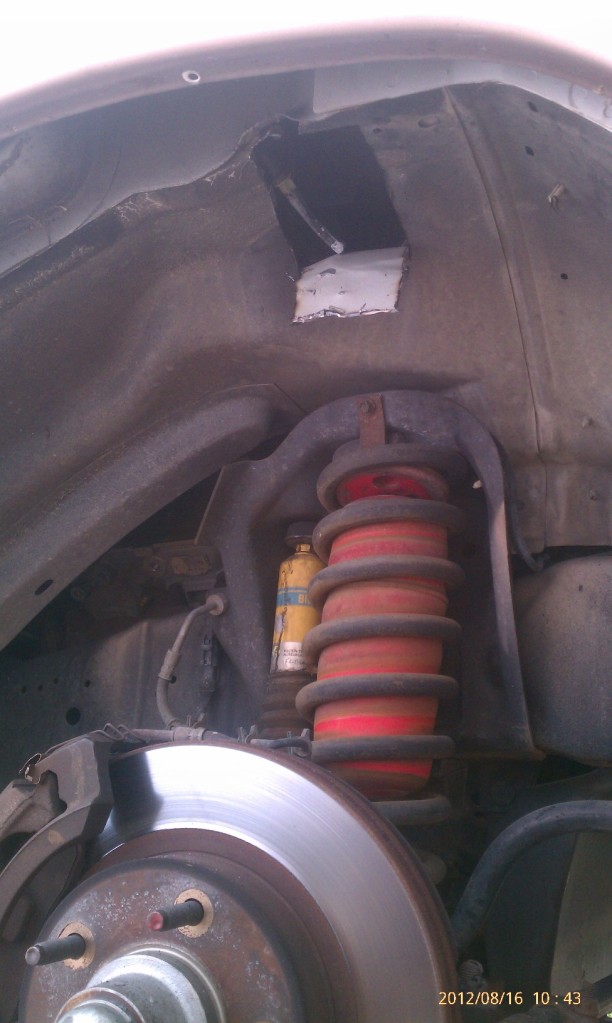
Picture of hole after bent back into place
You can see vacuum canister with male nipple at bottom left corner. The hose at cut out ( with white paint on it ) opening is vacuum hose that had fallen off of mine. You can see it is dry rotted and has expanded. I replaced this 3" long hose with a new one that fit nice and tight. All works fine!
Also the other hose used is a smaller plastic not rubber and still looked new. It was only this one rubber hose that dry rotted. The rubber connectors and everything else looked new.
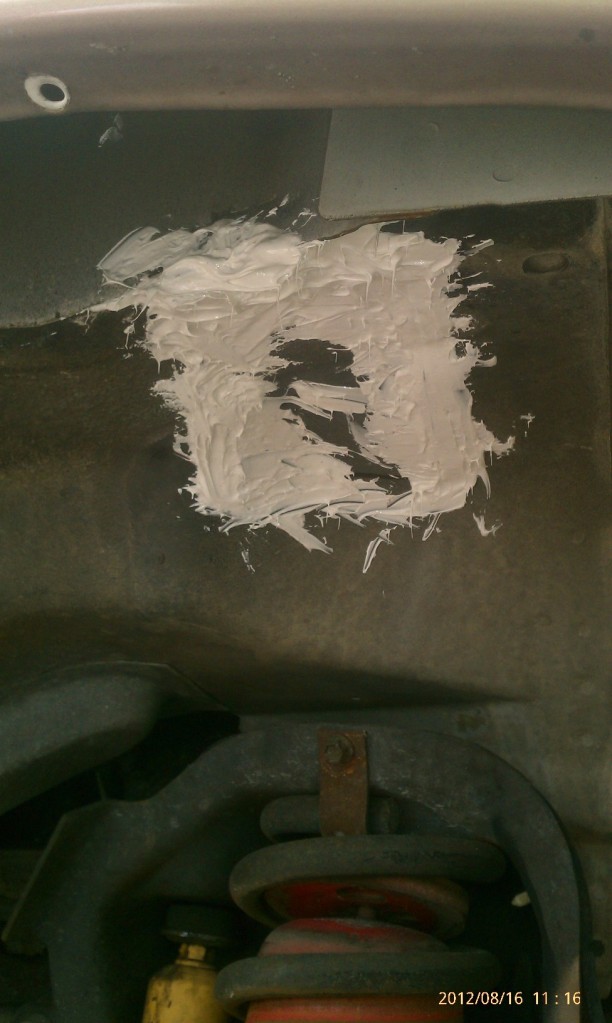
3M Marine adheasive patch job was quick and easy. I then painted over with undercoat.
Passing it on! Hope this helps others...
Jon
I used small metal cutting wheel. Metal is pretty strong. You won't cut it with tin snips. You'll need cutting tool.
I only cut three sides of the square hole and bent the metal down. Then bent it back into place and sealed with 3M marine adheasive. Then painted.
Took a total of 2 hr. start to finish in my drive way and I'm not a mechanic. I couldn't have done this without your info ydaveitsu on where to cut. I've been looking for a fix over a year. Ford dealers told me $350 to $450. Made me feel good I didn't pay that when I was able to fix myself in such a short period of time with little parts.
Once you see a picture of this, it's very easy to do.
Picture showing location of hole. 4" by 6" approx.
Picture of hole after bent back into place
You can see vacuum canister with male nipple at bottom left corner. The hose at cut out ( with white paint on it ) opening is vacuum hose that had fallen off of mine. You can see it is dry rotted and has expanded. I replaced this 3" long hose with a new one that fit nice and tight. All works fine!
Also the other hose used is a smaller plastic not rubber and still looked new. It was only this one rubber hose that dry rotted. The rubber connectors and everything else looked new.
3M Marine adheasive patch job was quick and easy. I then painted over with undercoat.
Passing it on! Hope this helps others...
Jon
This is for the E-series Vans that have this problem of the A/C blowers in the dash defaulting to the defrosters while accelerating, then coming back while going back to normal speed. There is not a lot of information as to what causes this or how to fix it. This is what I did after a lot of research and asking questions. I don't know when Ford did this. But they buried a vacuum tank and a small check valve that controls or feeds the heater/A/C control unit. My van is a 1997. The problem is from the mid 90's to around 2003 or 2004. The check valve and the vacuum tank location is between the inside heater core case and the evaporator case which is under the hood on the right side of the vehicle. According to Ford to replace these two units, you must remove both cases from the vehicle. To remove the inside heater core case and box unit, you have to remove the dash. The evaporator case can be removed after you discharge the A/C, the battery and battery tray and just about everything around the A/C evaporator case. Ford dealers gets about 15 to 17 hours labor to replace the HVAC check valve and the vacuum tank. Crazy, right? !!!!!. The other fix is bypass that whole system with another external check valve and vacuum tank. The problem here is getting the control vacuum lines up to the dash control unit and finding a place to put the vacuum tank
This was my fix after looking at my options. First I popped the cover on top of the dash which uncovered some of the HVAC vacuum lines. The black vacuum line at this location is the one that feeds the HVAC control head in the dash. I disconnected the line and capped it. I then went under the hood and found the black line that gets its vacuum from the engine. I disconnected that line and connected it to a hand held vacuum pump. I gave it a few pumps and could only draw a little vacuum that quickly disappeared. Vacuum Leak !!!??. I removed the lower right side dash panel and the steel reinforcement behind it to get a better look at the heater box that would have to come out if you were to follow Ford procedures. I thought to myself, there's no way I'm going to remove the dash to get this heater box out. Looking at the lower far right corner of the heater box you can see the black vacuum line going thru the firewall. But wait, it goes thru the plastic heater box case.
I then went under the hood to see if I could find the other end of this line coming into the engine compartment. At this time I took the Battery, the battery tray, the blower fan and the front right headlight unit out. To get the blower out, you have to remove the dryer/receiver bolts and pull the unit toward the front as far as possible. I then pulled away the wire harness from the evaporator case as much as possible. I took a mirror with a bright light and tried to get a look at under the evap case. Trying real hard you can see the check valve at this point, but there is no way you can get to it.
Here's the fix. Taking some careful measurement from a given point under the hood on top of the fender well and under the heater. Take the right front tire off and transfer those measurement to the underside of the wheel well. This will put you just about at the 12 O'clock position. I measured out a 5" long (front to back) and a 3" side to side rectangle. I took my wizzor and cut the panel out. Make sure you cut just as deep as to cut thru. You don't want to cut anything on the other side of the cut. Remove the panel and there they are !!!!! the check valve and the flat vacuum tank. The check valve is just push rubber connectors, but the vacuum tank is held in by a small screw.. I checked my vacuum tank and it held vacuum, so I didn't have to take it out. I checked the check valve and it didn't work. I took the old one to Autozone and matched it up with a Dorman check valve for $3.98. I connected the proper vacuum lines to the check valve and installed it back in it's hole.
I have duel batteries, so I switched over to battery 2 and started the vehicle. It worked as it should.
OK !! Now put the panel back in. can't weld it, too much heat. Take the little panel you cut out and weld two small flat flanges on the short sides. Drill some holes in the two flanges. Clean, prime and paint the flange, so it doesn't rust. Put a bead of body panel poly seal around the flange and the hole in the inner fender well. Then stick the panel up into place and using short self tapping screws, screw the panel in place. I then put another thin coating of body seal around the edge and smoothed it out with my finger tip. Final step was 3 or 4 coats of undercoating
Then I put everything back together. If for any reason I have problems with this again, I have a panel that I can open up and gain access. I hope this helps anyone that might have this problem. My 2 cents !! Good Luck
This was my fix after looking at my options. First I popped the cover on top of the dash which uncovered some of the HVAC vacuum lines. The black vacuum line at this location is the one that feeds the HVAC control head in the dash. I disconnected the line and capped it. I then went under the hood and found the black line that gets its vacuum from the engine. I disconnected that line and connected it to a hand held vacuum pump. I gave it a few pumps and could only draw a little vacuum that quickly disappeared. Vacuum Leak !!!??. I removed the lower right side dash panel and the steel reinforcement behind it to get a better look at the heater box that would have to come out if you were to follow Ford procedures. I thought to myself, there's no way I'm going to remove the dash to get this heater box out. Looking at the lower far right corner of the heater box you can see the black vacuum line going thru the firewall. But wait, it goes thru the plastic heater box case.
I then went under the hood to see if I could find the other end of this line coming into the engine compartment. At this time I took the Battery, the battery tray, the blower fan and the front right headlight unit out. To get the blower out, you have to remove the dryer/receiver bolts and pull the unit toward the front as far as possible. I then pulled away the wire harness from the evaporator case as much as possible. I took a mirror with a bright light and tried to get a look at under the evap case. Trying real hard you can see the check valve at this point, but there is no way you can get to it.
Here's the fix. Taking some careful measurement from a given point under the hood on top of the fender well and under the heater. Take the right front tire off and transfer those measurement to the underside of the wheel well. This will put you just about at the 12 O'clock position. I measured out a 5" long (front to back) and a 3" side to side rectangle. I took my wizzor and cut the panel out. Make sure you cut just as deep as to cut thru. You don't want to cut anything on the other side of the cut. Remove the panel and there they are !!!!! the check valve and the flat vacuum tank. The check valve is just push rubber connectors, but the vacuum tank is held in by a small screw.. I checked my vacuum tank and it held vacuum, so I didn't have to take it out. I checked the check valve and it didn't work. I took the old one to Autozone and matched it up with a Dorman check valve for $3.98. I connected the proper vacuum lines to the check valve and installed it back in it's hole.
I have duel batteries, so I switched over to battery 2 and started the vehicle. It worked as it should.
OK !! Now put the panel back in. can't weld it, too much heat. Take the little panel you cut out and weld two small flat flanges on the short sides. Drill some holes in the two flanges. Clean, prime and paint the flange, so it doesn't rust. Put a bead of body panel poly seal around the flange and the hole in the inner fender well. Then stick the panel up into place and using short self tapping screws, screw the panel in place. I then put another thin coating of body seal around the edge and smoothed it out with my finger tip. Final step was 3 or 4 coats of undercoating
Then I put everything back together. If for any reason I have problems with this again, I have a panel that I can open up and gain access. I hope this helps anyone that might have this problem. My 2 cents !! Good Luck
The following users liked this post:
Trending Topics
#8
09-25-2012, 05:21 PM

An Easier Way to Fix A/C Only Blows to Defrost Vents
When I bought my 03 E-250, the A/C would only blow through the Defrost Vents (this is the "No Vacuum", Default position of the damper doors controlling airflow under the dash). The shop wanted over $650 to analyze the problem -- NO WAY !! I bought the Ford Shop Manuals from e-bay and determined that between the firewall and the A/C control switch (on the dash) there was only a vacuum check valve and a vacuum reservoir. So all i needed to do was bypass the vacuum reservoir and check valve. First, let me tell you how to determine if bypassing the check valve and vacuum reservoir will fix your problem... Under the hood, on the firewall (passenger side) is a vacuum line that passes through the firewall and provides vacuum for the A/C and heater control dampers, there should be a vacuum connector in the line about where the line passes above the blower motor, disconnect this line and start your engine, place a finger over the line and determine if you have vacuum, this should be a fairly strong vacuum. If the vacuum is weak at this point your problem is the vacuum line between the engine and this point, replace it. Reconnect the vacuum lines. Next, on top of the dashboard is an access panel, under this panel is a cconnector with five or six vacuum lines going to the dashboard A/C switch. Disconnect the vacuum lines and start the engine if the vacuum is working properly the connector (male side), where the Black hose attaches, will have vacuum at this port. Cover the vacuum port with your finger and hold it there, does the vacuum feel strong? Is the vacuum as strong as it was at the firewall connector? If your vacuum is fairly strong the next thing to check is the reservoir and check valve, keep your finger over the vacuum port for about a minute, this will allow the resevoir to store the vacuum, turn off the engine and continue to hold your finger over the port for another minute, remove your finger slightly and feel if there is any vacuum remaining in the resevoir after you remove your finger, if not, then the vacuum resevoir and/or check valve are bad. Here's how I created an easy, and CHEAP, solution to this problem. I used a long section of vacuum line (5 - 6 feet , 2 meters) and a generic check valve to mimic the reservoir, I stuffed the vacuum line behind the dash and spliced my new line into the back side of the A/C control switch, IT WORKS GREAT! Here are the details... First, remove the dash front panel and the radio to gain access to the back side of the A/C control switch. The dash panel removal required removing the headlight **** (use small screwdriver to depress the locking tab) and bezel, then two screws above the instrument cluster, the remainder of the panel is held in place with push pins that will release when gently coaxed Note: remove the Cigar Lighter wire(s) by pressing on the release tab on the electrical connector. Once the panel is off you can release the radio by pressing in on the mounting brackets on both sides. With the panel off you can remove the A/C control switch. I ran a new vacuum line from the firewall connector toward the back of the engine and drilled a hole in the side of the Passenger footwell. The hole was placed slightly above and forward of the cowell strap bracket. I used a gromet in the hole and Hi-Temp Siicone to seal the hole after i threaded it through. I routed the new line up behind the radio bracket and installed the check valve here. I then coiled about five feet vacuum line (one size larger) and secured the coil with zip ties. I placed the coil (this creates the reservoir) in a void between the radio and instrument cluster. The other end of the coil was routed to the back side of the A/C control switch after reducing the hose size. I cut the BLACK vacuum hose going into the A/C switch and used silicone to secure it so it would not wiggle free (note: be sure to cut the black hose long enough to make it easy to attach your new vacuum line, ALSO, be certain the silicone does not plug up the end of the black hose). Test your fix and reinstall the radio and dash panel. Let us know how this worked for you. Good Luck and Keep on Truckin !!
Last edited by Man With a Van; 09-25-2012 at 05:22 PM. Reason: quote messed up
#9
11-20-2012, 08:06 AM

I was not so lucky to have only a vacuum leak my 2002 E-150. It leaked water thru the air intake to the HVAC blower housing. The water leaked into the cab soaking the fiber on the bottom of the floor mat. The truck smelled like mold and mildew.
With this case I had to do all the work to be able to fix the water leak. Now that I'm done with it, all the disassembley needed to fix these leaks was not that hard to do. There are just allot of simple steps that when done in order make it relatively easy but time consuming.. I printed the instruction from Helm .com for each step and organized them to create a custom service manual for this task. Other than the discharge/recharge of the AC only a few basic tool are needed. This job could be done in a day by an experienced person
My vacuum leak started before the water leak and was considering modifying the truck along the lines of this thread. Hopefully you don't get both leaks.
#10
05-16-2013, 02:03 AM
#11
05-17-2013, 06:26 AM

#12
05-18-2013, 11:04 AM

Freshman User
Join Date: May 2013
Location: San Juan Capistrano, CA
Posts: 33
Likes: 0
Received 0 Likes
on
0 Posts
That was me with the PM...
As it turns out, my 'puter at work (USPS) has some security software setting something or other that is blocking all of the pics because they are located off site...

I am at home now and the pics show up fine, so just forget I said anything...
Thanx,
SteveM14
#13
05-18-2013, 01:40 PM

#14
05-21-2013, 10:33 PM

New User
Join Date: May 2003
Location: Plano, TX
Posts: 15
Likes: 0
Received 0 Likes
on
0 Posts
Howdy Folks,
Man am I glad I came across this post, my '97 E150 has been having this issue for a while now... running down the highway on cruise, come to a little rise in the road and the AC changes to the defrost vents.
I am now having a different problem, I removed the after market stereo system, in anticipation of selling the van since we just bought a new F150 and now the only thing that comes through the dash vents is heat, even though the compressor is running and both front and rear evaporators are getting cold.
Is it possible I have accidentally disconnected a vacuum line some place to create this issue?
I appreciate any insight.
Thanks,
-Brian
#15
05-22-2013, 12:59 AM
Freshman User
Join Date: May 2013
Location: San Juan Capistrano, CA
Posts: 33
Likes: 0
Received 0 Likes
on
0 Posts
Brian,
It DOES sound like you have a vacuum line disconnected... It sounds as if the mixer doors aren't operating properly. I would take the dash cover off and check there as well as checking the check valve and canister problem. When you removed your stereo you may have knocked the vacuum line off the back of your A/C control. I would fix that first, before you look into the other problem.
Good Luck! Post back what you find...
SteveM14

