When you click on links to various merchants on this site and make a purchase, this can result in this site earning a commission. Affiliate programs and affiliations include, but are not limited to, the eBay Partner Network.
I'm looking for anyone who has installed a Classic Performance Brake booster mounted on the frame of a 56 Ford F-100. I have the booster mounted but I am looking for installation photos that help me determine more about exactly what happens after it has been installed.
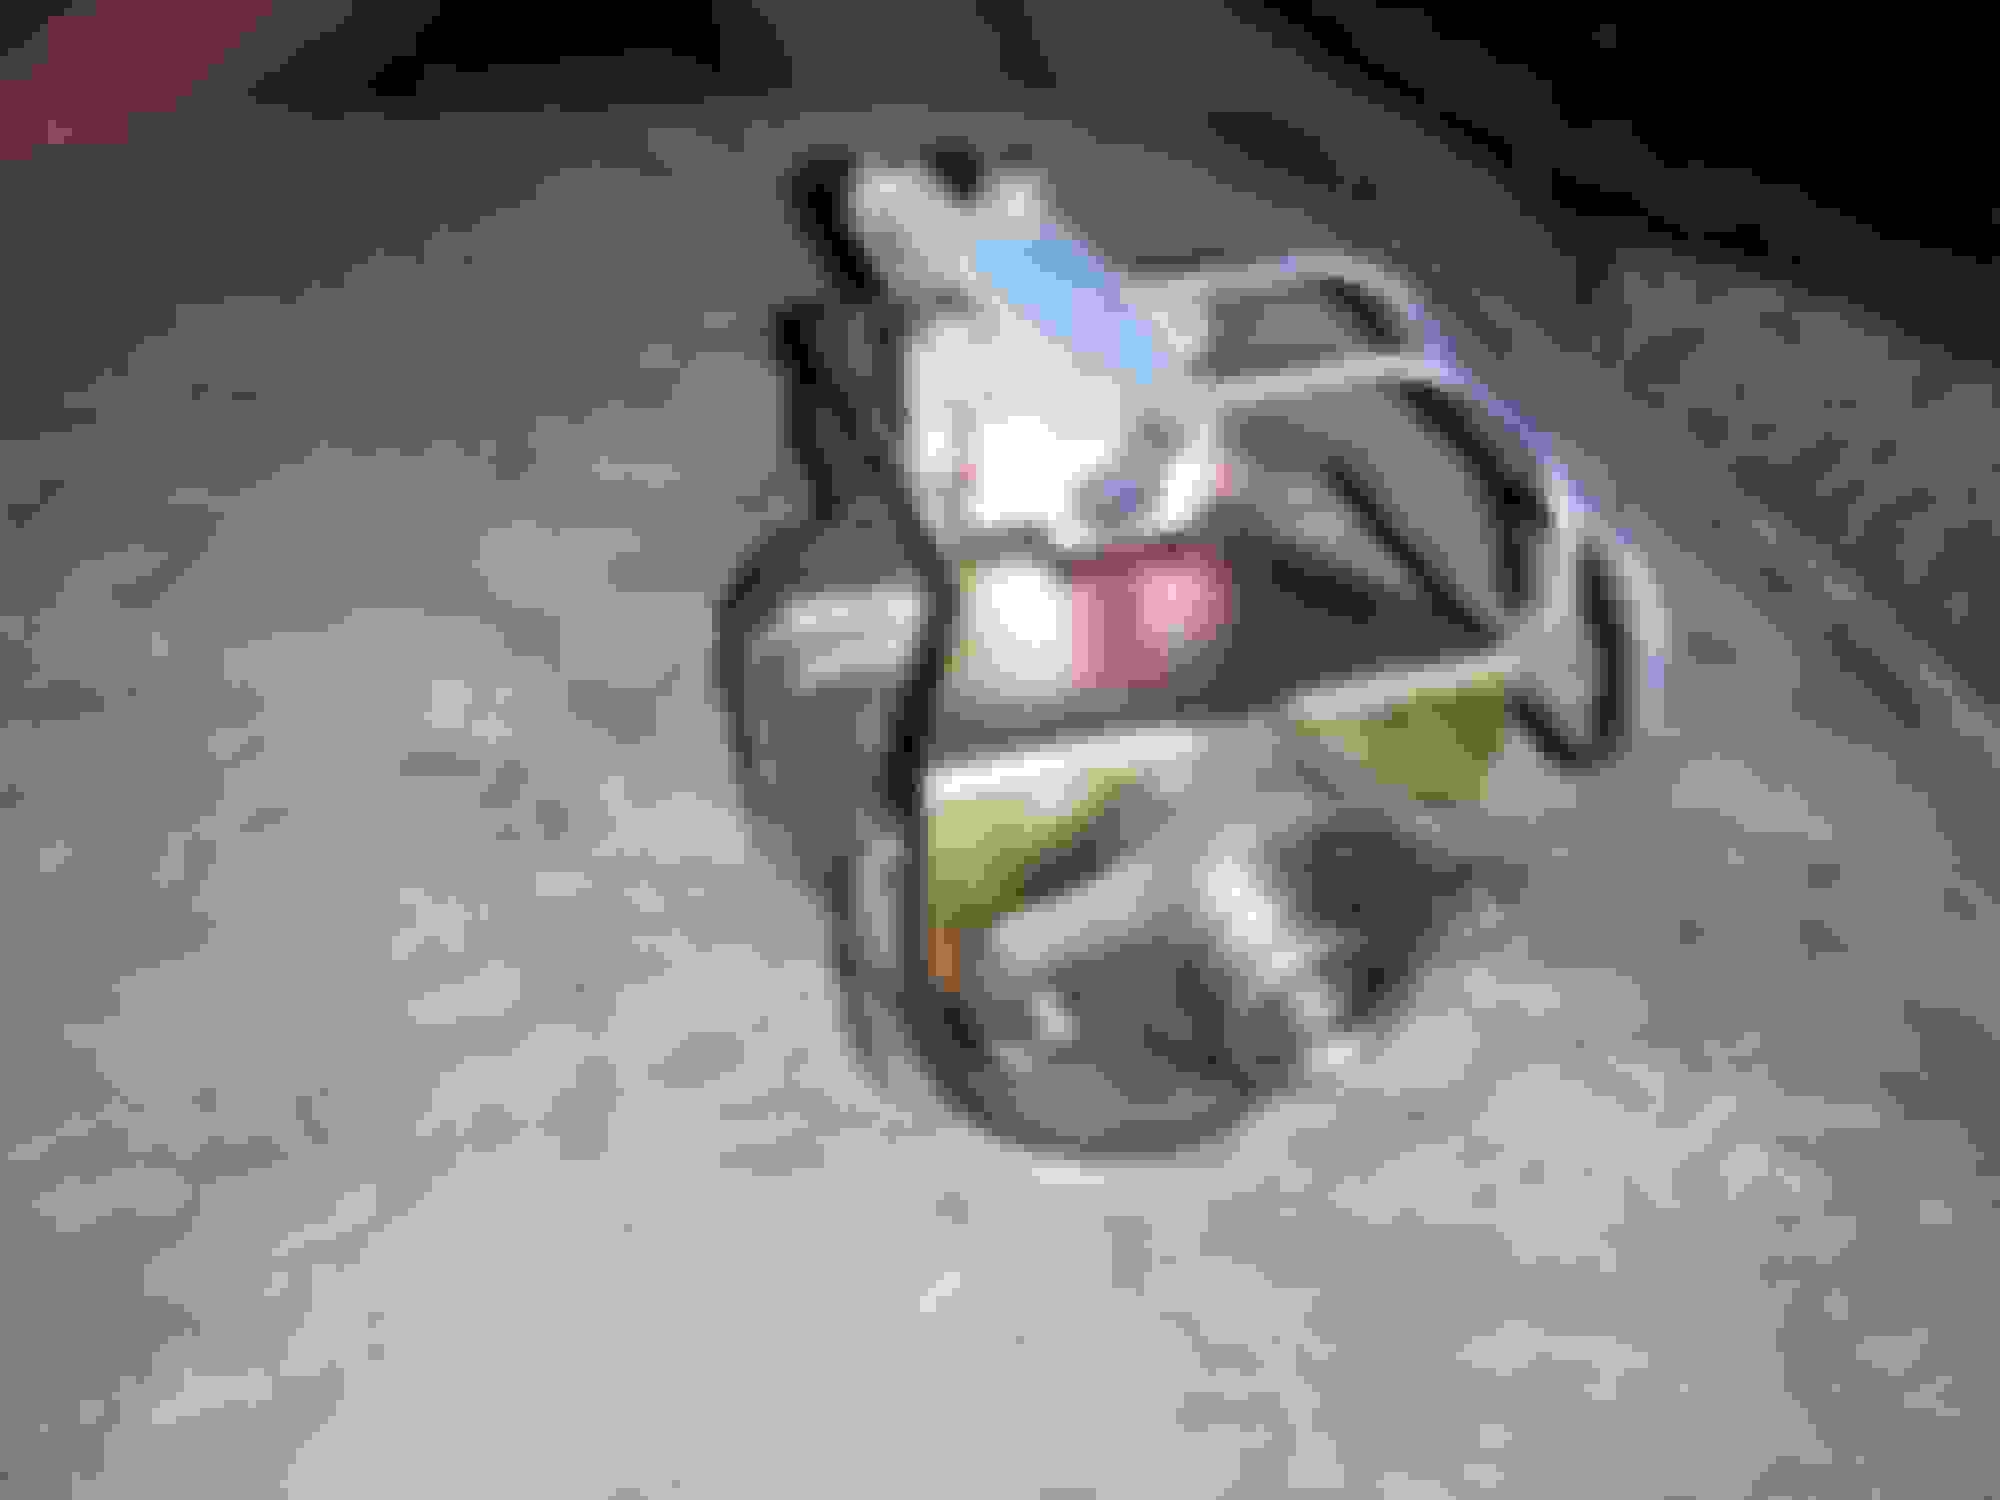
I contacted CPP Tech Support and this is what I was told. I am attaching a photo, hopefully it will help in my understanding of the proportionate valve plumbing. The reservoir and proportioning valve have been removed from the diaphragm. On the diaphragm, you will notice a connection that connects the 11/32 brake vacuum hose to vacuum supply on engine. He cautioned that when purchasing this hose, you must specify "power brake vacume" hose as its the ONLY rubber line that will work. Don't let them sell you fuel hose or rubber tubing, it will not work correctly.
The valve I am using is for rear drum brakes and front disk brakes. The black dot at the rear of the valve is the supply for the rear brakes. In the last six months, they have came out with a low pressure switch (PVWS-K) that screws into this fitting and then accepts the brake supply line for the rear brakes. The green dot is for a connection that runs to a gauge on the dash, I don't need it or have it in my dash, so will not be connected. The two red dots at the front of the valve are the supply connections for front brakes. You can plug one and run a single supply line with a splitter to both front brakes, or use one connection for each front brake. The blue dot with a little plastic cover is a metering valve and serves no connection. Hope this helps lower the intimidation factor I experienced when I first saw it. The tech also made sure I understood using the same diameter brake lines to front and back is very important. I advised him I would be using all 3/16 and he responded, "very good".
I just put this exact one on my truck. The instructions did suck. Make sure you bench bleed first. Your red dots are for front driver and passenger brake lines, black is for rear lines,
green is for a warning light if it loses pressure.
lol, I was editing my picture when you were replying. Thanks for your confirmation. Hopefully we will help others when they get see the one page install instructions. I have been reading up on the bench bleeding, that sounds like it will save a lot of time in the long run. Did you run a remote reservoir somewhere to not have to fill thru the floor boards? I think eventually, I will do the polished billet on the firewall. I did a ton of work on my firewall welding holes and making it look good. I really did not want the firewall mount vacuum brake on my firewall, but it does have some advantages when it comes to service.
i'm in the same boat with the firewall. i don't want to bolt a bunch of stuff on there after I spent so much time to clean it up. So i am leaning towards cutting a hole int he floor for how often i will need to access that which i hope is hardly ever. I haven't even looked to see how close it is to the original hole or how far under the seat it would be.
Couple of things I'm considering. They make some simple and cheap remote reservoirs that could be mounted inside the cab behind the seat. Not something I would be crazy about having brake fluid mess in the cab. They make some awesome remote reservoirs that look super nice and they can be connected to the master with braided stainless hoses. Google remote brake resevoirs for hot rods and there are some really nice ones, expensive to. A nice one with braided hoses is gonna be 3 bills or more. Hmmm, hole in the floor us sounding better, lol.
I was leaning toward the remote fill but now I am thinking along the lines of you by cutting a hole in the floor (a clean cut naturally ) but far less expensive and with floor covering you will not see it and how often will we need to check fluid which we can do when up on a hoist with a mirror. I am in the process of changing rear ends is the reason that I will need to add and bleed. I have thought about the cheap plastic one from mid 50 and had thought about behind the seat. Outlaw I will look and see if I have some pics of under the truck. Mine was on the truck already when I purchased it .
Not a very good picture and I have since corrected the interference problems with the pressure switch, but you can see that the hole necessary to check the fluid would be back the width of the power booster from the original and would have to be considerably larger to have reasonable access. I have the same reservations about the remote idea as you and have chickened out for the forseeable future by just checking it from underneath. Seems to hold very steady so far.
I think if you're not going remote you won't need to cut a hole at all. Mine reservoir is way up under the seat. There isn't any way to see to fill from the cab. Mirror from under or remote reservoir is about the only two options.
If you look down through the original fill hole all you can see on mine is the mounting bracket, so you have the rest of the bracket, the booster and then the master behind the original fill hole.
Master on the left, original 56 fill hole on the right.
Awesome input you guys. Sure is a good source to share information. That reservoir is really back there a long ways from stock. Seems like it might be difficult to get the lid on and off? After seeing the photos above, I'm leaning towards a nice billet reservoir hanging off the firewall or inner fender with braided hoses to the master. A small easy to access remote fill would look better (in my opinion) than the firewall mounted master and all the hardware that attaches to it. I did find some nice remotes and braided hoses for under $200. Nice thing about that option is it can go to the bottom of the wish list and added any time, if and when service underneath is to much PIA.
I guess this is the only pic I have the others show you a lot better but it is still easy to check with mirror. I am in the middle as to do a remote or not let us see some pics if you go on the firewall.
Will do Artscott, meanwhile your killing me. I have saw several photos you have posted of your build. Right above the right exhaust pipe and beside that red wire or tubing, there is a silver finned apparatus. What is that?
That their is a transmission cooler unlike a wine cooler. It was on from the po a lot of this truck was done from the p o but then a lot was not. To each his own so I had to get rid of some of the god awful green paint (worse than John Deere). But for the most part I am having fun with it and that is what it is all about. We all have our own ideas and that is fun. Outlaw 56 have fun
 03-22-2017, 05:50 PM