When you click on links to various merchants on this site and make a purchase, this can result in this site earning a commission. Affiliate programs and affiliations include, but are not limited to, the eBay Partner Network.
no start condition....and everything was going so well
No start condition
Truck completed about a 600 mile trip this weekend, no issues.
Started the truck up for daily commute, no issues.
drove for little over 30 minutes, no issues.
stop to get some breakfast, no start.
cranks, no fire.
from Torqpro:
2005 6.0L 140K 4X4
Oil change about 1100 miles ago, switched to Del 400 5w-40 syn, ford filters all around, no issues.
Had some charging issues due to rodent damage, resolved by Ford dealership about 3K miles ago.
purchased used, 3 months ago.
Truck is currently in parking lot. I'm at work. I'm going to check on it at lunch and I will have some basic tools. I guess the plan is to try and get it home.
Thanks in advance.
Mike
Last edited by flysniper; 02-20-2017 at 08:53 AM.
Reason: clarification
If it cools down enough before you go back to it it may just start. But if it doesn't then try unplugging the ICP on the passenger valve cover (it is towards the front of the valve cover, you can't miss it). Sounds like you have a high pressure oil leak but it is probably still small enough to only cause starting issues when the oil is hot (thinner). Unfortunately while you might be able to get it home you will still need to fix the HPO leak because it will only get worse. Usual suspects for your truck are are snap to connect fitting on the back on the high pressure oil pump, stand pipes, or dummy plugs. If it hasn't been updated already it is likely the snap to connect fitting on the back of the oil pump.
That pretty much confirms that you have a HPO leak. It likely won't start next time you shut it off until it cools off again.
Unfortunately the system should easily be able to build enough pressure with hot 5w-40 to fire. You have a mechanical issue, the only way to fix it at this point is to fix the leak. Do you know if the snap to connect fitting has ever been replaced?
Referencing previous post, I did have charging issues, but that was diagnosed as the rodent damage. The alternator was replaced but I don't think that was the root issue.
I would not consider myself as a mechanic but I do fancy myself as mechanically inclined. And, I have trust issues with other people working on my vehicles. And, I am not dependent on the truck. And I like working on my vehicles. SO, with good resources and the correct tools, I like to think that this is something that I might be able to accomplish.
So if you have any good resources, send them my way. I'd be happy to review them. I've already reached out to google and 'he' is a little overwhelming but that is to be expected.
Some folks will say to start with an air test and that isn't a bad idea. Personally I haven't had good luck air testing and you need Ford IDS to do it properly, I think you can also do it by getting a new pigtail for your IPR and and applying 12 volts to it but you will want to research that method more if you go down that road. Personally since you don't know if the STC fitting has been replaced before I would start by tearing it down and inspecting that fitting. You can search youtube for a video to replace the fitting but basically it is remove intake hoses, remove turbo, remove high pressure oil pump, replace fitting, reassemble. There are some special instructions in there specifically regarding the turbo drain tube. Below are the instructions for actually changing the fitting. Do you know what your EOT ECT delta was when it was running?
Replace STC
NOTE: AN AIR LEAK ON THE HIGH PRESSURE OIL PUMP SHAFT LIP SEAL IS NORMAL. THIS IS NOT AN INDICATION OF A HIGH PRESSURE OIL LEAK AND THE HIGH PRESSURE OIL PUMP SHOULD NOT BE REPLACED FOR THIS CONDITION.
Remove the high-pressure oil pump per WSM, Section 303-04C.
NOTE: DO NOT REMOVE THE BRANCH TUBE ASSEMBLY OR REAR COVER.
Mount the high pressure oil pump securely in a vise.
NOTE: IF THE HIGH-PRESSURE OIL PUMP AND BRANCH TUBE ADAPTER HAS AN ASSEMBLY SUPPORT BRACKET, REMOVE AND DISCARD THE ASSEMBLY SUPPORT, AND ALL ATTACHING HARDWARE. THIS WILL NOT BE REUSED.
Remove (unthread) the existing branch tube adapter and STC or jam nut fitting from the high-pressure oil pump. Discard either type of branch tube adapters.
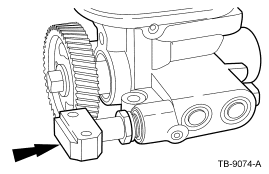
Remove the dowel pin. (Figure 7)
Figure 7 - Article 08-18-6
NOTE: IT IS NOT NECESSARY TO REPLACE THE HIGH PRESSURE PUMP WHEN REPLACING THE QUICK CONNECT FITTINGS.
CAUTION: TO PREVENT ENGINE DAMAGE, MATCH NEW O-RINGS WITH THE O-RINGS REMOVED. SEVERAL O-RINGS ARE SIMILAR IN SIZE, BUT WILL NOT SEAL IF USED IN THE WRONG LOCATION.
Prior to installing the new jam nut fitting, lubricate the entire jam nut fitting with clean engine oil, rotate the jam nut clockwise to the base of the branch tube adapter. The adapter is threaded to the jam nut. (Figure 8)
Figure 8 - Article 08-18-6
CAUTION: THE BRANCH TUBE ADAPTER MUST BE INSTALLED AT THE CORRECT DEPTH TO PREVENT HIGH PRESSURE OIL LEAKS.
Install the branch tube adapter into the high-pressure oil pump by threading it five (5) complete turns to set proper depth and set proper orientation. Tighten the jam nut to seat the O-ring at this time. (Figure 9)
Figure 9 - Article 08-18-6
CAUTION: TO PREVENT ENGINE DAMAGE, BRANCH TUBE ADAPTER OIL OUTLET HOLE MUST FACE DOWN.
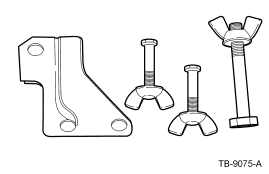
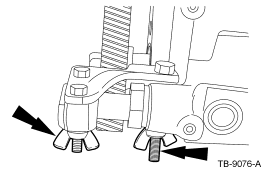
Loosen the jam nut 1/4 turn. Install holding tool using the supplied plastic bolts and wing nuts to align and position the jam nut fitting. (Figures 10 and 11)
Figure 10 - Article 08-18-6
Figure 11 - Article 08-18-6
With plastic holding tool securely fastened, torque jam nut to 49 lb-ft (66 N-m) with a 15/16 crow foot open end wrench and torque wrench.
NOTE: TORQUE SPECIFICATION FOR STEP 8 IS CALCULATED FOR THE USE OF A CROW FOOT OPEN END WRENCH.
Remove and discard holding tool, plastic bolts and wing nuts.
Install the new dowel pin provided in kit.
Lubricate and install a new O-ring in the branch tube inlet recess and in the high-pressure oil pump inlet recess.
CAUTION: TO PREVENT ENGINE DAMAGE THE OIL SUPPLY HOLE IN THE BRANCH TUBE ADAPTER MUST FACE THE BRANCH TUBE ASSEMBLY.
Install the high-pressure oil pump with branch tube adapter already installed. Use new bolts supplied in kit. Finger tighten the three (3) M 8x45 bolts securing the high-pressure oil pump to the crankcase and the two (2) M 6x30 bolts holding the branch tube adapter to the branch tube.
NOTE: NOTICE BRANCH TUBE ADAPTER TO BRANCH TUBE HOLE MISALIGNMENT IN MOST CASES THERE IS ENOUGH CLEARANCE IN THE BRANCH TUBE ASSEMBLY AND HIGH-PRESSURE OIL PUMP ASSEMBLY FOR PROPER HOLE ALIGNMENT. IF UNABLE, TO ALIGN HOLES THE BRANCH TUBE ASSEMBLY WILL HAVE TO BE REPLACED. (FIGURE 12)
Figure 12 - Article 08-18-6
Tighten three (3) M 8x45 bolts securing the high-pressure oil pump to the crankcase to 23 lb-ft (31 N-m)
Tighten two (2) M 6x30 bolts that hold the branch tube adapter jam nut to branch tube to 97 lb-in (11 N-m). Pressure test to verify repair and go to Air Pressure Testing (Pump). After STC replacement to verify no other leaks are present.
Air Pressure Testing (Pump) - After STC Replacement
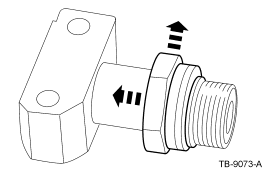
Remove the ICP adapter 303-765 from the ICP port, install the ICP sensor, Tighten to 9 lb-ft (12 N-m) if it was removed.
Install IPR valve.
NOTE: BEFORE PERFORMING TEST PLACE THE TURBOCHARGER OIL FEED TUBE INTO A SUITABLE CONTAINER TO CATCH THE ENGINE OIL.
Disconnect the fuel injector control module (FICM) relay.
Crank the engine to prime the oil system.
Repeat Air Pressure Test (ICP).
If no leaks are found, reconnect the FICM relay, check engine oil level, and refill as required. Return to customer.
If leaks are found, proceed to Step 6.
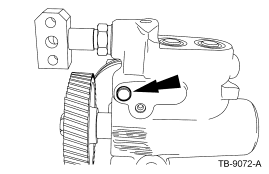
Remove and discard M 12 plug from the top of the high-pressure oil pump. (Figure 4)
Install ICP system test adaptor 303-765 in the top of the high-pressure oil pump. Attach shop air hose to the test adaptor. (Figure 5)
Apply shop air at 100 psi (689 kPa) maximum to the high-pressure oil pump.
Using IDS command IPR closed.
Listen for air leak.
If no leak is found, remove the test adapter and install the new M 12 plug provided in service kit. Tighten M 12 plug to 26 lb-ft (36 N-m). Reassemble the vehicle, check engine oil level, and refill as required. Return to customer.
If a leak is identified in the branch tube, use the Branch Tube Replacement Procedure for F-Super Duty and Excursion. Econoline refer to WSM, Section 303-01C.
If a leak is identified under the valve covers, remove the test adapter and install the new M 12 plug provided in service kit. Tighten M 12 plug to 26 lb-ft (36 N-m) and go to Under Valve Cover Leak Test procedure.
Flysnapper, I'm glad you're doing this. WARNING!!! It's addicting .
There is a great Diesel Tec Ron Video on doing this step by step. Besides you've got FTE on your side.
I didn't really do anything after the last event so I'm not surprised. I wanted to see what would happen. It went a lot longer than I though it would to be honest.
Looks like in in the market for STC replacement. I'll probably add dummy plugs, stand pipe, blue spring replacement and coolant filter. I will be doing some research on EGR delete (leaning toward welded plugs) And if its in the budget (probably not) a FICM refresh and exhaust replacement.
 02-20-2017, 08:51 AM


 .
.
