When you click on links to various merchants on this site and make a purchase, this can result in this site earning a commission. Affiliate programs and affiliations include, but are not limited to, the eBay Partner Network.
My DIY story Excursion fuse box GEM disassemble, clean, reinstall due to water leak
Hello. I'd like to share the experience I had removing, dismantling, cleaning, reassembling and reinstalling the fuse box and GEM due to a water intrusion leak that originated from my windshield. The vehicle is a 2001, 4X4 XLT Excursion v8 5.4. I'll explain the symptoms that led up to me undertaking the project and post photos during each step. Although I may not use correct terminology ie. calling an electrical plug when it should have been referred to an electrical something else. So please have a heart and excuse my mistakes. For a DIY guy like myself, it was challenging and rewarding, plus, saved me a ton of money!
NOTE: Before I continue, I feel a need to mention that I'm not trying to �reinvent the wheel�. There is a plethora of resources available I used to guide me through this project. I'm simply sharing my experience. If you to are experiencing problems like extreme parasitic battery draw, unusual equipment functions, if your vehicle seems to have a mind of its own, you may have the same problem I had and if so, I hope by reading the journey I took to remedy the malfunction somehow helps you.
Like so many owners of these vehicles, including myself, exterior water intrusion seems to inevitably become an issue. As a result, strange and unexplainable idiosyncrasies slowly begin to creep up with the electronics. The funny thing is, I had a water leak for years but didn't know it because the leak was so small, it didn't expose itself in ways you would think. Wet headliner or carpet for example. But what little water that was leaking found its way to the fusebox and through time began causing havoc. At first, subtle quirks like� the AC/heater blower motor would keep running after turning off the ignition unless I turned it off first before the ignition. The power door locks would cycle lock/unlock for a brief moment on their own. There were other strange occurrences as well but since they happened so infrequently, �once in a blue moon�, and didn't affect my ability to get from point A to point B, I'd shrugged them off not knowing that eventually the day would come when I would have no choice but to fix it.
Needless to say that day finally came when my wife called me from a shopping mall parking lot complaining that the truck wouldn't start. It cranked over like normal but wouldn't start. When I arrived I couldn't start it either. After removing then replacing the battery cables it started right up. I'm assuming something reset. At home I tinkered around with it then drove to work in another vehicle. Next morning, the one month old Interstate battery was dead. Volts down to 7. After fully recharging it I checked the parasitic amperage and it was through the roof. 5.0 amps! Yes, 5.0 and not milliamps. The leeds on my multimeter were even warm.
The current draw disappeared after removing fuse #15 and wouldn't you know it, amongst other components, the GEN was apart of the loop. So I did my research and came to the conclusion that the GEN may be damaged due to water intrusion. While I was snooping around the area of the fuse box I noticed the E-brake had small drips of water on it which gave me confidence I was going in the right direction.
Here's what I did to remove the fuse box/GEN:
� Removed the battery cables
� Tools required - �� drive ratchet with long and short 10mm sockets
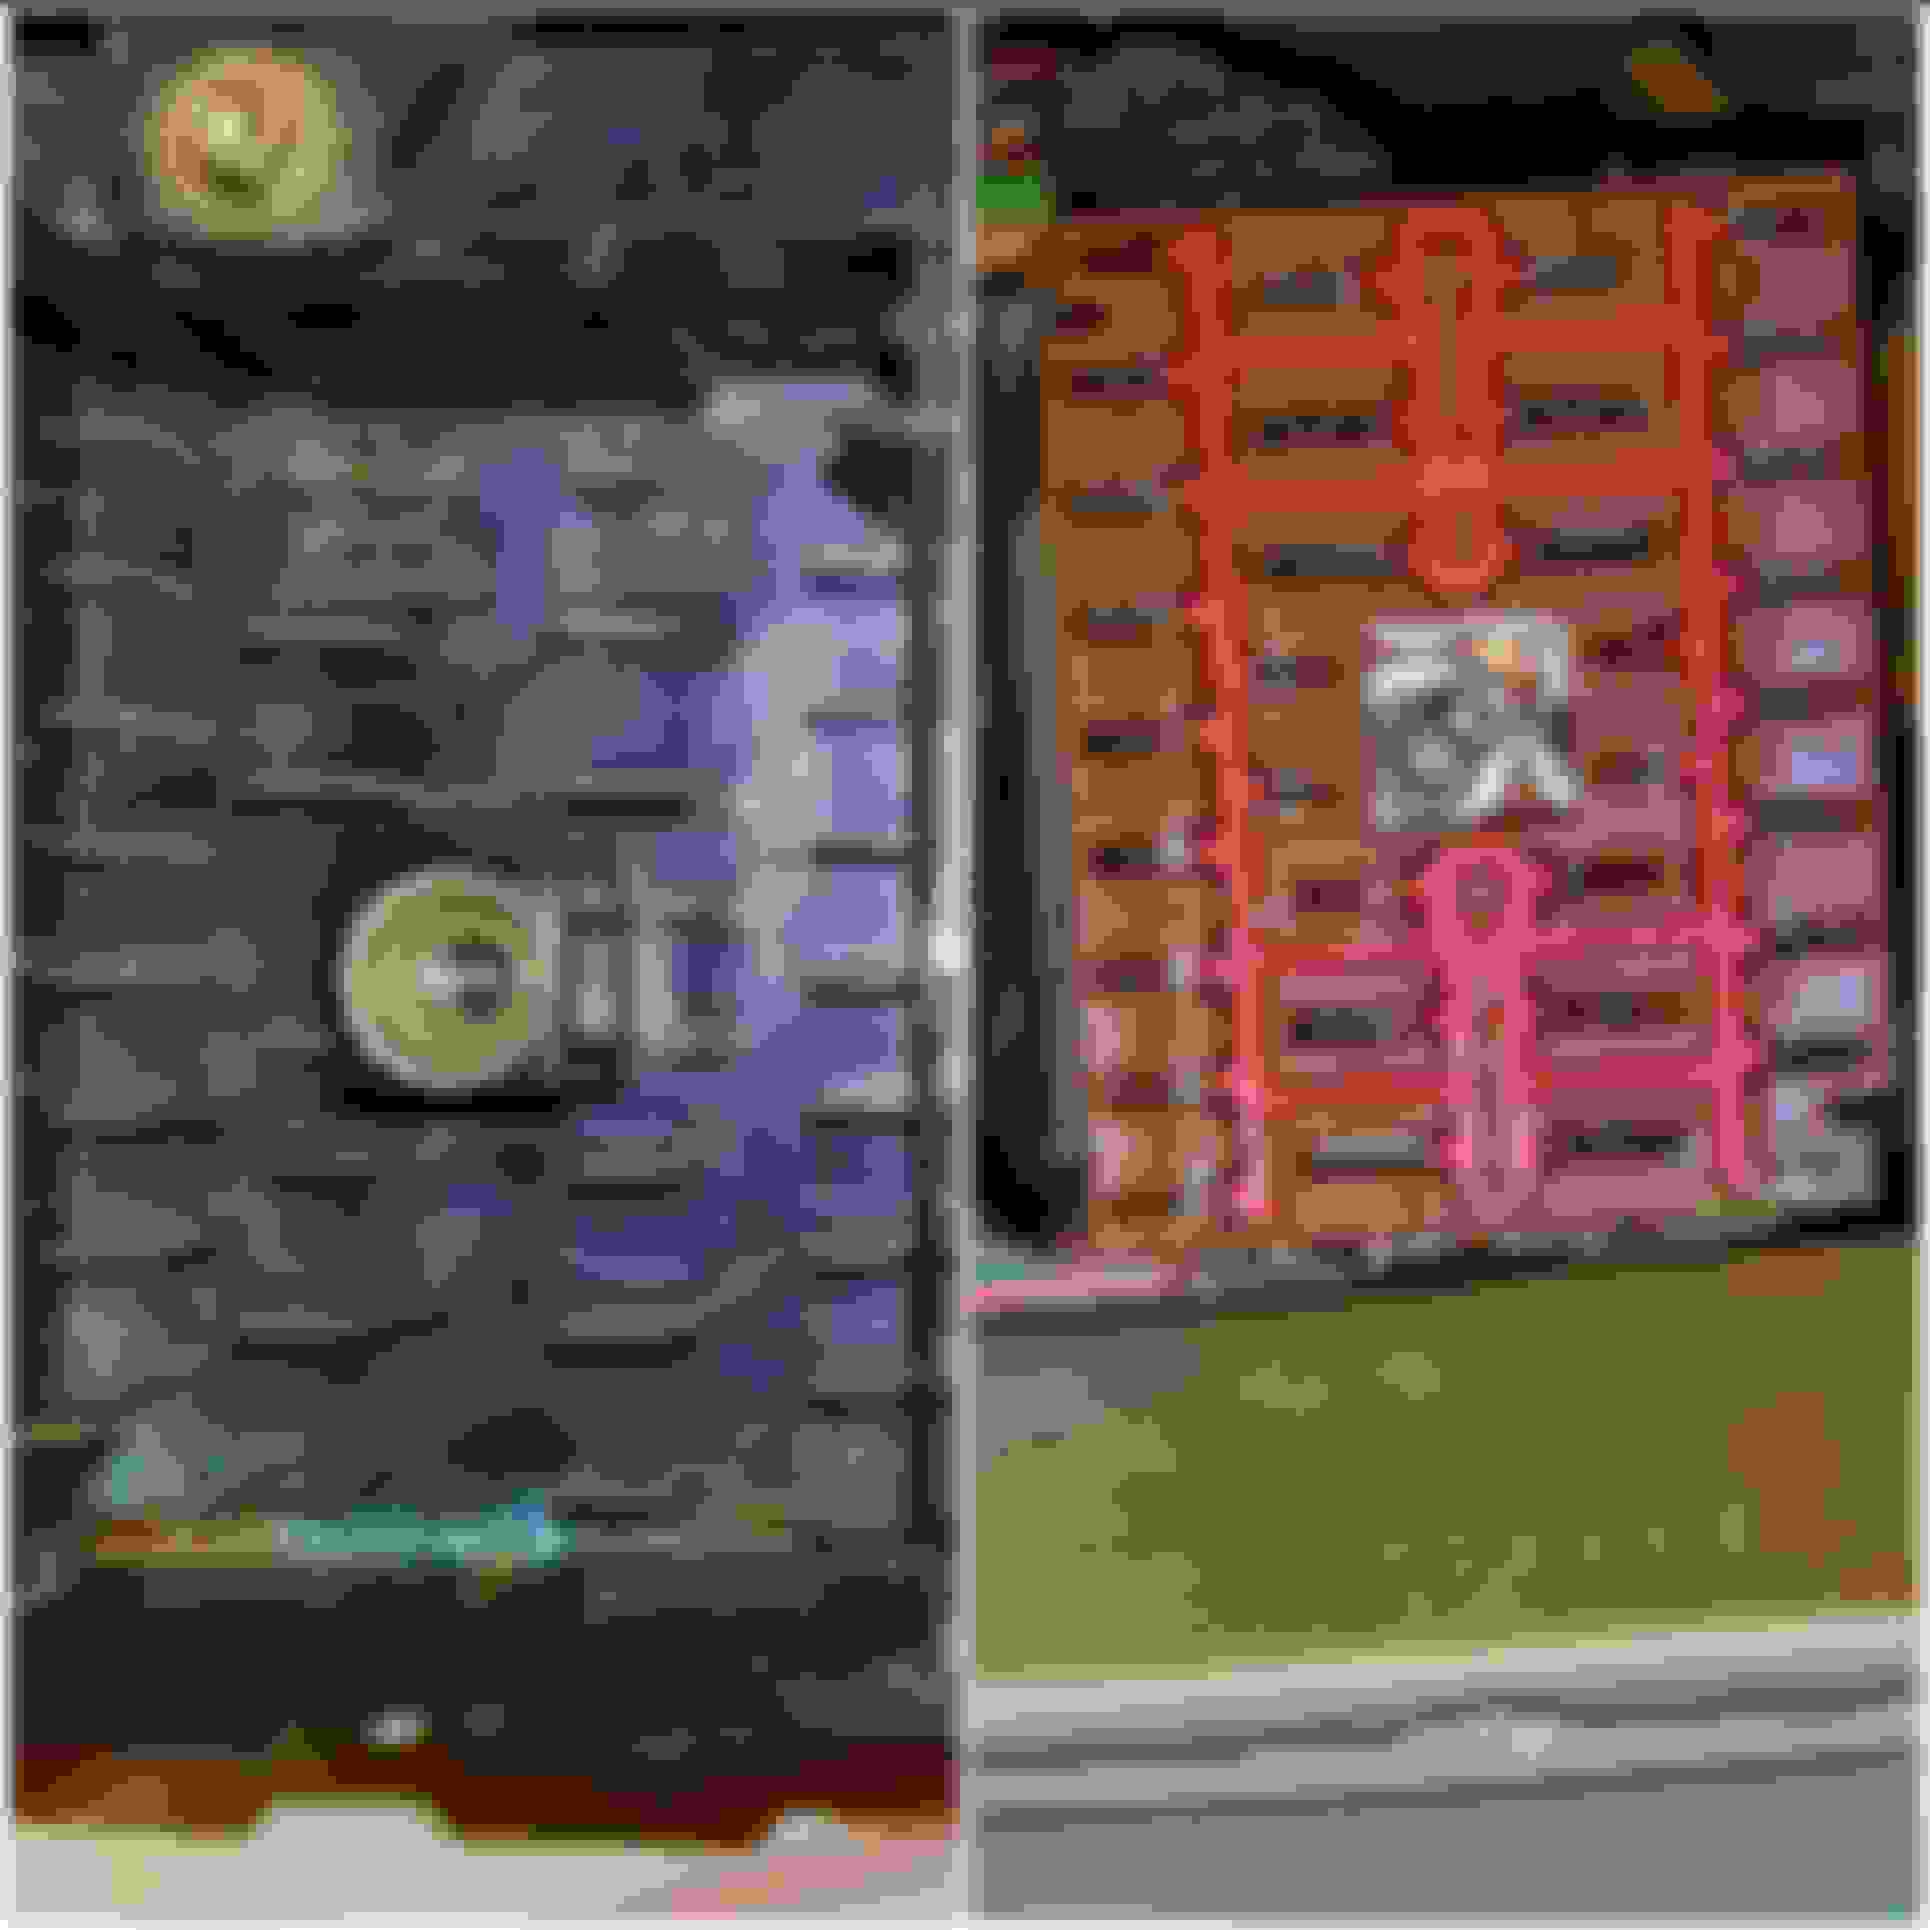
See photo. You will also be removing the E-brake release bracket and letting it hang down. Makes more room to move around. Removing the fuse cover also makes more room when maneuvering the fuse box out.
After removing the highlighted nuts and bolts in the photo, before you remove the box, you will need to unplug 5 electrical sockets from the box (2 behind and 3 on the left). Behind the fuse box are two electrical sockets that bolted into the lower part of the fuse box. While lying on your back with your legs hanging out the door, feel around the center of the plugs for their hold down bolt. I used the short 10mm socket to loosen. After you pull out both sockets, maneuver them completely out of the way in the area of the left wall.
There are 3 more electrical snap in type plugs to remove. To get to them, carefully start pulling back the box and bring it straight down as far as it will go to expose the 3 plugs located on the left side of the box and disconnect them.
Wallah, the fuse box is now out.
So I bring the box to the work station in my house and the first thing I notice is, the prongs that the electrical plugs plug into are corroded and rusty. I opened the cover to the GEN with fingers crossed the circuit board didn't have the same appearance. And to my luck it was free from water intrusion!
To tell you the truth, I really wasn't looking forward to disassembling the entire fuse box and was hoping by simply cleaning just the prongs and their plugs in the cab would solve the ground fault problem. So I cleaned them using an electrical solvent, an emery board and 100 grain sand paper. Afterwards, I reinstalled the fuse box and the truck started right up. I drove it around to let things reset, then parked it and checked to see if the current draw was gone and to my delight it was.
I was happier than a pig in mud! After allowing the battery saver relay to reset (I think that's the term) an hour or so later I opened the driver door only to find all the instrument cluster idiot lights were lit up along with some other things. The truck started right up but when I shut it down everything else stayed on. I again checked for current draw and it was normal, 4 milliamps.
So my electrical short was repaired but there was obviously something more going on within the fuse box and possibly the GEN. Luckily, I had another means of transportation because I had a feeling this problem wasn't going to be resolved as quickly as the ground fault. Which BTW took half a day.
So I removed the fuse box again and started to disassemble it while snapping photos during each step to use as a reference when reassembling.
Step 1- Remove the GEM from the fuse box by unscrewing the 3 star screws and gently, but firmly, lift the GEM up off the FB being careful not to break the electrical connector.
Step 2- Remove all fuses and relays
Step 3- Remove the cover by using a small screwdriver around the edges prying it loose.
Step 4- Remove every connector. I found using a dentist tool by inserting it into the small holes of the connectors and moving them around while prying up worked great. Don't forget to snap a photo before hand for a reference when replacing them.
Step 5- Refer to photo. See those two studs. One side (female) used to bolt down the 2 electrical connectors to the box inside the cab and the other side to secure the box to the cab. Before you can dismantle the box any further the studs must be removed.
Look closely at the following photo. You will notice that the female side is tapered at the top. You need to grind down that taper just enough to tap out the studs. I used a large drill bit then screwed in a bolt and taped on the bolt to remove the studs.
CAUTION: Pay close attention to the threads inside the studs. Do not damage them while removing the bevels!!!
NOTE: If for any reason you need to remove the fuse box after reinstalling in your truck, due to you removing the bevels, the studs will push out when unscrewing the electrical plugs on the back. You will have to tap them back into place to remove the electrical plugs. By tapping them back in place, pushes the electrical plug out far enough for you to hold and pull out.
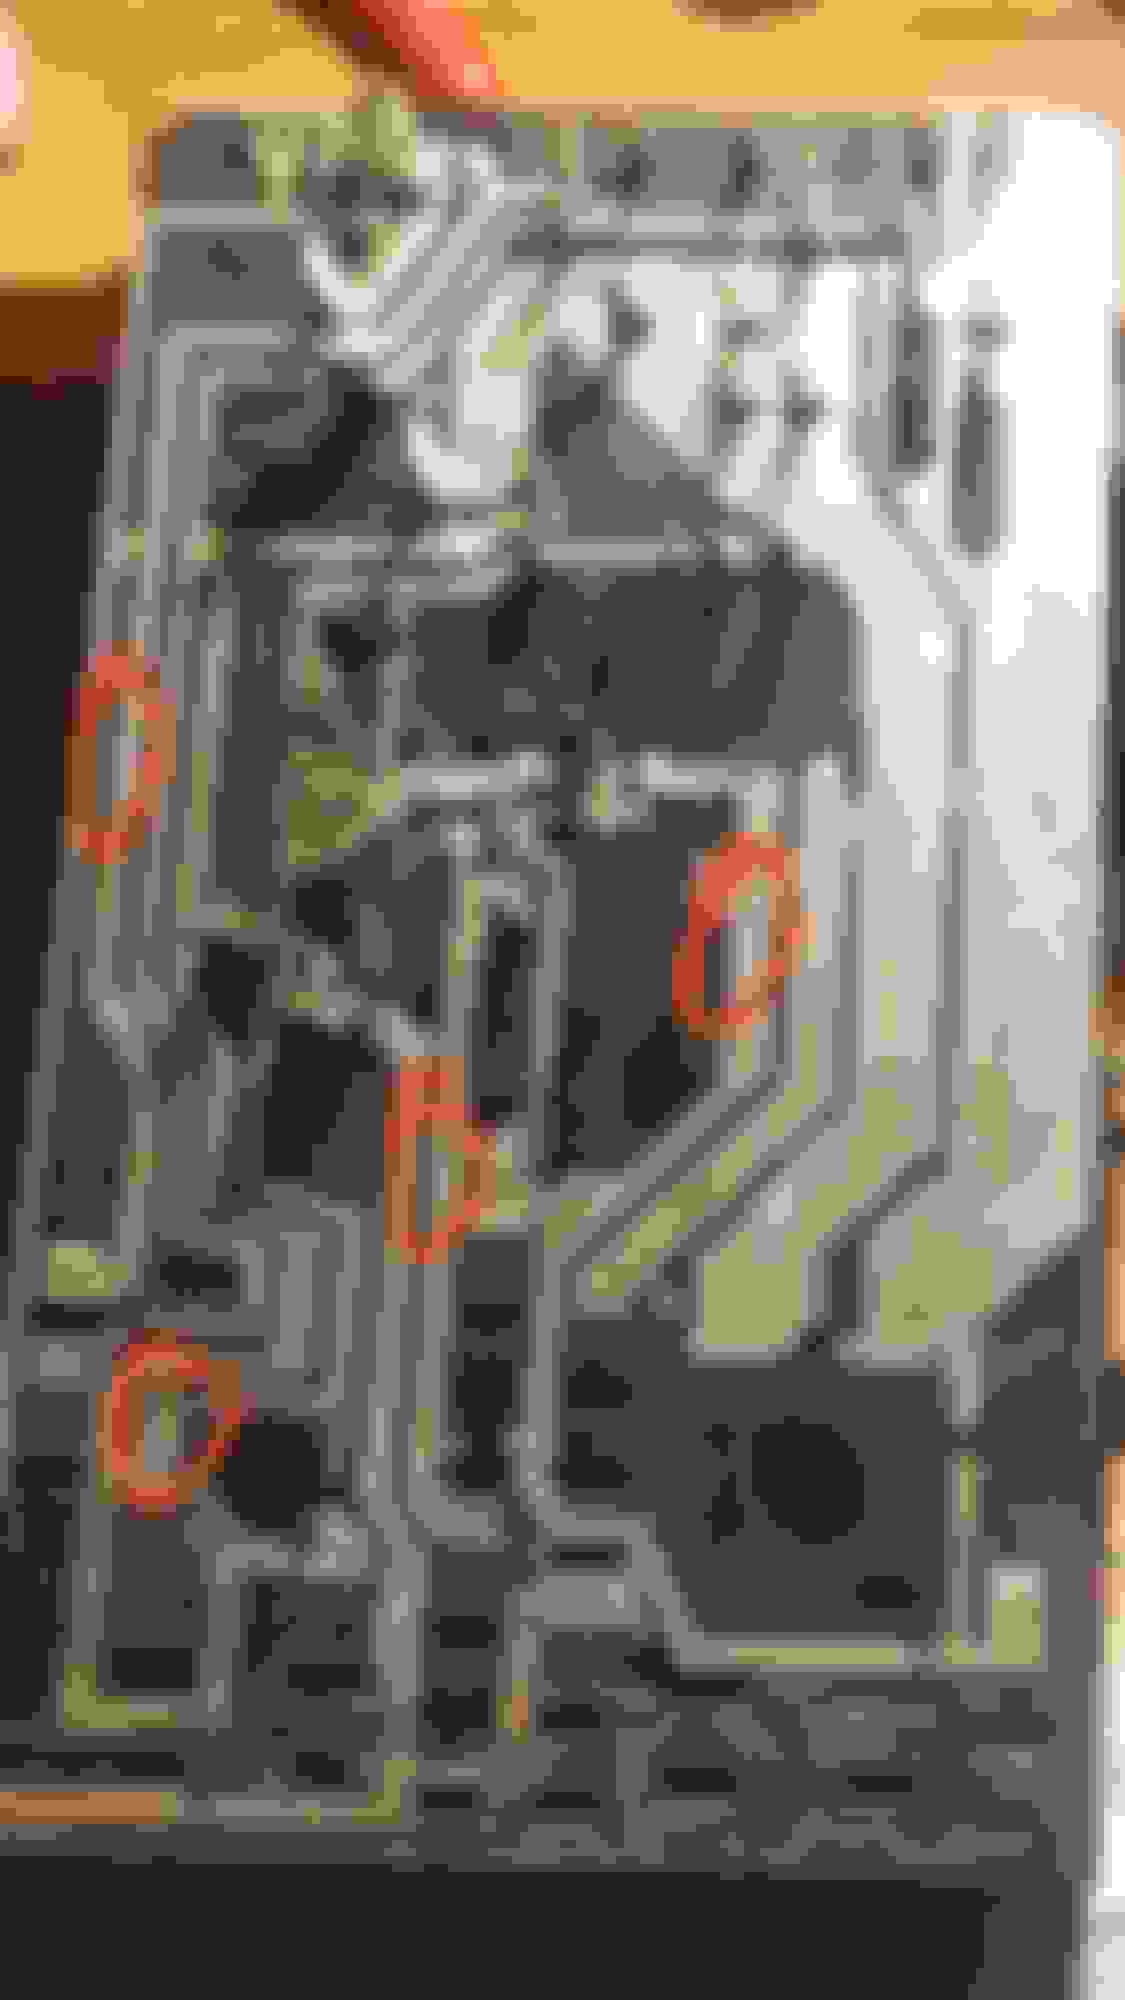
Step 6- Opening the fuse box. Work around the box with a screwdriver by unsnapping the tabs. Once the cover is loose, slowly wiggle it up while the same time pushing down on the electrical prongs sticking out. Be careful not to damage the internals.
NOTE: There are a total of 6 layers inside with the bottom one permanently attached to the box. Remove the 5 others up off the affixed one together as one unit and set aside.
Step 7- Separating the layers. Starting from the top, separate each layer one at a time. Mark each layer as you separate them and set aside. Don't forget to snap a photo of each layer.
NOTE: Notice the corrosion on the electrical runners as a result of water intrusion. It's concentrated on the lower portion of every layer where the electrical plugs bolt into the sockets. Obviously, water has migrated down the wire looms passing through the the center of the plugs, through the prongs the plugs attach to and into the internals of the box.
Step 8- Removing each electrical runner from their boards. This is where a steady hand and patience is key. The runners are extremely thin and flexible. If you were to severely bend them, especially crease them, straightening them back into shape before you place them back is a chore you don't want to deal with. Take it from me.
TIP: Work with one layer at a time to avoid the possibility of mixing up the parts. Personally, I dismantled, cleaned and assembled a layer before proceeding to the next layer.
Refer to photo below. Each runner is indexed as well as the space they are attached to. In addition, there are multiple tabs that keep each runner in place. Once again�. Have patience, steady hands. Don't bend the runners while removing them.
Once you have removed all the runners from the board, clean them including the board. I soaked them in a saturated salty white vinegar solution for a half hour then a bath of water mixed with baking soda to neutralize them. I also used a scouring pad and 100 grit sandpaper for the stubborn areas. I read that it's not good to use something like a brake cleaner product on the board. So I cleaned the board layers with the same solutions I used with the runners. Thoroughly dry all components before reassembly. The photo below shows all the runners replaced in their proper location on the boards with the exception of the last board. All parts have been cleaned.
Step 9- Installing the runners. I found this task rather tedious. After struggling with trying to maneuver each runner around their keepers that hold them in place, I finally decided to snip off some of runners corresponding keepers with a box cutter and with electrical black tape, tape them in place being careful not to tape over another runner and possibly creating a short circuit. See photo below.
TIP #1: Ensure the prongs sticking out of the runners are straight.
Tip #2- After you have completed replacing the runners, place each board on top of a bowl or something because the runners attached to them have prongs that stick out of the boards and if you place them on a flat service, the runners tend to pop off the board.
Step 10- Assembling the boards to one another. Starting with the bottom board #6 that's permanently attached to the fuse box, place the next board on top of it and so on until all 6 layers are back in place.
NOTE: This is another step that requires patience. Take your time aligning the prongs into the corresponding slots of the next board. You will find that some of the runners on the board you are installing will have a tendency to pop up. Just place a finger on those runners as you gently push the layer down into place.
Step 11- Now that all 6 layers are in place, pick up the assembly and pace it up in front of your face. Observe the prongs at different angles and even look down at them. Ask yourself whether or not the electrical plugs will attach to them. Are they crooked, bent? If so, now's the time to straighten them with a needle nose plier?
Step 12- Attach the cover over the layers while aligning the prongs sticking up on the multilayer board to slits on the cover and snap the cover in place. Inspect the prongs again for proper alignment and tweak if necessary.
Step 13- Reassemble the rest of the fuse box and install it in your vehicle in reverse order. Refer to the steps taken earlier and your photographs.
So that's it. I hope someone got something out of this. By the way, after installing the fuse box my truck started right up and I have not experienced any more hickups with the electrical system. As for as the water leak, I'll leave this thread with a synopsis of my discovery. Thank you.
Today while the wife was in the cab, I took a garden hose and methodically concentrated on wetting small areas at a time with the thought there may be more than one source being I have at least 2 leaks.
I began my search for the water leak by wetting the passenger side, lower front windshield and wiper cowl concentrating the water a couple feet towards the drivers side for a few minutes. While doing so, my partner in crime after searching high and low gave me the thumbs up to move on.
After covering the entire lower portion and receiving multiple thumbs up, I started to wet the roof just above the windshield passenger side. Like the lower side, I spent a few minutes wetting the area before moving on. Once I got to the center all heck broke loose. Water started pouring down from the rear view mirror right into the center console cubbie. And the area around the E-brake started to show signs of water but nothing like the mirror. Unfortunately, it was starting to get dark and began to rain so I was unable to continue but another thread of mine specifically about the water leak, someone suggested the area where I discovered the water leak is rusted under the weather stripping.
Last edited by Stewart_H; 07-08-2018 at 08:17 PM.
Reason: Thread title edit (SP)
Excellent write up, well written and awesome photo documentation!
This will no doubt be a huge help for many folks in the future.
Reps sent, wish I could rep you multiple times for this one!
@Stewart_H I think this one NEEDS to go in the Tech Folder.
In all seriousness though this is an impressive job well done, and much gratitude for selflessly making an already tedious job even more tedious by documenting it for our benefit.
Fantastic write up! Thanks for taking the time to document and share. Got my fingers crossed I won't need to use as a reference though, LOL! Reps pending.
As you must know I'm a newbie to this incredible site. The information, stories and whatnot is unfathomable. Who needs Google to search for answers to your Ford vehicle questions when we have FTE!!!
Most of all, I would like to thank each and every one of you for your outstanding feedback. I'm trying to get up to speed about how to get around the site and understand things like "reps". I'm humbled after reading an explanation of what reps are and cannot thank you all enough.

 01-20-2017, 01:24 AM