
2016 F-250 Platinum Build
#1
 10-21-2016, 10:48 PM

Join Date: Sep 2016
Posts: 242
Likes: 0
Received 0 Likes
on
0 Posts
2016 F-250 Platinum Build
Been posting pieces but I will start this thread an put all my bits in here, have a lot to do to the truck over the next 6 months or so and might as well keep it in one thread, I will also copy the other two or three pieces in here at some point so you may see a few posts you have seen before but it will keep it all together.
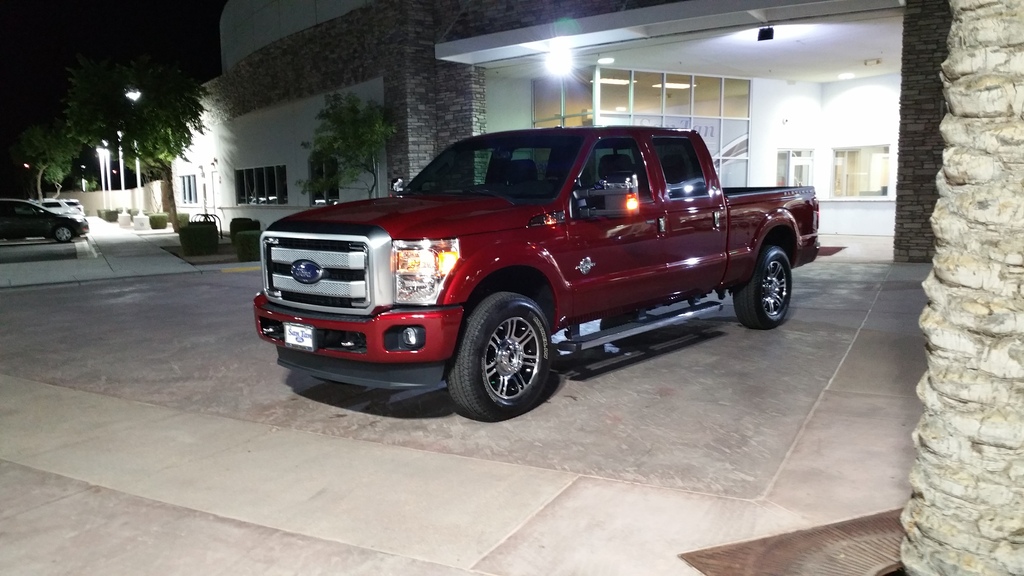
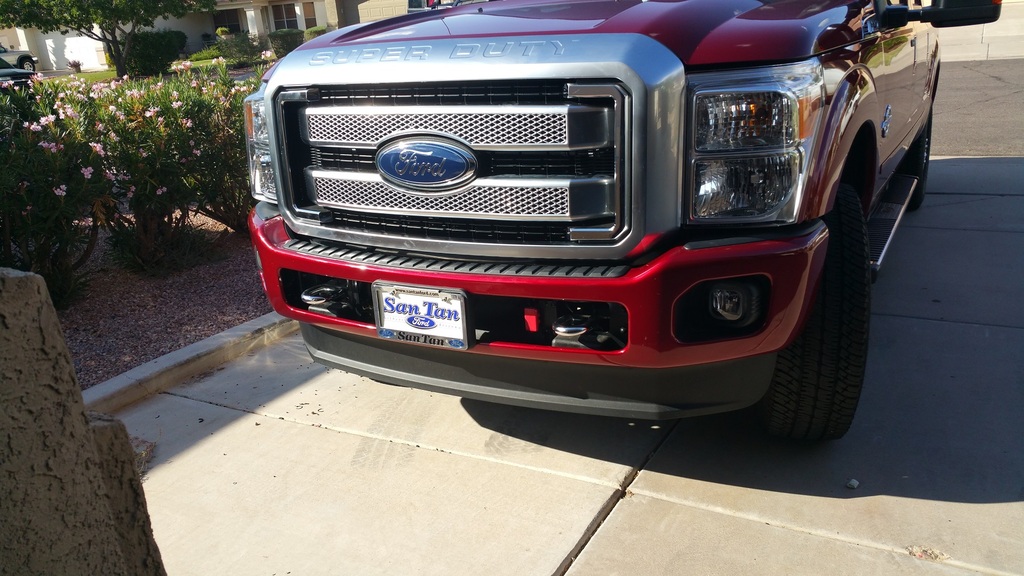
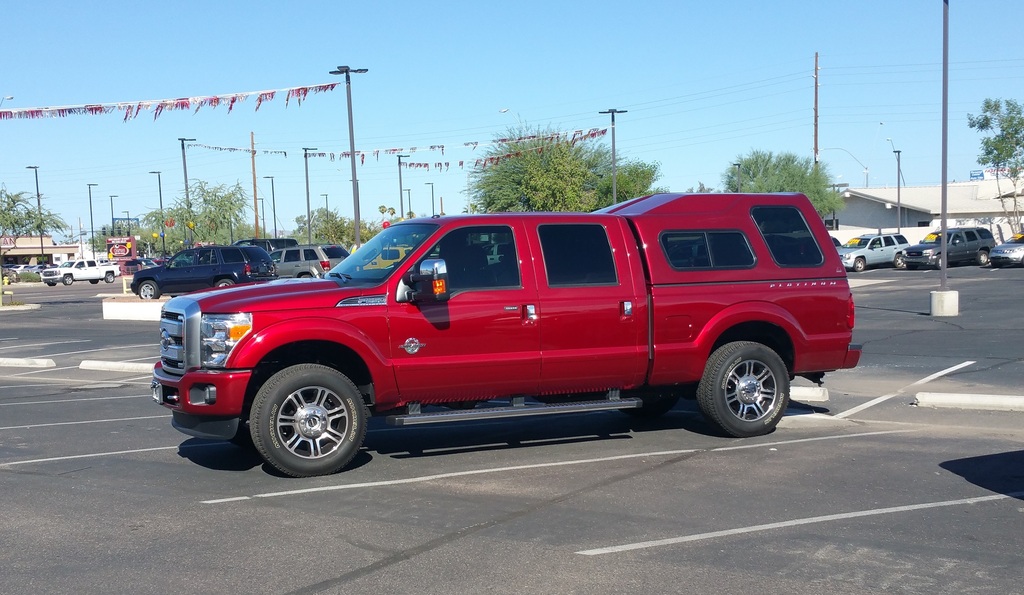
So, truck is about a month old now and have almost 2K on her. Wife calls her Ruby due to the ruby red color and it seems to be sticking. We bought Ruby brand new as a 2016 closeout, she is and F-250 CCSB 4x4 diesel with most of the options, we like them nice for traveling. Lots of plans but I am not going to do the norm and list them all out, just post them as I go. Due to a fight with cancer I can not off road any more so this one won't get lifted or hard cored at all.
Her baby picture
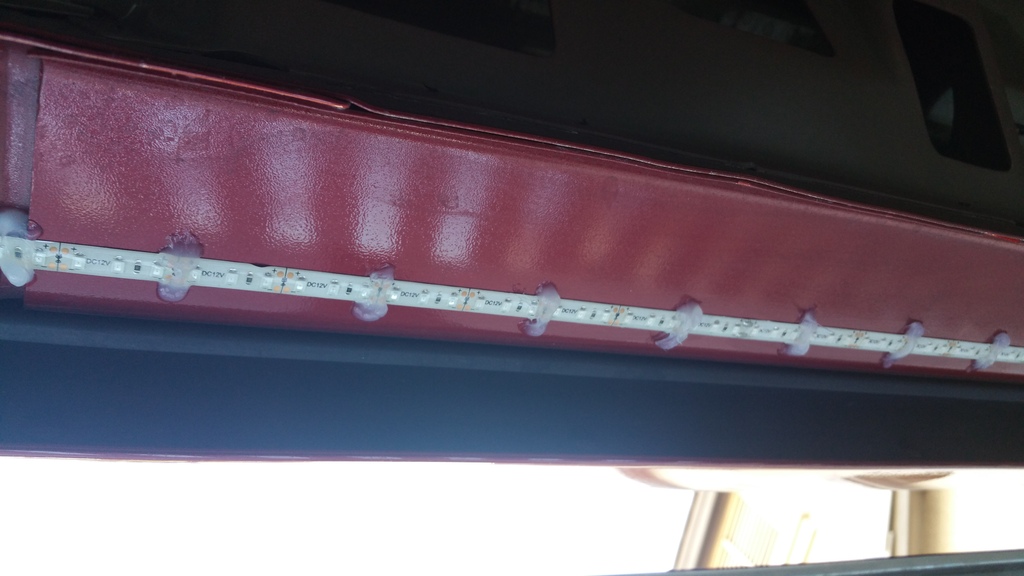
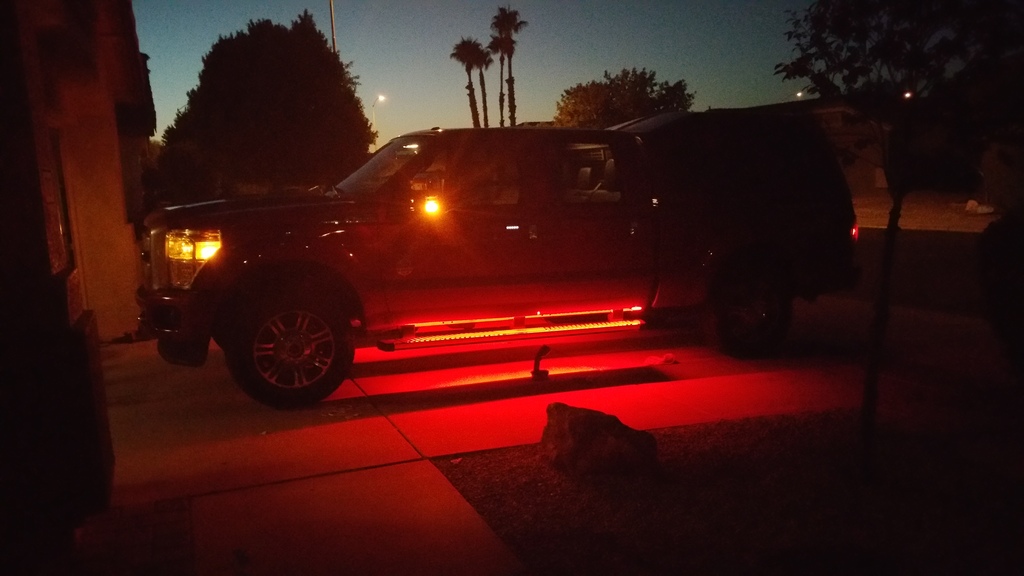
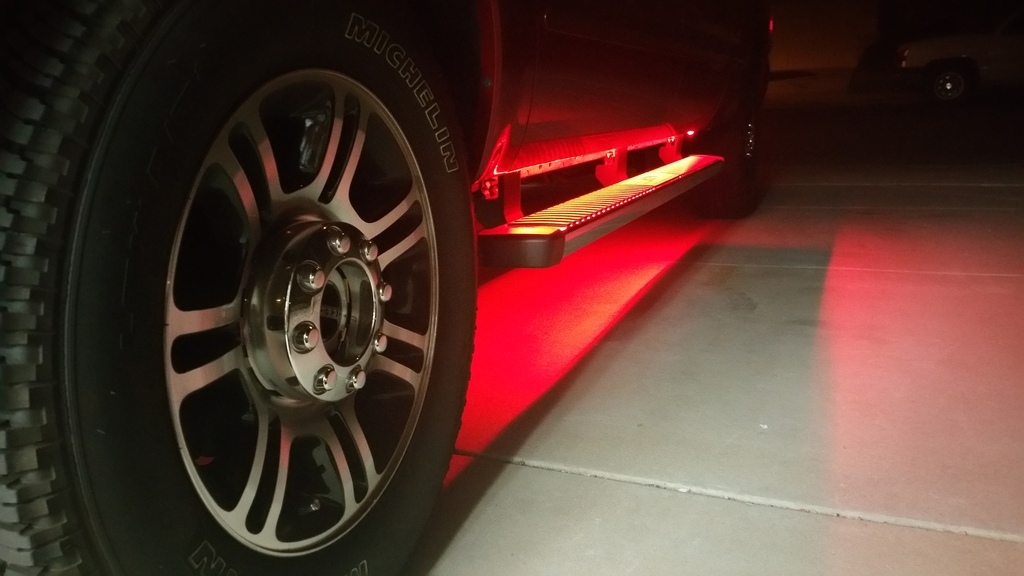
Tonight was the task of side/running board lights. I do some playing with LED strip lighting on motorcycles and other vehicles so I ordered a couple reels of high intensity red.....SMD Waterproof Led Strip Light 3528 600leds Red....Cut two strips the just under the length of the cab and soldered clip plugs on the end.
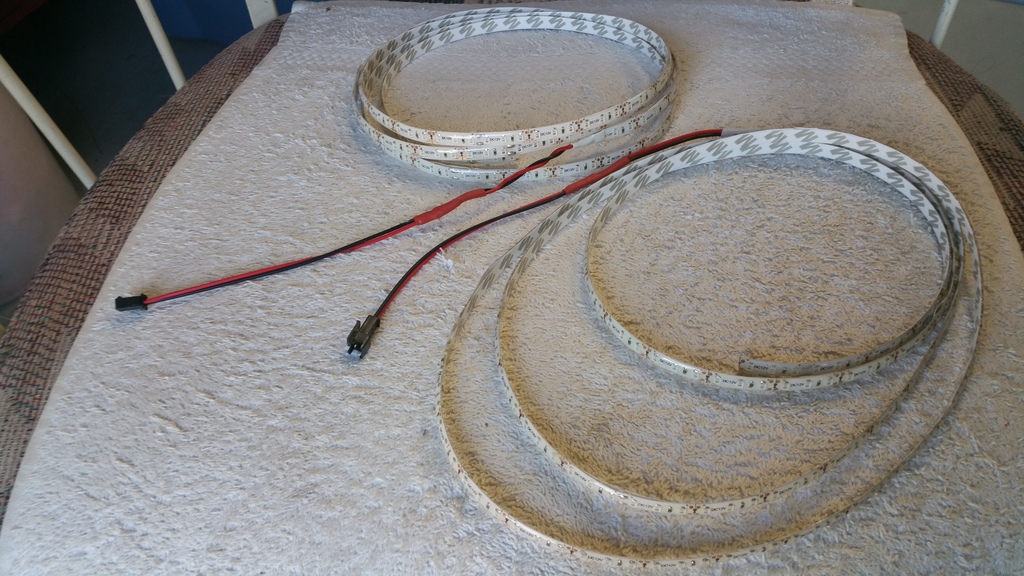
Cleaned off the lower cab area behind the doors, above the running boards and wiped them down with alcohol pads then attached the LED strips with the plug toward the back of the cab.
With both strips stuck in place, I went back and "stiched" them every 2" to the truck with exterior silicone so if the 3M tape gives way, the silicone will hold them in place
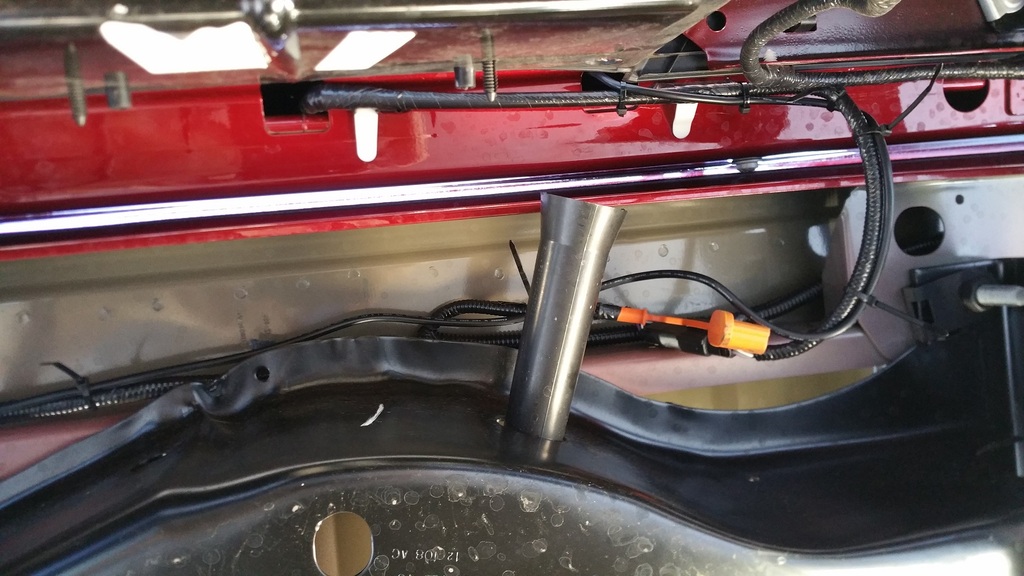
Based on another thread here, I ordered the plugs for the factory running board harness connection...
https://www.amazon.com/gp/product/B0...?ie=UTF8&psc=1
These are speaker plugs but fit the harness I needed. Since I may add a manual switch for the lights later, I put a 5A diode in line with the power on the plug so it would not backfeed into the truck system. Soldered it in line and added heatshrink.
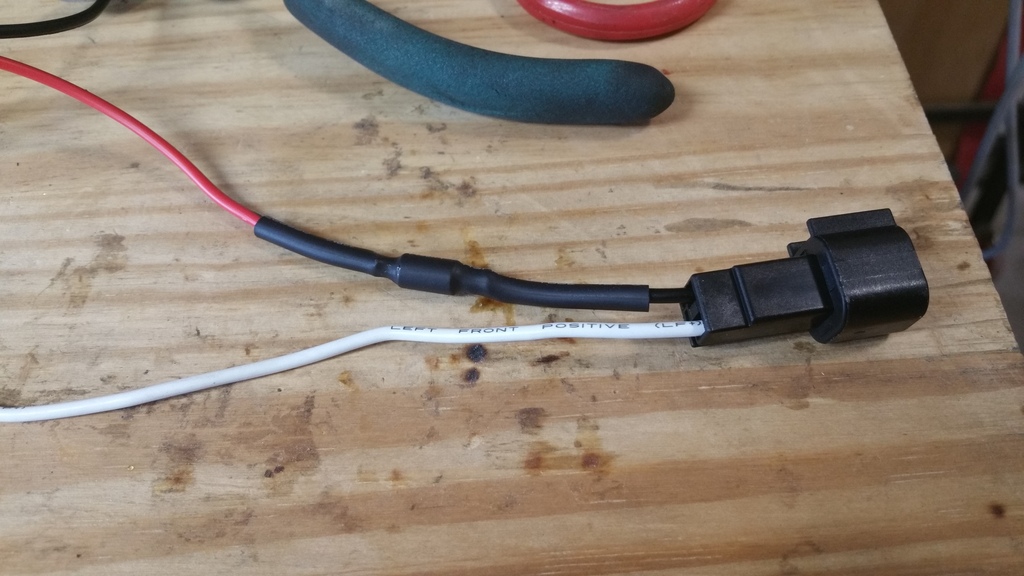
Then put the mating plug for the lights on the other end of this jumper harness.
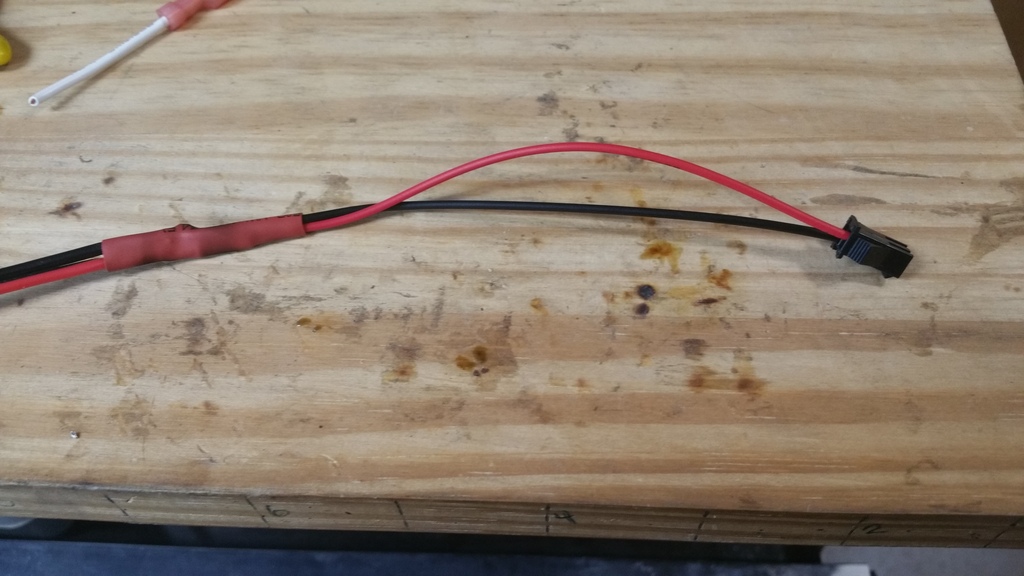
And finally added the wrap and put heatshrink on the ends, 2 jumper harnesses done.
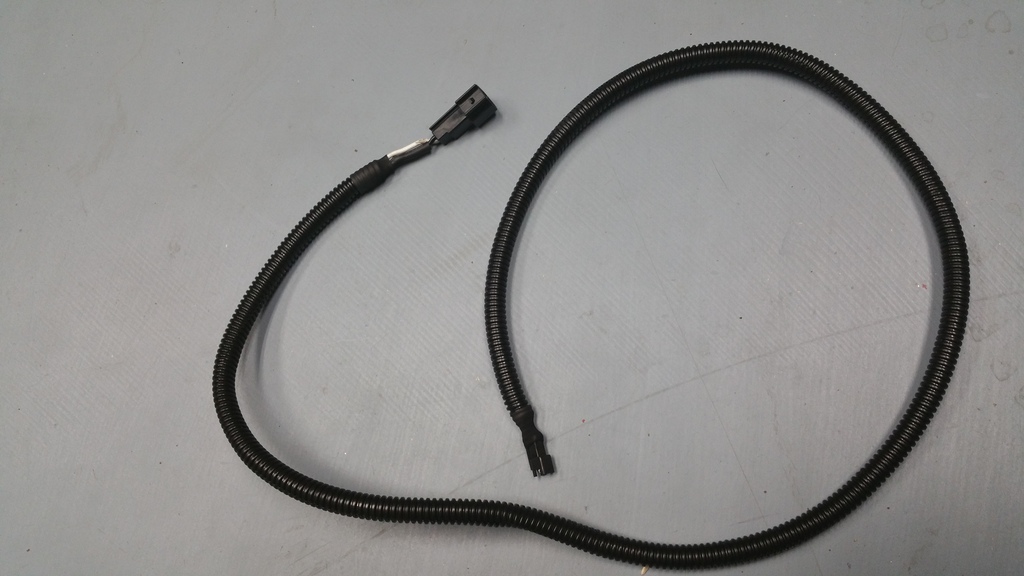
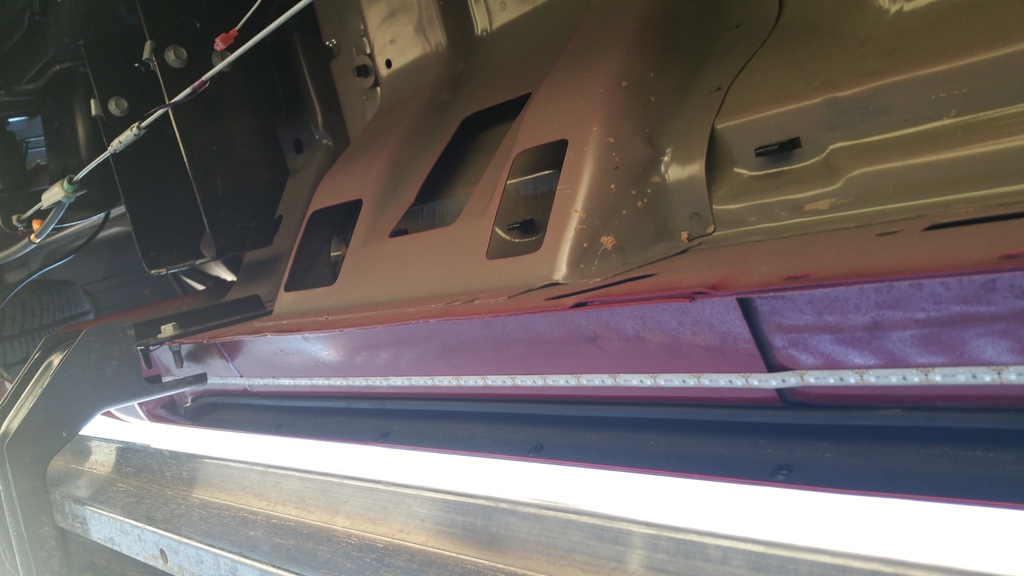
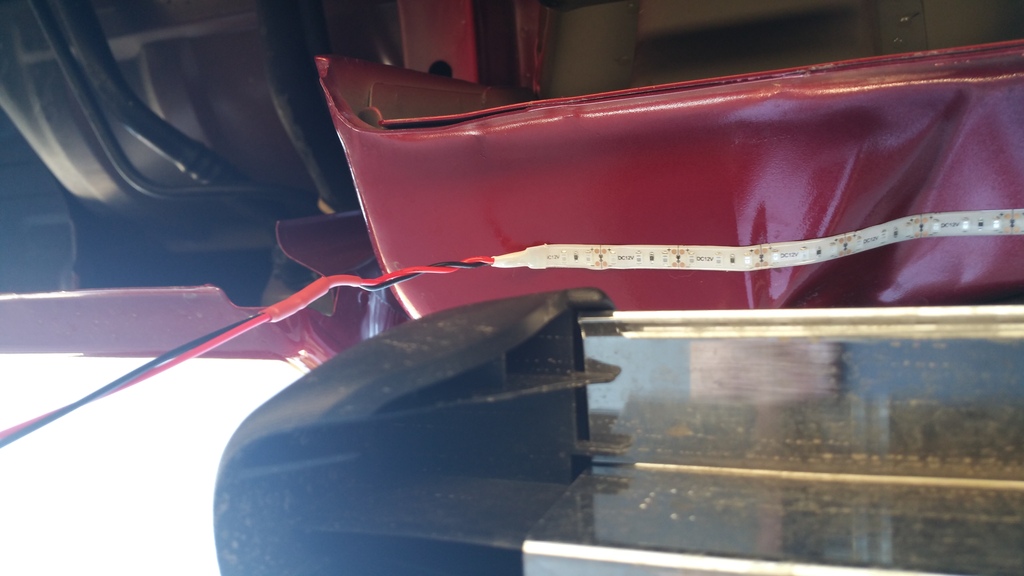
Clipped the harness into the truck plug and ran in down to the plug for the lights, taped it in place and then added silicone to glue it in, once it dries the tape can come off. I have use this method a lot and have had great luck but if it does start to pull away, I can add screw down ties later. second picture is connecting it to the LEDs.
Took a few hours and at easy pace and a lot of BS'ing to people dropping by, burned out my heat gun in the middle and had to resort to a lighter but it all got done. And the results..

So, truck is about a month old now and have almost 2K on her. Wife calls her Ruby due to the ruby red color and it seems to be sticking. We bought Ruby brand new as a 2016 closeout, she is and F-250 CCSB 4x4 diesel with most of the options, we like them nice for traveling. Lots of plans but I am not going to do the norm and list them all out, just post them as I go. Due to a fight with cancer I can not off road any more so this one won't get lifted or hard cored at all.
Her baby picture

Tonight was the task of side/running board lights. I do some playing with LED strip lighting on motorcycles and other vehicles so I ordered a couple reels of high intensity red.....SMD Waterproof Led Strip Light 3528 600leds Red....Cut two strips the just under the length of the cab and soldered clip plugs on the end.

Cleaned off the lower cab area behind the doors, above the running boards and wiped them down with alcohol pads then attached the LED strips with the plug toward the back of the cab.


With both strips stuck in place, I went back and "stiched" them every 2" to the truck with exterior silicone so if the 3M tape gives way, the silicone will hold them in place

Based on another thread here, I ordered the plugs for the factory running board harness connection...
https://www.amazon.com/gp/product/B0...?ie=UTF8&psc=1
These are speaker plugs but fit the harness I needed. Since I may add a manual switch for the lights later, I put a 5A diode in line with the power on the plug so it would not backfeed into the truck system. Soldered it in line and added heatshrink.

Then put the mating plug for the lights on the other end of this jumper harness.

And finally added the wrap and put heatshrink on the ends, 2 jumper harnesses done.

Clipped the harness into the truck plug and ran in down to the plug for the lights, taped it in place and then added silicone to glue it in, once it dries the tape can come off. I have use this method a lot and have had great luck but if it does start to pull away, I can add screw down ties later. second picture is connecting it to the LEDs.


Took a few hours and at easy pace and a lot of BS'ing to people dropping by, burned out my heat gun in the middle and had to resort to a lighter but it all got done. And the results..


#2
10-22-2016, 08:51 AM

#4
10-22-2016, 12:56 PM
Join Date: Sep 2016
Posts: 242
Likes: 0
Received 0 Likes
on
0 Posts
Some of this part will be copied from another thread that I had started but will move it all in here......
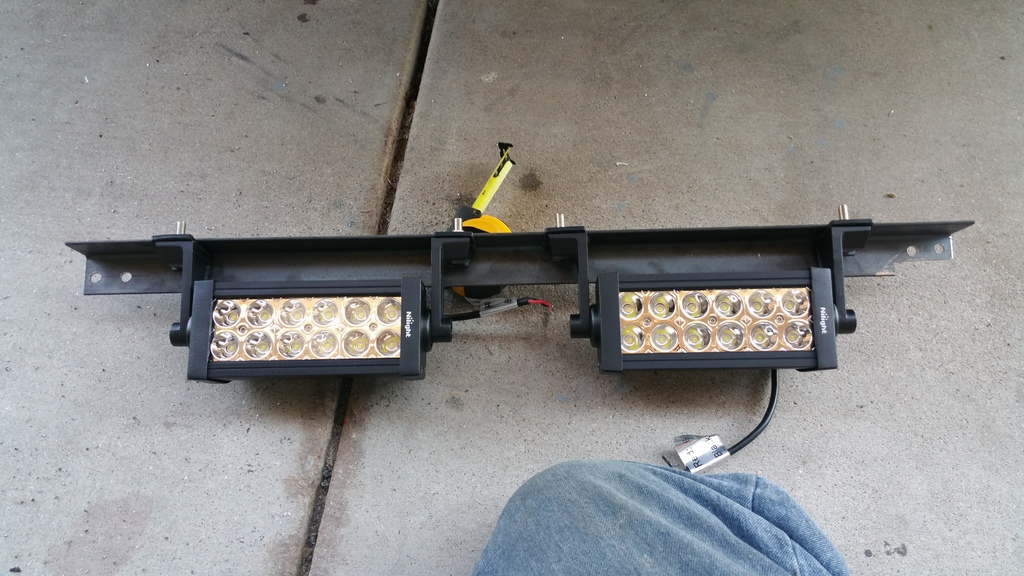
I have 5 kids and have to do emergency roadside when they break and still "fooloishly" help people broke down, especially motorcycles, so I wanted something in a flood, not a spot so these are not as intense as a spot but the do flare out good. I also did not want to spend a fortune on Rigid for as little as I use them, cheap but usable was the key.
These will mount under the grill in the opening with the tow hooks, one 7" on each side so I can have enough open space in the middle for a front camera that will be added later.
The lights are from NiLight on Amazon for $15 each on Prime:
https://www.amazon.com/gp/product/B0...?ie=UTF8&psc=1
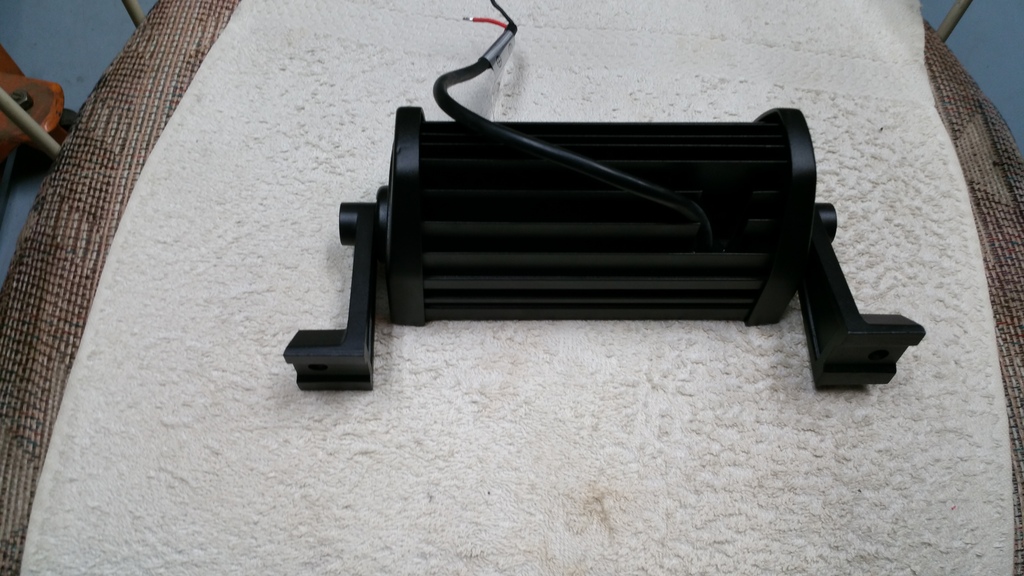
Reviews were good except for the moisture issue that seems to plague all cheap lights so I will tear them apart and silicone everything before I install them. Other than that, people seem to have good results with them. At $15, I can replace one occasionally if necessary. These do NOT come with a wire harness but that was ok as I will wire them to the upfitter switches.
I found a bracket on Amazon also for a 20" bar for $35 but I am not getting it, it just gave me the idea on how to make a mounting bracket that I will start later. Bracket is a Rough Country - 70524:
https://www.amazon.com/Rough-Country...per+bracket+20
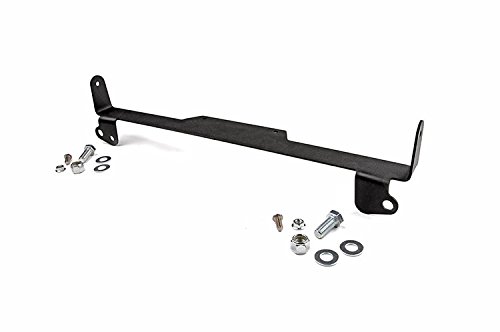
Mine will be a very modified version of that if it works like I see it in my head!!
So, the lights look like:
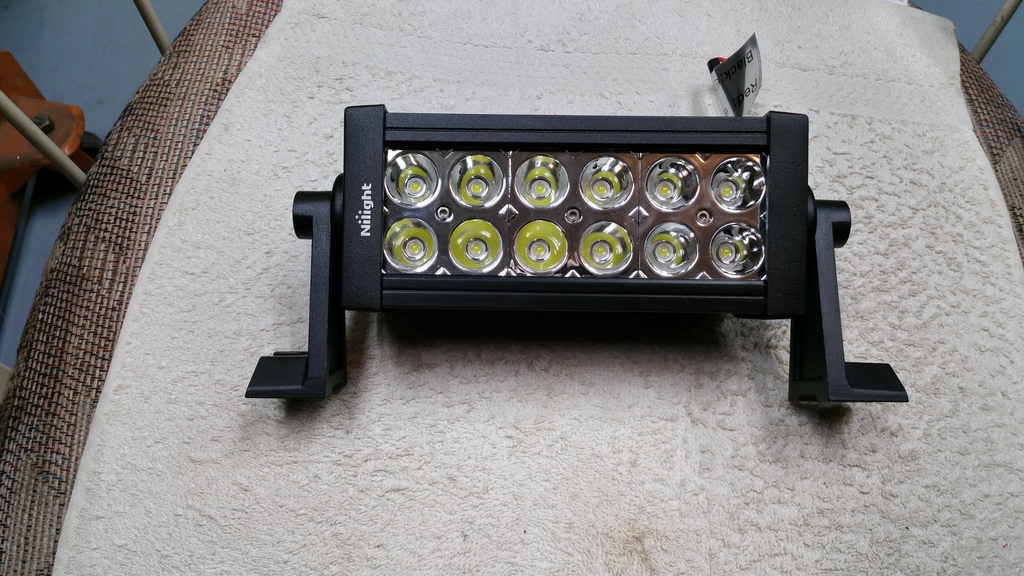
First impression is they are heavy and seem fairly well made, I hooked one to the test bench and ran it for an hour with no issue and it really was bright, camera does not do it justice but I shined it thru the garage and accross the street and it will give all the light I need.
Next test was light output. So, I took a light meter to the truck on low beam and 9" from the drivers side light, moved around to the brightest spot:
Avg 35,000 LUX and 3000K Lumens (intensity (daylight bulbs are 6000K))
Next I did the same on the factory driving light:
Avg 45,000 LUX and 3000K
Last was the LED light, just one hooked on the test bench:
Avg 78,000 LUX and 6000K
So, per the meter, they deliver more than twice the light of the headlights and double the intensity. Good start if they hold up.
Hooked one light up and checked the current, test battery had 13.17v and the draw was 1.37A. works out to 18.04W per light. So, their claim of 36W per light is way off and these are supposed to be spot but flood out pretty good, overall, not what they claim but pretty much what I expected from a $15 light and will do what I wanted them for.
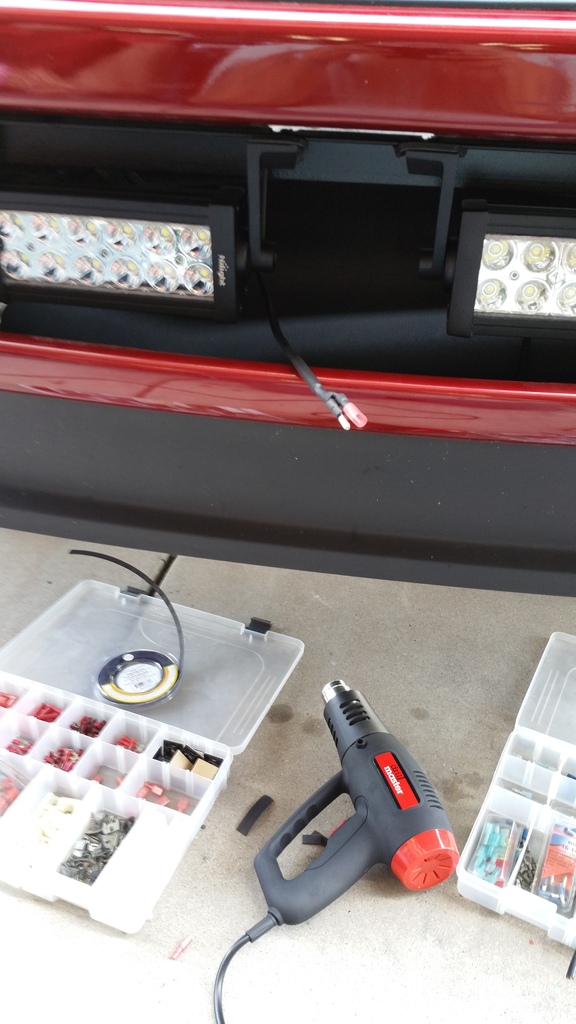
So this morning I started the setup, won't finish today but want to get them mounted.
So, need a mount in this opening, picked up a 1-1/2" steel angle that will mount to the inner/upper part of the frames around the tow hooks.

Cut the angle at 29" and notched it to fit over the booster cable mount.
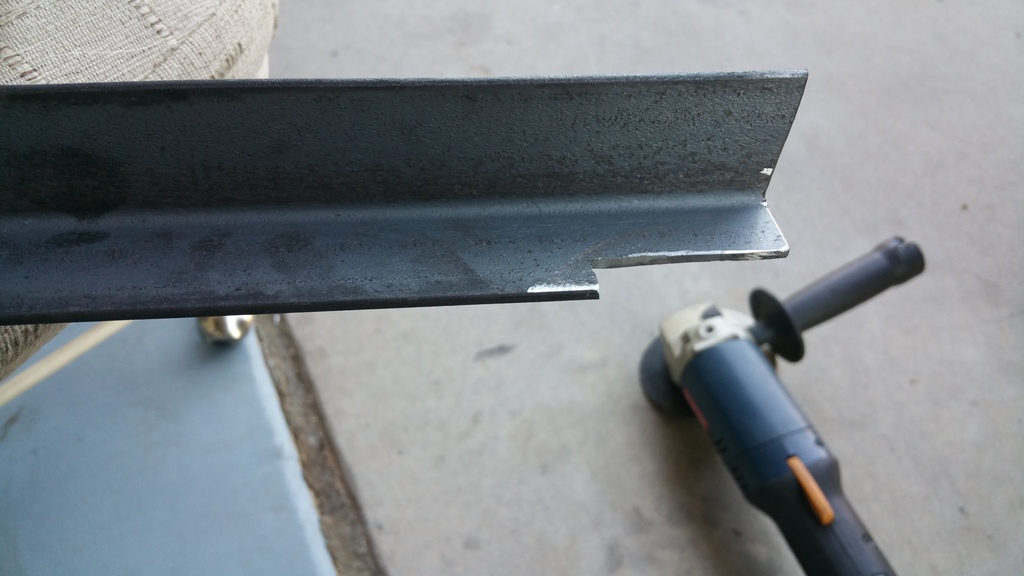
Drilled pilot holes in the angle and matched them to the frames, drilled the frames out to 1/4" and the angle to 5/16" for the carriage bolts.
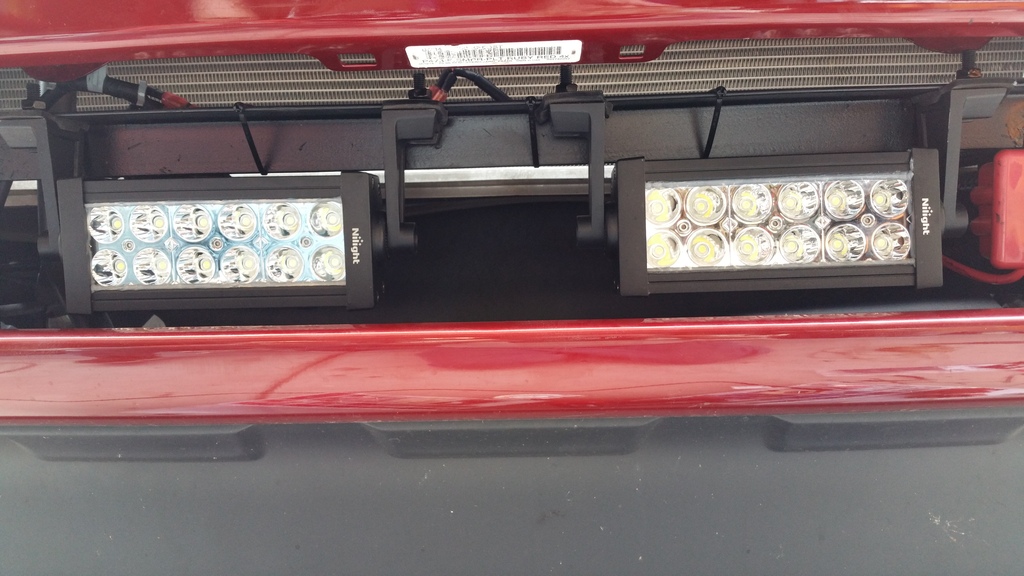
With the test fit good, put the lights in place and marked the rough position. Pulled it all down and measured it all out and drilled for the lights and mounted them to the angle.
with the lights mounted I needed to test fit in the truck.
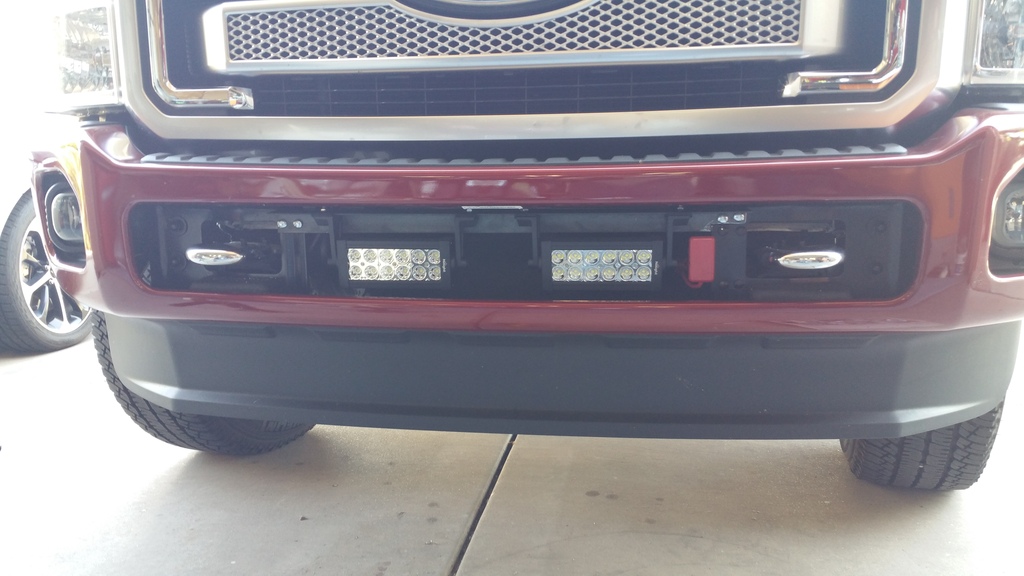
All fit well and looks right. Next step is take it all apart, clean it up and paint the pieces satin black and then put it back together and wire it to the upfitters. Will take it back out in the future and mount the front camera in the middle to the same bracket.
I have 5 kids and have to do emergency roadside when they break and still "fooloishly" help people broke down, especially motorcycles, so I wanted something in a flood, not a spot so these are not as intense as a spot but the do flare out good. I also did not want to spend a fortune on Rigid for as little as I use them, cheap but usable was the key.
These will mount under the grill in the opening with the tow hooks, one 7" on each side so I can have enough open space in the middle for a front camera that will be added later.
The lights are from NiLight on Amazon for $15 each on Prime:
https://www.amazon.com/gp/product/B0...?ie=UTF8&psc=1
Reviews were good except for the moisture issue that seems to plague all cheap lights so I will tear them apart and silicone everything before I install them. Other than that, people seem to have good results with them. At $15, I can replace one occasionally if necessary. These do NOT come with a wire harness but that was ok as I will wire them to the upfitter switches.
I found a bracket on Amazon also for a 20" bar for $35 but I am not getting it, it just gave me the idea on how to make a mounting bracket that I will start later. Bracket is a Rough Country - 70524:
https://www.amazon.com/Rough-Country...per+bracket+20

Mine will be a very modified version of that if it works like I see it in my head!!
So, the lights look like:


First impression is they are heavy and seem fairly well made, I hooked one to the test bench and ran it for an hour with no issue and it really was bright, camera does not do it justice but I shined it thru the garage and accross the street and it will give all the light I need.

Next test was light output. So, I took a light meter to the truck on low beam and 9" from the drivers side light, moved around to the brightest spot:
Avg 35,000 LUX and 3000K Lumens (intensity (daylight bulbs are 6000K))
Next I did the same on the factory driving light:
Avg 45,000 LUX and 3000K
Last was the LED light, just one hooked on the test bench:
Avg 78,000 LUX and 6000K
So, per the meter, they deliver more than twice the light of the headlights and double the intensity. Good start if they hold up.
Hooked one light up and checked the current, test battery had 13.17v and the draw was 1.37A. works out to 18.04W per light. So, their claim of 36W per light is way off and these are supposed to be spot but flood out pretty good, overall, not what they claim but pretty much what I expected from a $15 light and will do what I wanted them for.
So this morning I started the setup, won't finish today but want to get them mounted.
So, need a mount in this opening, picked up a 1-1/2" steel angle that will mount to the inner/upper part of the frames around the tow hooks.

Cut the angle at 29" and notched it to fit over the booster cable mount.

Drilled pilot holes in the angle and matched them to the frames, drilled the frames out to 1/4" and the angle to 5/16" for the carriage bolts.


With the test fit good, put the lights in place and marked the rough position. Pulled it all down and measured it all out and drilled for the lights and mounted them to the angle.

with the lights mounted I needed to test fit in the truck.

All fit well and looks right. Next step is take it all apart, clean it up and paint the pieces satin black and then put it back together and wire it to the upfitters. Will take it back out in the future and mount the front camera in the middle to the same bracket.
#5
10-22-2016, 07:20 PM
Join Date: Sep 2016
Posts: 242
Likes: 0
Received 0 Likes
on
0 Posts
Paint dried so we installed the lights.
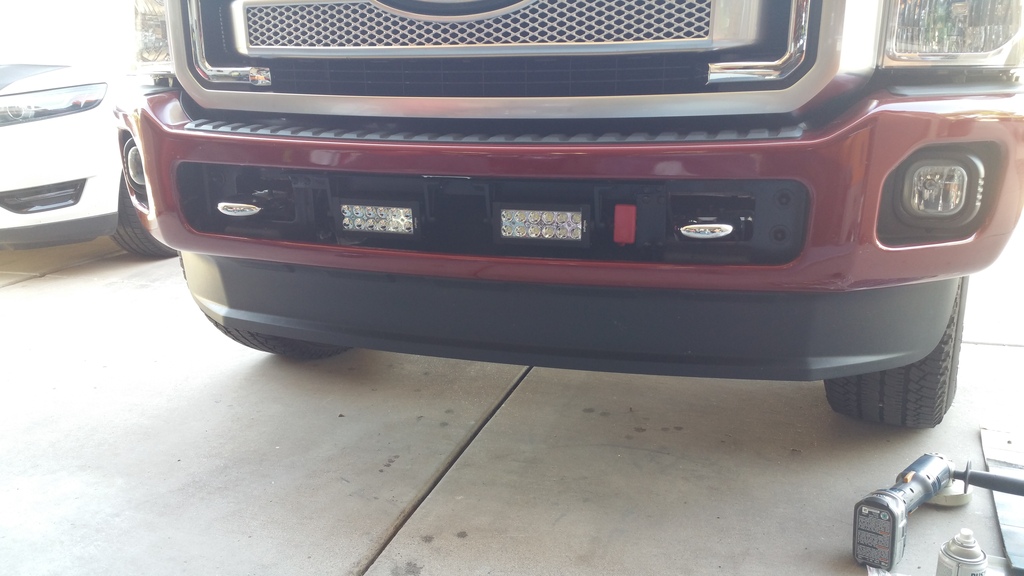
Hooked a couple jumper wires to the lights and fired them up for a test, checked the current while on and they were drawing 3.9A so they are putting out about 54W as a pair. Next step will be wiring. Need to get a new heat gun tho!!
The biggest complaint people have with these as I posted earlier is condensation, so before putting the lights in I took both of them apart and sealed them better with exterior weatherproof silicone and ran a bead along each side of the glass, hopefully there are no more spots for water to get in.


Hooked a couple jumper wires to the lights and fired them up for a test, checked the current while on and they were drawing 3.9A so they are putting out about 54W as a pair. Next step will be wiring. Need to get a new heat gun tho!!

The biggest complaint people have with these as I posted earlier is condensation, so before putting the lights in I took both of them apart and sealed them better with exterior weatherproof silicone and ran a bead along each side of the glass, hopefully there are no more spots for water to get in.
#7
10-23-2016, 06:51 AM
Trending Topics
#8
10-23-2016, 04:00 PM
Join Date: Sep 2016
Posts: 242
Likes: 0
Received 0 Likes
on
0 Posts
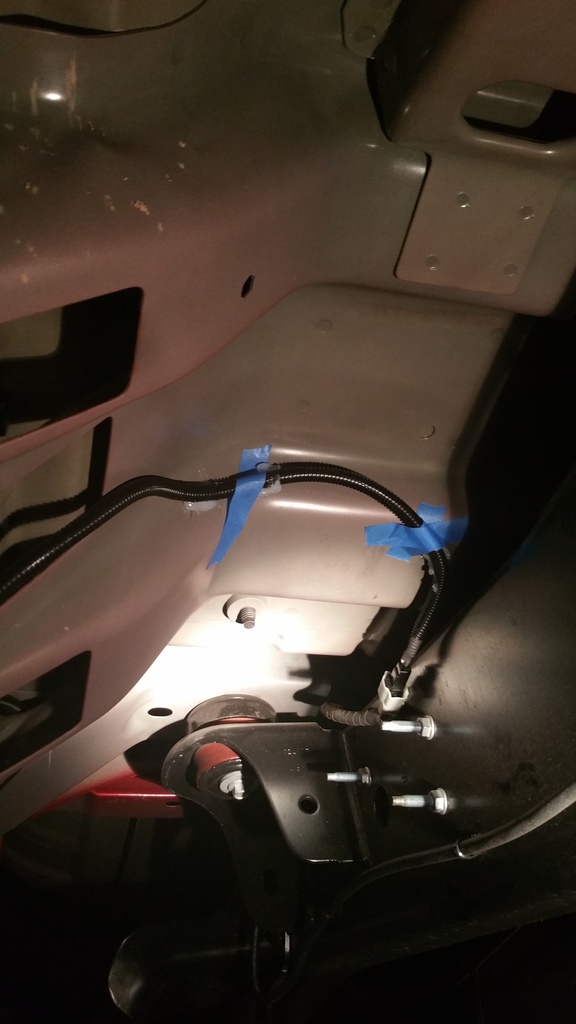
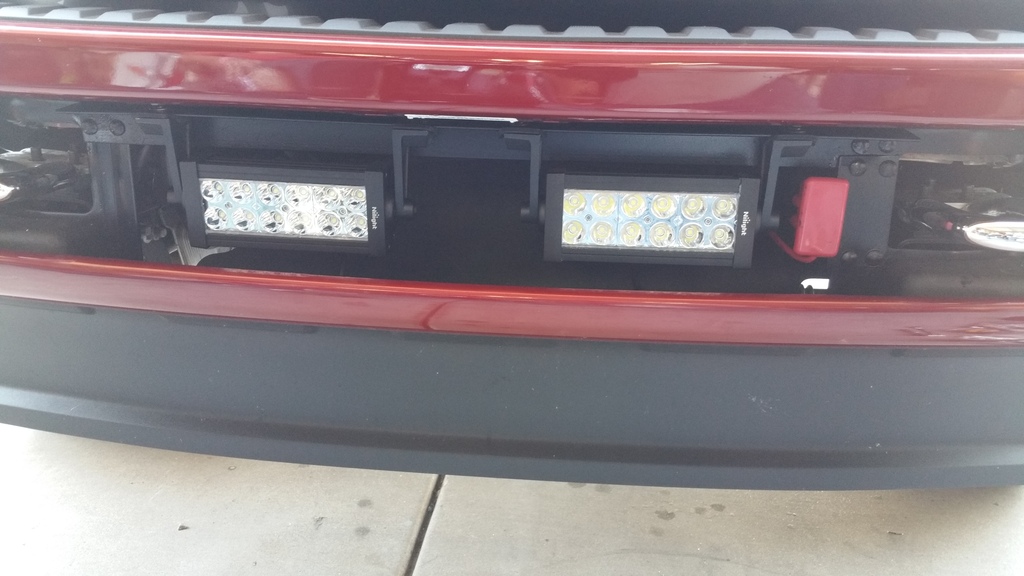
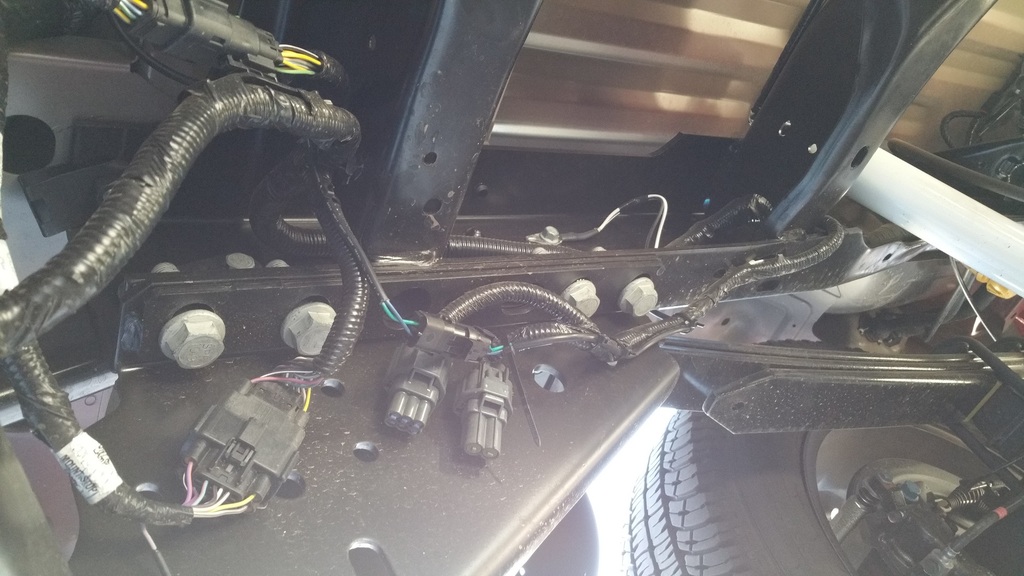
Started the wiring for the lights. Blade on the hot side and round on the ground. Build a jumper harness to connect the lights together and hook to the main wire for the switch.
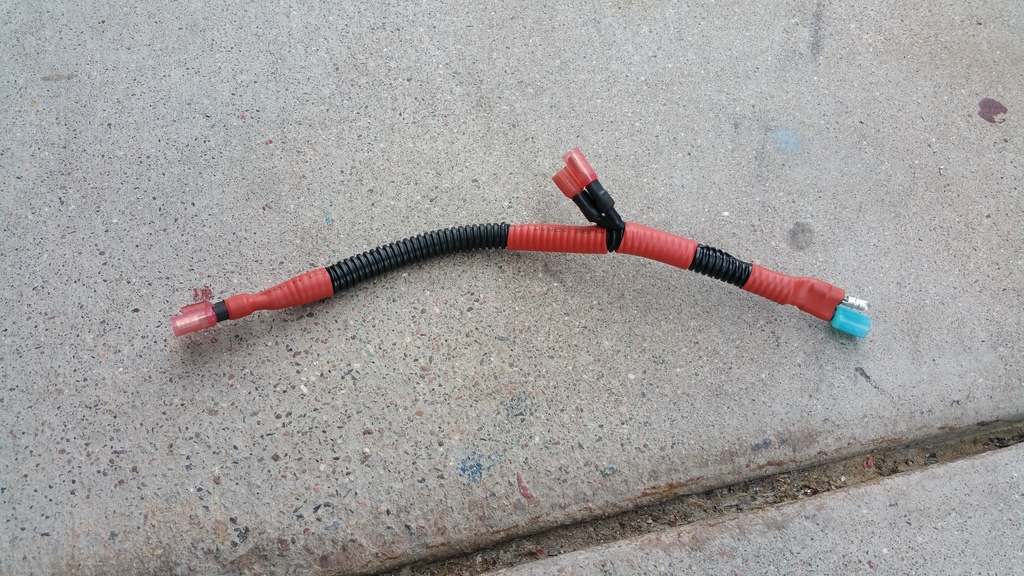
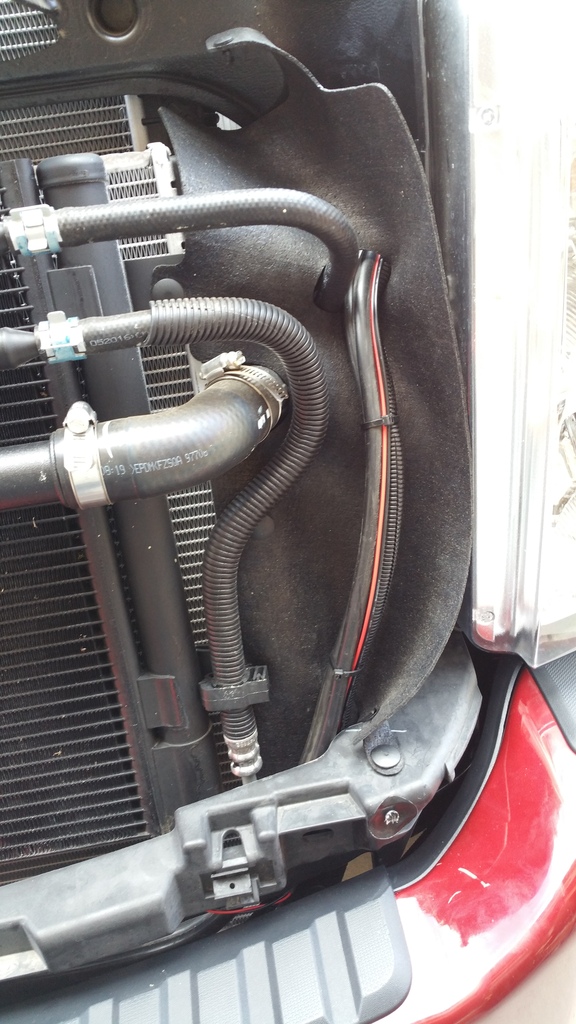
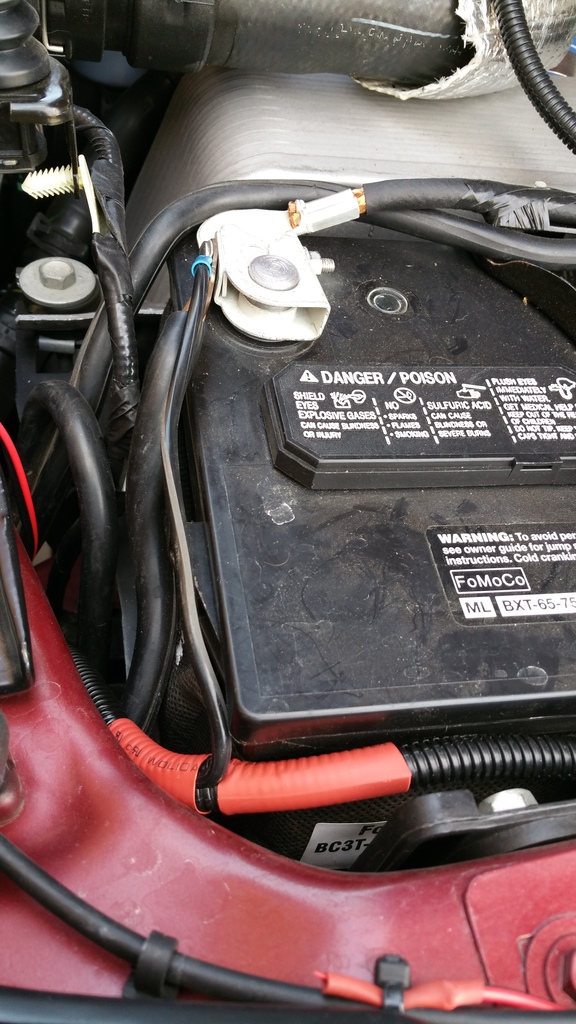
Tied the harness up to the backside of the mount frame and ran the wire harness up behind the grill with the booster cable wires. Came up in front of the battery and tied the ground directly to the battery.
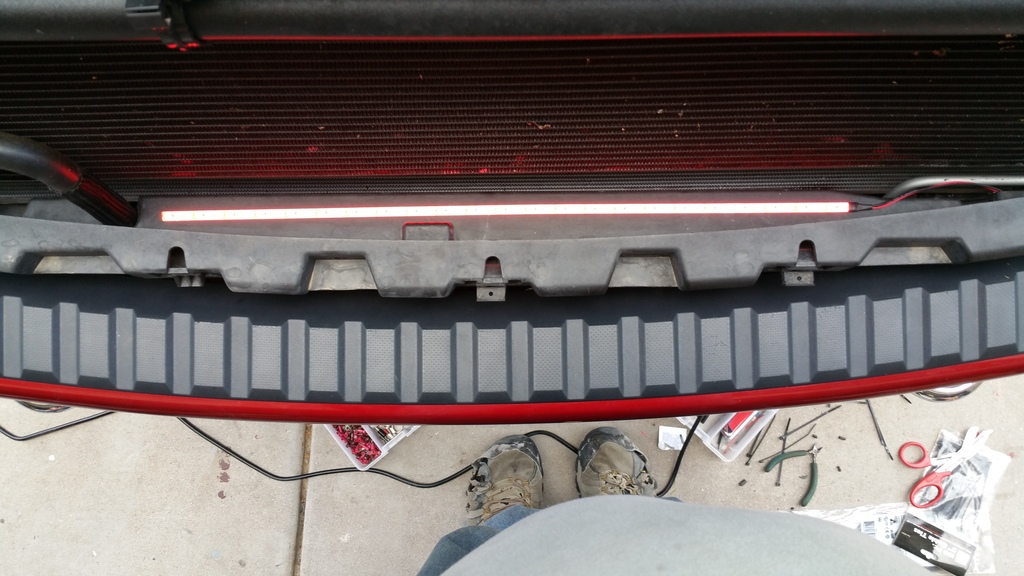
Decided while the grill was out to play a little with the red LEDs and put a strip on the inside center of the lower grill support, will see how they look after dark.
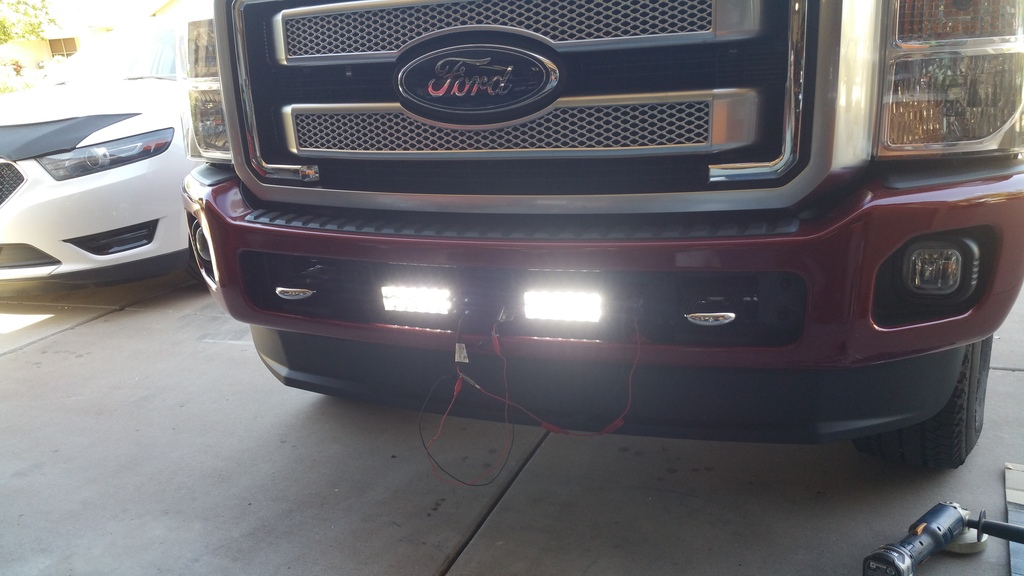
Ran the hot wire for the flood lights back toward the fuse box and put a connector on the end. Found the white/red thru firewall lead and added a connector and plugged it all in, secured the wires and put the fuse box top back in. Lights work and will get some pictures after dark.


Tied the harness up to the backside of the mount frame and ran the wire harness up behind the grill with the booster cable wires. Came up in front of the battery and tied the ground directly to the battery.


Decided while the grill was out to play a little with the red LEDs and put a strip on the inside center of the lower grill support, will see how they look after dark.

Ran the hot wire for the flood lights back toward the fuse box and put a connector on the end. Found the white/red thru firewall lead and added a connector and plugged it all in, secured the wires and put the fuse box top back in. Lights work and will get some pictures after dark.


#10
10-24-2016, 02:42 PM
Cargo Master
#11
10-24-2016, 04:40 PM
Join Date: Sep 2016
Posts: 242
Likes: 0
Received 0 Likes
on
0 Posts
More stuff copied from another post so its all in one thread for the future:
So, when I had my 2009 I wanted cables easier to manage than having to open the hood and connect. I help people on the road plus have a lot of kids that I help with their cars and little things make life easier. The old tow truck from my race days had the plug in cables so I went looking for some. Found a set on Amazon that were $126 (down to $95 now);
https://www.amazon.com/gp/product/B0...?ie=UTF8&psc=1
So I ordered them and put them on, before I sold that truck I pulled them off and decided to put them on Ruby.
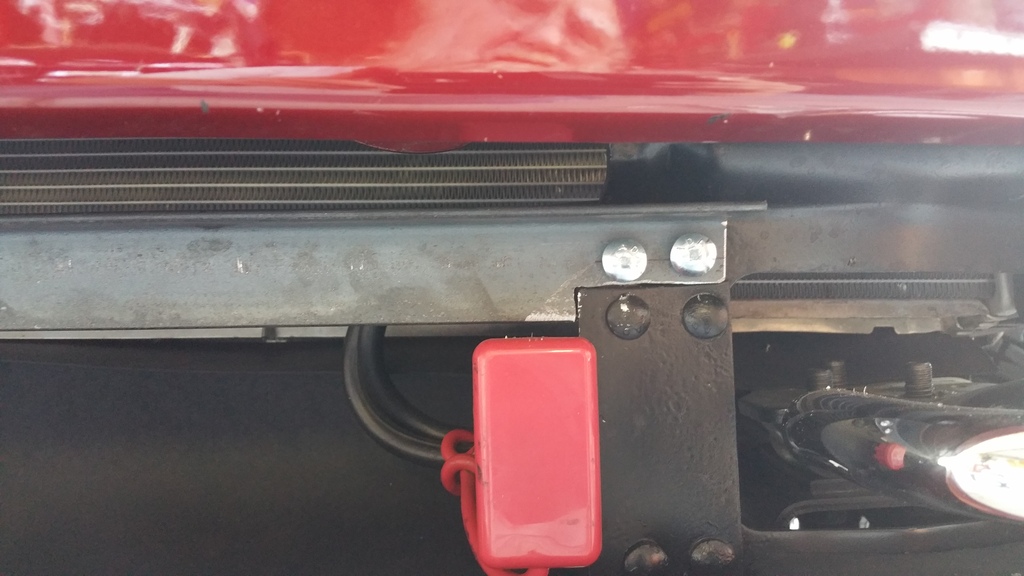
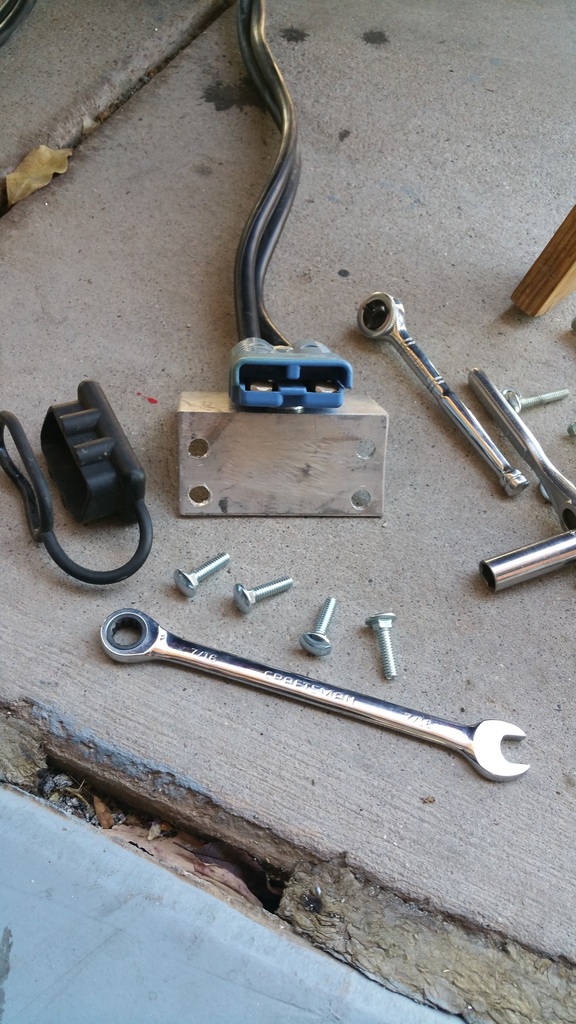
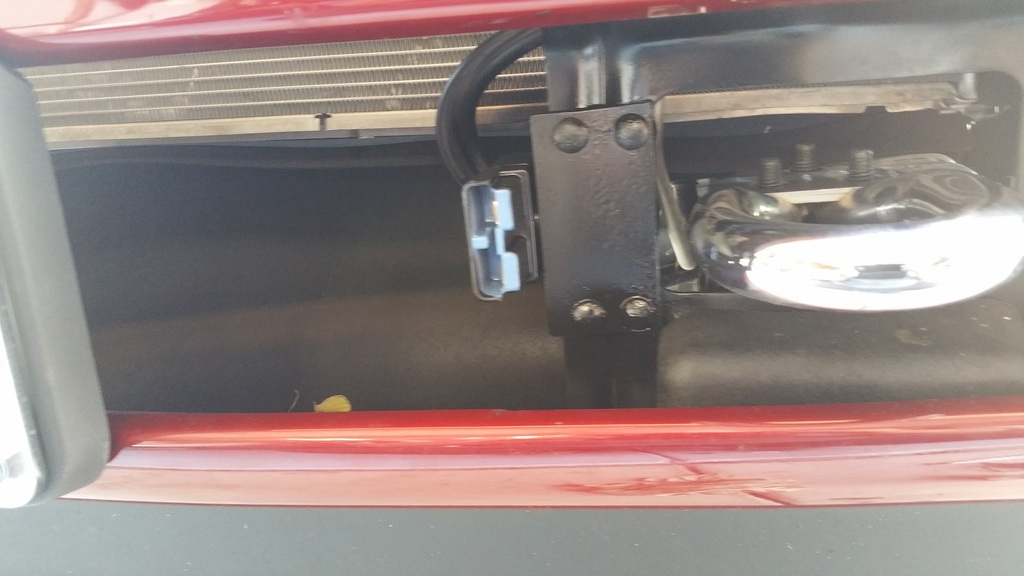
I found some 2x2 angle heavy aluminum in the drawer so I cut off 4 inches and fit it to the tow hook bracket, drilled everything out and did a test fit with....should work fine.
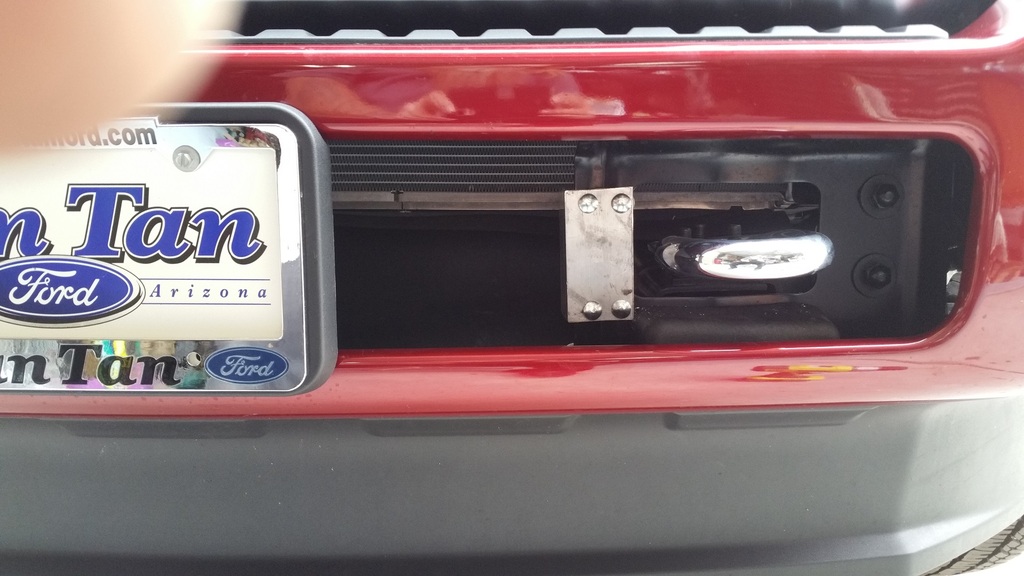
This is the drilled frame it will be mounted too.
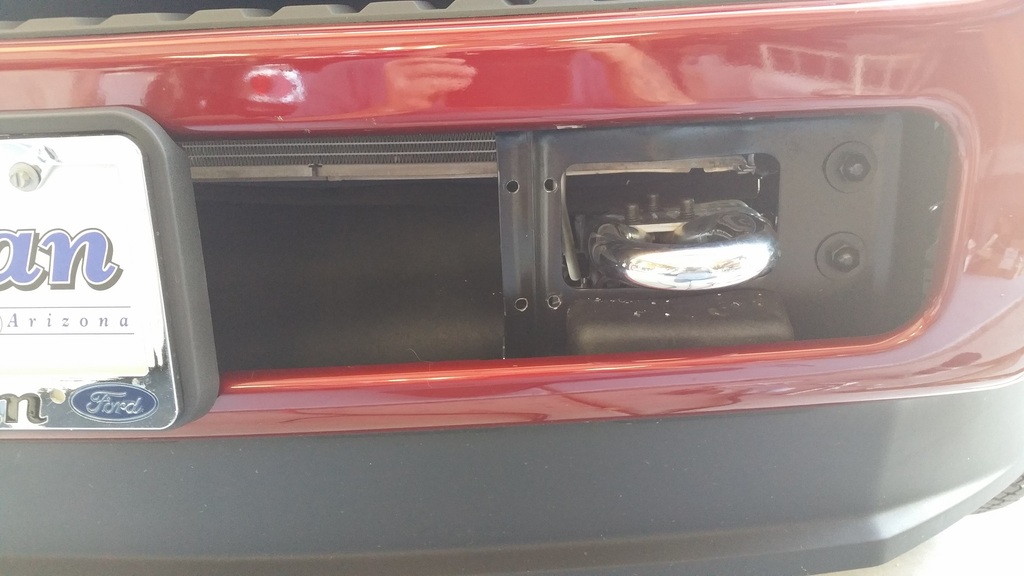
Next was to mount the anderson plug to the aluminum bracket.
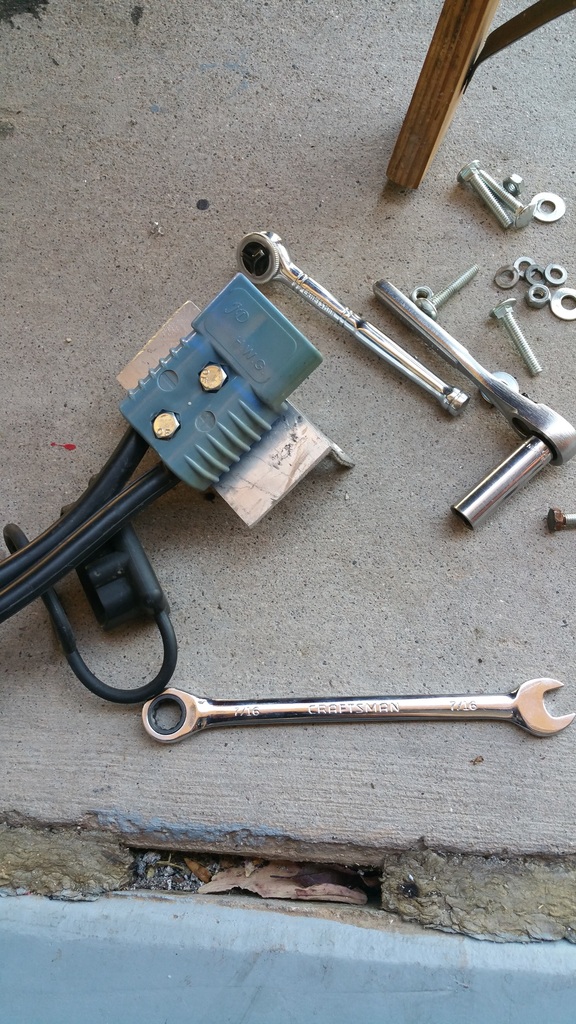
I spaced out the plug with two washers so the mating plug could slide all the way on and then took it and some 1/4"x1" carriage bolts over to clean up and paint in satin black.
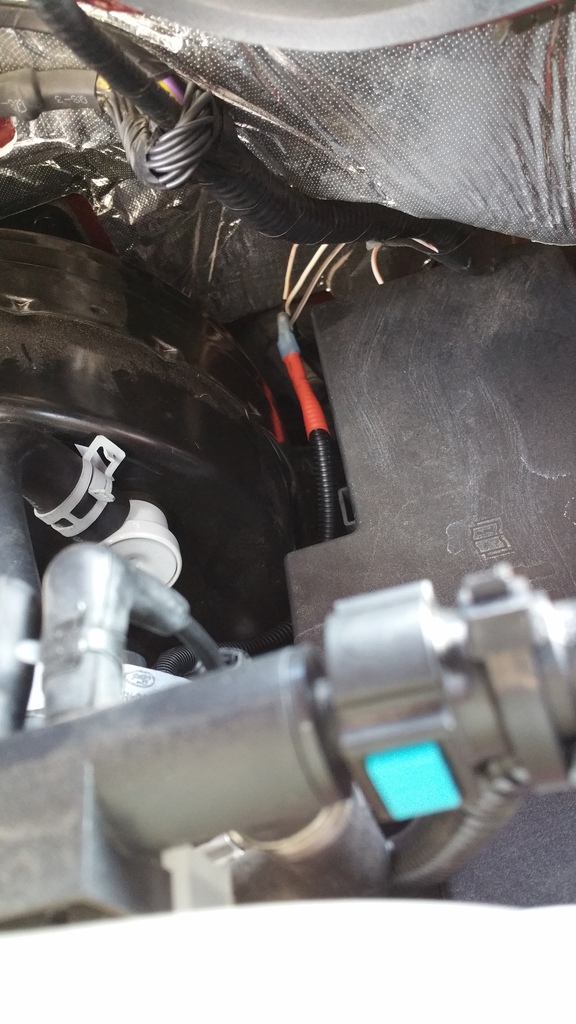
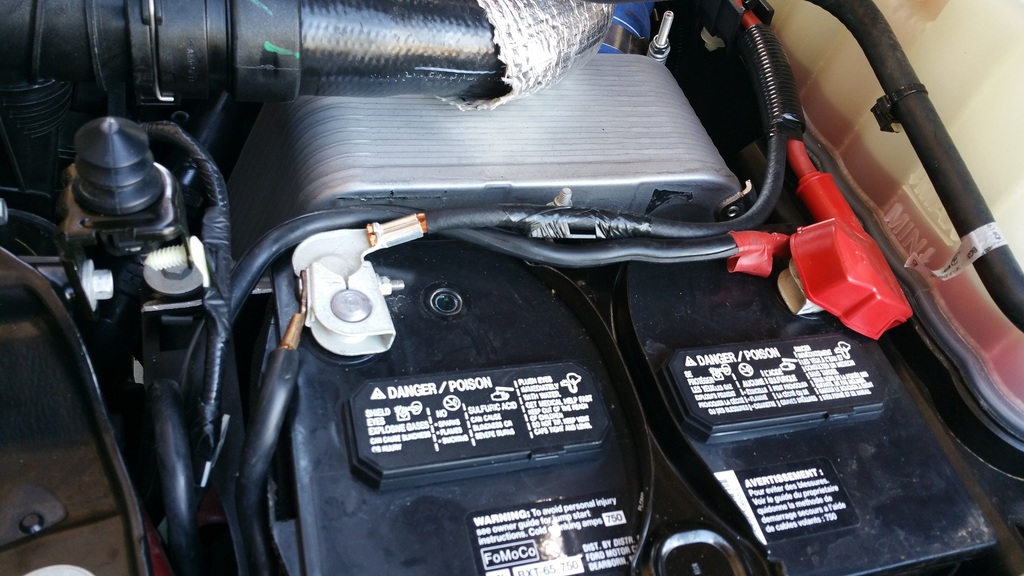
While the paint was drying, I pulled the grill and started running the wires up behind, around the headlight and into the battery area. Brought the cables around and hooked them up to the drivers side battery, didn't have the cable ties in on this picture but the wires are all secured in place now.
Back to the bumper and mounted the bracket and plug with the 1" carriage bolts.
Test the connection and verify we have power.
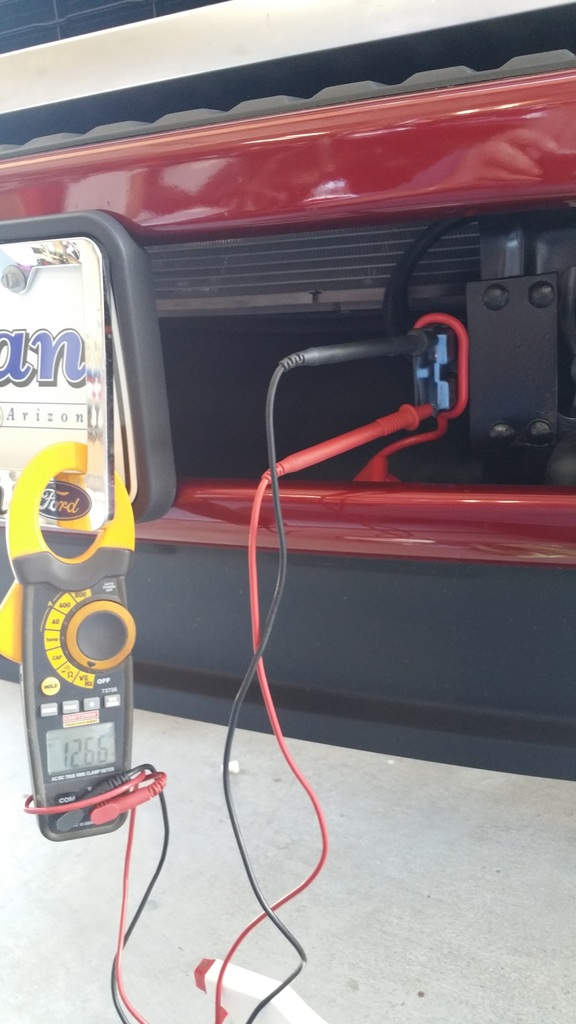
Hook up the cables and make sure everything fits correctly.
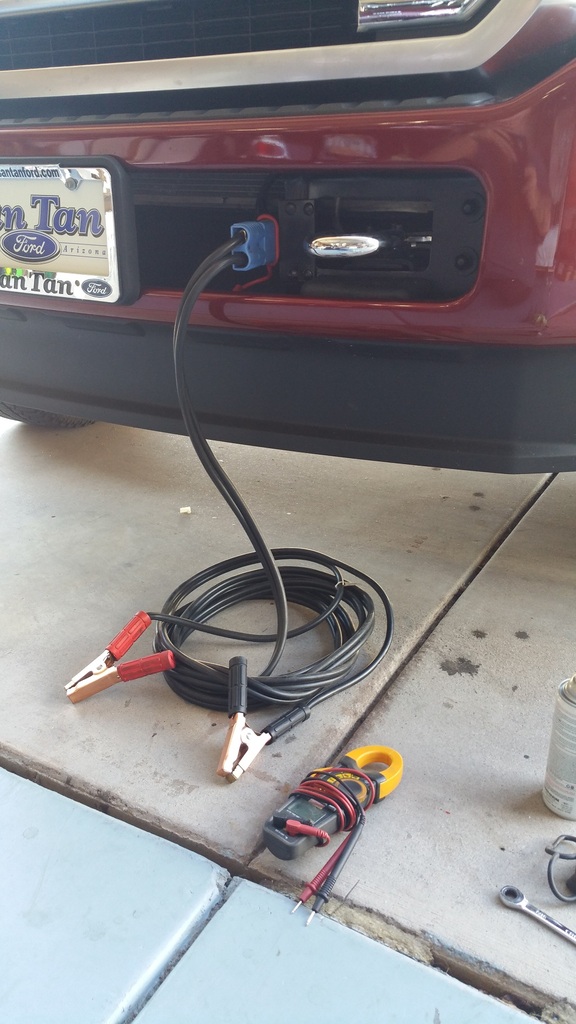
And then add the new dust cap to keep it all clean.
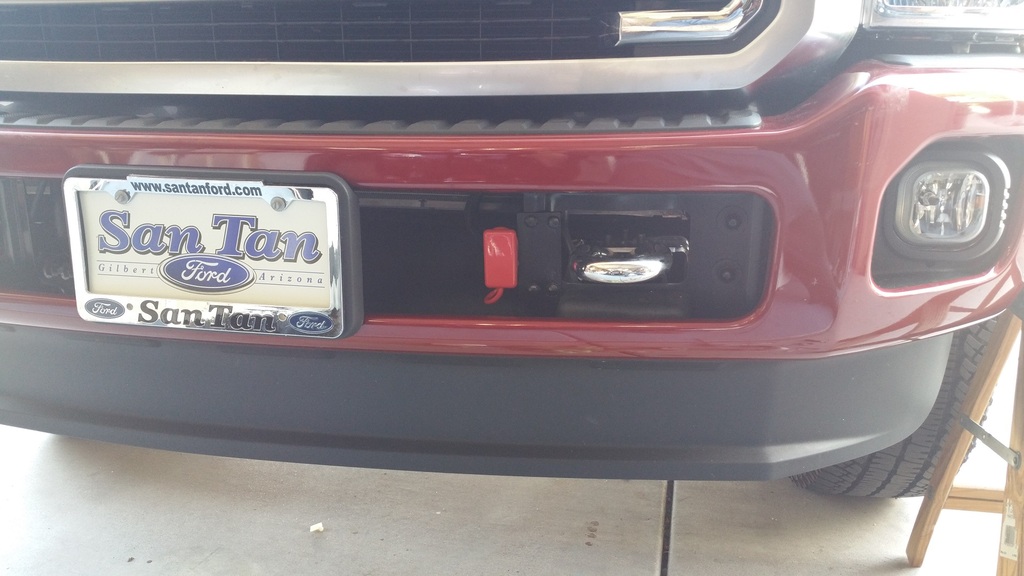
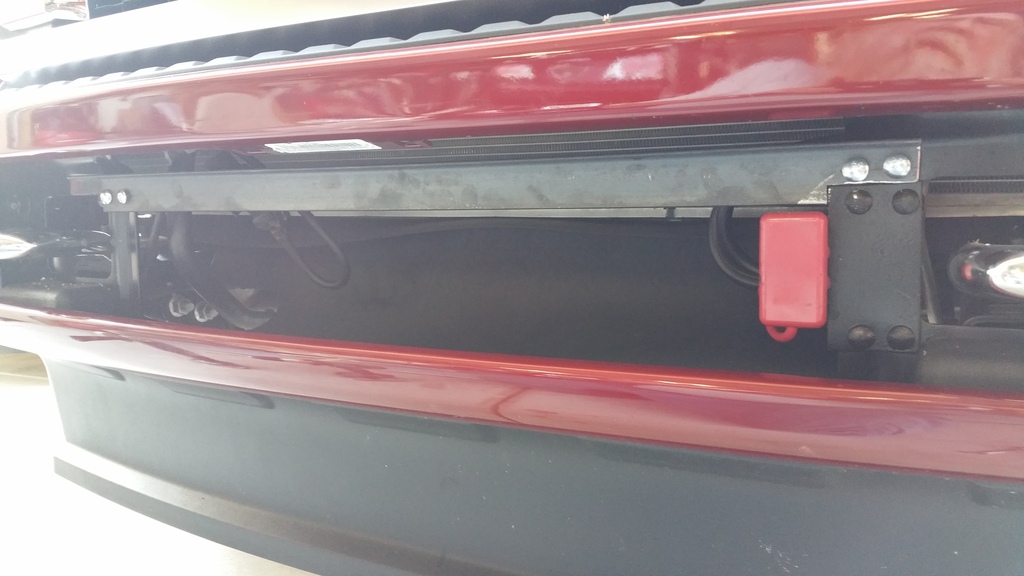
And we are done with another small mod that really helps in the long run. There will eventually be a connection on the rear also in case its needed but also to run the winch on the trailer, more on that one later.
So, when I had my 2009 I wanted cables easier to manage than having to open the hood and connect. I help people on the road plus have a lot of kids that I help with their cars and little things make life easier. The old tow truck from my race days had the plug in cables so I went looking for some. Found a set on Amazon that were $126 (down to $95 now);
https://www.amazon.com/gp/product/B0...?ie=UTF8&psc=1
So I ordered them and put them on, before I sold that truck I pulled them off and decided to put them on Ruby.
I found some 2x2 angle heavy aluminum in the drawer so I cut off 4 inches and fit it to the tow hook bracket, drilled everything out and did a test fit with....should work fine.

This is the drilled frame it will be mounted too.

Next was to mount the anderson plug to the aluminum bracket.

I spaced out the plug with two washers so the mating plug could slide all the way on and then took it and some 1/4"x1" carriage bolts over to clean up and paint in satin black.

While the paint was drying, I pulled the grill and started running the wires up behind, around the headlight and into the battery area. Brought the cables around and hooked them up to the drivers side battery, didn't have the cable ties in on this picture but the wires are all secured in place now.

Back to the bumper and mounted the bracket and plug with the 1" carriage bolts.

Test the connection and verify we have power.

Hook up the cables and make sure everything fits correctly.

And then add the new dust cap to keep it all clean.

And we are done with another small mod that really helps in the long run. There will eventually be a connection on the rear also in case its needed but also to run the winch on the trailer, more on that one later.

#12
10-24-2016, 04:43 PM
Join Date: Sep 2016
Posts: 242
Likes: 0
Received 0 Likes
on
0 Posts
Tailgate on my 2009 truck was stolen once to the tune of $4700 replacement cost so I have learned to keep it locked. A friends Dodge's tailgate locks with the power door lock and when I looked into it, the new F-150's have this option but its not available on the Super Duty yet and I assume this Platinum tailgate is more expensive than the Lariat, so I started researching a way.
I was looking at the F-150 parts and the Dodge parts to find a way to mod something but the prices were not favorable on either, then I found the Pop & Lock PL8250 Power Tailgate Lock for Ford on Amazon for $81.27:
https://www.amazon.com/gp/product/B0...?ie=UTF8&psc=1
After reading a bunch of reviews and some other research I decided to give it a try.
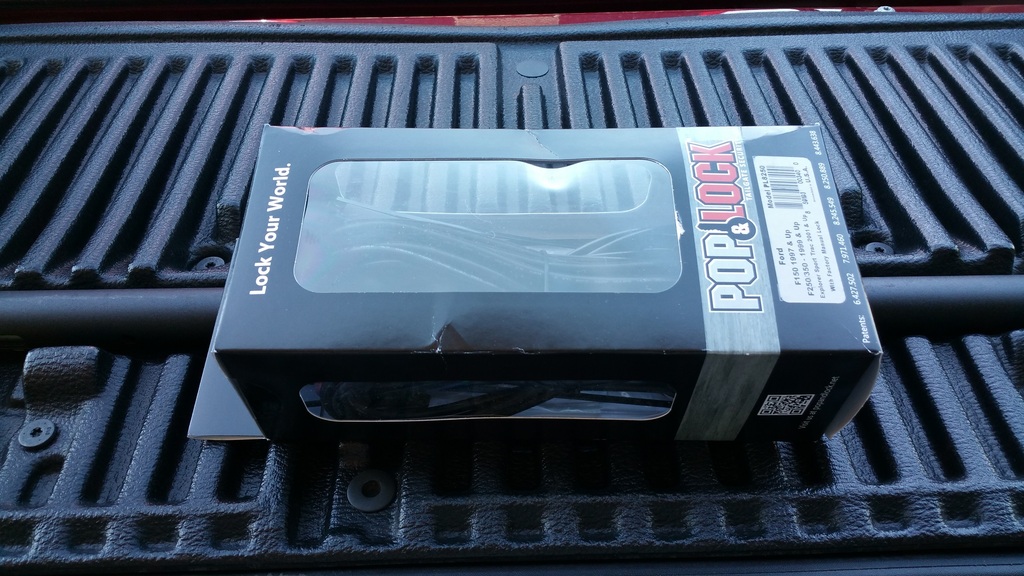
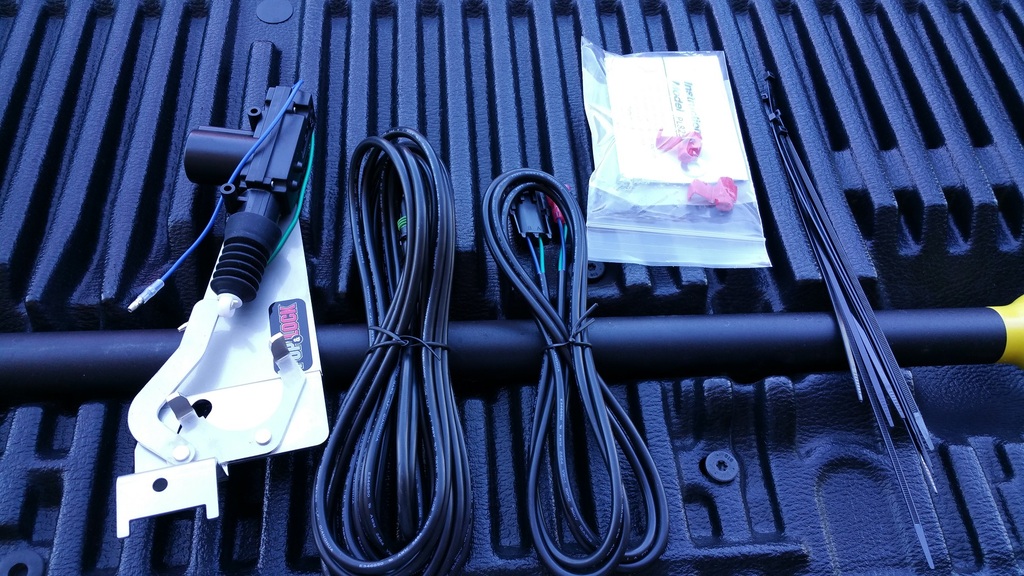
They say it takes about an hour and a half to install but in the reviews there is a lot of complaints about the color codes not being accurate, (more on that fun later) and most said it takes two hours plus to install, no sweat, I have most of Saturday to do it. The kit was well setup up with nice parts and the wire was all encased with waterproof plug for the underside. One issue I noticed right off was the tailgate wiring was quite long which will leave the plug way under the truck and make it hard if you want to remove the tailgate, this will not be a problem for me as with the rest of the build in mind, my tailgate will likely never have to come off.
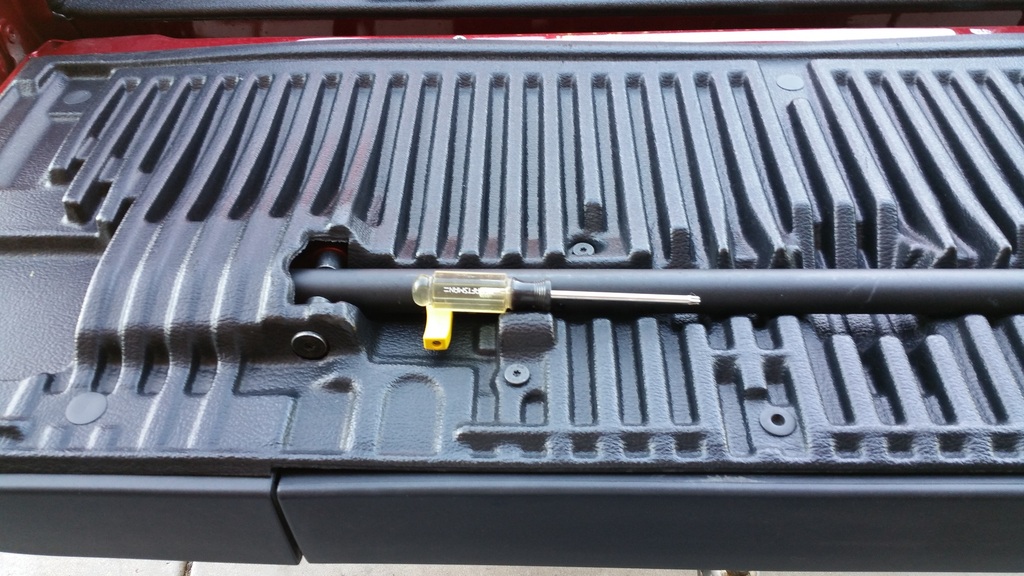
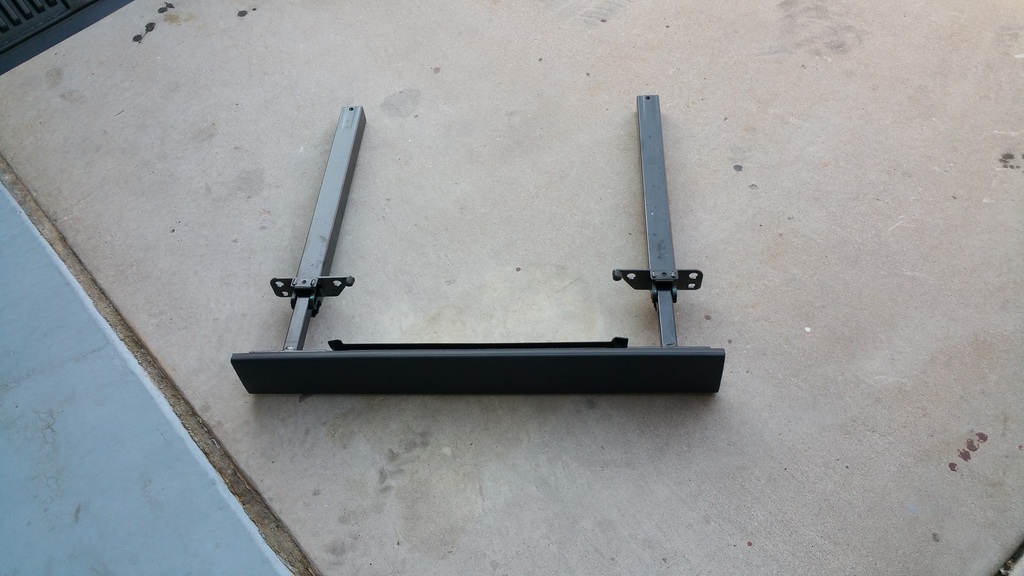
First step is to gain access to the inside of the tailgate. Remove the torx bolts and the plugs as well as the old man handle. If you do not have the old man step then you only have to remove torx bolts to get the panel off.
With access inside, you have to remove the passenger side nut on the tailgate lock assembly and put two supplied washers over the stud, slide the pop & lock plate in and down over the stud with the lock arms straddling the tailgates lock arm assembly and then put the supplied lock nut on to hold it down. This is probably easy with out the old man step.......

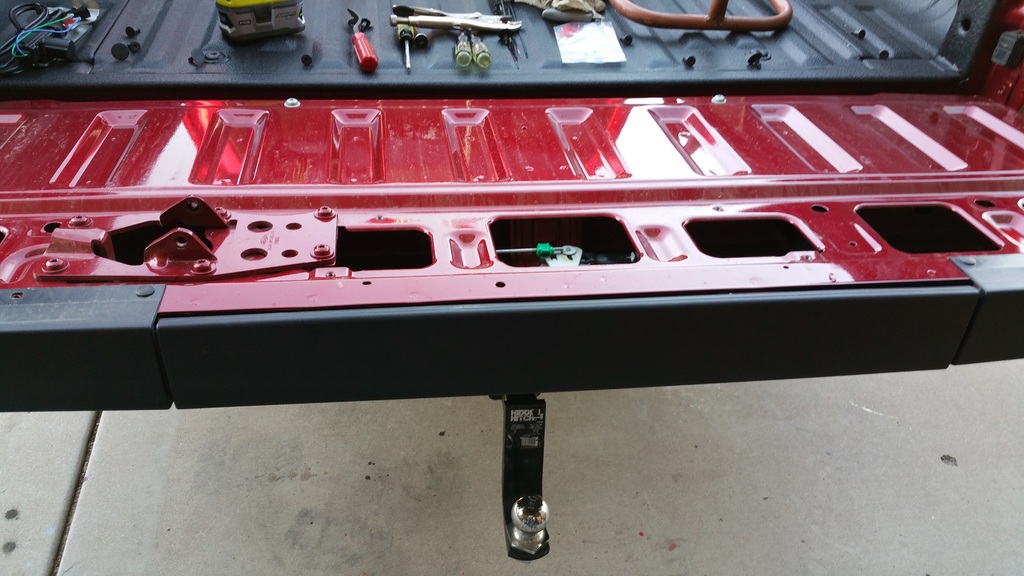
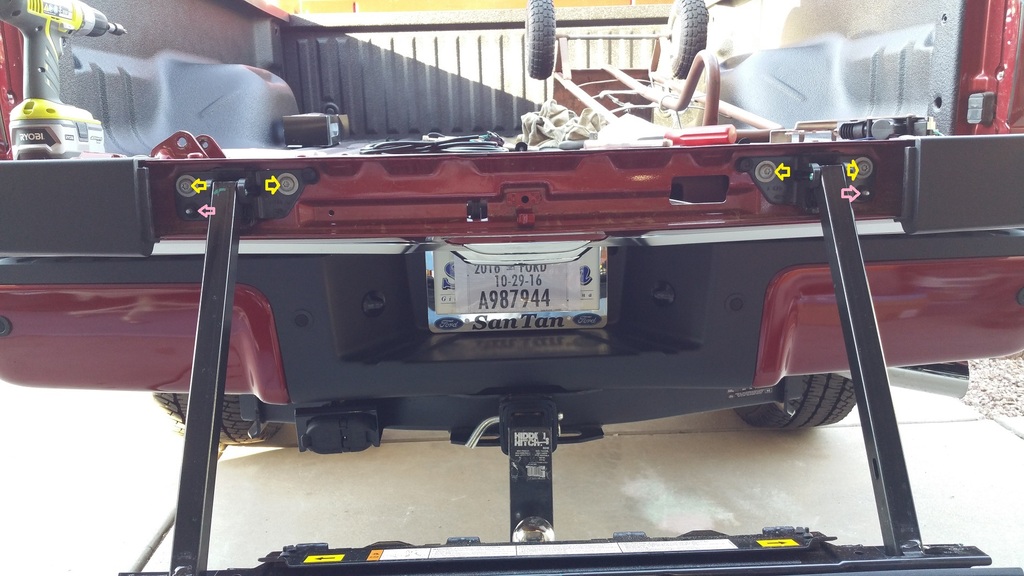
If you have the old man step, it is in the way of getting the lock plate in and positioned so it needs to come out. Remove the 4 torx bolts indicated with yellow arrows, there are two more torx bolts on the inside face of the tailgate close to the bottom (close to the bed) that need to be removed. The two nut indicated by the pink arrows have to be removed also but you need to make sure and take the stud out from inside the tailgate. I suggest marking the exact position of all the hardware on this unit as with the bolts and nuts loose it moves around a bit and the movement is used to align it to the tailgate, with mine being new, I could still see the original markings.
With the hardware removed, slide the complete assembly out of the tailgate and set it to the side.
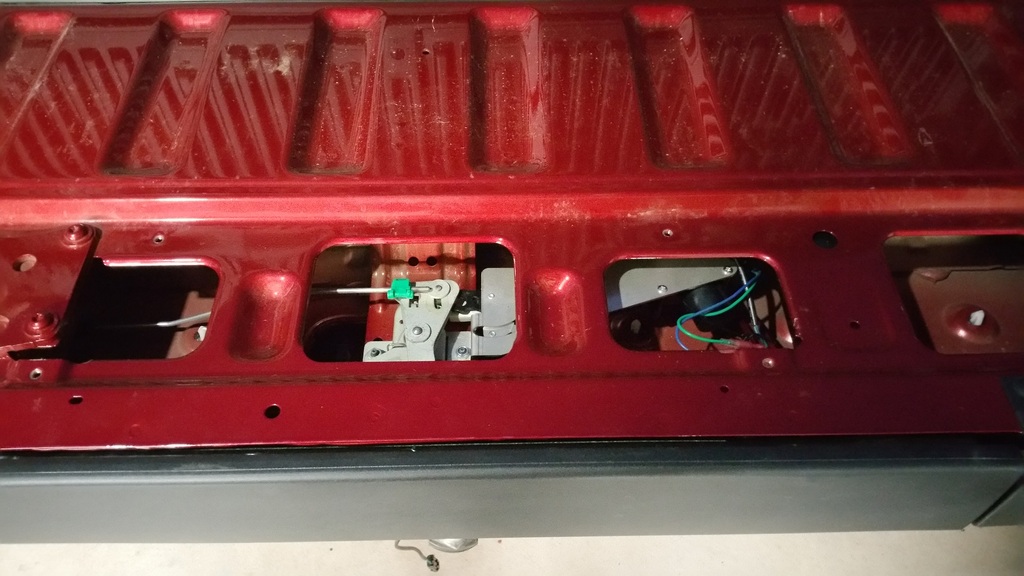
With that out of the way, the new lock assembly will slide in and fit over the stud. At this point the directions say to simply feed the wires through a drain hole in the bottom of the tailgate up to the lock assembly......yea, simply!! So, there are baffles and access hole and I think sand traps and waterholes with gators inside that think....well, something bit me, but anyway, this is no easy task and having a rearview camera just adds to the mess. We finally used my inspection camera to work out way through from the top, tape the wires to it and pull them back through, it was simply a nightmare. That done we reversed the procedure to put the tailgate back together.
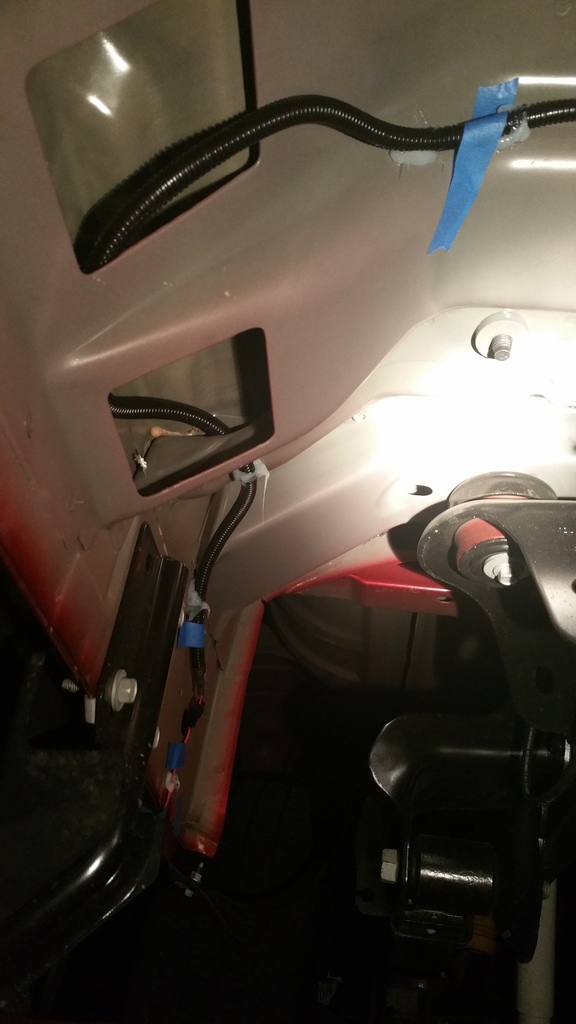
On to the wiring....O dear lawd the wiring..... Yes, people said the color codes they have are not necessarily correct but opening the drivers door sill produced a 2" plus bundle of wires and the search was on, this truck has most every option available but I think now the amount of copper wire in just the door sill is half the cost of the truck! After many attempts and failures at finding the right wires I opened the B-pillar and unplugged the back door harness and used a meter to find the right wires. Crawling under the truck there is a rubber drain plug in the drivers foot well, I used this to push the wires into the cab and down the sill to the B-pillar. I used their taps as I did not want to cut the wires yet (its only a week old) but eventually I will go in and remove them and solder the wires in the right way. With this done the door harness was reconnected and the sill put back together.
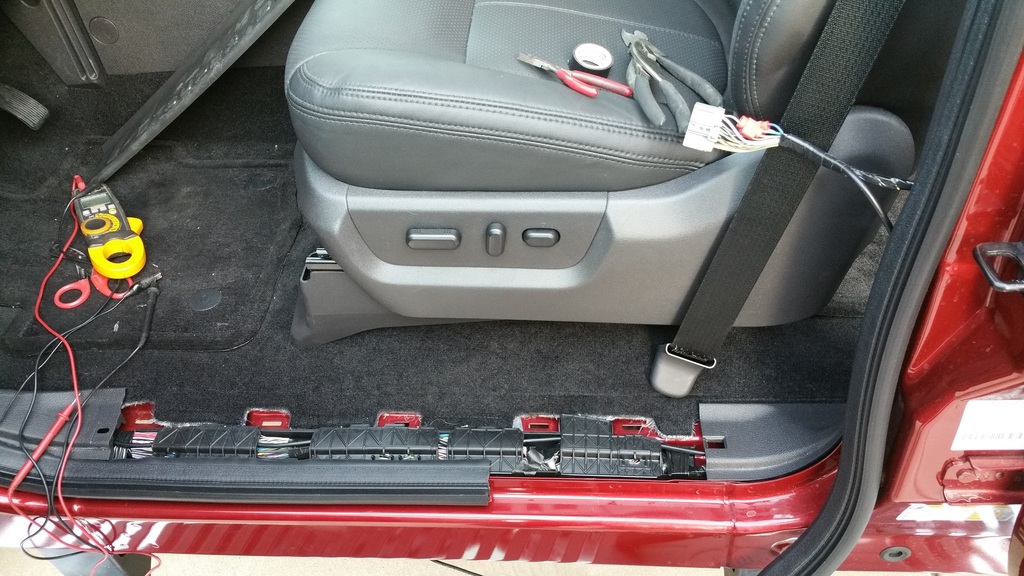
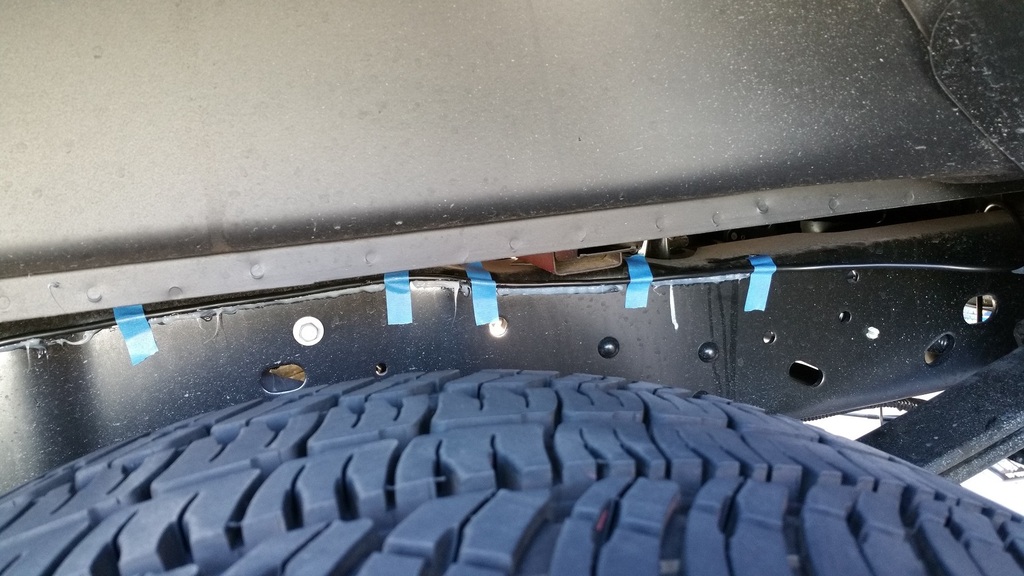
Crawling under the truck I started to run the wire back to the rear. There is not a lot of points to use zip ties and I do not like loose wires hanging, especially in a vehicle that goes off road. So, it is zip tied where I can but I used blue painters tape to temporarily hold the wire in position and glued it to the bottom of the truck with clear silicone. We have used this method many times with off road rigs with great success.
Worked my way to the back of the cab
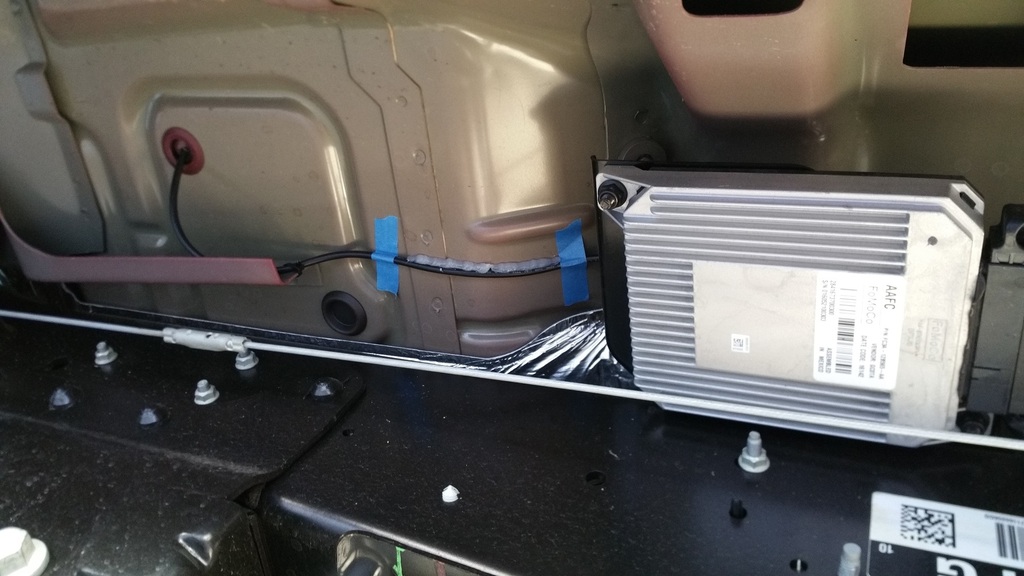
At the back of the cab I moved the wire down onto the frame and ran down the outside of the frame, normally I go inside the frame and run it with the original vehicle harness but there was far too many things in the way on this truck.
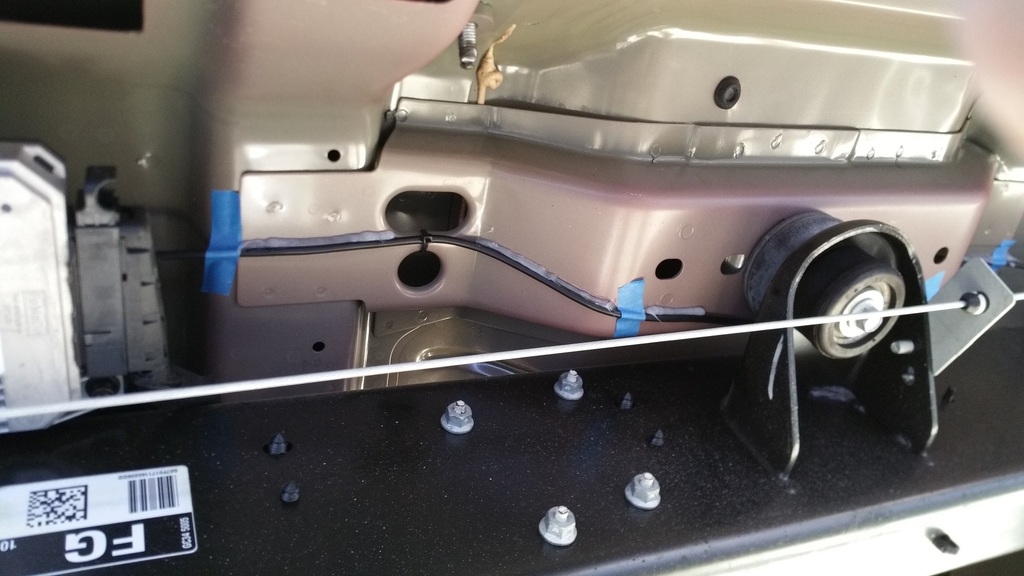
With the main wire run most of the way back, I switched to the tailgate wires. Here I used zip ties to run it with the rear view camera wire along the upper rear frame member and to the drivers side rear corner. Running it with the camera wire allows enough slack for the tailgate to be lowered.
In the back corner I brought the front wire down the frame and ran it along the main harness to a point I could connect it to the rear wire and secured it all with zip ties. Went back and clipped the tie tails and crawled out from under the truck. Hitting the lock and unlock on the trucks remote now locks and unlocks the tailgate, I am a happy camper and hopefully will not have another expensive tailgate stolen! This seems to be a really well made kit even if the instructions suck, if you decide to add this, leave more time than they say, depending on your truck it can take quite a while. We will have to wait and see how it holds up to the test of time.
I was looking at the F-150 parts and the Dodge parts to find a way to mod something but the prices were not favorable on either, then I found the Pop & Lock PL8250 Power Tailgate Lock for Ford on Amazon for $81.27:
https://www.amazon.com/gp/product/B0...?ie=UTF8&psc=1
After reading a bunch of reviews and some other research I decided to give it a try.

They say it takes about an hour and a half to install but in the reviews there is a lot of complaints about the color codes not being accurate, (more on that fun later) and most said it takes two hours plus to install, no sweat, I have most of Saturday to do it. The kit was well setup up with nice parts and the wire was all encased with waterproof plug for the underside. One issue I noticed right off was the tailgate wiring was quite long which will leave the plug way under the truck and make it hard if you want to remove the tailgate, this will not be a problem for me as with the rest of the build in mind, my tailgate will likely never have to come off.

First step is to gain access to the inside of the tailgate. Remove the torx bolts and the plugs as well as the old man handle. If you do not have the old man step then you only have to remove torx bolts to get the panel off.


With access inside, you have to remove the passenger side nut on the tailgate lock assembly and put two supplied washers over the stud, slide the pop & lock plate in and down over the stud with the lock arms straddling the tailgates lock arm assembly and then put the supplied lock nut on to hold it down. This is probably easy with out the old man step.......

If you have the old man step, it is in the way of getting the lock plate in and positioned so it needs to come out. Remove the 4 torx bolts indicated with yellow arrows, there are two more torx bolts on the inside face of the tailgate close to the bottom (close to the bed) that need to be removed. The two nut indicated by the pink arrows have to be removed also but you need to make sure and take the stud out from inside the tailgate. I suggest marking the exact position of all the hardware on this unit as with the bolts and nuts loose it moves around a bit and the movement is used to align it to the tailgate, with mine being new, I could still see the original markings.

With the hardware removed, slide the complete assembly out of the tailgate and set it to the side.

With that out of the way, the new lock assembly will slide in and fit over the stud. At this point the directions say to simply feed the wires through a drain hole in the bottom of the tailgate up to the lock assembly......yea, simply!! So, there are baffles and access hole and I think sand traps and waterholes with gators inside that think....well, something bit me, but anyway, this is no easy task and having a rearview camera just adds to the mess. We finally used my inspection camera to work out way through from the top, tape the wires to it and pull them back through, it was simply a nightmare. That done we reversed the procedure to put the tailgate back together.

On to the wiring....O dear lawd the wiring..... Yes, people said the color codes they have are not necessarily correct but opening the drivers door sill produced a 2" plus bundle of wires and the search was on, this truck has most every option available but I think now the amount of copper wire in just the door sill is half the cost of the truck! After many attempts and failures at finding the right wires I opened the B-pillar and unplugged the back door harness and used a meter to find the right wires. Crawling under the truck there is a rubber drain plug in the drivers foot well, I used this to push the wires into the cab and down the sill to the B-pillar. I used their taps as I did not want to cut the wires yet (its only a week old) but eventually I will go in and remove them and solder the wires in the right way. With this done the door harness was reconnected and the sill put back together.

Crawling under the truck I started to run the wire back to the rear. There is not a lot of points to use zip ties and I do not like loose wires hanging, especially in a vehicle that goes off road. So, it is zip tied where I can but I used blue painters tape to temporarily hold the wire in position and glued it to the bottom of the truck with clear silicone. We have used this method many times with off road rigs with great success.

Worked my way to the back of the cab

At the back of the cab I moved the wire down onto the frame and ran down the outside of the frame, normally I go inside the frame and run it with the original vehicle harness but there was far too many things in the way on this truck.

With the main wire run most of the way back, I switched to the tailgate wires. Here I used zip ties to run it with the rear view camera wire along the upper rear frame member and to the drivers side rear corner. Running it with the camera wire allows enough slack for the tailgate to be lowered.

In the back corner I brought the front wire down the frame and ran it along the main harness to a point I could connect it to the rear wire and secured it all with zip ties. Went back and clipped the tie tails and crawled out from under the truck. Hitting the lock and unlock on the trucks remote now locks and unlocks the tailgate, I am a happy camper and hopefully will not have another expensive tailgate stolen! This seems to be a really well made kit even if the instructions suck, if you decide to add this, leave more time than they say, depending on your truck it can take quite a while. We will have to wait and see how it holds up to the test of time.

#13
10-24-2016, 04:46 PM
Join Date: Sep 2016
Posts: 242
Likes: 0
Received 0 Likes
on
0 Posts
Another older one to add to the flow:
The truck is now 3 weeks old and the shell is getting put on. 2016 F-250 Platinum and the shell is a Leer model 122 with side sliding window, front sliding full removable window and the ceiling carpet.. This starts the full build of the bed area to include custom built bed drawers, under rail lighting, ceiling lights and more. This shell is huge inside and once the drawers and platform are built a full size mattress will fit nicely for the wife and I to sleep on when hauling the bikes around.

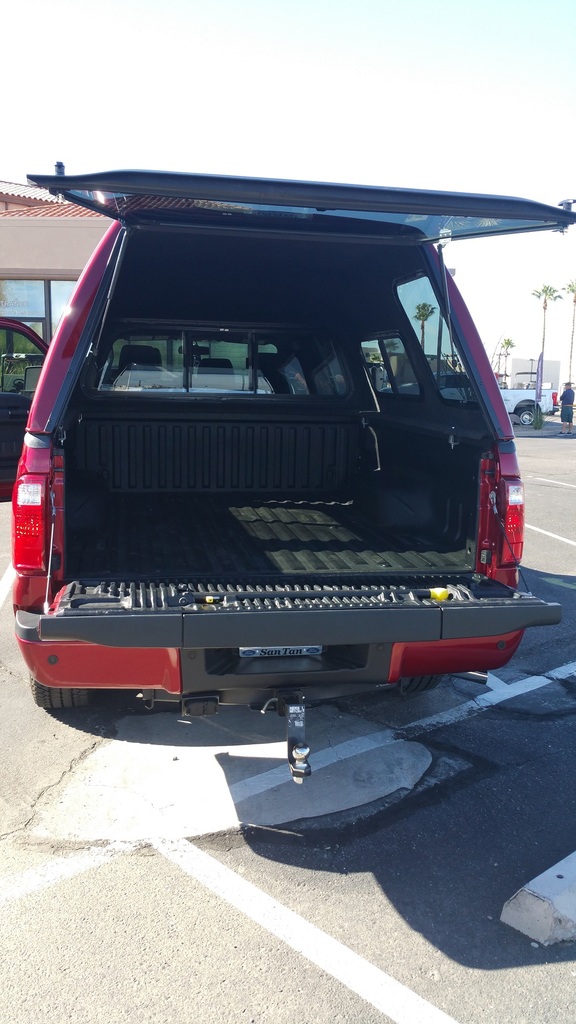
The truck is now 3 weeks old and the shell is getting put on. 2016 F-250 Platinum and the shell is a Leer model 122 with side sliding window, front sliding full removable window and the ceiling carpet.. This starts the full build of the bed area to include custom built bed drawers, under rail lighting, ceiling lights and more. This shell is huge inside and once the drawers and platform are built a full size mattress will fit nicely for the wife and I to sleep on when hauling the bikes around.


#14
10-24-2016, 04:47 PM
Join Date: Sep 2016
Posts: 242
Likes: 0
Received 0 Likes
on
0 Posts
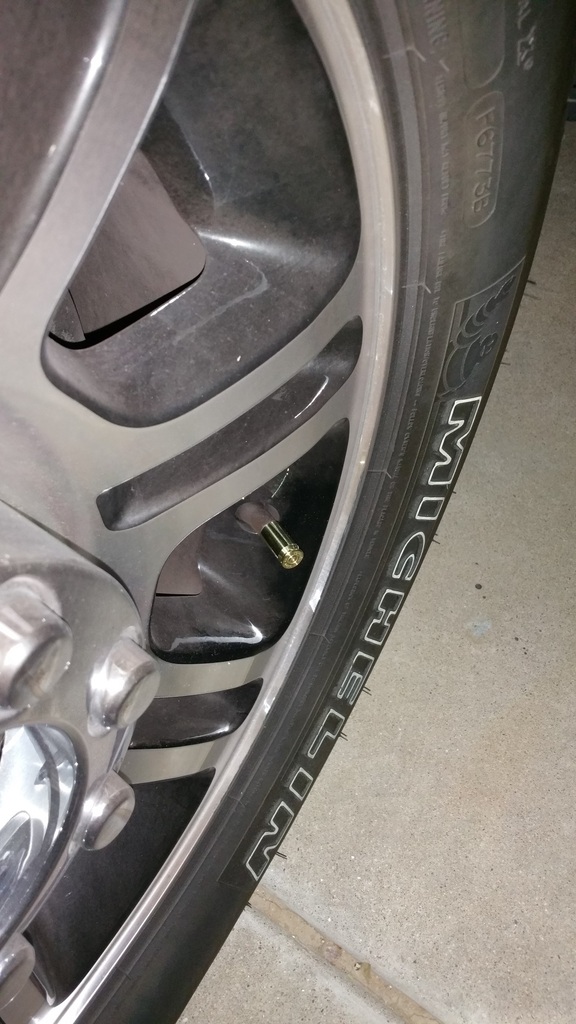
While playing with the truck, I kept seeing the ugly *** green valve stem caps on the tires and decided they needed to go....Nitrogen in your tires is a joke in the first place, yes, we used it in the race car but the tires on my truck do not generate near the heat, and the green caps are just stupid. So I decided it needed something cool. Being a gun toting redneck car guy I decided to ad a little 2nd amendment flare. I had some used .380, .40, 9mm and .45 brass laying around and started sizing it up. Decided the .45 cal fit best so polished up 4 brass and 4 aluminum. Here is 2 of each after polishing...

Took the brass and slid a black plastic valve cap inside, fit was real loose so I took it out and added a large dab of gorilla glue inside then put the cap back in and let it dry. Next morning I tried it on the truck and love it. Cap goes inside far enough that the brass comes down over the rubber stem a bit and makes for a nice fit. This pic is the brass but I decided the aluminum looks better with these wheels so I set up all the caps in aluminum and have been running them a couple weeks now with no lost caps
Lots more upgrades to go.

Took the brass and slid a black plastic valve cap inside, fit was real loose so I took it out and added a large dab of gorilla glue inside then put the cap back in and let it dry. Next morning I tried it on the truck and love it. Cap goes inside far enough that the brass comes down over the rubber stem a bit and makes for a nice fit. This pic is the brass but I decided the aluminum looks better with these wheels so I set up all the caps in aluminum and have been running them a couple weeks now with no lost caps

Lots more upgrades to go.
#15
10-26-2016, 08:58 AM

Truck looks great, and I love the idea for the valve stem caps.
Question on the running board lights. Are those always on or just when you lock or unlock it? I have considered the idea of doing that, but really only wanted them to light the ground when we are loading or unloading. I had looked at doing rock lights under it.
Question on the running board lights. Are those always on or just when you lock or unlock it? I have considered the idea of doing that, but really only wanted them to light the ground when we are loading or unloading. I had looked at doing rock lights under it.