How to Set 352 Timing w/Vac Advance
#1
 10-04-2010, 08:27 AM

Join Date: Jan 2008
Location: Cincinnati, OH
Posts: 246
Likes: 0
Received 0 Likes
on
0 Posts
How to Set 352 Timing w/Vac Advance
Over the weekend I bought my very own timing light and decided to attempt to dial in the timing on the old 352 in my '65 F-100. Can anyone verify if I did this correctly? I realize my settings might not be totally correct, but I wanted to at least make sure I am performing the correct procedure.
Note: I am working with all new components including re-man carb, pertronix ignition under the cap, new cap, rotor, wires, plugs, coil, vac advance canister (adjustable type). Checked the distributor for play in the shaft, did not feel any.
1. Disconnected the vacuum line from vac advance canister to timed vaccum port on bottom of carb and plugged the port on the carb.
2. Used my new fancy timing light to verify the engine speed at idle (it was off) and re-set it to 550 RPM.
3. Checked initial timing (it was off) and set it at 8 degrees.
4. Gave the engine some gas and held it at 2000 RPM while checking timing again for mechanical advance (centrifugal advance?) and measured 22 degrees.
5. Re-connected vacuum line between advance canister and timed vacuum port on carb. Held engine RPM at 2000 and measured 53 degrees!
6. Using an allen wrench, I cranked on the little screw in my new vacuum advance cansiter until it stopped (it came cranked all the way one way so I cranked it all the way back the other way for a starting point)
7. Re-checked timing with engine at 2000RPM and vac advance hooked up and this time I measured 34 degrees. I had the vac advance canister cranked all the way "down" in my estimation, so it seems like the minimum amount of vac advance this canister will give me is 12 degrees??
So:
8 degrees initial timing
22 degrees with mechanical advance (@ 2000rpm)
34 degrees with mechanical and vacuum advance (@ 2000rpm)
I drove it about 30 miles up and down hills and no pinging that I could hear, but still got hesitation when barely in the gas (that could be the carb though cause the daily temp dropped 30 degrees since I adjusted on the carb.)
It starts up easy and doesn't "diesel" when I shut it off.
Did I do all this correctly
<!-- / message -->
#2
10-04-2010, 09:59 AM
Post Fiend
You did everything right except that 2000 RPM is no where near enough RPM for max mechanical advance unless the dist has be recurved. Stock, you will need at least 4000 RPM and maybe even higher to see you total advance. Keep revving the engine until the timing stops advancing to see what the total is and at what RPM it happens at.
FYI, total mechanical advance should be 36� to 38� (with vacuum advance disconnected). With the the timing set so you have the 36� total advance, then check you initial. That should be what you should use for an initial advance number.
12� of vacuum advance is probably fine for your application. But it never counts toward you total advance. It is in addition to you total mechanical advance.
I always recommend a dist. mechanical advance recurve. Shot for the shorts advance curve your dist. has and try to have full advance in by 3500 RPM. This will require you to obtain and recurve kit with lighter springs.
Go here for recurve info. Yes, I know it is a Dura-spark dist. but they are the same.
Crap my link is no good. I will research it and get back to you.
#3
10-04-2010, 10:24 AM
Post Fiend
The Ford Dura-spark distributor is an inexpensive and reliable alternative to the expensive aftermarket distributors. You can find them for about $52.00 US retail and the recurve spring kits are cheap at about $7.00 US. This recurving operation usually takes me about an hour or less. Just use care with the little parts as they like to migrate out of sight or flip half way across the room.
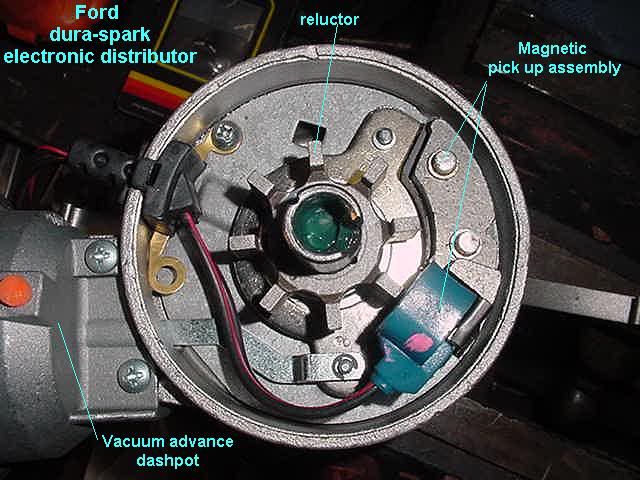
Step 1
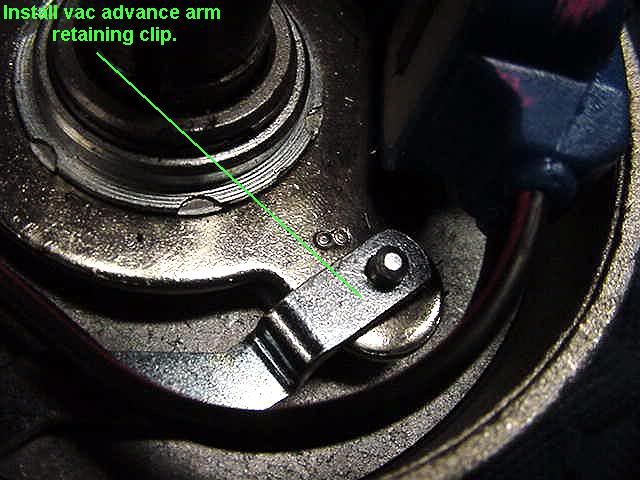
Remove the two vacuum advance dashpot to main body screws and then the vacuum advance arm to breaker plate pin C clip.
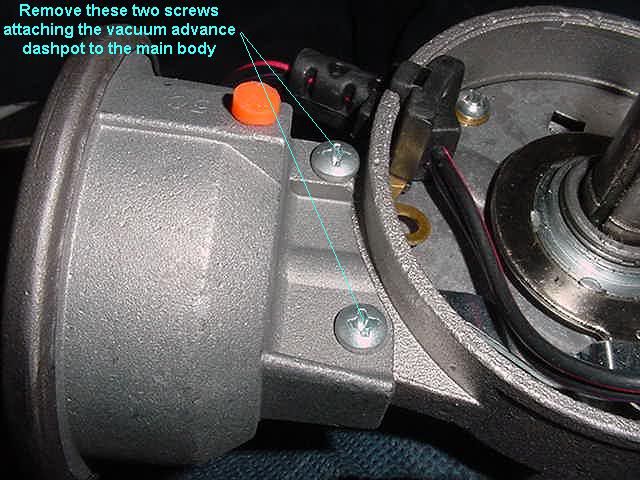
Pull advance dashpot away from main body and pull the arm off of the breaker plate pin.

Step 2
Mark reluctor position as there are two slots.
Remove reluctor from upper advance shaft. Use two prybars or large screwdrivers and Do Not pry on the teeth but rather the beefy portion of the reluctor near the center shaft.

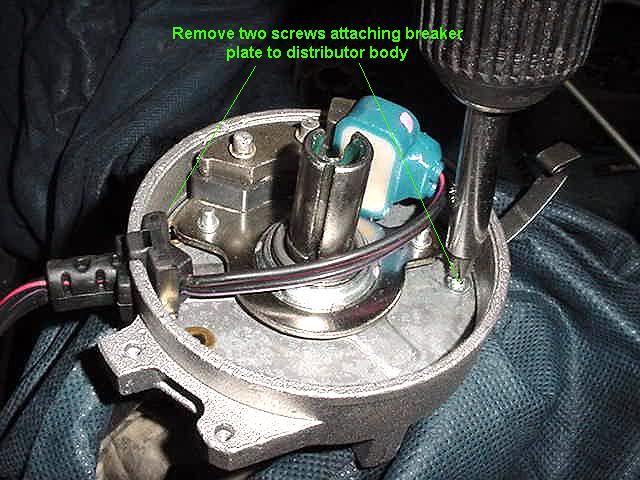
Step 3
Remove the two breaker plate to main body retaining screws. Rotate the pick up to gain access. lift off breaker plate.
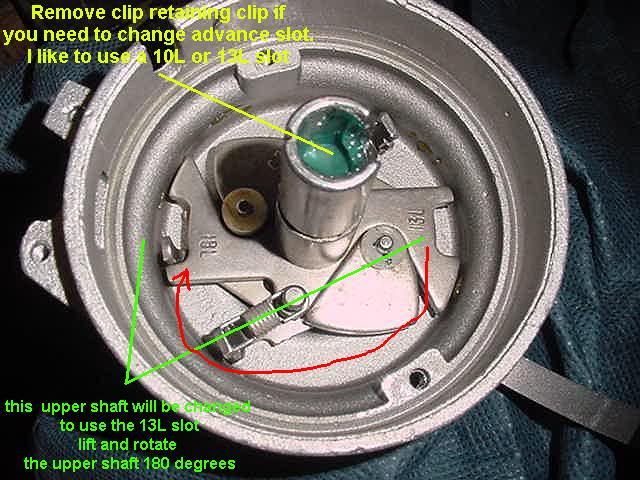
To figure approximate slot width for a given advance figure Multiply the number of desired centrifugal degrees by .013" then add .150" to account for the width of the stop pin.
8L slot = 16 degrees centrifugal advance = .358"
9L slot = 18 degrees centrifugal advance = .384"
10L slot = 20 degrees centrifugal advance = .410" Total slot width
11L slot = 22 degrees centrifugal advance = .436
12L slot = 24 degrees centrifugal advance = .462"
13L slot = 26 degrees centrifugal advance = .488"
14L slot = 28 degrees centrifugal advance = .514
Step 6
install the springs from the recurve kit and bend the tabs to keep tension on both springs so the advance shaft returns to its idle position. Step 4
Decide which slot you want to use and if necessary remove the upper advance shaft retaining clip and springs so you can lift and rotate the shaft in to the proper position. If ordering a distributor from a parts store ask for one for a 1975 elite with a 460 4v engine. You will be more likely to get the lower number advance slot like a 10L or 13L rather than the 18 or 21L's. If you have a distributor with the larger numbered slots limit rotation via welding the slot smaller or placing a bushing around the pin to limit total shaft roatation.
Step 7
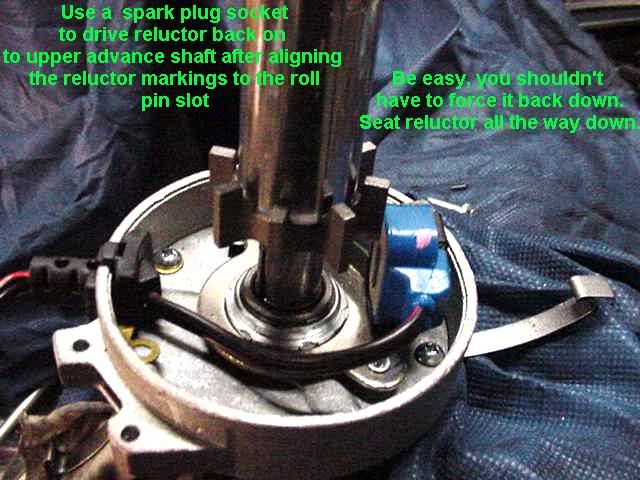
Reassemble in the reverse order. Breaker plate, Reluctor, Vac advance dashpot and return the little clips to their proper place. Place the reluctor back on the shaft in its original position and align the roll pin slot in the reluctor with the roll pin slot on the upper distributor shaft. Carefully place the roll pin into place after fully seating reluctor on shaft and gently push it back into place with a hammer and a small punch. The 1/2 slots in both the reluctor and in the shaft together make a round hole for the roll pin.
Step 8
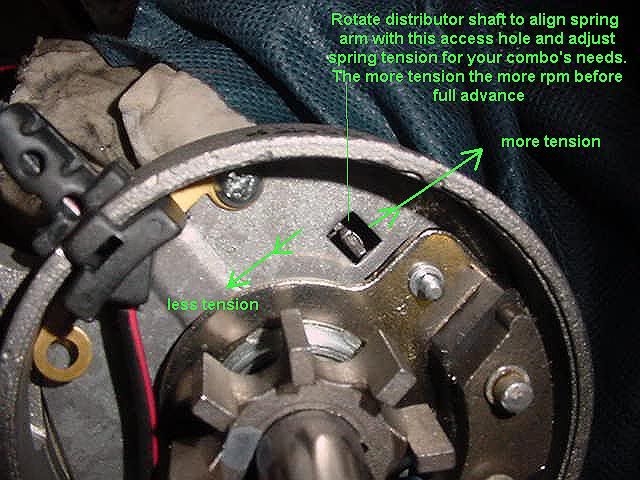
After complete reassembly of your distributor again make sure that the upper shaft returns to the idle position via spring tension. Adjust the spring tension adjustment arms so that the shaft returns to the idle position via spring tension if necessary. You can access the adjustment arms through the square access hole, adjust tension when the distributor is in the engine and you can check RPM to full advance with a dialback timing light. The shaft has to be still to make this adjustment.
Typically a high performance application needs full centrifugal advance in by 2,500 to 3,000 rpm. Towing and heavily loaded combos typically need to have full advance delayed to 3,500 rpm or thereabouts. Each combo is unique and you will have to make adjustments based on expected use and Compression Ratio.
Step 1
Remove the two vacuum advance dashpot to main body screws and then the vacuum advance arm to breaker plate pin C clip.
Pull advance dashpot away from main body and pull the arm off of the breaker plate pin.
Step 2
Mark reluctor position as there are two slots.
Remove reluctor from upper advance shaft. Use two prybars or large screwdrivers and Do Not pry on the teeth but rather the beefy portion of the reluctor near the center shaft.
Step 3
Remove the two breaker plate to main body retaining screws. Rotate the pick up to gain access. lift off breaker plate.
To figure approximate slot width for a given advance figure Multiply the number of desired centrifugal degrees by .013" then add .150" to account for the width of the stop pin.
8L slot = 16 degrees centrifugal advance = .358"
9L slot = 18 degrees centrifugal advance = .384"
10L slot = 20 degrees centrifugal advance = .410" Total slot width
11L slot = 22 degrees centrifugal advance = .436
12L slot = 24 degrees centrifugal advance = .462"
13L slot = 26 degrees centrifugal advance = .488"
14L slot = 28 degrees centrifugal advance = .514
Step 6
install the springs from the recurve kit and bend the tabs to keep tension on both springs so the advance shaft returns to its idle position. Step 4
Decide which slot you want to use and if necessary remove the upper advance shaft retaining clip and springs so you can lift and rotate the shaft in to the proper position. If ordering a distributor from a parts store ask for one for a 1975 elite with a 460 4v engine. You will be more likely to get the lower number advance slot like a 10L or 13L rather than the 18 or 21L's. If you have a distributor with the larger numbered slots limit rotation via welding the slot smaller or placing a bushing around the pin to limit total shaft roatation.
Step 7
Reassemble in the reverse order. Breaker plate, Reluctor, Vac advance dashpot and return the little clips to their proper place. Place the reluctor back on the shaft in its original position and align the roll pin slot in the reluctor with the roll pin slot on the upper distributor shaft. Carefully place the roll pin into place after fully seating reluctor on shaft and gently push it back into place with a hammer and a small punch. The 1/2 slots in both the reluctor and in the shaft together make a round hole for the roll pin.
Step 8
After complete reassembly of your distributor again make sure that the upper shaft returns to the idle position via spring tension. Adjust the spring tension adjustment arms so that the shaft returns to the idle position via spring tension if necessary. You can access the adjustment arms through the square access hole, adjust tension when the distributor is in the engine and you can check RPM to full advance with a dialback timing light. The shaft has to be still to make this adjustment.
Typically a high performance application needs full centrifugal advance in by 2,500 to 3,000 rpm. Towing and heavily loaded combos typically need to have full advance delayed to 3,500 rpm or thereabouts. Each combo is unique and you will have to make adjustments based on expected use and Compression Ratio.
#4
10-04-2010, 10:28 AM
Join Date: Jan 2008
Location: Cincinnati, OH
Posts: 246
Likes: 0
Received 0 Likes
on
0 Posts
Awesome -Thanks for the info. I wanted to verify that my procedure was correct, and then start asking questions about what the numbers should actually be.
So I can change the dist curve without removing it from the engine? Where do I get the new peice which has the different advance slot?
So I can change the dist curve without removing it from the engine? Where do I get the new peice which has the different advance slot?
#5
10-04-2010, 11:04 AM
Post Fiend
#7
10-04-2010, 11:35 AM
Trending Topics
#8
10-05-2010, 09:00 AM


#9
10-12-2010, 12:29 PM
Join Date: Jan 2008
Location: Cincinnati, OH
Posts: 246
Likes: 0
Received 0 Likes
on
0 Posts
UPDATE:
I left the distributor wieghts/springs alone and set the initial at 10 degrees. I revved it to about 3900 (it was singing!!) and measured total advance at 33 degrees (not including the vac advance). I also moved the accelerator pump linkage to the hole closer to the pump, and she is finally running real smooth. Shifts smooth and accelerates smooth. I put 600 miles on it over the past weekend hauling heavy stuff through the hills of KY and she had plenty of power and no pinging. I actually got 17.8 MPG going around 65 on the highway at about 2400rpm. I couldn't believe it. Almost as efficient as my brother's newer Ranger!
I left the distributor wieghts/springs alone and set the initial at 10 degrees. I revved it to about 3900 (it was singing!!) and measured total advance at 33 degrees (not including the vac advance). I also moved the accelerator pump linkage to the hole closer to the pump, and she is finally running real smooth. Shifts smooth and accelerates smooth. I put 600 miles on it over the past weekend hauling heavy stuff through the hills of KY and she had plenty of power and no pinging. I actually got 17.8 MPG going around 65 on the highway at about 2400rpm. I couldn't believe it. Almost as efficient as my brother's newer Ranger!
#10
10-29-2012, 03:09 PM

1966 352 timing
I have a 1966 F350, I replaced the old disturbitor that was shoot with a new one. I stayed with the org. piont set system and replaced coil, wires and spark plugs. I have it running smooth at 600rpm, I do not have a timing light and the timing plate on the engine is rust badly, so I set the old way by sound, but should I raise the rpm up high (2000) when doing it this way and fine the smooth spot and tighten it there?
#11
10-30-2012, 03:42 PM
You need to beg, borrow or steal a timing light and set the timing correctly for the best results. I used to use the "by ear" method until inaudible spark knock burnt a hole in a piston. A cheap timing light is only a few bucks and you might even be able to rent one from the auto parts store. A timing light is an essential tool for a Pro or a DIYer. Also check your local Craigs List for tools.
#12
10-31-2012, 06:30 AM
#13
06-25-2013, 09:21 AM
Elder User
Join Date: Feb 2006
Location: Cascade, ID
Posts: 788
Likes: 0
Received 0 Likes
on
0 Posts
#14
09-29-2016, 08:04 AM
I would add to this thread to be very wary of rebuilt Duraspark distributors. Many of them don't have the magnetic pickup firmly secured to the plate. You will never be able to get your timing stable if it's moving around, even a little because the gap at the reluctor will change.
I've found it's better to find an original Ford plate in the wrecking yard and swap that in a rebuilt unit. I paid a lot for a supposed "performance" rebuild and it ran like crap. I rebuilt it myself and swapped out the plate with a used Ford piece and the difference was amazing.
Short of being hit with a hammer or being in a fire, I don't think the mag pickup ever goes bad.
#15
05-02-2019, 07:41 AM
