

 11-11-2014, 06:19 PM
Last edit by: IB Advertising
See related guides and technical advice from our community experts:
Browse all: Wheels & Tires How-Tos
- How to Replace Wheel Hub
Step by step instructions for do-it-yourself repairs
Browse all: Wheels & Tires How-Tos

How To: Replace Rear Wheel/Hub Bearings
#1
08-26-2010, 07:56 AM

Join Date: Jun 2007
Location: Rogers, MN
Posts: 459
Likes: 0
Received 0 Likes
on
0 Posts
How To: Replace Rear Wheel/Hub Bearings
How to Replace the Rear Wheel/Hub Bearings in a Ford 10.5"/10.25" Axle
This was done on my:
2003 Ford Excursion – 4x4 – 7.3L Diesel
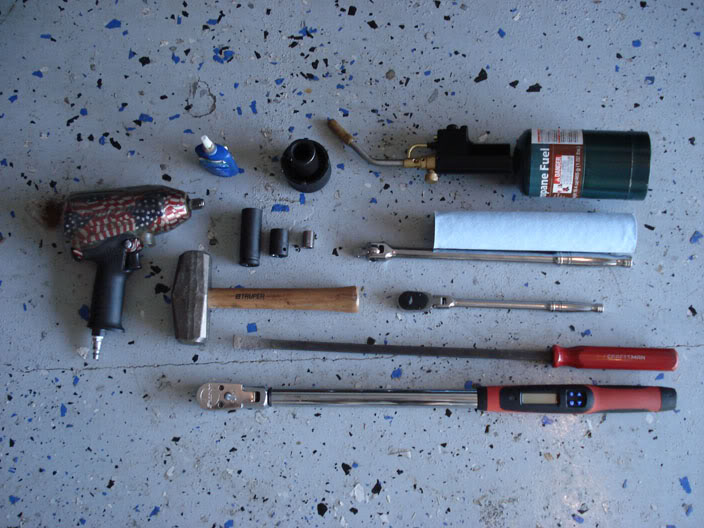
Tools Used:
- 1/2” Drive Impact
- 1/2” Drive Breaker Bar
- 3/8” Drive Ratchet
- Pry Bars
- Hammer
- Torch
- 1/2” Drive Torque Wrench
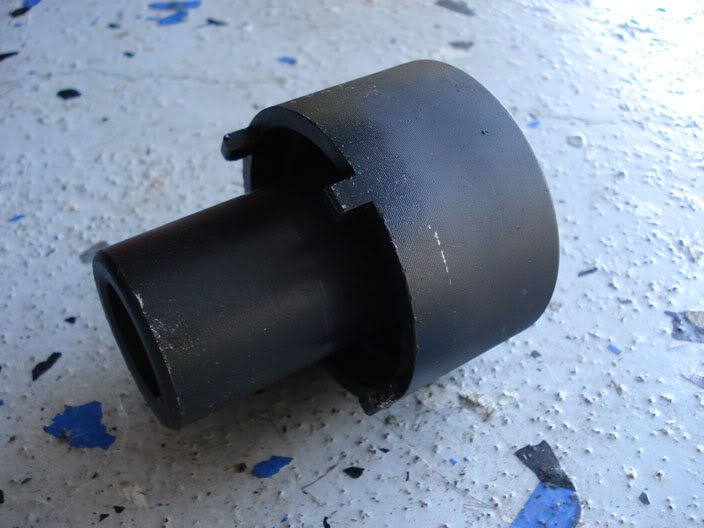
- Ford Rear Hub Socket
- 13/16” for Lug Nuts
- 18mm for Rear Brake Caliper Mounting Bracket Bolts
- 12mm for Rear Brake Caliper Mounting Bolts (Slide Pin)
- Misc. other sockets for other than intended uses (Not Shown)
- Puller (Not Shown)
- Punch Set (Not Shown)
- Dremel and Cut-Off Wheel (Not Shown)
- Blue Loctite
- Rags
- Brake Cleaner
- Penetrating Fluid (Optional)
- Jack and Stands
- And a bunch of stuff I probably forgot
Parts Used:
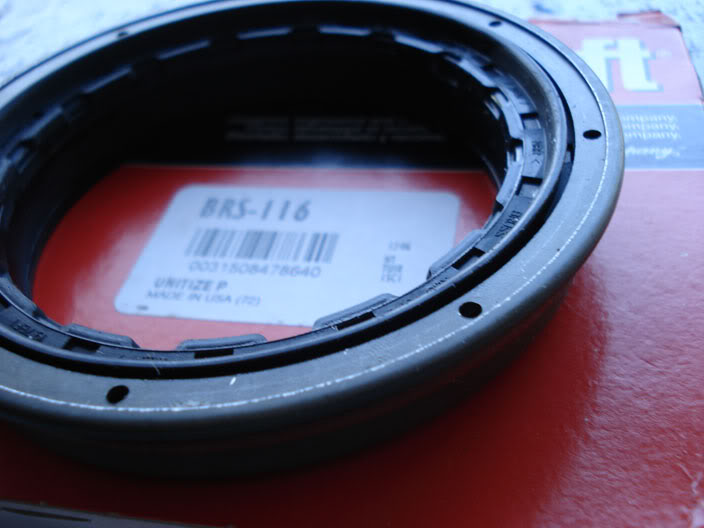
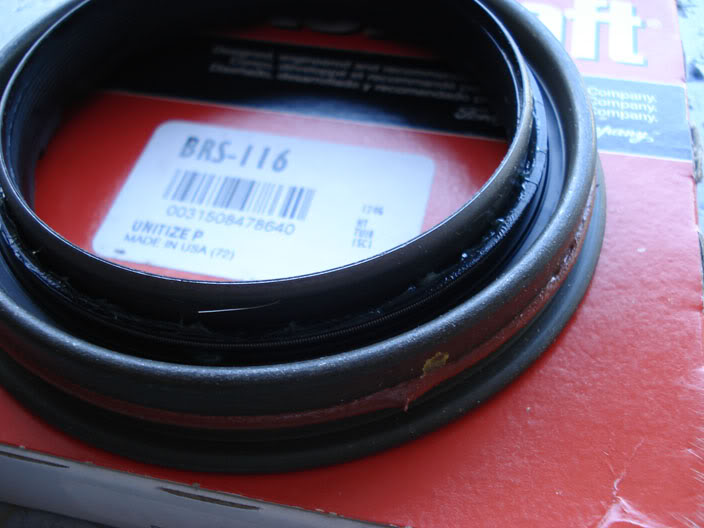
- Rear Hub Seals - #2C3Z-1177-AB (Qty 2)
- Axle Shaft O-Rings - #E5TZ-4A331-A (Qty 2: Thanks to Guzzle for this one)
- Oil Slinger (I Broke Mine) - #F81Z-4670-AA (Qty 1: One per side; May Vary with model year)
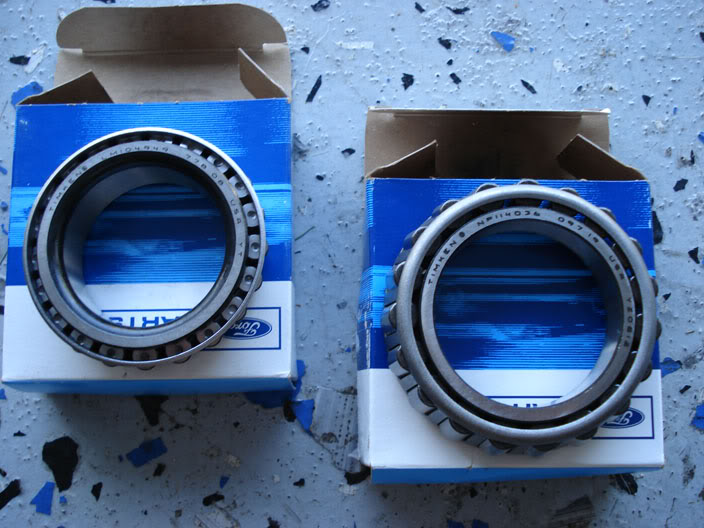
- Inner Bearing - # F81Z1244AB (Qty 2: Cone Only Does NOT Include Cup, and please double check this Ford Part Number); Also TIMKEN# NP114036 09719 USA YZ081Z
- Outer Bearing - # C7TZ-1240-A (Qty 2: Cone Only Does NOT Include Cup); Also TIMKEN# LM104949 778 08 YT
- Inner Bearing Race - #NP064306 (Qty 2) Sourced from NAPA
- Outer Bearing Race - #LM104911 (Qty 2) Sourced from NAPA
- 75W-140 Gear Oil

Step 1:
Raise Vehicle and Support with Jack Stands. (Crack Lug Nuts and Axle Bolts loose if Necessary)
Step 2:
Remove Wheel. (13/16” Socket)
Step 3:
Remove Brake Caliper and Caliper Mounting Bracket. (Caliper Bracket – 18mm; Slide Pin Bolt – 12mm) Secure caliper so it is not hanging by the brake line.
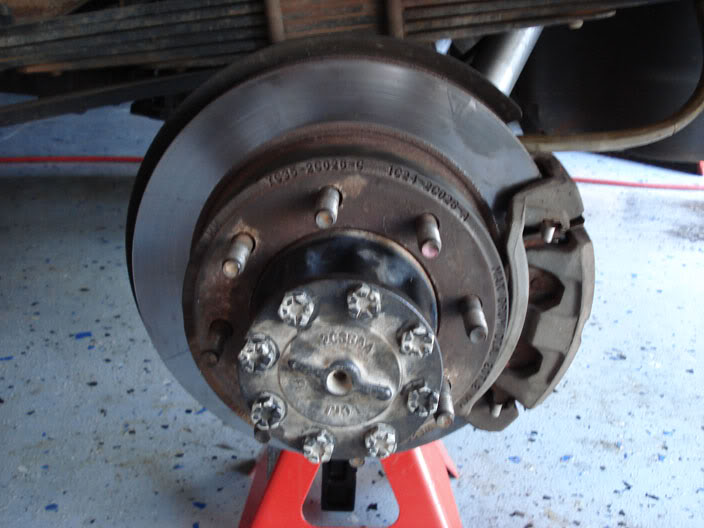
Step 4:
Remove Brake Disc (Mine were a PITA, and I had to use a plastic dead blow, some penetrating fluid, and some heat).
This was done on my:
2003 Ford Excursion – 4x4 – 7.3L Diesel
Tools Used:
- 1/2” Drive Impact
- 1/2” Drive Breaker Bar
- 3/8” Drive Ratchet
- Pry Bars
- Hammer
- Torch
- 1/2” Drive Torque Wrench
- Ford Rear Hub Socket
- 13/16” for Lug Nuts
- 18mm for Rear Brake Caliper Mounting Bracket Bolts
- 12mm for Rear Brake Caliper Mounting Bolts (Slide Pin)
- Misc. other sockets for other than intended uses (Not Shown)
- Puller (Not Shown)
- Punch Set (Not Shown)
- Dremel and Cut-Off Wheel (Not Shown)
- Blue Loctite
- Rags
- Brake Cleaner
- Penetrating Fluid (Optional)
- Jack and Stands
- And a bunch of stuff I probably forgot
Parts Used:
- Rear Hub Seals - #2C3Z-1177-AB (Qty 2)
- Axle Shaft O-Rings - #E5TZ-4A331-A (Qty 2: Thanks to Guzzle for this one)
- Oil Slinger (I Broke Mine) - #F81Z-4670-AA (Qty 1: One per side; May Vary with model year)
- Inner Bearing - # F81Z1244AB (Qty 2: Cone Only Does NOT Include Cup, and please double check this Ford Part Number); Also TIMKEN# NP114036 09719 USA YZ081Z
- Outer Bearing - # C7TZ-1240-A (Qty 2: Cone Only Does NOT Include Cup); Also TIMKEN# LM104949 778 08 YT
- Inner Bearing Race - #NP064306 (Qty 2) Sourced from NAPA
- Outer Bearing Race - #LM104911 (Qty 2) Sourced from NAPA
- 75W-140 Gear Oil
Step 1:
Raise Vehicle and Support with Jack Stands. (Crack Lug Nuts and Axle Bolts loose if Necessary)
Step 2:
Remove Wheel. (13/16” Socket)
Step 3:
Remove Brake Caliper and Caliper Mounting Bracket. (Caliper Bracket – 18mm; Slide Pin Bolt – 12mm) Secure caliper so it is not hanging by the brake line.
Step 4:
Remove Brake Disc (Mine were a PITA, and I had to use a plastic dead blow, some penetrating fluid, and some heat).
Last edited by Stewart_H; 12-18-2013 at 10:54 PM. Reason: Corrected O-ring part number
#2
08-26-2010, 07:58 AM
Join Date: Jun 2007
Location: Rogers, MN
Posts: 459
Likes: 0
Received 0 Likes
on
0 Posts
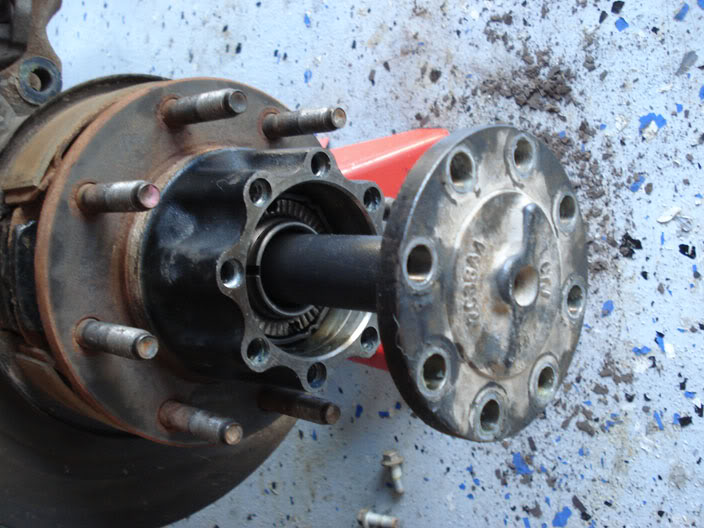
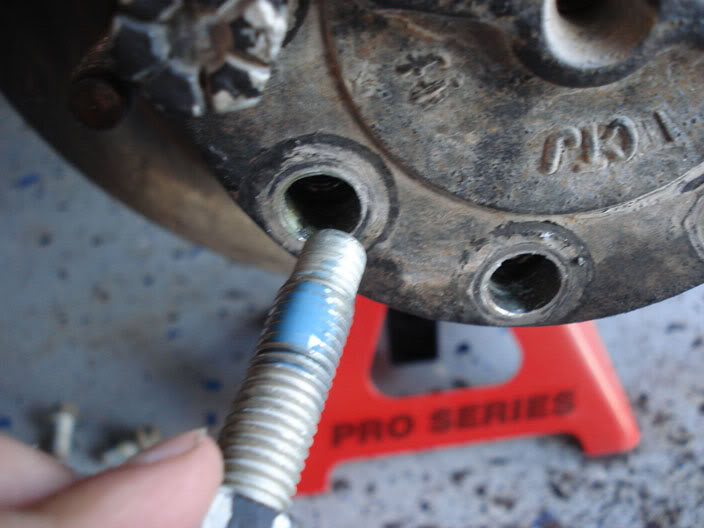
Step 5:
Put an oil catch pan/some rags under the hub, and remove the axle shaft. There are 8 Bolts that have a torque of 80 ft/lb with blue Loctite, then you just pull it out (Bolts are 18mm).
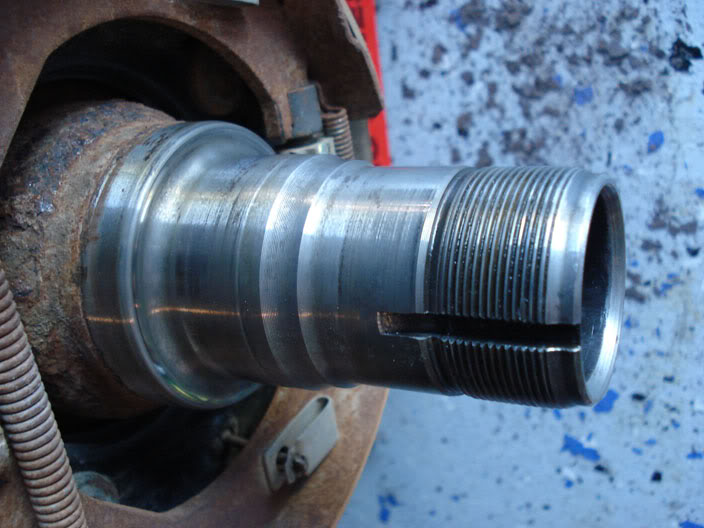
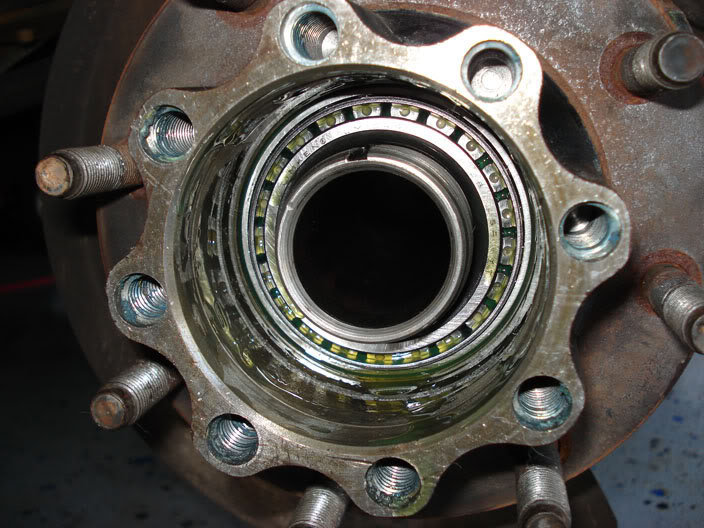
Step 6:
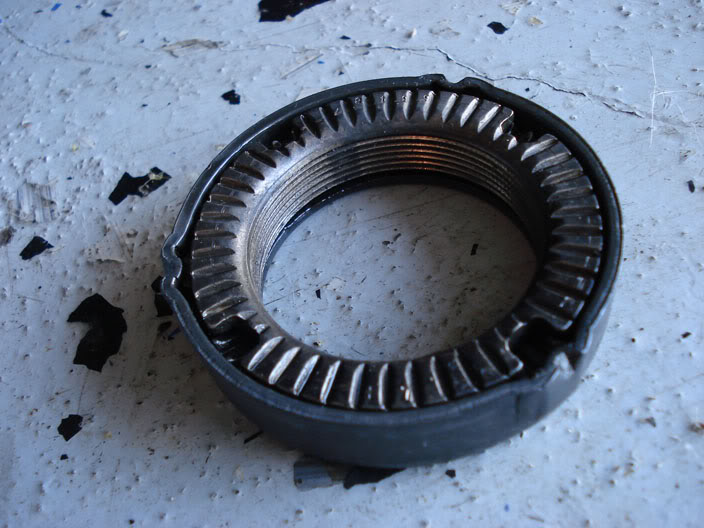
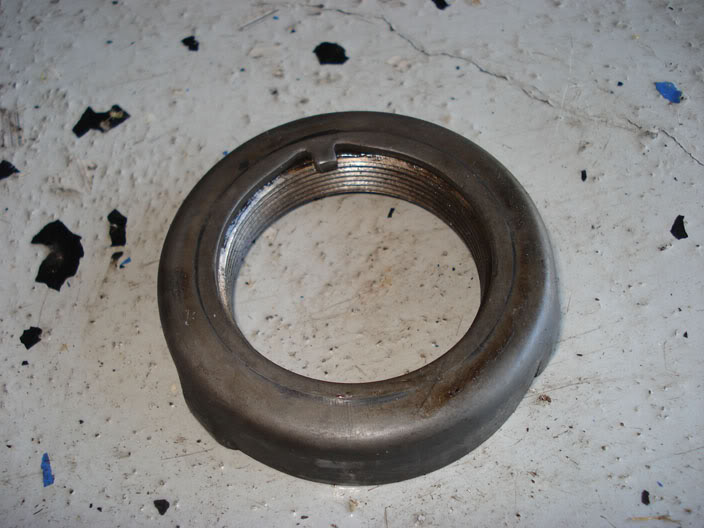
Loosen the hub nut with the special socket (on my truck the Drivers Side was LH Thread, and the Passenger Side was RH Thread; some axles don’t have LH threads). The nut will click wile loosening it. The outer bearing may want to fall out after removing the nut; remove and set aside (It is in there pretty loose).

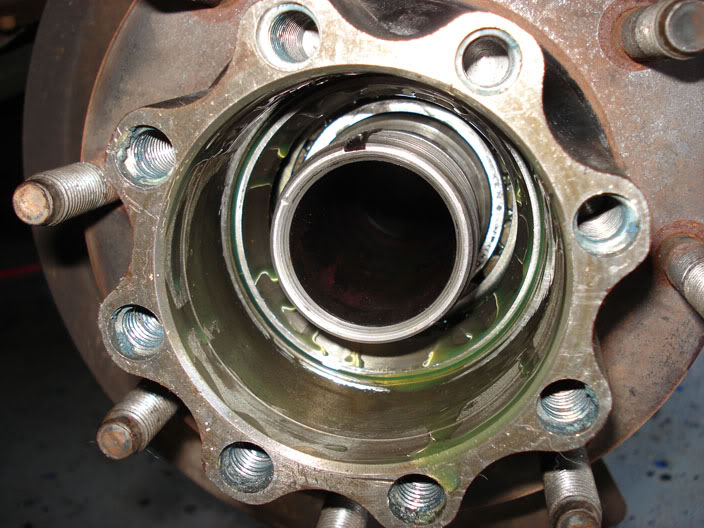
Step 7:
Remove the Hub. I needed to use a puller.
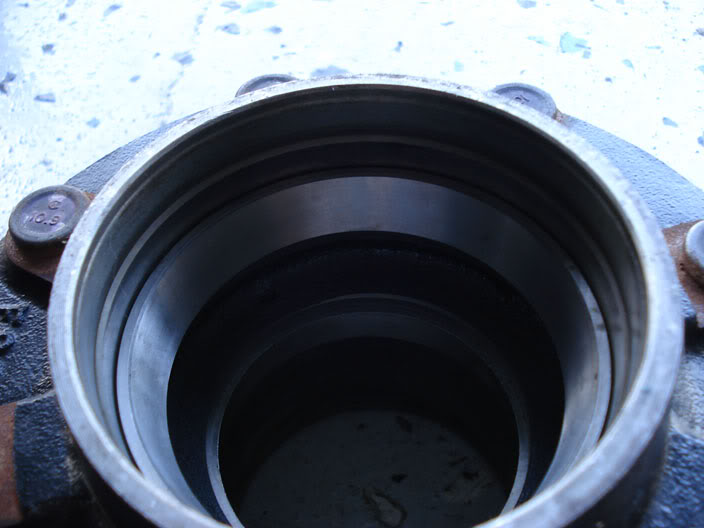
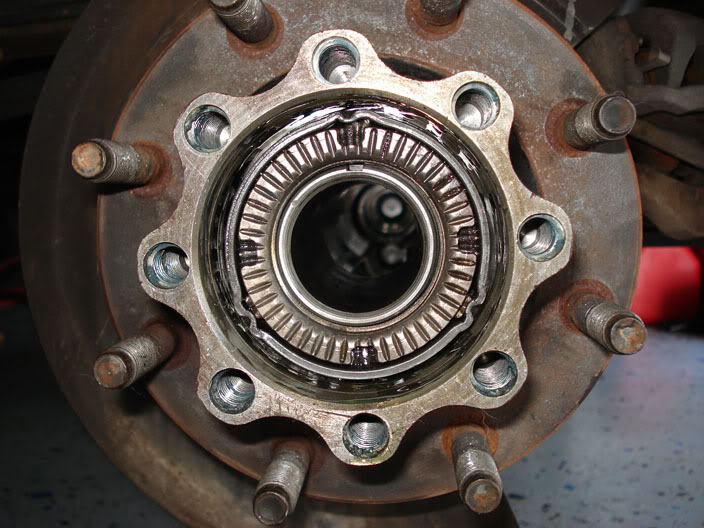
Step 8:
My hub seal pulled apart and left the inner portion still attached to the Axle housing. A little prying popped it off.
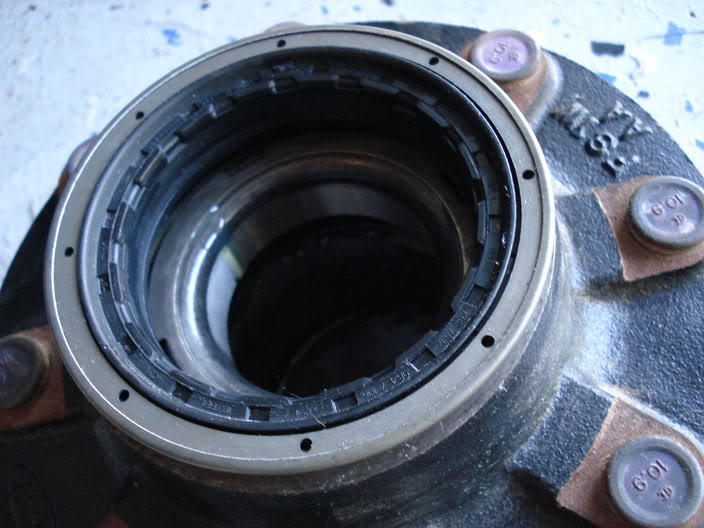
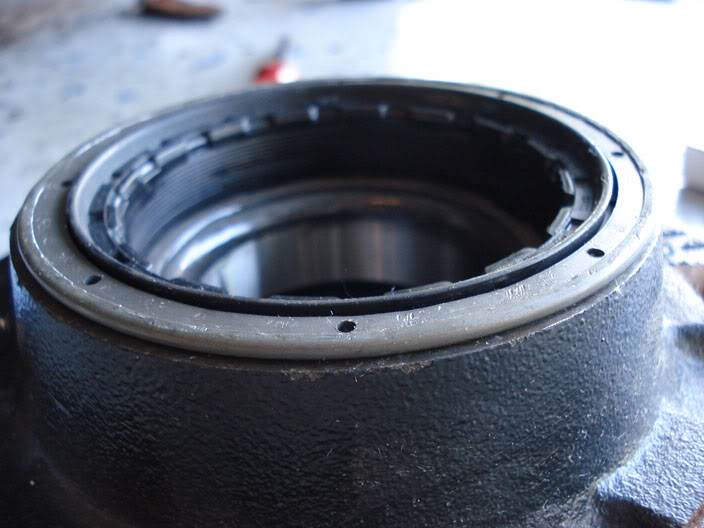
Step 9:
Next, we need to remove the part of the seal still pressed into the hub. I was not able to do this without pounding on the inner bearing to push the seal out. This is how I broke my oil slinger. If the seal separates, you are able to remove the oil slinger wile the seal is still installed (which is what I did on the opposite side, and which is why I only needed one slinger). In hind sight, I would have removed the seal by trying to pry it off, or chisel it off from the side.
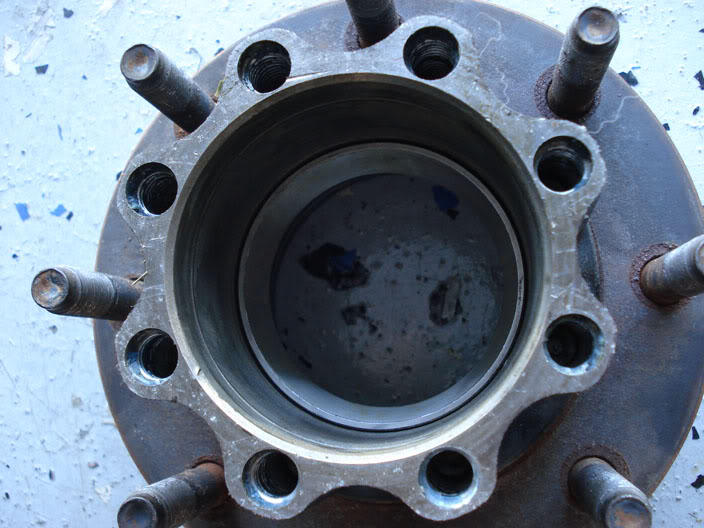
Step 10:
After the seal is removed, remove the Inner Bearing (and oil slinger if you haven’t already) and set aside.
Put an oil catch pan/some rags under the hub, and remove the axle shaft. There are 8 Bolts that have a torque of 80 ft/lb with blue Loctite, then you just pull it out (Bolts are 18mm).
Step 6:
Loosen the hub nut with the special socket (on my truck the Drivers Side was LH Thread, and the Passenger Side was RH Thread; some axles don’t have LH threads). The nut will click wile loosening it. The outer bearing may want to fall out after removing the nut; remove and set aside (It is in there pretty loose).
Step 7:
Remove the Hub. I needed to use a puller.
Step 8:
My hub seal pulled apart and left the inner portion still attached to the Axle housing. A little prying popped it off.
Step 9:
Next, we need to remove the part of the seal still pressed into the hub. I was not able to do this without pounding on the inner bearing to push the seal out. This is how I broke my oil slinger. If the seal separates, you are able to remove the oil slinger wile the seal is still installed (which is what I did on the opposite side, and which is why I only needed one slinger). In hind sight, I would have removed the seal by trying to pry it off, or chisel it off from the side.
Step 10:
After the seal is removed, remove the Inner Bearing (and oil slinger if you haven’t already) and set aside.
Last edited by GregN; 08-26-2010 at 02:17 PM. Reason: More Smileys
#3
08-26-2010, 07:59 AM
Join Date: Jun 2007
Location: Rogers, MN
Posts: 459
Likes: 0
Received 0 Likes
on
0 Posts
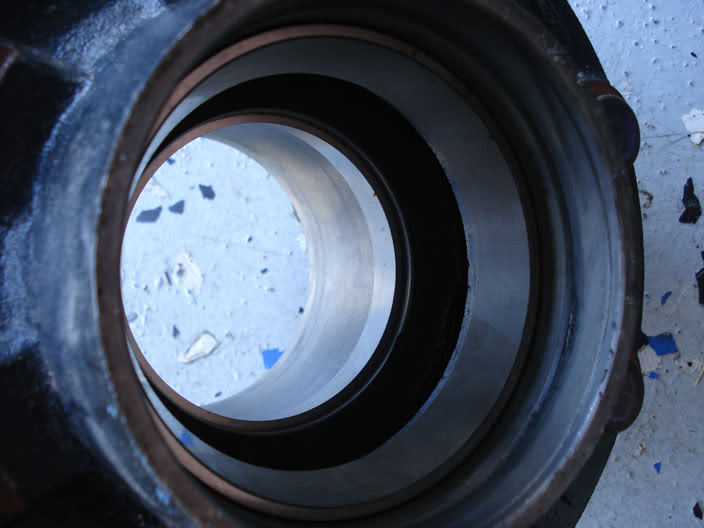
Step 11:
If you are replacing the Bearing Races/Cups (which I recommend when replacing the roller/taper half), then these will need to be either pressed or pounded out. I do not have an Arbor press, or the correct sized pullers/pushers/plates. I did it the old fashioned way and just tapped them out using a punch and a hammer. I did the inner side first, and then did the outer side. Each one took about 2 minutes; just work your way around tapping opposite sides so that the race doesn’t get crooked and bind up. Keep the races that are removed.
Step 12:
Clean everything and get set-up to press/tap the new races into the hubs. Make sure that you didn’t mar any of the surfaces inside the hub while removing the old races; if you did, just clean them up with a piece of emery or a Dremel. If you are doing this completely by hand, I would suggest having the races in the freezer this whole time to help them shrink a little. Also, I did both sides at the same time, so I took all four bearing races and cut all of them into a “C” (so completely cut through each race with a cut-off wheel one time); I used these to make sure the new races were completely seated.
Step 13:
After everything is cleaned and your races are out of the freezer and ready to go, I heated the hubs so that they were hot to the touch (to expand the metal slightly), then put the race in THE CORRECT WAY (thick part in first). I then put the two old, cut races skinny part first on top of the new race, and pounded the stack until the new race bottomed in the hub (there will be an obvious thunk when you hit bottom). Repeat this on all 4 races (2 per hub). Double check that these races are going in the correct way. Do not use a punch directly on the race to seat it; you will most likely deform and destroy it. You have two free pressing dies (the old races) that are the perfect size, and are very easy to remove by hand if you cut them with a cut-off (the width of the blade/wheel allows the race to squeeze together).
Step 14:
After everything cools, you can start to re-assemble and install. Set the hub studs down, and set the Inner Bearing on the race. Either pack the bearing with grease, or coat it with gear lube first. Make sure the slinger get put in next with the little tabs down (into the bearing). Take the hub seal and set it on top of that. The seal will need to be seated. I just used a hammer (CAREFULLY) to seat the seal.
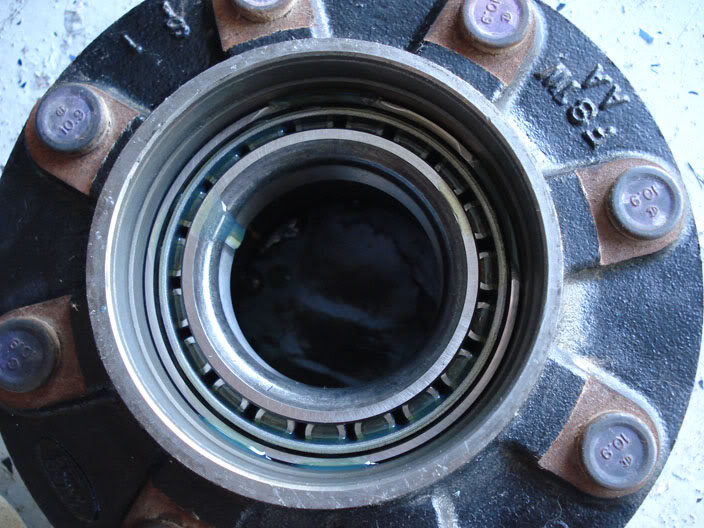

Step 15:
Put the hub on its side and fill the cavity in the center of the hub with Gear Oil (It is difficult to do this after it is slid onto the spindle), and slide the hub onto the spindle (that you remembered to clean in Step 12) and push on as far as it will go. Fill new outer bearing with gear oil (or pack with grease) and slide onto spindle. Make sure the bearing is fully seated in the cup.

If you are replacing the Bearing Races/Cups (which I recommend when replacing the roller/taper half), then these will need to be either pressed or pounded out. I do not have an Arbor press, or the correct sized pullers/pushers/plates. I did it the old fashioned way and just tapped them out using a punch and a hammer. I did the inner side first, and then did the outer side. Each one took about 2 minutes; just work your way around tapping opposite sides so that the race doesn’t get crooked and bind up. Keep the races that are removed.
Step 12:
Clean everything and get set-up to press/tap the new races into the hubs. Make sure that you didn’t mar any of the surfaces inside the hub while removing the old races; if you did, just clean them up with a piece of emery or a Dremel. If you are doing this completely by hand, I would suggest having the races in the freezer this whole time to help them shrink a little. Also, I did both sides at the same time, so I took all four bearing races and cut all of them into a “C” (so completely cut through each race with a cut-off wheel one time); I used these to make sure the new races were completely seated.
Step 13:
After everything is cleaned and your races are out of the freezer and ready to go, I heated the hubs so that they were hot to the touch (to expand the metal slightly), then put the race in THE CORRECT WAY (thick part in first). I then put the two old, cut races skinny part first on top of the new race, and pounded the stack until the new race bottomed in the hub (there will be an obvious thunk when you hit bottom). Repeat this on all 4 races (2 per hub). Double check that these races are going in the correct way. Do not use a punch directly on the race to seat it; you will most likely deform and destroy it. You have two free pressing dies (the old races) that are the perfect size, and are very easy to remove by hand if you cut them with a cut-off (the width of the blade/wheel allows the race to squeeze together).
Step 14:
After everything cools, you can start to re-assemble and install. Set the hub studs down, and set the Inner Bearing on the race. Either pack the bearing with grease, or coat it with gear lube first. Make sure the slinger get put in next with the little tabs down (into the bearing). Take the hub seal and set it on top of that. The seal will need to be seated. I just used a hammer (CAREFULLY) to seat the seal.
Step 15:
Put the hub on its side and fill the cavity in the center of the hub with Gear Oil (It is difficult to do this after it is slid onto the spindle), and slide the hub onto the spindle (that you remembered to clean in Step 12) and push on as far as it will go. Fill new outer bearing with gear oil (or pack with grease) and slide onto spindle. Make sure the bearing is fully seated in the cup.
Last edited by GregN; 08-26-2010 at 02:19 PM. Reason: More Smileys
#4
08-26-2010, 08:00 AM
Join Date: Jun 2007
Location: Rogers, MN
Posts: 459
Likes: 0
Received 0 Likes
on
0 Posts
Step 16:
Put Spindle Nut onto spindle (making sure to line up the tab at the 12 O’clock position on the shaft). Tighten the nut while turning the hub. Tighten the nut to 60 ft/lb, and then loosen the nut 5 clicks (or 7 clicks for used bearings). Double check these torque specs with YOUR vehicles specs.

Step 17:
Re-install axle shafts (it will take a little wiggling to get the end of the shaft to line up with the carrier, then to mesh the splines). Put a little gear lube on the axle shaft o-rings. Re-Install axle shaft bolts using appropriate thread locker (I just used Blue Loctite).
Step 18:
Re-Install the rotor, as well as the brake caliper and all associated parts/hardware. Torque to spec. (I lubed all of the brake components (i.e. Slide Pins) before re-installing).

Step 19:
Re-install wheel and tighten lug nuts (torque to spec). (I did this part while the vehicle was on the ground).
Step 20:
Raise vehicle, remove jack stands, lower vehicle, and clean-up. Then, test drive vehicle.
Additional Notes:
I was very apprehensive about doing this myself, since everything I read said to use this special tool, or that special tool to get the job done. I just used what I had laying around and a little thought, and this job was much easier than I expected it to be.
I have heard about packing the bearings with grease instead of just coating them with gear lube, but I didn’t feel that was necessary. I didn’t want to introduce grease to my gear oil. There is much debate on this that I don’t want to argue about.
Also, I have noted that there is a discrepancy between the last few steps of my write-up and Guzzle’s write-up at: http://www.guzzle7pt3.com/embrake.php . I torqued my axle bolts and lug nuts in a different order.
If anyone has any comments or questions, feel free to fire away.
-GregN
Put Spindle Nut onto spindle (making sure to line up the tab at the 12 O’clock position on the shaft). Tighten the nut while turning the hub. Tighten the nut to 60 ft/lb, and then loosen the nut 5 clicks (or 7 clicks for used bearings). Double check these torque specs with YOUR vehicles specs.
Step 17:
Re-install axle shafts (it will take a little wiggling to get the end of the shaft to line up with the carrier, then to mesh the splines). Put a little gear lube on the axle shaft o-rings. Re-Install axle shaft bolts using appropriate thread locker (I just used Blue Loctite).
Step 18:
Re-Install the rotor, as well as the brake caliper and all associated parts/hardware. Torque to spec. (I lubed all of the brake components (i.e. Slide Pins) before re-installing).
Step 19:
Re-install wheel and tighten lug nuts (torque to spec). (I did this part while the vehicle was on the ground).
Step 20:
Raise vehicle, remove jack stands, lower vehicle, and clean-up. Then, test drive vehicle.
Additional Notes:
I was very apprehensive about doing this myself, since everything I read said to use this special tool, or that special tool to get the job done. I just used what I had laying around and a little thought, and this job was much easier than I expected it to be.
I have heard about packing the bearings with grease instead of just coating them with gear lube, but I didn’t feel that was necessary. I didn’t want to introduce grease to my gear oil. There is much debate on this that I don’t want to argue about.
Also, I have noted that there is a discrepancy between the last few steps of my write-up and Guzzle’s write-up at: http://www.guzzle7pt3.com/embrake.php . I torqued my axle bolts and lug nuts in a different order.
If anyone has any comments or questions, feel free to fire away.
-GregN
Last edited by GregN; 08-26-2010 at 02:20 PM. Reason: More Smileys that needed to go!

 )
) 
#6
08-26-2010, 02:13 PM
Join Date: Jun 2007
Location: Rogers, MN
Posts: 459
Likes: 0
Received 0 Likes
on
0 Posts
That's the thing, I can't see any of those smileys! I had to put this on here in three segments because it said that I was using too many pictures (180 something). If there is a moderator out there that can give me a hand, I would appreciate it. None of those show up on my screen.
Sorry about them!
Also, sorry about all of the mismatched photo sizes. Apparently I didn't get all of them through Photoshop like I thought I did.
Thanks for the heads up Monsta!
Sorry about them!
Also, sorry about all of the mismatched photo sizes. Apparently I didn't get all of them through Photoshop like I thought I did.
Thanks for the heads up Monsta!
#7
08-26-2010, 11:15 PM

Elder User
Join Date: Oct 2007
Location: Montreal,Canada
Posts: 706
Likes: 0
Received 0 Likes
on
0 Posts
Trending Topics
#8
08-27-2010, 07:09 AM
Join Date: Jun 2007
Location: Rogers, MN
Posts: 459
Likes: 0
Received 0 Likes
on
0 Posts
I know what you mean; I was very apprehensive about doing the bearings because of all of the special tools "required". I was contemplating just buying new hubs, and bringing them to a shop to have the bearing races pressed in. Or, just bite the bullet and take it in to have it done...didn't like that idea.
Good luck, and thanks.
#9
03-02-2012, 10:35 PM

#11
03-03-2012, 10:51 AM
Hotshot
Good write up! I am curious if the 60ft/lb is the same for all years full floating axles back to the 80's?
I ask because I have had these rear hubs apart on all of our trucks at least twice and never torqued the nut/bearings simply because I didn't know the torque specs. What I have been doing for years is just spinning the hub and going by feel of the bearing drag as I tightened the nut. I always did tighten the nut down and then back it off a few clicks until it "felt right". hundreds of thousands of miles on all the trucks and not on bearing had to be replaced yet.
FYI the older ford trucks had the same bearings and nut deal in the front ends as well. Now ford just makes a million dollar "unit" that gets replaced.
#12
12-07-2012, 02:36 PM
great write up. Quick question, i tightened to 60 lbs then backed off 7 clicks. Hub seems very tight still when turning by hand. Did I over tighten? My front D60 hubs are only hand tight to prevent burning bearings up, and spin very easily. Is there a secret to tightening the rear nut? I am scared they are too tight.
thanks.
thanks.
#13
12-07-2012, 03:39 PM
Join Date: Jun 2007
Location: Rogers, MN
Posts: 459
Likes: 0
Received 0 Likes
on
0 Posts
First, you are doing this without the axle shaft or brakes installed right? If either of these are installed, that is most likely where you are feeling the resistance.
The hub seal can also create quite a bit of friction. If you didn't put a little lube on the shaft/seal lip, then that could be your problem.
It has been a while since I did this one, but no, I don't believe that you over tightened it. As long as you were following the steps and turning the hub while tightening to 60 lbs, then backed off 5-7 clicks, you should be fine. The hubs will not turn as nice and free as you would expect with new bearings because everything needs a little bit to seat itself. If you are still worried, the best thing to do is to keep an eye on it. Do this by putting everything back together (except for the lug nut cover/center cap). Drive around the block listening and feeling for anything out of the ordinary > touch the hub (the black part protruding from the wheel) - You should still be able to hold onto it with no problem > If OK > Drive a few miles at a higher speed > Stop and touch the hub again (it may be uncomfortable to touch, but it still shouldn't burn you) - The bearings will heat up a little more than normal until break-in is done. A better way of doing this is with an infrared thermometer (but I don't have one, so the old fashioned way does the trick) - If using a thermometer, 200 - 250 is about the hottest you want it to get, Over 300F and there is definitely something wrong.
During the first few miles, make sure that you take some turns left and right. Doing so allows the gear oil to flow to the wheel bearings, which will make sure that they aren't running dry (which would not be good).
Did you pack the bearings with grease? If so, this can cause it to feel tight.
Did you lube the bearing before install? If so, good.
It is better to be too tight, then too loose...Giggity (Family Guy Reference)...you will just wear the bearing a little faster and create a little more heat. If it is too loose, then the bearing can move around and will fail much much sooner (and your seals will wear and leak quickly).
So, if you can still turn it by hand, it isn't extremely tight.
If you have vertical movement in the hub, then it is too loose.
If you can turn it by hand, and you have no vertical movement, then you shouldn't worry (I wouldn't).
I hope this helps. I have installed a lot of these kinds of bearings in the manufacturing world, and just kind of do it by feel (since I usually don't have any specs).
If everything checks out fine, but you are still worried, spin them by hand after you have put on 50 - 100 Miles. They will feel just like they should.
#14
12-07-2012, 03:58 PM
Thanks. I am doing a disc brake conversion, so I am spinning the hub with no brakes or shafts in it. I did put gear oil on bearings (did not use grease). I used a Timken seal that spins on itself similar to scotseal, and I put a few drops of my Royal Purple gear oil in the holes to pre-lube the seal. It just feels so different from doing front bearings hand tight when I rebuilt my entire front end, maybe its just I have never done rear bearings so its new.
I figured I would keep an eye on it and see. I grab my hubs from time to time to see how hot they get as a sanity check.
Appreciate the opinion.
I figured I would keep an eye on it and see. I grab my hubs from time to time to see how hot they get as a sanity check.
Appreciate the opinion.
First, you are doing this without the axle shaft or brakes installed right? If either of these are installed, that is most likely where you are feeling the resistance.
The hub seal can also create quite a bit of friction. If you didn't put a little lube on the shaft/seal lip, then that could be your problem.
It has been a while since I did this one, but no, I don't believe that you over tightened it. As long as you were following the steps and turning the hub while tightening to 60 lbs, then backed off 5-7 clicks, you should be fine. The hubs will not turn as nice and free as you would expect with new bearings because everything needs a little bit to seat itself. If you are still worried, the best thing to do is to keep an eye on it. Do this by putting everything back together (except for the lug nut cover/center cap). Drive around the block listening and feeling for anything out of the ordinary > touch the hub (the black part protruding from the wheel) - You should still be able to hold onto it with no problem > If OK > Drive a few miles at a higher speed > Stop and touch the hub again (it may be uncomfortable to touch, but it still shouldn't burn you) - The bearings will heat up a little more than normal until break-in is done. A better way of doing this is with an infrared thermometer (but I don't have one, so the old fashioned way does the trick) - If using a thermometer, 200 - 250 is about the hottest you want it to get, Over 300F and there is definitely something wrong.
During the first few miles, make sure that you take some turns left and right. Doing so allows the gear oil to flow to the wheel bearings, which will make sure that they aren't running dry (which would not be good).
Did you pack the bearings with grease? If so, this can cause it to feel tight.
Did you lube the bearing before install? If so, good.
It is better to be too tight, then too loose...Giggity (Family Guy Reference)...you will just wear the bearing a little faster and create a little more heat. If it is too loose, then the bearing can move around and will fail much much sooner (and your seals will wear and leak quickly).
So, if you can still turn it by hand, it isn't extremely tight.
If you have vertical movement in the hub, then it is too loose.
If you can turn it by hand, and you have no vertical movement, then you shouldn't worry (I wouldn't).
I hope this helps. I have installed a lot of these kinds of bearings in the manufacturing world, and just kind of do it by feel (since I usually don't have any specs).
If everything checks out fine, but you are still worried, spin them by hand after you have put on 50 - 100 Miles. They will feel just like they should.
The hub seal can also create quite a bit of friction. If you didn't put a little lube on the shaft/seal lip, then that could be your problem.
It has been a while since I did this one, but no, I don't believe that you over tightened it. As long as you were following the steps and turning the hub while tightening to 60 lbs, then backed off 5-7 clicks, you should be fine. The hubs will not turn as nice and free as you would expect with new bearings because everything needs a little bit to seat itself. If you are still worried, the best thing to do is to keep an eye on it. Do this by putting everything back together (except for the lug nut cover/center cap). Drive around the block listening and feeling for anything out of the ordinary > touch the hub (the black part protruding from the wheel) - You should still be able to hold onto it with no problem > If OK > Drive a few miles at a higher speed > Stop and touch the hub again (it may be uncomfortable to touch, but it still shouldn't burn you) - The bearings will heat up a little more than normal until break-in is done. A better way of doing this is with an infrared thermometer (but I don't have one, so the old fashioned way does the trick) - If using a thermometer, 200 - 250 is about the hottest you want it to get, Over 300F and there is definitely something wrong.
During the first few miles, make sure that you take some turns left and right. Doing so allows the gear oil to flow to the wheel bearings, which will make sure that they aren't running dry (which would not be good).
Did you pack the bearings with grease? If so, this can cause it to feel tight.
Did you lube the bearing before install? If so, good.
It is better to be too tight, then too loose...Giggity (Family Guy Reference)...you will just wear the bearing a little faster and create a little more heat. If it is too loose, then the bearing can move around and will fail much much sooner (and your seals will wear and leak quickly).
So, if you can still turn it by hand, it isn't extremely tight.
If you have vertical movement in the hub, then it is too loose.
If you can turn it by hand, and you have no vertical movement, then you shouldn't worry (I wouldn't).
I hope this helps. I have installed a lot of these kinds of bearings in the manufacturing world, and just kind of do it by feel (since I usually don't have any specs).
If everything checks out fine, but you are still worried, spin them by hand after you have put on 50 - 100 Miles. They will feel just like they should.