Horn wiring
#1
 08-22-2010, 10:58 AM


Join Date: Jun 2008
Location: Wilmington Delaware
Posts: 347
Likes: 0
Received 0 Likes
on
0 Posts
Horn wiring
I got another horn on EBAY and tried to test it by hooking up jumpers to the TWO contacts on the horn and touching them to BATT terminals real quick to get sound. It just sparked ,... no sound. My truck had only one horn ( lower pitch ) when I got it and it has only ONE lead and is grounded via the mount brackets. I tested and tuned the old horn the same way by touching a jumper to BATT .
Are they wire in a series ??? Not much in Shop manual wiring diagram or pages #276-77-78 regarding horns
Photo of horn via ebay 1950 FORD F -1 FLATHEAD V-8 6 VOLT HORN: eBay Motors (item 110572027647 end time Aug-18-10 04:15:43 PDT)
This new horn is a lot different looking re" adjustment, cover
Any Ideas????
Last edited by john smith jr; 08-22-2010 at 11:01 AM. Reason: had an urg to edit
#2
08-22-2010, 12:03 PM
Fleet Owner
Doesn't appear that one can be opened for adjustment; is there a screw on the trumpet side of the coil?
A lot of times there are bugs and dirt wedged in the coil section so it can't vibrate. Try turning it trumpet end down, and rapping it smartly with a screwdriver handle, see if a bunch of junk comes out. If you have a VOM, check the resistance across the coil. Worse comes to worse, you could drill out the rivets and clean it, fix the coil and bolt back together.
They are wired in parallel.
#3
08-22-2010, 12:45 PM

Post Fiend
Hi John,
Well first of all the E-bay auction advertisement is incorrect - the horn is a late 51/52 trumpet. The 48-mid 51s had a round cap on the back (which is probably what your original is like). The only reason it's important is because you can't remove the cap and tune with a feeler gauge like the older ones.
But, no worries. It's basically the same otherwise.
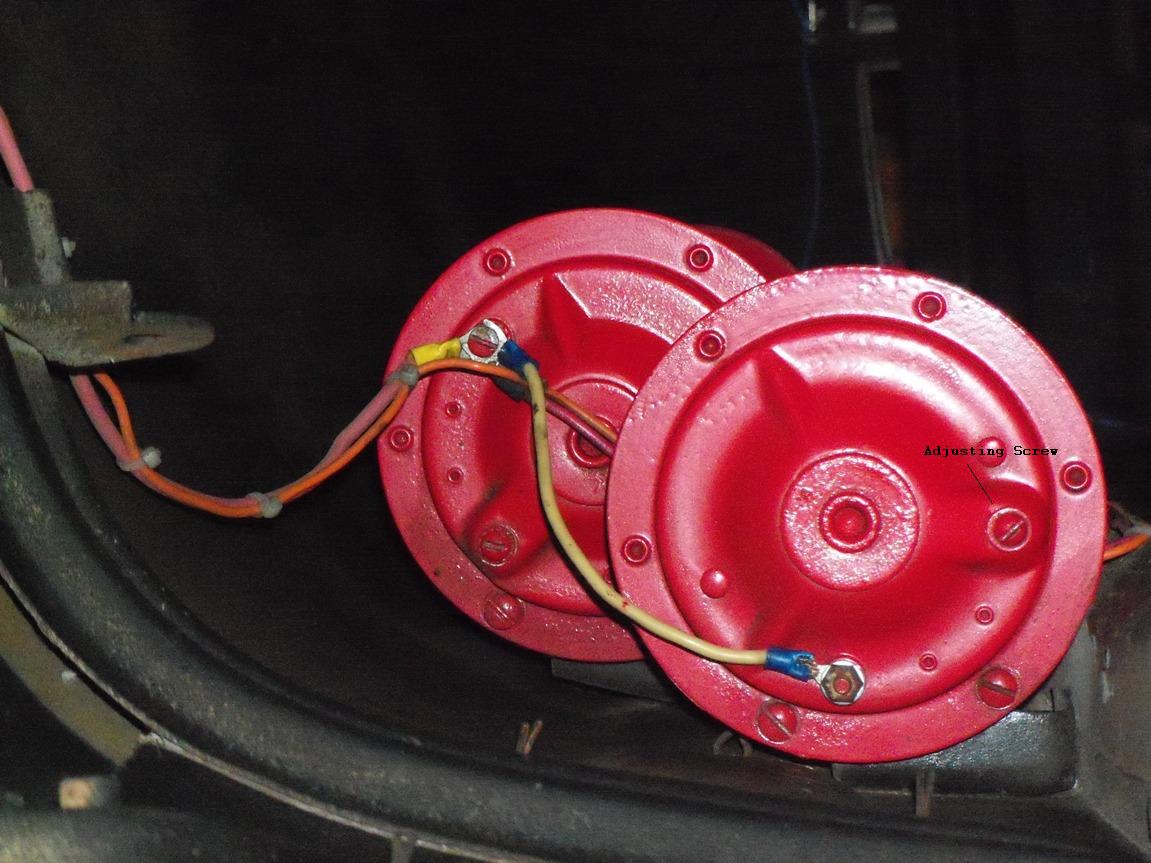
The taller contact of the two (a threaded stud) is for hooking up power. The machine headed screw is the adjustment. (hope you didn't weld yours together by hooking up both!) And like your original, the horn is grounded through its body and mounting brackets to your hood.
Inside the horns, there is a "Blued" metal disk that vibrates to produce the sound. They tend to rust when they have been sitting which affects their ability to vibrate.
Also, these trumpets are one of the highest Amperage draw items on your truck at 14-17 amps EACH! So, they need big (10AWG) wire if you are still on 6 volt power, and the ground has to be VERY solid - including your hood back to the frame. And, if you are still running a 6 volt generator, you may not have enough amps flowing to push the horns at idle. But since you have one that works now, it sounds like that is all ok.
So, how thick was your test lead (and how hot did it get)? When I used 12AWG wire to push just two of my horns - at 12 volts! - that wire was not big enough to carry the power necessary to blow the horns (remember at 6 volts your horns take TWICE the amperage).
The second screw on the top is the "Tuning Adjustment." There are no points on these "flat version" horns that you can get to to adjust with a feeler gauge to tune, you just have to guess by turning the screw. The adjustment on these is very delicate - in that the entire sound range of the horn will be heard in less than one full turn of the screw - and it stops working if you go over or under.
I have four of these guys on my truck! I run them on 12 volt and they are loud (you oughta see my ammeter needle dip when I blast them). Anyway, every one of them I bought, I had to "bring back to life."
First (after turning it over and "knocking the 'crap' out of it" as Ross suggested) I sprayed a good amount of WD-40 (or what ever kind of spray lubricant you like to use) down the horn (about a 6-8 second blast) and let it sit over night with the horn opening pointing up. Then, in the morning, flip it over and let it drain out.
Next if I were you, I would remove your existing horn and mount this new one in it's place - for two reasons: First you know the circuitry and wire size is good to make that horn work. Second, I don't care how prepared you are, if you are holding that horn, and it goes off, you are going to throw it.
Make sure all your contacts are good and solid then grab one of the neighbor kids to help you. Loosen the nut holding the adjustment screw and have the little one push the horn button (be sure and warn him that it's not a Toyota horn and it's gonna be loud) as you screw the adjustment screw IN a full turn, then out two turns - slowly. During the turns of the screw the horn should start to sound (like a cow at first, then sharpen up) and blow out a brown cloud of rust!
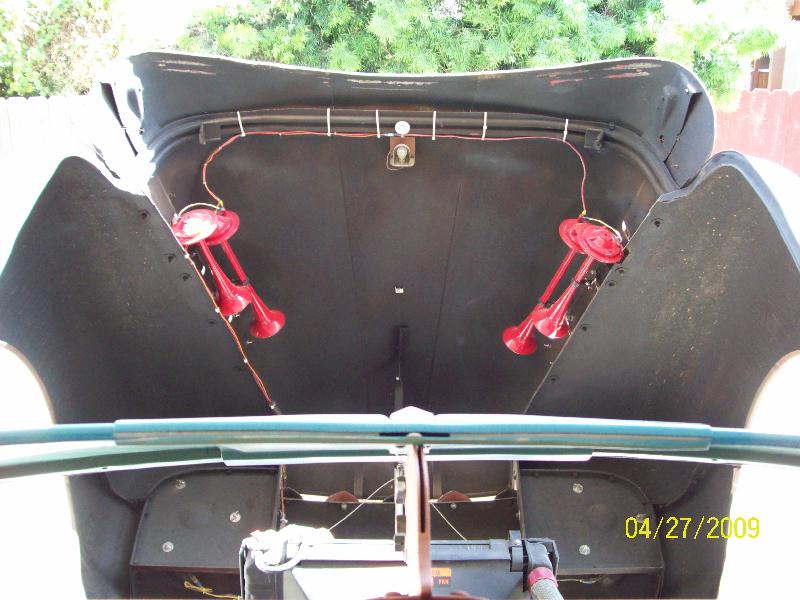
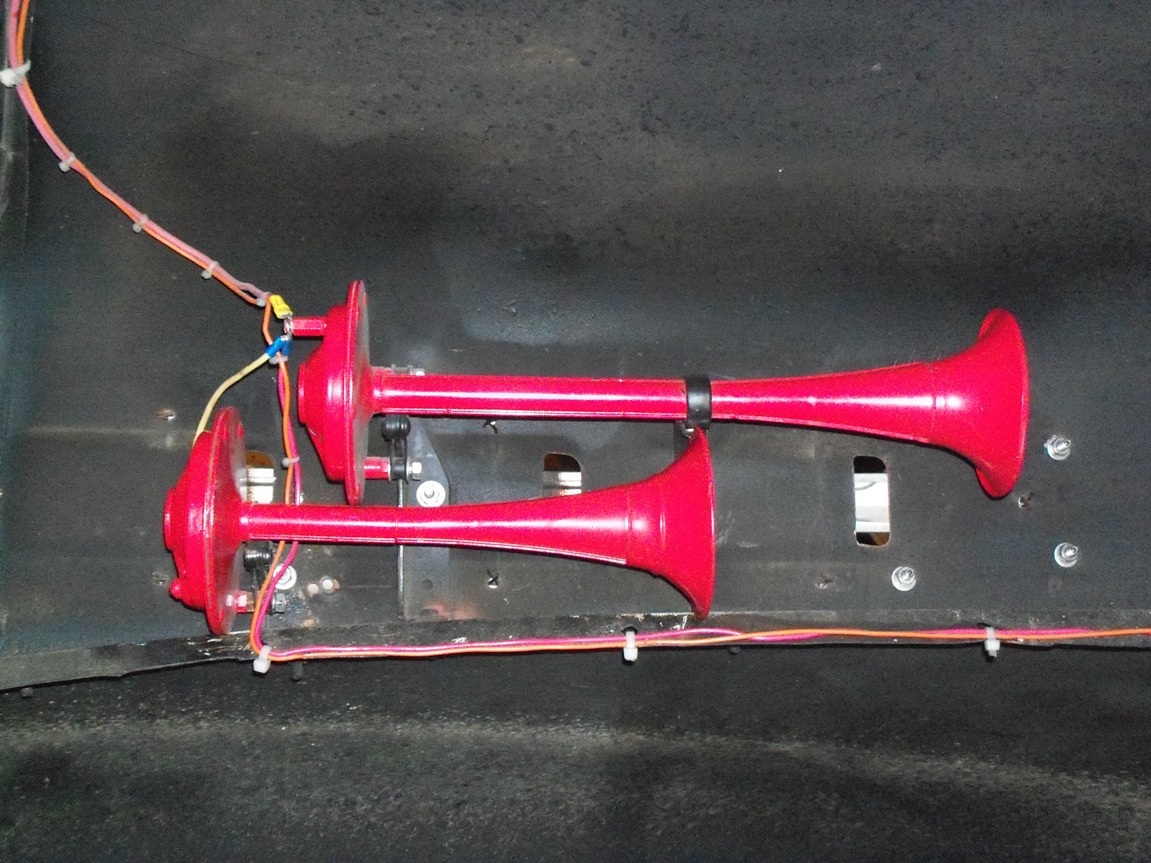
After you get it going, mount your original horn on the OTHER side using a 10 AWG wire. They must be wired in parallel since they are body grounded - horn wire comes from the relay and attaches to the first horn. Then a single wire connects the other horns - A to B to C to D. Note in my pictures how large the wires are. The pink is 8AWG, the yellow 10AWG (the orange is for the inside hood light - disregard that one). At 12 volts, my four horns draw exactly the same amperage as your two do at 6 volts.
Here's some pics:
BTW, for those of you who are curious, I shortened the two additional horns by cutting and then brazing them back to gether. The neighbor kid who plays Xylophone in his school band came over to help me and would ding a note that was a chord and I would grind off another 1/8 inch (the note would change with that little shortening). It took a couple hours- and really pissed off one of my neighbors, but all four are now a perfect D Chord - and VERY loud on the 12 volts.
If you find the horn doesn't work, contact ILYA (51 PanelMan) as I gave him some parts and there were 4+ horns in them - some are the rounded ones like yours. And I believe the one with the round cap painted red was all set and working fine.
Well first of all the E-bay auction advertisement is incorrect - the horn is a late 51/52 trumpet. The 48-mid 51s had a round cap on the back (which is probably what your original is like). The only reason it's important is because you can't remove the cap and tune with a feeler gauge like the older ones.
But, no worries. It's basically the same otherwise.
The taller contact of the two (a threaded stud) is for hooking up power. The machine headed screw is the adjustment. (hope you didn't weld yours together by hooking up both!) And like your original, the horn is grounded through its body and mounting brackets to your hood.
Inside the horns, there is a "Blued" metal disk that vibrates to produce the sound. They tend to rust when they have been sitting which affects their ability to vibrate.
Also, these trumpets are one of the highest Amperage draw items on your truck at 14-17 amps EACH! So, they need big (10AWG) wire if you are still on 6 volt power, and the ground has to be VERY solid - including your hood back to the frame. And, if you are still running a 6 volt generator, you may not have enough amps flowing to push the horns at idle. But since you have one that works now, it sounds like that is all ok.
So, how thick was your test lead (and how hot did it get)? When I used 12AWG wire to push just two of my horns - at 12 volts! - that wire was not big enough to carry the power necessary to blow the horns (remember at 6 volts your horns take TWICE the amperage).
The second screw on the top is the "Tuning Adjustment." There are no points on these "flat version" horns that you can get to to adjust with a feeler gauge to tune, you just have to guess by turning the screw. The adjustment on these is very delicate - in that the entire sound range of the horn will be heard in less than one full turn of the screw - and it stops working if you go over or under.
I have four of these guys on my truck! I run them on 12 volt and they are loud (you oughta see my ammeter needle dip when I blast them). Anyway, every one of them I bought, I had to "bring back to life."
First (after turning it over and "knocking the 'crap' out of it" as Ross suggested) I sprayed a good amount of WD-40 (or what ever kind of spray lubricant you like to use) down the horn (about a 6-8 second blast) and let it sit over night with the horn opening pointing up. Then, in the morning, flip it over and let it drain out.
Next if I were you, I would remove your existing horn and mount this new one in it's place - for two reasons: First you know the circuitry and wire size is good to make that horn work. Second, I don't care how prepared you are, if you are holding that horn, and it goes off, you are going to throw it.
Make sure all your contacts are good and solid then grab one of the neighbor kids to help you. Loosen the nut holding the adjustment screw and have the little one push the horn button (be sure and warn him that it's not a Toyota horn and it's gonna be loud) as you screw the adjustment screw IN a full turn, then out two turns - slowly. During the turns of the screw the horn should start to sound (like a cow at first, then sharpen up) and blow out a brown cloud of rust!
After you get it going, mount your original horn on the OTHER side using a 10 AWG wire. They must be wired in parallel since they are body grounded - horn wire comes from the relay and attaches to the first horn. Then a single wire connects the other horns - A to B to C to D. Note in my pictures how large the wires are. The pink is 8AWG, the yellow 10AWG (the orange is for the inside hood light - disregard that one). At 12 volts, my four horns draw exactly the same amperage as your two do at 6 volts.
Here's some pics:
BTW, for those of you who are curious, I shortened the two additional horns by cutting and then brazing them back to gether. The neighbor kid who plays Xylophone in his school band came over to help me and would ding a note that was a chord and I would grind off another 1/8 inch (the note would change with that little shortening). It took a couple hours- and really pissed off one of my neighbors, but all four are now a perfect D Chord - and VERY loud on the 12 volts.
If you find the horn doesn't work, contact ILYA (51 PanelMan) as I gave him some parts and there were 4+ horns in them - some are the rounded ones like yours. And I believe the one with the round cap painted red was all set and working fine.
#4
08-22-2010, 02:59 PM
Join Date: Jun 2008
Location: Wilmington Delaware
Posts: 347
Likes: 0
Received 0 Likes
on
0 Posts
#5
08-22-2010, 05:55 PM
Join Date: Jun 2008
Location: Wilmington Delaware
Posts: 347
Likes: 0
Received 0 Likes
on
0 Posts
Thanks
WOW. that bugger is LOUD.
I whacked it with a screwdriver handle, wire it correctly,and had my daughter hold the horn button down as I turned the adjustment screw until I got It were it sounded good and its working like a champ.
Its 10x louder than the old horn so I guess I need to set/adjust that one next.
Do I adjust the nut on my other horn while someone keeps the horn button on. or just play with the adjusting nut and do trial and error?
Thanks a bunch,.....AGAIN
#6
08-22-2010, 06:43 PM
Post Fiend
I've never heard the two versions of the horns (older round cap back Vs. newer flat back) side by side so I'm not sure you have an adjustment/dirt/rust issue or if the older ones were just not as loud - by design. My newer style are VERY loud as they are even louder on 12 volts! You can just imagine what FOUR of them sounds like 
There is a procedure for tuning (adjusting the tone of) the older style horns in the shop manual that involves removing the back cap and adjusting the points gap by measuring the amperage to the horn (Page 276). I also read one once that involved setting the gap with a flat feeler gauge, but I'll be darned if I can find it now. I'll keep looking.
But honestly, it's not going to make it much louder as much as it's going to adjust the tone to match the other horn. Those horns are such that one is physically longer than the other and they sound off in two different "tuned" tones. So if your horns are the same length, you won't be able to get the two tones. Long story short, if it is working, and soundwise it doesn't "clash" with the newer one, I'd probably take the cap off and clean it (brush the rust off the diaphragm and swipe a piece of 320 wet/dry between the points just to clean them, but otherwise leave it alone.
Maybe it also just needs a good whack with the screw driver handle !!! LOL (LOL but no kidding)! (Don't ya just love the "bigger hammer" solutions on these steel elephants!)
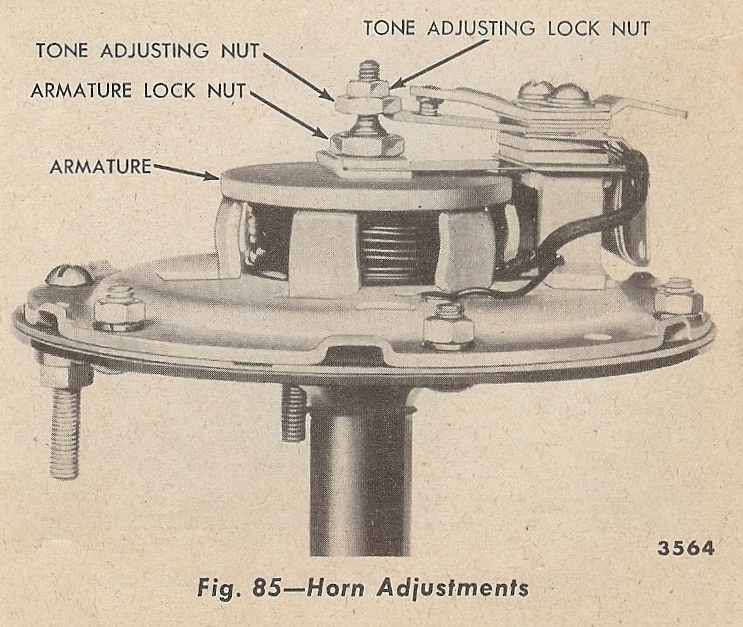
Another pic - old style horn with cap removed:
Have fun (I'll bet your daughter had a ball blowing the old truck horns!)
PS: If you do decide to try the adjustment, again, this one is equally sensative. Once you loosen the "Tone Adjusting Locking Nut" the full range of tone for the horn will be used up in less than one full turn of the "Tone Adjusting Nut." Try the adjustment by screwing it down first, if that doesn't work, then back it up. Might be prudent to mark the original position of the nut by scribing a line on the nut relative to the base - before you move it!
There is a procedure for tuning (adjusting the tone of) the older style horns in the shop manual that involves removing the back cap and adjusting the points gap by measuring the amperage to the horn (Page 276). I also read one once that involved setting the gap with a flat feeler gauge, but I'll be darned if I can find it now. I'll keep looking.
But honestly, it's not going to make it much louder as much as it's going to adjust the tone to match the other horn. Those horns are such that one is physically longer than the other and they sound off in two different "tuned" tones. So if your horns are the same length, you won't be able to get the two tones. Long story short, if it is working, and soundwise it doesn't "clash" with the newer one, I'd probably take the cap off and clean it (brush the rust off the diaphragm and swipe a piece of 320 wet/dry between the points just to clean them, but otherwise leave it alone.
Maybe it also just needs a good whack with the screw driver handle !!! LOL (LOL but no kidding)! (Don't ya just love the "bigger hammer" solutions on these steel elephants!)
Another pic - old style horn with cap removed:
Have fun (I'll bet your daughter had a ball blowing the old truck horns!)
PS: If you do decide to try the adjustment, again, this one is equally sensative. Once you loosen the "Tone Adjusting Locking Nut" the full range of tone for the horn will be used up in less than one full turn of the "Tone Adjusting Nut." Try the adjustment by screwing it down first, if that doesn't work, then back it up. Might be prudent to mark the original position of the nut by scribing a line on the nut relative to the base - before you move it!
#7
08-22-2010, 07:34 PM
Join Date: Jun 2008
Location: Wilmington Delaware
Posts: 347
Likes: 0
Received 0 Likes
on
0 Posts
Trending Topics
#8
08-22-2010, 07:50 PM
Post Fiend
One other suggestion. I'm not sure what order you have them wired, but run the power wire to the quiet one first then to the loud one. The new one might just be eating up all your "juice" before it gets to the other one - need a BIG wire on those - no lie.
Also, try testing them with the engine running - over 1100 rpm (generator producing extra amps).
You could also buy the mate to the newer one and take out your round backed one! $25????
Also, try testing them with the engine running - over 1100 rpm (generator producing extra amps).
You could also buy the mate to the newer one and take out your round backed one! $25????
#9
08-22-2010, 09:36 PM
Post Fiend
PS John look what I found out by you. Be sure to measure yours to make sure it's not the same as the one you just bought but I think it IS the other side. Remember your neighbors are counting on you!
vintage ford truck horn 1951-52 works LOUD : eBay Motors (item 290466868880 end time Aug-29-10 11:22:03 PDT)
vintage ford truck horn 1951-52 works LOUD : eBay Motors (item 290466868880 end time Aug-29-10 11:22:03 PDT)
#10
08-22-2010, 11:41 PM
Post Fiend
 ), but the red horns that I obtained from you with the dome on the end are working and tuned? This means that I can just hook them up?
 Just curious why you changed from the dome end design to the flat (stepped) end design as described in this thread.
In your experience, is one better/louder than the other? Reason I ask is because I have several sets of long and short (pairs) horns that I've been saving to use on both Panels. If one style is better than the other, then I can narrow down my collection and get rid of the ones I don't need.
Also, just to make sure that I got the wiring procedure, the horn wire coming through the steering box attaches to the horn relay. Then, another wire is going to the closest horn and one more wire from the closest horn to the furthest horn (on the opposite side of the hood). Is that correct?
My 52 Panel has a 48-50 horn mounted on the right inner fender. It's one of the things that I'd like to replace once the truck is back on the road.
Thanks.
#11
08-23-2010, 01:16 PM
Post Fiend
Not to hijack the thread (always wanted to use this politically incorrect smilie ), but the red horns that I obtained from you with the dome on the end are working and tuned? This means that I can just hook them up?
Just curious why you changed from the dome end design to the flat (stepped) end design as described in this thread.
In your experience, is one better/louder than the other? Reason I ask is because I have several sets of long and short (pairs) horns that I've been saving to use on both Panels. If one style is better than the other, then I can narrow down my collection and get rid of the ones I don't need.
Also, just to make sure that I got the wiring procedure, the horn wire coming through the steering box attaches to the horn relay. Then, another wire is going to the closest horn and one more wire from the closest horn to the furthest horn (on the opposite side of the hood). Is that correct?
My 52 Panel has a 48-50 horn mounted on the right inner fender. It's one of the things that I'd like to replace once the truck is back on the road.
Thanks.
), but the red horns that I obtained from you with the dome on the end are working and tuned? This means that I can just hook them up? Just curious why you changed from the dome end design to the flat (stepped) end design as described in this thread.
In your experience, is one better/louder than the other? Reason I ask is because I have several sets of long and short (pairs) horns that I've been saving to use on both Panels. If one style is better than the other, then I can narrow down my collection and get rid of the ones I don't need.
Also, just to make sure that I got the wiring procedure, the horn wire coming through the steering box attaches to the horn relay. Then, another wire is going to the closest horn and one more wire from the closest horn to the furthest horn (on the opposite side of the hood). Is that correct?
My 52 Panel has a 48-50 horn mounted on the right inner fender. It's one of the things that I'd like to replace once the truck is back on the road.
Thanks.
The Red Horns were the original ones I had mounted. But I "retuned" them for my 12 volt set up. There is a musical range the horns will blow at. The tone of that note is controlled by the frequency of the vibration of the metal disc. That frequency is controlled by how far apart the points are and the amount of amperage that passes between the points - more amps, the point cycle more quickly. If there is excesive or insufficient points gap, the horns will not work at all.
So, when you put them on a 12 volt truck they usually have to be adjusted - and I did, and they were working. Unfortunately if you were to put them back on your 6 volt panel, you will have to adjust them back.
The reason I changed to the flats was more simple than you might think. The round cap horns were too deep and two of them stacked up the way I show in the picture hit my battery box on the passenger side. The flat horns are much more compact. Simply a matter of physical fit!
But, now, I do prefer the flat horns because of the way they are constructed. They tend to be less succeptible to corrosion because they are sealed. Plus they tend to be louder - I'm not sure if that was intended in the design or if they are because they are cleaner inside. If you have a working pair of the flat horns (17" & 21 1/2") I would probably go with those. I might be tempted to keep an extra pair just in case.
Also, just as a side note, three of the ones I gave you are from a "music box" where you could play a tune on your horns. They also may be different lengths than the stock horns and thus play a different note!
I also recall, one (maybe two) of the ones I gave you is extra short (like my second set that I modified). Be sure to measure them!
I would test/play with those that I gave you to see that they will still work with the 6 volts.
How you explained the wiring is correct. Here's a Picture:
OEM 14 AWG wire color is Blue w/Yellow trailer from button to relay; and 10 AWG yellow w/green trailer from battery post of the starter solenoid to the relay and also from relay out to the horns. Make sure the grounds from the horn to the horn bracket, and bracket to hood are VERY clean!
Johns one horn may be quiet because of marginal grounds.
#12
03-31-2013, 07:53 PM
Junior User
Join Date: Jul 2012
Location: Dallas
Posts: 74
Likes: 0
Received 0 Likes
on
0 Posts
Thanks for this great thread. I picked up a pair of 'flat backs' for $20 bucks at a local swap meet this weekend. Got one working with the info in the thread, but the diaphragm on the other is rusted through the bottom 1/3.
Any idea where a replacement could be acquired? Or just braze in some new metal to replace the cancer? Thanks for any advice.
Her first startup in 30 odd years.
http://https://plus.google.com/u/0/p...85143612717010
Any idea where a replacement could be acquired? Or just braze in some new metal to replace the cancer? Thanks for any advice.
Her first startup in 30 odd years.
http://https://plus.google.com/u/0/p...85143612717010
#14
03-31-2013, 09:16 PM
Fleet Owner

Thread
Thread Starter
Forum
Replies
Last Post