

 11-17-2014, 05:34 PM
Last edit by: IB Advertising
See related guides and technical advice from our community experts:
Browse all: Engine Guides
- Oil Change How To
Step by step instructions for do-it-yourself repairs
Browse all: Engine Guides

How to: Fuel filter and oil filter change in a 6.0L/6.4L
#1
06-19-2010, 01:29 AM

How to: Fuel filter and oil filter change in a 6.0L/6.4L
At the request of a fellow member here, I have decided to do a how to on changing th fuel filters on a 6.0L and 6.4L PSD truck. I have decided to do this writeup on a 2003 6.0L Powerstroke F-350 dually, mainly because that's the truck I've got.  The process should be the same for the 6.4L as well as all 250, 350, 450, and 550 trucks equipped with these motors.
Tools needed:
• 36mm socket- both filters.
• ratchet- both jobs.
• 6mm allen head- fuel filter only.
• Catch pan (15+ quarts capacity), both jobs.
• 19mm socket- oil filter only.
Parts and materials needed:
•Motorcraft oil filter.
•Motorcraft fuel filter set (will include two filters).
•15 quarts CJ4 approved diesel oil. (Note: Be careful how much oil is in your gallon jug. Some places sell the correct four quart gallons, some actually sell five quart gallons. If buying five quart gallons, three gallons will be enough for the job.)
•Upgrade time! If your truck has the OEM drain plug that is flush mount, purchase part number #6E7Z-9C082-A for around $16.00. It will make is MUCH easier to drain the next time you need to do so, and is an easy install.
Time required:
30-45 minutes for both job processes.
Tech tips:
•There are three names in filters for the Powerstroke diesels, Motorcraft, Motorcraft, and Motorcraft. DON'T be lured by $10 savings that will end up costing you a $10,000 engine!
•Making sure that the engine has been sitting for at least a couple of hours will assure that the motor oil will be cool and will also assure that the oil will be mostly in the pan and not on the inside of the motor, making for a more complete change.
•Always price the O-rings wih fresh oil before installing.
•Always be sure to check that each filter has a supplied O-ring. Do not reuse the O-rings that are on the caps. Also be sure that the O-rings are free of cracks and knicks.
•Having 1/4 tank of fuel only will minimize fuel loss when draining the HFCM.
Oil filter change:
Step 1. Place the vehicle in park and lock the emergency brake down. Now, place a chock under the tire to asure that the vehicle will not roll. Always remember to wear proper eye protection, too.
Step 2. Climb under the vehicle and locate the oil drain plug located on the very bottom of the oil pan. Place a catch pan underneath the plug. If using a blow plastic can, make sure that the plug is removed from the can. Using the 19mm socket and ratchet, remove the drain plug and allow the vehicle to drain fully.
Step 3. Once fully drained, reinstall the drain plug into the oil pan and torque to spec. Wipe off any spill.
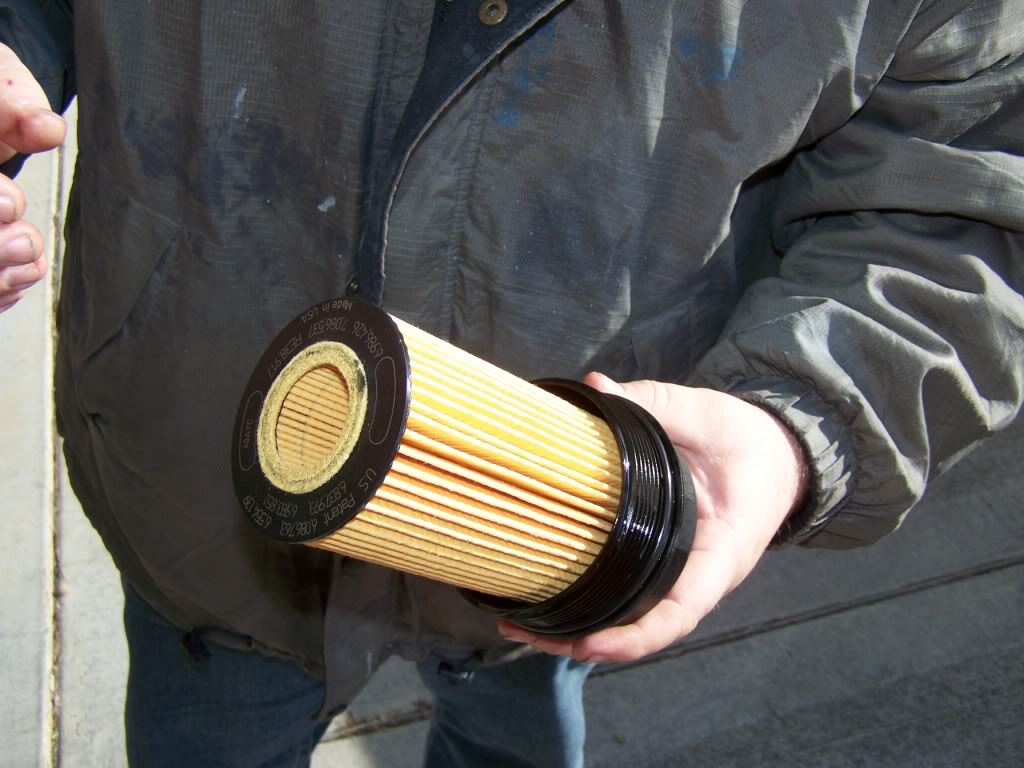
Step 4. Working under the hood, locate the large cap that houses the oil filter. It is the tall style cap favoring the passenger side. Using the 36mm socket and ratchet, remove the oil filter cap. The oil filter will come out of with it.
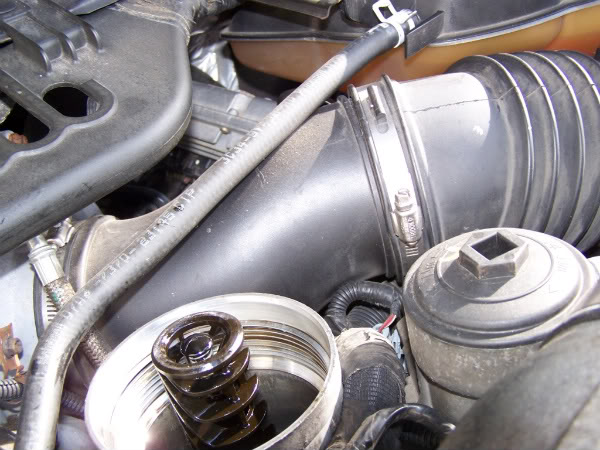
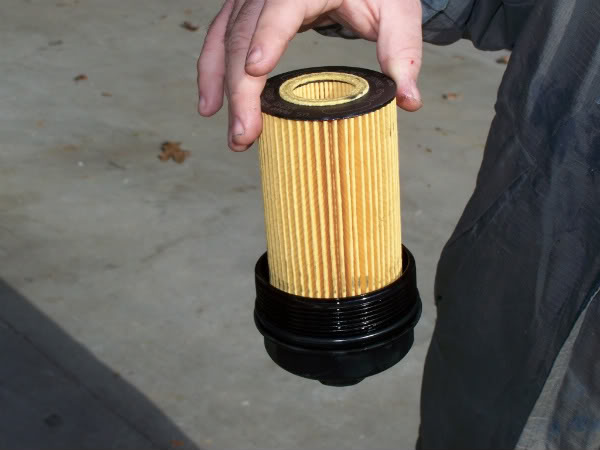
Step 5. Pull the filter out of the cap. It will take a little tugging, as it snaps into place.

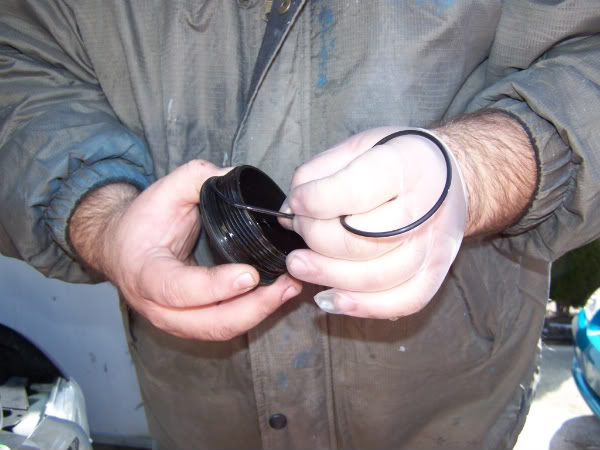
Step 6. Wipe down the filter cap both the inside as well as the threads with a clean, lint free cloth. I prefer to use the pretty Christmas napkins with little stars on them.
Step 7. Remove the O-ring and install the new one.
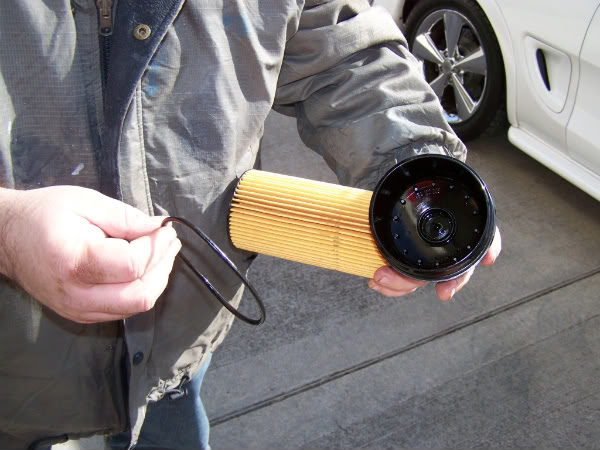
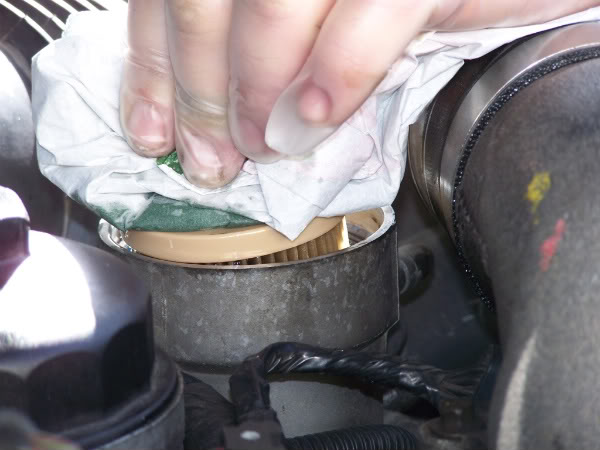
Step 8. Install the new oil filter. It will snap into place.
The process should be the same for the 6.4L as well as all 250, 350, 450, and 550 trucks equipped with these motors. Tools needed:
• 36mm socket- both filters.
• ratchet- both jobs.
• 6mm allen head- fuel filter only.
• Catch pan (15+ quarts capacity), both jobs.
• 19mm socket- oil filter only.
Parts and materials needed:
•Motorcraft oil filter.
•Motorcraft fuel filter set (will include two filters).
•15 quarts CJ4 approved diesel oil. (Note: Be careful how much oil is in your gallon jug. Some places sell the correct four quart gallons, some actually sell five quart gallons. If buying five quart gallons, three gallons will be enough for the job.)
•Upgrade time! If your truck has the OEM drain plug that is flush mount, purchase part number #6E7Z-9C082-A for around $16.00. It will make is MUCH easier to drain the next time you need to do so, and is an easy install.
Time required:
30-45 minutes for both job processes.
Tech tips:
•There are three names in filters for the Powerstroke diesels, Motorcraft, Motorcraft, and Motorcraft. DON'T be lured by $10 savings that will end up costing you a $10,000 engine!
•Making sure that the engine has been sitting for at least a couple of hours will assure that the motor oil will be cool and will also assure that the oil will be mostly in the pan and not on the inside of the motor, making for a more complete change.
•Always price the O-rings wih fresh oil before installing.
•Always be sure to check that each filter has a supplied O-ring. Do not reuse the O-rings that are on the caps. Also be sure that the O-rings are free of cracks and knicks.
•Having 1/4 tank of fuel only will minimize fuel loss when draining the HFCM.
Oil filter change:
Step 1. Place the vehicle in park and lock the emergency brake down. Now, place a chock under the tire to asure that the vehicle will not roll. Always remember to wear proper eye protection, too.
Step 2. Climb under the vehicle and locate the oil drain plug located on the very bottom of the oil pan. Place a catch pan underneath the plug. If using a blow plastic can, make sure that the plug is removed from the can. Using the 19mm socket and ratchet, remove the drain plug and allow the vehicle to drain fully.
Step 3. Once fully drained, reinstall the drain plug into the oil pan and torque to spec. Wipe off any spill.
Step 4. Working under the hood, locate the large cap that houses the oil filter. It is the tall style cap favoring the passenger side. Using the 36mm socket and ratchet, remove the oil filter cap. The oil filter will come out of with it.
Step 5. Pull the filter out of the cap. It will take a little tugging, as it snaps into place.
Step 6. Wipe down the filter cap both the inside as well as the threads with a clean, lint free cloth. I prefer to use the pretty Christmas napkins with little stars on them.
Step 7. Remove the O-ring and install the new one.
Step 8. Install the new oil filter. It will snap into place.
#2
06-19-2010, 01:33 AM
You will know it is intalled properly when you can hold it upside down and the cap is fastened securely.
Step 9. Prime the filter cap O-ring and prime it with some fresh oil. This will assist in install and will prevent O-ring damage.
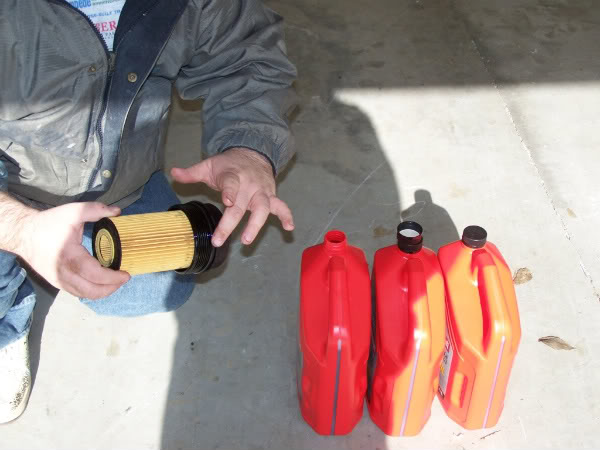
Install the filter and cap and torque to specifications.
Step 10. Remove the oil cap located on the passenger side valve cover and fill to 15 quarts. Reinstall cap and you are done.
Step 9. Prime the filter cap O-ring and prime it with some fresh oil. This will assist in install and will prevent O-ring damage.
Install the filter and cap and torque to specifications.
Step 10. Remove the oil cap located on the passenger side valve cover and fill to 15 quarts. Reinstall cap and you are done.
#3
06-19-2010, 01:52 AM
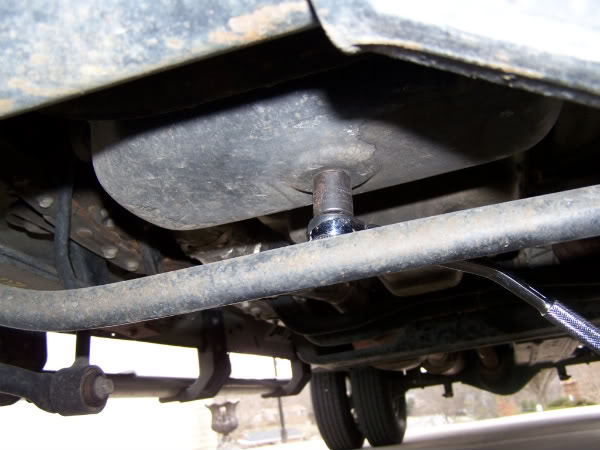
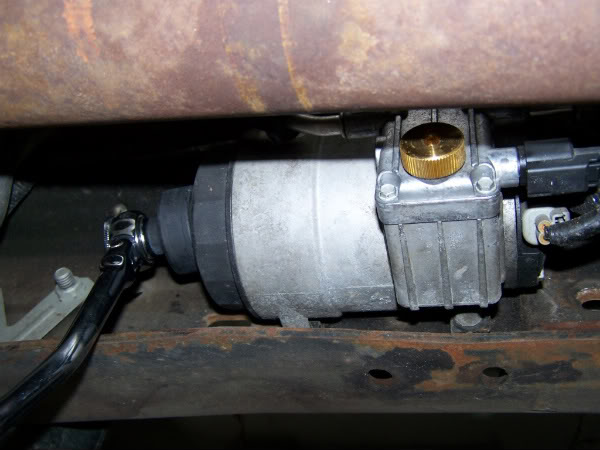
Water Separator Drain:
Step 1. Climb under the vehicle favoring the driver side. Locate the HFCM inside the driver side framerail. It is a gray box with some fuel lines going onto it.

Step 2. Locate the drain plug. In the picture above, it is brass. If yours is the OEM unit and does not look like this, you should upgrade to the brass style, as it directs fuel/water away from the driveshaft and frame rail and makes the process a lot cleaner and easier for the next time.
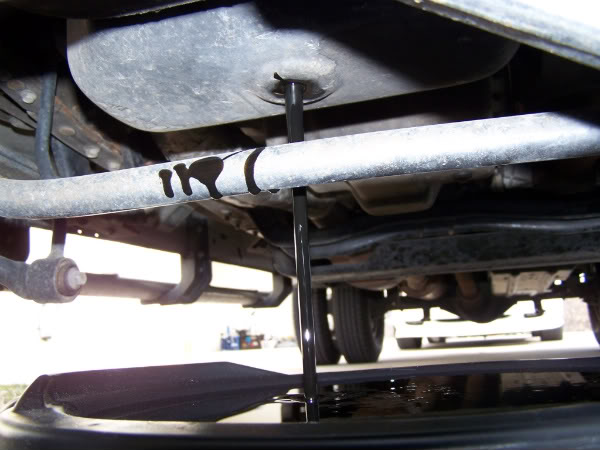
Step 3. Place the catch pan under the water separator and using the 6mm allen head wrench, remove the OEM drain plug. Do not lay under it, as some water and fuel will come out.
Step 4. Once drained, install the new brass plug and tighten snug, but do not over tighten.
Step 1. Climb under the vehicle favoring the driver side. Locate the HFCM inside the driver side framerail. It is a gray box with some fuel lines going onto it.
Step 2. Locate the drain plug. In the picture above, it is brass. If yours is the OEM unit and does not look like this, you should upgrade to the brass style, as it directs fuel/water away from the driveshaft and frame rail and makes the process a lot cleaner and easier for the next time.
Step 3. Place the catch pan under the water separator and using the 6mm allen head wrench, remove the OEM drain plug. Do not lay under it, as some water and fuel will come out.
Step 4. Once drained, install the new brass plug and tighten snug, but do not over tighten.
#4
06-19-2010, 01:58 AM
Fuel Filter change:
Step 1. Locate the HFCM and drain the water, as illustrated above.
Step 2. Using the 36mm socket and ratchet, remove the chassis fuel filter cap. Be careful, as some more fuel and water will come out as you loosen the cap and remove it.
Step 3. Once the cap is removed, pull the filter out with a twisting motion to unsnap it from the HFCM housing. As with the oil filter, remove the O-ring and install and prime a new ring using some fresh oil to lubricate the O-ring.
Step 4. Install the new filter (larger one in the kit) into the HFCM. Make note that the bypass channel hole is located at the top of the filter (12 oclock position) and install the cap. Torque to spec.
Note: Sorry, I did not think to take pics until I was half way through this process, so I don't have any pictures of the change of the chassis filter.
#5
06-19-2010, 02:10 AM
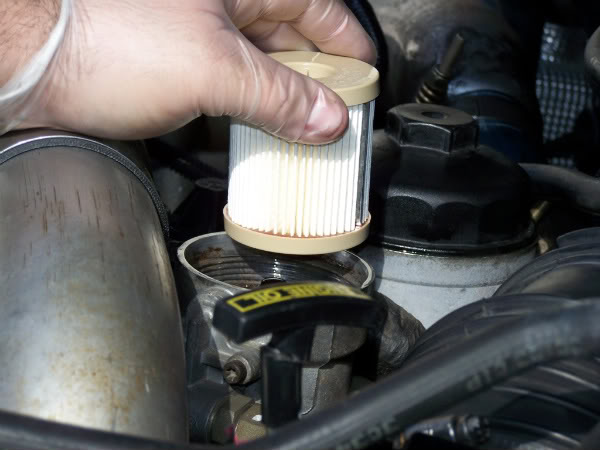
Engine Fuel Filter Change:
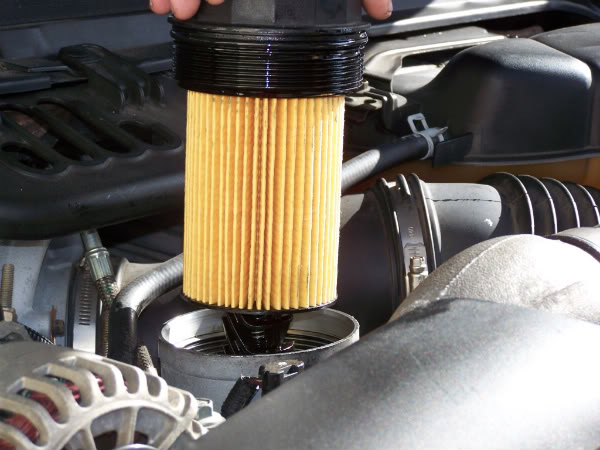
Step 1. Working on top of the engine, locate the secondary fuel filter housing. It is identical to the oil filter cap, only smaller and more flush mount style. It is just to the passenger side of the oil filter housing. Remove it using the 35mm socket. It will also allow a 3/8" drive ratchet by itself, but I am not a fan of this practice, as it puts too much stress on the cap and can cause it to split.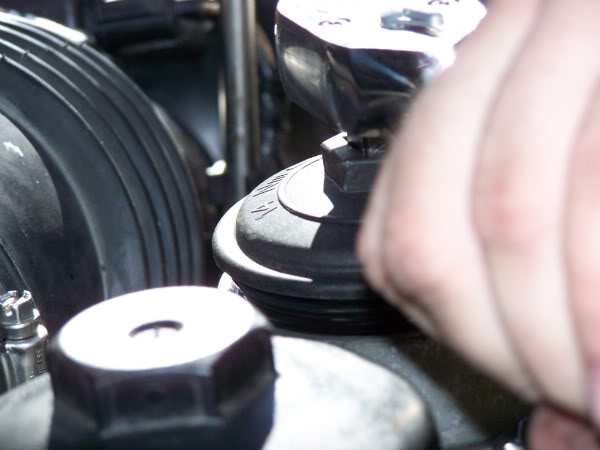
Step 2. As with the other filters, remove the O-ring and prime with a light coat of oil.
Step 3. Remove the fuel filter from the engine housing and trash it. Unlike the other filters that snap into place, this filter just sits in the housing and needs no effort to remove.
Step 4. Install the new filter, install the cap and torque to specs. Yup, it is that easy!
The final thing you will need to do is to cycle the key on and off four or five times. You will hear the fuel pump spin each time you cycle the ignition on. When it stops buzzing, turn it off and turn it back on again. Doing this four or five times will prime the HFCM with fuel to build fuel pressure back up. Now, take a look under the truck and search for leaks. Look at the engine bay as well to assure that the secondary filter housing is leak free too. Now, start the truck and look under it once more, again searching for leaks. Take the truck for a test drive and enjoy a job well done!
#6
06-19-2010, 06:35 AM

Great write up! The 6.4 uses a 36mm socket for both oil and fuel filters.
The fuel water separator is of a little different design so it is just a yellow lever that you will turn to drain before removal of the filter. Maybe attach a small hose on the end so you can drain into a pan.
I also might add that on the 6.4 sometimes just cycling the key to prime the fuel filters to purge the air is not enough. I have had to hold down my fuel cutoff switch and crank the motor to get it to fire.
Fuel fiter for the 6.4 on frame is a little more difficult as well because of the wiring harness, so I use a wiggle tail on the end of the socket so I can get a better angle.
#7
06-19-2010, 10:01 AM

Temporarily Deactivated
Trending Topics
#8
06-19-2010, 10:18 AM

Posting Guru
Join Date: Aug 2008
Location: Sunny, Snowy, CO
Posts: 2,313
Likes: 0
Received 0 Likes
on
0 Posts
#9
06-19-2010, 10:50 AM

#10
06-19-2010, 11:10 AM
#11
06-19-2010, 11:20 AM
Great write up! The 6.4 uses a 36mm socket for both oil and fuel filters.
The fuel water separator is of a little different design so it is just a yellow lever that you will turn to drain before removal of the filter. Maybe attach a small hose on the end so you can drain into a pan.
I also might add that on the 6.4 sometimes just cycling the key to prime the fuel filters to purge the air is not enough. I have had to hold down my fuel cutoff switch and crank the motor to get it to fire.
Fuel fiter for the 6.4 on frame is a little more difficult as well because of the wiring harness, so I use a wiggle tail on the end of the socket so I can get a better angle.
The fuel water separator is of a little different design so it is just a yellow lever that you will turn to drain before removal of the filter. Maybe attach a small hose on the end so you can drain into a pan.
I also might add that on the 6.4 sometimes just cycling the key to prime the fuel filters to purge the air is not enough. I have had to hold down my fuel cutoff switch and crank the motor to get it to fire.
Fuel fiter for the 6.4 on frame is a little more difficult as well because of the wiring harness, so I use a wiggle tail on the end of the socket so I can get a better angle.
Thanks Scott. Yeah, I wish ours was designed like yours, but with the new brass plug it is pretty easy to do too.
#12
07-06-2010, 03:51 PM

Great write up! The 6.4 uses a 36mm socket for both oil and fuel filters.
The fuel water separator is of a little different design so it is just a yellow lever that you will turn to drain before removal of the filter. Maybe attach a small hose on the end so you can drain into a pan.
I also might add that on the 6.4 sometimes just cycling the key to prime the fuel filters to purge the air is not enough. I have had to hold down my fuel cutoff switch and crank the motor to get it to fire.
Fuel fiter for the 6.4 on frame is a little more difficult as well because of the wiring harness, so I use a wiggle tail on the end of the socket so I can get a better angle.
The fuel water separator is of a little different design so it is just a yellow lever that you will turn to drain before removal of the filter. Maybe attach a small hose on the end so you can drain into a pan.
I also might add that on the 6.4 sometimes just cycling the key to prime the fuel filters to purge the air is not enough. I have had to hold down my fuel cutoff switch and crank the motor to get it to fire.
Fuel fiter for the 6.4 on frame is a little more difficult as well because of the wiring harness, so I use a wiggle tail on the end of the socket so I can get a better angle.
Where is the fuel cutoff switch if I need to crank the motor to get it to fire?
#13
07-06-2010, 03:53 PM
#14
07-06-2010, 04:39 PM

Tools needed:
� 36mm socket- both filters.
� ratchet- both jobs.
� 6mm allen head- fuel filter only.
� Catch pan (15+ quarts capacity), both jobs.
� 19mm socket- oil filter only. (I think you mean drain plug)
� 24mm or 15/16" socket (engine fuel filter)
Step 3. Once fully drained, reinstall the drain plug into the oil pan and torque to spec. Wipe off any spill.
Step 4. Working under the hood, locate the large cap that houses the oil filter. It is the tall style cap favoring the passenger side. Using the 36mm socket and ratchet, remove the oil filter cap. The oil filter will come out of with it.
I think it important to open the oil filter cap and let it drain before you install the drain plug. You'll get about 1 more quart to drain down.
Step 4. Install the new filter (larger one in the kit) into the HFCM. Make note that the bypass channel hole is located at the top of the filter (12 oclock position) and install the cap. Torque to spec.
You want to install the filter in the CAP, just like the oil filter. I don't know about the orientation, it seems like it's just going to turn with the cap as you screw the cap down. Got a reference for that?
You want to install the filter in the CAP, just like the oil filter. I don't know about the orientation, it seems like it's just going to turn with the cap as you screw the cap down. Got a reference for that?
Step 1. Working on top of the engine, locate the secondary fuel filter housing. It is identical to the oil filter cap, only smaller and more flush mount style. It is just to the passenger side of the oil filter housing. Remove it using the 35mm socket. It will also allow a 3/8" drive ratchet by itself, but I am not a fan of this practice, as it puts too much stress on the cap and can cause it to split.
It doesn't take a 35mm. Takes a 24mm, but I just use a 15/16" wrench which fits perfectly.
It doesn't take a 35mm. Takes a 24mm, but I just use a 15/16" wrench which fits perfectly.
Thanks for the work on this. Just a few notes added.
#15
07-06-2010, 05:12 PM
Posting Guru
Join Date: Aug 2008
Location: Sunny, Snowy, CO
Posts: 2,313
Likes: 0
Received 0 Likes
on
0 Posts