
'74 F-100 Build thread "prerunner" (desert truck) LOTS of PICS
#91
 06-15-2010, 04:16 PM


#92
06-15-2010, 08:23 PM

New User
Join Date: Jun 2010
Location: Heaven (Ok, TEXAS!)
Posts: 22
Likes: 0
Received 0 Likes
on
0 Posts
#94
06-16-2010, 12:04 PM
I-beams are cheap and easy to build plus strong. Nasty camber change through the suspension cycle is the main (only??) weakness...
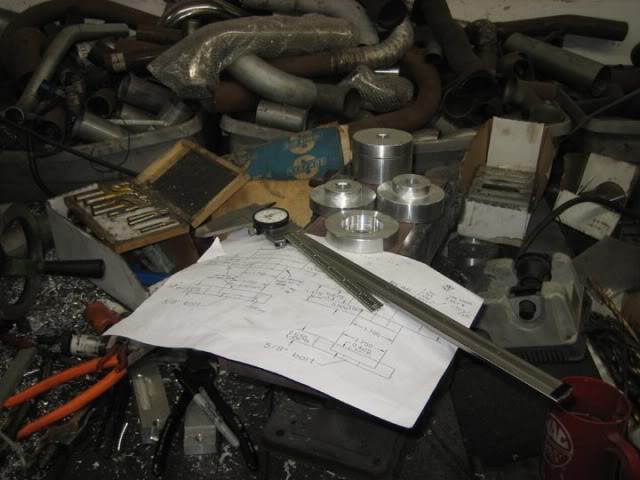
I got a little more time on that lathe last night. I'm no machinist, so these aren't as nice as I would like, but they'll do for sure.
2 front uppers (male), 1 front lower (female) and 1 rear upper (male) are cut. Hopefully I'll get another hour on the lathe tonight and get a bit more cut...
I got a little more time on that lathe last night. I'm no machinist, so these aren't as nice as I would like, but they'll do for sure.
2 front uppers (male), 1 front lower (female) and 1 rear upper (male) are cut. Hopefully I'll get another hour on the lathe tonight and get a bit more cut...
#96
06-16-2010, 06:45 PM
#98
06-16-2010, 07:00 PM
The strength of the beam itself could be retained. The strength of the suspension as a whole I could see having issues. Your inner pivot point would have move up/down with the travel of the "beam" through the suspension cycle - meaning you'd have to support the load of the vehicle on it.
The only other way to do it is do a parallel upper and lower rod or "beam" with the upper being shorter - kind of like an a-arm, but in reality it would be more of a sideways link setup...
People do 2 piece radius arms to keep from major caster change though a large suspension cycle. It could be done like this, but it would not longer be an "i-beam" setup...
Let's see if this works...

Looks like it worked - here's photo #2

Oh - and if you guys think I'm a good fabricator - I look up to this guys work!
The only other way to do it is do a parallel upper and lower rod or "beam" with the upper being shorter - kind of like an a-arm, but in reality it would be more of a sideways link setup...
People do 2 piece radius arms to keep from major caster change though a large suspension cycle. It could be done like this, but it would not longer be an "i-beam" setup...
Let's see if this works...
Looks like it worked - here's photo #2
Oh - and if you guys think I'm a good fabricator - I look up to this guys work!
#100
06-16-2010, 07:29 PM
Post Fiend
#101
06-17-2010, 01:29 AM
D'oh - looks like my little trick didn't work. They were showing up before because I was signed into the website they were on still. I'm too lazy to put them on photobucket and this place is lame about attaching pics - so PM me if anybody wants to see the pics.
Brady and 460/5 - I have both of your email address' - so if you want the pics just holler. Brady - I've got to send you the measurements I took from those spindles tonight anyways, so if I remember when I get around to that tomorrow I'll throw the pics in.
Ok - back on topic. Body mounts are done as of tonight. Pics tomorrow. If I'm lucky they'll go in the truck tomorrow night. If not they'll have to wait until Monday since it looks like I'll be gone Saturday and Sunday and won't be able to touch the thing yet again this weekend.
#102
06-17-2010, 02:00 PM
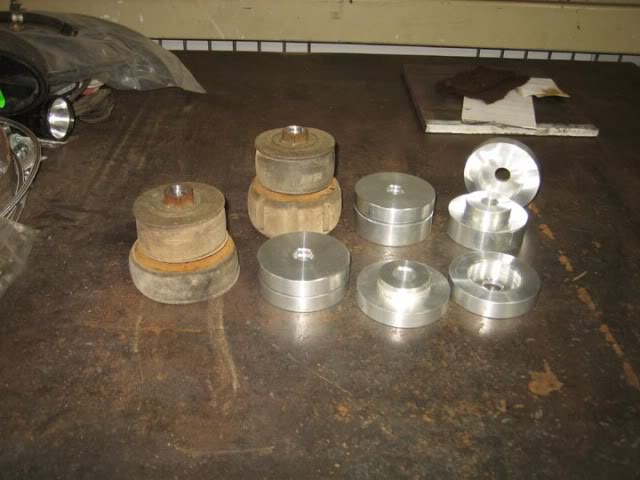
Body mounts done and compared to stock. It's a bit deceiving though as the stock ones squish down under the load of the body. I will only be dropping the body .375" with mine...
Back row is rear and front row is fronts. I left one mated together and the other open so you can see the male/female fitment.
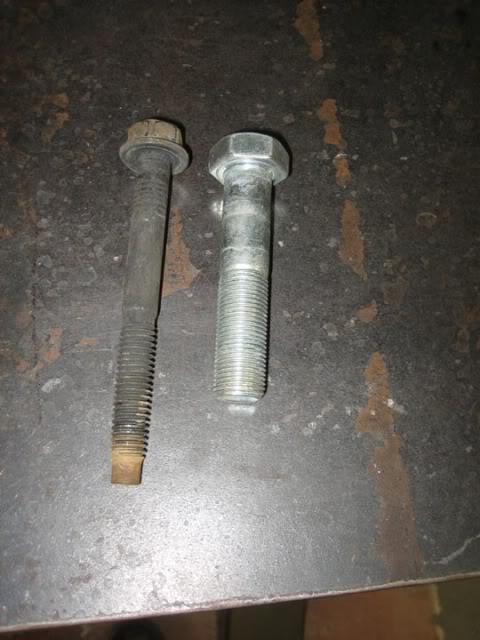
And the best part. Bolt size difference. 7/16 to 5/8"!
Back row is rear and front row is fronts. I left one mated together and the other open so you can see the male/female fitment.
And the best part. Bolt size difference. 7/16 to 5/8"!
#103
06-17-2010, 06:30 PM
Post Fiend
#104
06-17-2010, 06:48 PM
