Converting a 1999 Ford E-250 into a camper van
#481
 07-06-2013, 10:50 AM

I interrupt this project for a little mechanical update. So I'm driving to Lowe's to get a sheet of Formica for the next project when the van starts running rough. The ScanGauge shows error codes P0303 and P0304 which means misfiring on cylinders #3 and #4. In checking the engine I find the spark plug wire for cylinder #4 is just hanging.

The part of the plug wire that grips the spark plug had broken off.

Nothing a new set of plug wires couldn't fix.

The #3 misfire code was probably caused by the #4. The engine is a 4.2L 6 cylinder and I was surprised how well it ran on only 5 cylinders. The last time I lost a cylinder like that was on my first car, a 6 cylinder AMC (green colored) Hornet. No fuel injection back then and it ran a heck of a lot rougher on only 5. At the time I didn't think I could get it back home.
Windshield Cover continued -
With the window cover in place there is still a gap on each side. Need to fix that.

This is the plastic trim cover for the "A" pillar passenger side. Use epoxy to glue three rare earth magnets to the back side of the cover. The magnets came from old computer hard drives.

It was easy to hold the magnets in place while the epoxy set up by putting washers on the opposite side of the plastic trim.

Do the same to the driver's side trim piece.

See where the washer lines up to on the cover.

Hand stitch the washer to the front of the cover.

As I'm sitting in the van sewing on the washers I was under supervision.

After sewing on the three washers the magnets now hold the window cover tight enough to the trim piece to block out light.

Use the sewing machine to hem this edge of the window cover.

Do the same to the passenger side edge of the window cover.


OK, that's the finish of the windshield cover. It came out pretty sweet. Goes up real easy and comes down with just a tug.


When not being used the window cover can easily be folded up small enough to fit in a plastic shopping bag.

When doing all this work on the inside of the windshield I began rethinking the shelf I'd bought from JC Whitney. Here's a picture from their web site.
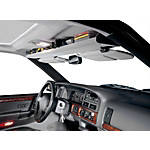
The idea was to increase storage space in the front of the van. It works OK but it does restrict your upper vision through the front window. Having used it for a couple years I've come up with a better storage solution. A zippered tool bag from Harbor Freight. It has more storage space, is a lot cheaper and will fit just fine under the drivers seat.

Something else to add to the parts pile.

The part of the plug wire that grips the spark plug had broken off.
Nothing a new set of plug wires couldn't fix.
The #3 misfire code was probably caused by the #4. The engine is a 4.2L 6 cylinder and I was surprised how well it ran on only 5 cylinders. The last time I lost a cylinder like that was on my first car, a 6 cylinder AMC (green colored) Hornet. No fuel injection back then and it ran a heck of a lot rougher on only 5. At the time I didn't think I could get it back home.
Windshield Cover continued -
With the window cover in place there is still a gap on each side. Need to fix that.
This is the plastic trim cover for the "A" pillar passenger side. Use epoxy to glue three rare earth magnets to the back side of the cover. The magnets came from old computer hard drives.
It was easy to hold the magnets in place while the epoxy set up by putting washers on the opposite side of the plastic trim.
Do the same to the driver's side trim piece.
See where the washer lines up to on the cover.
Hand stitch the washer to the front of the cover.
As I'm sitting in the van sewing on the washers I was under supervision.
After sewing on the three washers the magnets now hold the window cover tight enough to the trim piece to block out light.
Use the sewing machine to hem this edge of the window cover.
Do the same to the passenger side edge of the window cover.
OK, that's the finish of the windshield cover. It came out pretty sweet. Goes up real easy and comes down with just a tug.
When not being used the window cover can easily be folded up small enough to fit in a plastic shopping bag.
When doing all this work on the inside of the windshield I began rethinking the shelf I'd bought from JC Whitney. Here's a picture from their web site.
The idea was to increase storage space in the front of the van. It works OK but it does restrict your upper vision through the front window. Having used it for a couple years I've come up with a better storage solution. A zippered tool bag from Harbor Freight. It has more storage space, is a lot cheaper and will fit just fine under the drivers seat.
Something else to add to the parts pile.
#483
07-07-2013, 04:55 AM

Interesting progress---but then again always is with this project of your's WVVan!
Just as an aside K&J Magnetics is a great site for magnets---in fact they have a type that is made to be sewn into things like your windshield cover.
BTW that's a great idea for a camper. I use a very nice standard style that's a bear to roll up and stow. I don't camp but instead use it as a theft deterrent along with two front door glass covers I made.
Thanks for the updates!
#484
07-30-2013, 03:41 PM

#485
08-23-2013, 08:37 PM

New User
Join Date: Aug 2013
Location: Trying to live everywhere
Posts: 1
Likes: 0
Received 0 Likes
on
0 Posts
Hello
Glad I found your very detailed page. I've got a 2002 e150 that I've been converting as well. Now you're making me think I need to start over a bit before I get too deep and have to do everything over. =) So Far all I have completed is a platform for a full size futon mattress, a rug, a small fridge, and camping gear shoved everywhere. It's a work in progress but my goal is to keep it simple and light yet insulated, wired, and paneled inside. I really look forward to learning from your experience as I browse this thread. It's nice to see that I'm not the only one working on a mini camper. =)
#486
09-09-2013, 06:50 AM

Hotshot
Nice score! QCGB, milling attachment, stead rest, 4 jaw, and a box of surprises!
I have its older brother.

#488
09-09-2013, 09:18 PM
Hotshot
Its your thread, you can ask whatever you want.

I am making a piston for an excavator ram. They tore up the original and I turned up a new one for them over night (needed it right away) for a nice profit.


#489
09-18-2013, 02:37 PM
This thread has been kind of quiet lately. Between my new (to me) lathe:


and camping:
Green Ridge State Forest, Maryland

and biking:
C&O Canal National Historic Park
Paw Paw Tunnel

Lock #58


I've not been posting much. Still working on the van. Just not posting about it.
Next up project is what I'll call the "fridge cabinet". This will be on the drivers side, next to the sofa. It will hold the Engel fridge, porta-potty, and a couple drawers.

Fridge Cabinet - Post #1
Had trouble getting accurate measurements from the section of the van where I wanted the cabinet to go since the van isn't level and the wall curves in towards both the top and the back at that point. Making a wooden mock-up was the best way to go.


With the curved wall I want to find what is the optimum location. If the fridge is mounted at a lower level the cabinet can be moved closer to the wall which gives more room to the center aisle.

I can gain some space by removing the wall panel while deciding.


A quick note about the wall panels. Here is a side view of the panel just removed. This panel started out as flat when first installed but has now taken on a curve that matches the wall. I'm real happy how the "foam insulation+fiberboard+headliner material" wall panels have turned out.

continued -
and camping:
Green Ridge State Forest, Maryland
and biking:
C&O Canal National Historic Park
Paw Paw Tunnel
Lock #58
I've not been posting much. Still working on the van. Just not posting about it.
Next up project is what I'll call the "fridge cabinet". This will be on the drivers side, next to the sofa. It will hold the Engel fridge, porta-potty, and a couple drawers.
Fridge Cabinet - Post #1
Had trouble getting accurate measurements from the section of the van where I wanted the cabinet to go since the van isn't level and the wall curves in towards both the top and the back at that point. Making a wooden mock-up was the best way to go.
With the curved wall I want to find what is the optimum location. If the fridge is mounted at a lower level the cabinet can be moved closer to the wall which gives more room to the center aisle.
I can gain some space by removing the wall panel while deciding.
A quick note about the wall panels. Here is a side view of the panel just removed. This panel started out as flat when first installed but has now taken on a curve that matches the wall. I'm real happy how the "foam insulation+fiberboard+headliner material" wall panels have turned out.
continued -
#490
09-18-2013, 03:41 PM
Fridge Cabinet - Post #2
Look at the gap between the wooden mock-up and the wheel "hump".

Compare it to this pic. I've lowered the fridge about an inch which allows the wooden mock-up to be moved all the way against the wheel "hump". This gives me the most aisle room.

So I've decided the position of the fridge cabinet. Now work on the height of the objects within the cabinet. Next consideration is the height of the porta-potty. Do several test "sits" in the garage while varying the height of the porta-potty until I find what feels just right. After that effort I should name it "Goldipot".

At this point I've decided on all final measurements. Use the mock-up as a framework to hold the angle iron pieces in place so they can be welded together.


Check fit.

I only want a small gap between the top of the fridge cabinet and the penthouse metal reinforcement that runs along the side of the opening.

Keep working.

Final cabinet frame.

Weight a little over 20 lbs.

Do a test fit with the sofa reassembled and fridge in place.


continued -
Look at the gap between the wooden mock-up and the wheel "hump".
Compare it to this pic. I've lowered the fridge about an inch which allows the wooden mock-up to be moved all the way against the wheel "hump". This gives me the most aisle room.
So I've decided the position of the fridge cabinet. Now work on the height of the objects within the cabinet. Next consideration is the height of the porta-potty. Do several test "sits" in the garage while varying the height of the porta-potty until I find what feels just right. After that effort I should name it "Goldipot".
At this point I've decided on all final measurements. Use the mock-up as a framework to hold the angle iron pieces in place so they can be welded together.
Check fit.
I only want a small gap between the top of the fridge cabinet and the penthouse metal reinforcement that runs along the side of the opening.
Keep working.
Final cabinet frame.
Weight a little over 20 lbs.
Do a test fit with the sofa reassembled and fridge in place.
continued -
#491
09-18-2013, 05:46 PM
Hotshot
Excellent stuff! Lathes are addicting and soon you'll want a mill, then a surface grinder, the a press, sheet metal brake....
Here is my hangout for atlas lathe stuff:
Machinist Web - Powered by vBulletin
And
The Home Shop Machinist & Machinist's Workshop Magazine's BBS
Happy turning!
Here is my hangout for atlas lathe stuff:
Machinist Web - Powered by vBulletin
And
The Home Shop Machinist & Machinist's Workshop Magazine's BBS
Happy turning!
#492
09-18-2013, 07:04 PM
#493
09-18-2013, 07:10 PM
Hotshot
Hey Snowseeker,
You sure called that tune. I picked up a sheet metal brake just last week. Already have a mini mill but been looking in the Grizzly catalog at knee mills like it's the old Sears Wish Book. Hadn't thought about a surface grinder. I'm going to have to do some reading!
You sure called that tune. I picked up a sheet metal brake just last week. Already have a mini mill but been looking in the Grizzly catalog at knee mills like it's the old Sears Wish Book. Hadn't thought about a surface grinder. I'm going to have to do some reading!
Besides the lathe my most favorite purchase was a 7x12 horizontal bandsaw.
I am also looking for a mill but looking for old iron still in good shape. And you got to have a welder you know! lol
#494
09-21-2013, 10:45 PM
Fridge Cabinet - Post #3
I was able to get the fridge to fit without the wall panel in the way. Put the panel back into place.

Figure out how much of the panel must be removed and mark it with tape.

Cut it out with the jigsaw.

Here's a side view of the piece just cut from the wall panel. I used contact cement as a adhesive for the three layers when building it. You can see that it's held together rather well.

I then put the panel back and checked the fit with the fridge.

Ended up cutting on it two more times until I got the fit just right with the cooling unit on the back of the fridge.

The cutting left a large gap in the insulating properties of the wall panel so I used some Reflectix to help seal it up.


The fridge arrived with the door mounted to open from the left side. I need it to open from the right. To do that remove the door.

Swap the hinges and hardware.

Here's the sliders for the three drawers.

Will add flat steel bars to the metal framework that the sliders will be bolted to.


Weld those into place.


Next I'll need to add support for the TV mount. This is the piece that's screwed to the TV

Next to it is the piece that will be bolted to the cabinet frame. The design of this mount allows the TV to be lifted off the cabinet and stowed away when not in use.

Figure out where I want the TV to go. Moved it around till it looked right.

Mark that location on the framework.


Weld the supports in place.

Add the final detail to the framework. I want some tie-down points for things carried in the back of the van. I'll be using 1 inch wide straps. Use some wire to create a mock-up.


Transpose the mock-up to 1/4" steel rod. Straightening out the wire gives me the length to cut the steel rod.

Use a vise and hand tools to bend the 1/4" rod into the shape I want.


I'll be the first to admit that these are not all identical but close enough for what I need.

Weld them into place.

Do some clean up work on my welds.

OK. I'm officially finished welding on the fridge cabinet's metal framework.

Framework weight is now 25 lbs.

continued -
I was able to get the fridge to fit without the wall panel in the way. Put the panel back into place.
Figure out how much of the panel must be removed and mark it with tape.
Cut it out with the jigsaw.
Here's a side view of the piece just cut from the wall panel. I used contact cement as a adhesive for the three layers when building it. You can see that it's held together rather well.
I then put the panel back and checked the fit with the fridge.
Ended up cutting on it two more times until I got the fit just right with the cooling unit on the back of the fridge.
The cutting left a large gap in the insulating properties of the wall panel so I used some Reflectix to help seal it up.
The fridge arrived with the door mounted to open from the left side. I need it to open from the right. To do that remove the door.
Swap the hinges and hardware.
Here's the sliders for the three drawers.
Will add flat steel bars to the metal framework that the sliders will be bolted to.
Weld those into place.
Next I'll need to add support for the TV mount. This is the piece that's screwed to the TV
Next to it is the piece that will be bolted to the cabinet frame. The design of this mount allows the TV to be lifted off the cabinet and stowed away when not in use.
Figure out where I want the TV to go. Moved it around till it looked right.
Mark that location on the framework.
Weld the supports in place.
Add the final detail to the framework. I want some tie-down points for things carried in the back of the van. I'll be using 1 inch wide straps. Use some wire to create a mock-up.
Transpose the mock-up to 1/4" steel rod. Straightening out the wire gives me the length to cut the steel rod.
Use a vise and hand tools to bend the 1/4" rod into the shape I want.
I'll be the first to admit that these are not all identical but close enough for what I need.
Weld them into place.
Do some clean up work on my welds.
OK. I'm officially finished welding on the fridge cabinet's metal framework.
Framework weight is now 25 lbs.
continued -
#495
09-26-2013, 01:44 PM
Fridge Cabinet - Post #4
If you look back at the pictures from the first postings about the Fridge Cabinet you'll notice that I'm continually moving the metal framework from the van to the garage and back again to do work or take measurements. The framework is light and easy to move. That's what I really like about constructing the cabinet this way.
With the framework done, drill some holes and bolt it in place.


The front bolt extends through the floor into the area enclosed by the underfloor storage box ("The Basement") so there's no worries about water incursion from underneath.

The frame top will be bolted to the metal shelf that runs along the side of the penthouse opening. I put down tape first to prevent the cloth headliner from catching in the drill bit and snagging.


Don't have a picture but there is also a bolt through the back floor brace. With the framework bolted into place I started tugging on it to see how solid it was. It's rock solid. Got the van swaying in no time.
Take the framework out again to prime and paint it.

Don't remember if I've mention before about my system for reusing paint thinner. I'm using oil based paint and primer so the brushes must be cleaned with paint thinner. If you plan ahead you can keep reusing the paint thinner instead of throwing it away.
I use three paint thinner containers. A new paint thinner can, a reuse jug and a waste can.

After cleaning the brushes pour the used paint thinner into the waste can.

If you let the waste can sit for a few weeks the paint and primer particles will settle out to the bottom of the can. Next time you're going to paint, carefully pour out the paint thinner into the reuse jug leaving the sludge behind. The used paint thinner will acquire a slight tint but will still be clear. If it's cloudy then it needs to sit longer. Use the paint thinner from the reuse jug to clean the brushes. The can of new thinner is to make up what's lost due to evaporation or for when paint needs to be thinned. Since I don't paint constantly this system works well for me.
Been using my current waste can so long that it now has 5 lbs of paint sludge on the bottom after draining.

Put the painted frame into place and just insert the bolts to position it.


Slide the fridge into place.

There are four mounting holes for the fridge. Mark their position on the framework.

Position the TV.

Use the TV mount as a guide for marking the framework.

Will need two cover panels for the sides of the fridge cabinet. Have to duplicate the curve of the wall panel where it meets the front cover panel. Can't find my compass so make one up from an inside divider, marker and masking tape.

Use that to trace an outline of the wall onto some posterboard.

Here's where the back cover panel will go. Along with meeting the curved wall also have to consider the eight tie-down points and ventilation for the fridge.

These are the cooling fins for the fridge. After some thought decide to leave these uncovered. That should increase the fridge efficiency.

continued -
If you look back at the pictures from the first postings about the Fridge Cabinet you'll notice that I'm continually moving the metal framework from the van to the garage and back again to do work or take measurements. The framework is light and easy to move. That's what I really like about constructing the cabinet this way.
With the framework done, drill some holes and bolt it in place.
The front bolt extends through the floor into the area enclosed by the underfloor storage box ("The Basement") so there's no worries about water incursion from underneath.
The frame top will be bolted to the metal shelf that runs along the side of the penthouse opening. I put down tape first to prevent the cloth headliner from catching in the drill bit and snagging.
Don't have a picture but there is also a bolt through the back floor brace. With the framework bolted into place I started tugging on it to see how solid it was. It's rock solid. Got the van swaying in no time.
Take the framework out again to prime and paint it.
Don't remember if I've mention before about my system for reusing paint thinner. I'm using oil based paint and primer so the brushes must be cleaned with paint thinner. If you plan ahead you can keep reusing the paint thinner instead of throwing it away.
I use three paint thinner containers. A new paint thinner can, a reuse jug and a waste can.
After cleaning the brushes pour the used paint thinner into the waste can.
If you let the waste can sit for a few weeks the paint and primer particles will settle out to the bottom of the can. Next time you're going to paint, carefully pour out the paint thinner into the reuse jug leaving the sludge behind. The used paint thinner will acquire a slight tint but will still be clear. If it's cloudy then it needs to sit longer. Use the paint thinner from the reuse jug to clean the brushes. The can of new thinner is to make up what's lost due to evaporation or for when paint needs to be thinned. Since I don't paint constantly this system works well for me.
Been using my current waste can so long that it now has 5 lbs of paint sludge on the bottom after draining.
Put the painted frame into place and just insert the bolts to position it.
Slide the fridge into place.
There are four mounting holes for the fridge. Mark their position on the framework.
Position the TV.
Use the TV mount as a guide for marking the framework.
Will need two cover panels for the sides of the fridge cabinet. Have to duplicate the curve of the wall panel where it meets the front cover panel. Can't find my compass so make one up from an inside divider, marker and masking tape.
Use that to trace an outline of the wall onto some posterboard.
Here's where the back cover panel will go. Along with meeting the curved wall also have to consider the eight tie-down points and ventilation for the fridge.
These are the cooling fins for the fridge. After some thought decide to leave these uncovered. That should increase the fridge efficiency.
continued -