My *%&@#$& Trailing Arms
#1
 03-17-2010, 07:58 PM


My *%&@#$& Trailing Arms
So last week I start hearing this dreadful thunking when coming to a stop and then taking off. I looked under the truck and found a broken trailing arm (rear, lower control arm) on the driver's side. I ordered up a set from PMT along with the bolts (yes, do get the set that comes with the bolts), and today they arrived. Being such a nice day out, I decided to tackle the job right away. It was a bit tough to get the old bolts out because they've been in there for 13 years or so. The worst one was the front driver's side because of the gas tank interference issue (see below.)
These three pictures show the break in the trailing arm and how the second arm was about to break.
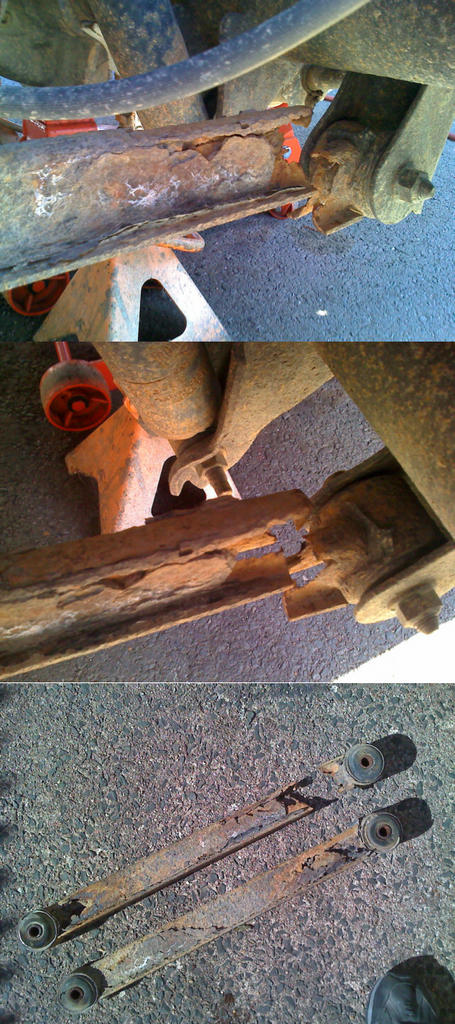
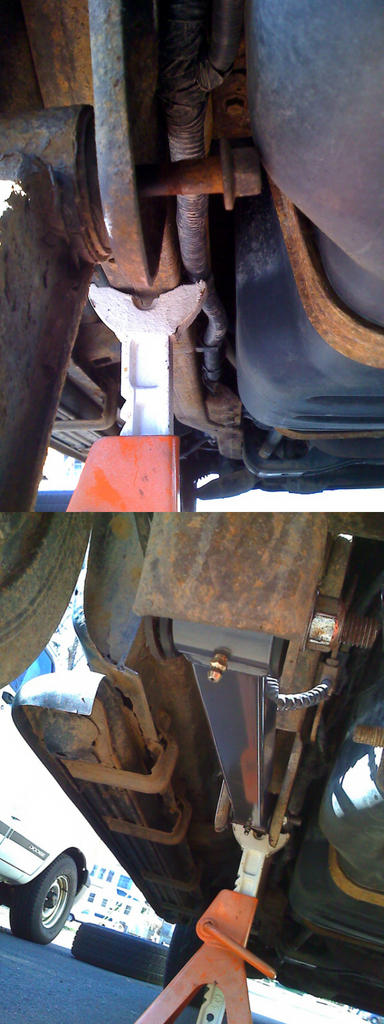
This one shows how the front bolt on the driver's side doesn't come out due to interference with the gas tank.
You have to cut the head off the bolt and take it out the other direction.
Then there's the installed driver's side arm.
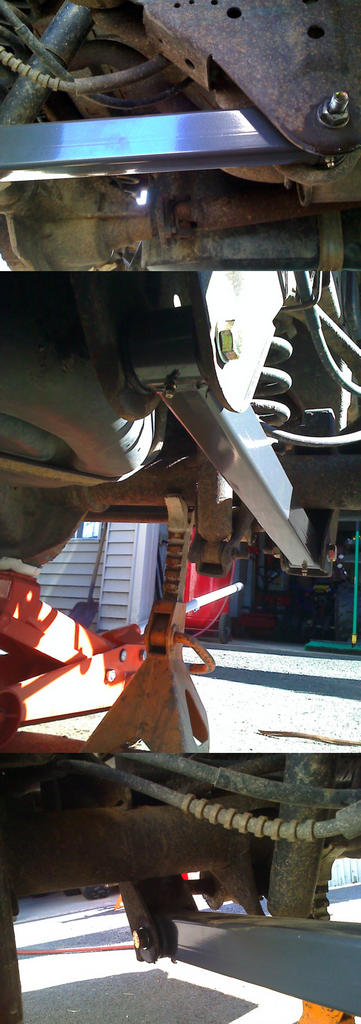
Here are the final three pictures of the installed arms.
These three pictures show the break in the trailing arm and how the second arm was about to break.
This one shows how the front bolt on the driver's side doesn't come out due to interference with the gas tank.
You have to cut the head off the bolt and take it out the other direction.
Then there's the installed driver's side arm.
Here are the final three pictures of the installed arms.
#2
03-17-2010, 08:25 PM
Senior User
Join Date: Dec 2009
Location: Cuyahoga Falls, OH
Posts: 147
Likes: 0
Received 0 Likes
on
0 Posts
#3
03-17-2010, 08:51 PM
I replaced just the lowers, the uppers were still in good shape.
I missed the rusted through sections because the tire hid it from view. I avoid car work at all cost during the winter and haven't been underneath the truck since last summer. But thanks for rubbing it in by pointing out my lack of due diligence.
")
I missed the rusted through sections because the tire hid it from view. I avoid car work at all cost during the winter and haven't been underneath the truck since last summer. But thanks for rubbing it in by pointing out my lack of due diligence.
#4
03-17-2010, 09:19 PM
Senior User
Join Date: Dec 2009
Location: Cuyahoga Falls, OH
Posts: 147
Likes: 0
Received 0 Likes
on
0 Posts
Sorry, we all appreciate all of your input and expertise on all of our questions. At least you did not damage anything else when they broke. I also purchased the PMT's they are nice units, I decided to replace all four on my expy they were not cheap but still less than the dealer even buying them at cost through my shop.
#5
03-17-2010, 09:24 PM
Posting Guru
Join Date: Jan 2008
Location: Trenton, MI
Posts: 2,408
Likes: 0
Received 0 Likes
on
0 Posts

#7
03-18-2010, 12:03 AM
Trending Topics
#8
03-18-2010, 12:06 AM
#9
03-18-2010, 07:01 AM

I just recently replaced all 4 of mine with the PMT pieces myself. I am now waiting for a track bar from them as well. My track bar has all the powder coating loose and I just want to change it on my schedule. They are good looking units. Glad you did not have anything else happen when it let go.
#10
03-18-2010, 07:05 AM

Senior User
Join Date: May 2007
Location: SUNMAN INDIANA
Posts: 412
Likes: 0
Received 0 Likes
on
0 Posts
#11
03-18-2010, 09:34 AM
#12
03-18-2010, 06:23 PM
Senior User
Join Date: Dec 2009
Location: Cuyahoga Falls, OH
Posts: 147
Likes: 0
Received 0 Likes
on
0 Posts
#13
03-18-2010, 06:27 PM
Senior User
Join Date: Dec 2009
Location: Cuyahoga Falls, OH
Posts: 147
Likes: 0
Received 0 Likes
on
0 Posts
#14
03-18-2010, 07:31 PM

Scary...
Questions:
So the one bolt doesn't come out due to the gas tank being in the way. Solution = cut the head of the bolt off which is fine BUT when installing the new bolt, I'm assuming you install it on the opposite side to avoid this situation in the future?
Secondly, I've been considering pulling mine off and repainting them with some Chasis Saver paint I have. Is there any other special bracing of the rear axle or vehicle that we should know about before attempting this project? Looks like just supporting the frame and the axle is sufficient for this job. Am I correct?
Third, a list of tools needed would be nice
#15
03-18-2010, 08:12 PM
Senior User
Join Date: Dec 2009
Location: Cuyahoga Falls, OH
Posts: 147
Likes: 0
Received 0 Likes
on
0 Posts
Yes, 97expguy just install the new bolt with the head of the bolt facing the opposite direction. I cannot remember what size wrench & socket to use but I did use the torch on the nuts to loosen them (I think due to being undercoated) and a good strong impact wrench. When I did mine I was on a drive on rack and did not even jack up the back end for the lowers. We should have done both of the lowers at the same time due to being slightly longer making it a little easier to shift the axle a little bit. The uppers are a little more tough. the wheels do have to come off for easier access to the bolts.