Few more pony's please
#46
 03-22-2010, 05:15 PM


 took the girl out 4x4'n a bit sunday just so I could remember how she ran before the upgrades
 It'll be a night and day difference.
On mine, since it was used, the previous owner had screwed in some vacuum ports. This picture wasn't directed at them, so they're almost off-camera, but should be visible.
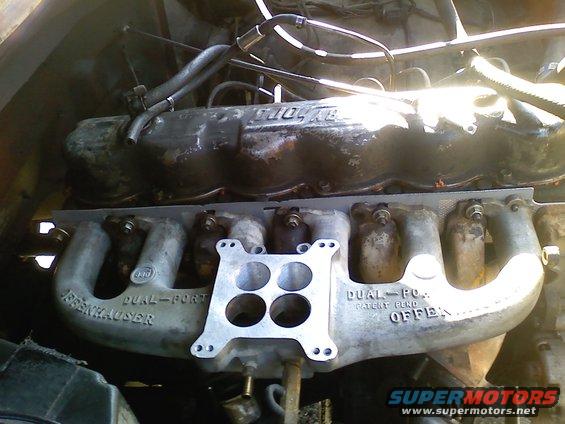
One was just a big one for the brake booster, and the other one had multiple sized ports for whatever reasons. I didn't use all but one or two, so I capped them off. I have no clue where to get them since I've never looked, but can't imagine they're not readily available.

#48
03-22-2010, 05:25 PM
Senior User
Join Date: Nov 2009
Location: Rochester
Posts: 406
Likes: 0
Received 0 Likes
on
0 Posts
#49
03-22-2010, 05:58 PM
Join Date: Mar 2010
Posts: 337
Likes: 0
Received 0 Likes
on
0 Posts
cheer's guys for the info
ups stoped by a bit ago as well

scored a engine host and stand off Craig's list for 200 for the project as well
top of the day to you all
ups stoped by a bit ago as well
scored a engine host and stand off Craig's list for 200 for the project as well
top of the day to you all
#50
03-24-2010, 02:45 PM
Join Date: Mar 2010
Posts: 337
Likes: 0
Received 0 Likes
on
0 Posts
Good day
AB or coolguy, would one of you be so kind as too grab this piccy and draw on it with paint and show me what all will need filled in with the JB weld, just want to make sure I do it right.
also we are looking at the manifold side right?
and what would be the best gasket setup, 4 hole for both sides?
thanks for any/all help folks

also we are looking at the manifold side right?
and what would be the best gasket setup, 4 hole for both sides?
thanks for any/all help folks
#51
03-24-2010, 02:53 PM
It'd just be this area here:
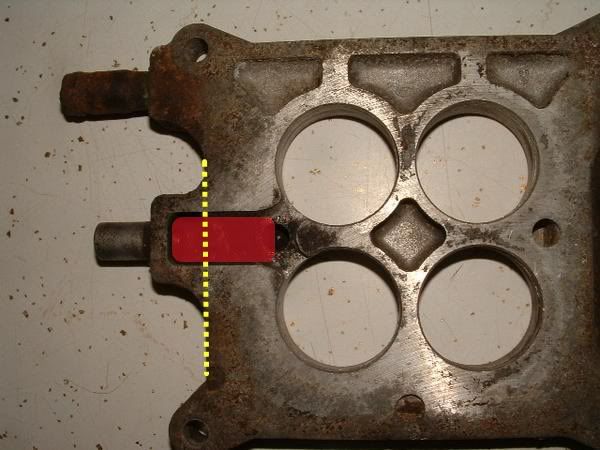
All of the area to the left of the dotted line is exposed to atmosphere, so if it's not covered, that entire opening is a vacuum leak. Plus, the opening on the end of the nozzle needs to be filled.
The side in the picture does go towards the manifold, and definitely use gaskets with individual runners. If not, you'll have air/fuel mixture mixing between the upper and lower runners in the intake.
#52
03-24-2010, 03:23 PM
Join Date: Mar 2010
Posts: 337
Likes: 0
Received 0 Likes
on
0 Posts
Thank you sir what made me ask on the part to fill is because I didn't know If I should block off the channel to the right side of your shaded in area between the 2 chambers on the left side
Now that I think about it the first plate you used before the heated spacer could not have blocked those off.
cheers and thanks for your help and info
what made me ask on the part to fill is because I didn't know If I should block off the channel to the right side of your shaded in area between the 2 chambers on the left sideNow that I think about it the first plate you used before the heated spacer could not have blocked those off.
cheers and thanks for your help and info
#53
03-24-2010, 03:30 PM
Hrmm...not sure on that one. That part isn't covered on mine. Maybe it doesn't make a difference because they're both secondaries? (at least on mine) The parts I colored in were only thinking about the vacuum leak.
However, if you can fill it, and do a quality job of it, I'd say it's a good idea since it won't leave it up to question if it has any ill effects. Maybe since mine's off right now, I'll try filling that gap and see if it makes a difference.
However, if you can fill it, and do a quality job of it, I'd say it's a good idea since it won't leave it up to question if it has any ill effects. Maybe since mine's off right now, I'll try filling that gap and see if it makes a difference.
#54
03-24-2010, 03:39 PM
Join Date: Mar 2010
Posts: 337
Likes: 0
Received 0 Likes
on
0 Posts
from your youtube vid I would say your's ran fine that way.... but you have posted about low MPG on road trips? hmmm
I dont know how the carb system's worked back in those days but prob nothing like today.
wonder if Holley tech support can be of any help, and I bet the machine shop could be of some help to make sure it got done proper
I dont know how the carb system's worked back in those days but prob nothing like today.
wonder if Holley tech support can be of any help, and I bet the machine shop could be of some help to make sure it got done proper
#55
03-24-2010, 07:04 PM
Senior User
Join Date: Nov 2009
Location: Rochester
Posts: 406
Likes: 0
Received 0 Likes
on
0 Posts
#56
03-24-2010, 10:58 PM
Join Date: Mar 2010
Posts: 337
Likes: 0
Received 0 Likes
on
0 Posts

got my EFI exhaust in today as well as a weather strip'n kit for the F250
can see some globs of slag in the efi manifolds... should I grind those off?
thanks all for the input and info
#57
03-25-2010, 06:02 AM
Senior User
Join Date: Nov 2009
Location: Rochester
Posts: 406
Likes: 0
Received 0 Likes
on
0 Posts
#58
03-25-2010, 11:57 PM
Join Date: Mar 2010
Posts: 337
Likes: 0
Received 0 Likes
on
0 Posts
coolguy, thanks for the input buddy
welp was a snow/rain day today and by 10:30 am figured it was a no go on engine removal but no my mechanic bud showed up at 11
got the motor out with the hood still on with a fancy 180* turn clockwise 3/4 of the way out
couple of picture's of the start of the project.... thanks a ton all for your help and input
#59
03-26-2010, 08:57 AM
