Is this Salvagable or worth fixing?
#1
 11-10-2009, 10:40 AM

Join Date: May 2009
Location: Peoria, Arizona
Posts: 729
Likes: 0
Received 0 Likes
on
0 Posts
Is this Salvagable or worth fixing?
I have this big crack right on the front lip of my hood. It goes all the way through and is jagged.
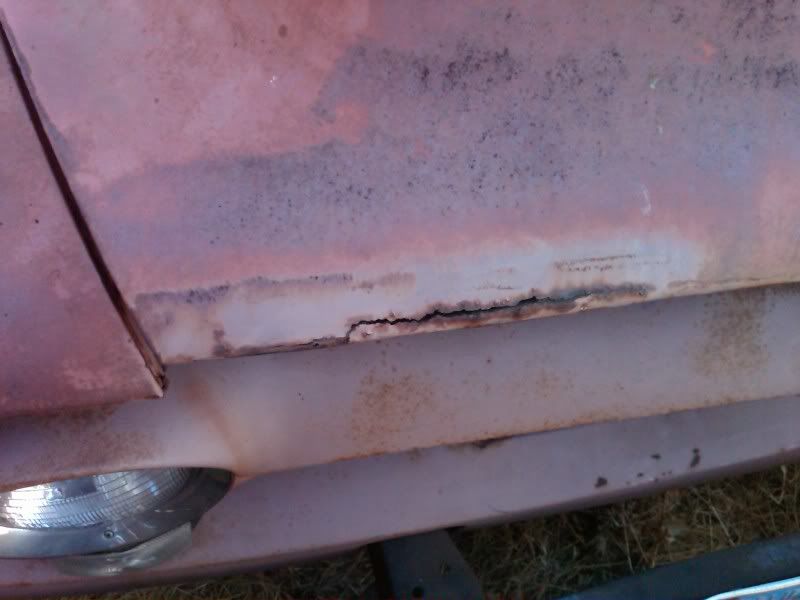
What do you guys think. Is it able to be fixed or should I just go for a different hood. WIll post better picture later.
I also have questions about my cab and whether it is salvageable or not.
Thanks in advance everyone.
What do you guys think. Is it able to be fixed or should I just go for a different hood. WIll post better picture later.
I also have questions about my cab and whether it is salvageable or not.
Thanks in advance everyone.
#2
11-10-2009, 10:47 AM
Posting Guru
#3
11-10-2009, 10:50 AM
Join Date: May 2009
Location: Peoria, Arizona
Posts: 729
Likes: 0
Received 0 Likes
on
0 Posts
Thats good news!
My problem is that i dont have any metal working or welding skills yet I imagine that I will be getting some very soon but i'm still in the dark.
Do they sell patch panels for that area? Do you know anyone that makes them?
Should I stop asking dumb questions and actually find a welding class? - Yes
Thanks guys/gals
My problem is that i dont have any metal working or welding skills yet
I imagine that I will be getting some very soon but i'm still in the dark.Do they sell patch panels for that area? Do you know anyone that makes them?
Should I stop asking dumb questions and actually find a welding class? - Yes
Thanks guys/gals
#4
11-10-2009, 10:57 AM
Posting Guru
Join Date: Aug 2000
Location: S.C.
Posts: 1,849
Likes: 0
Received 0 Likes
on
0 Posts
I bought me a stick welder and start practicing, then I got a wire fed welder for body panels at this point I can make & weld panels pretty good. I even welded the stake holes in my bed sides which look pretty darn good if I may say so myself. If you can get in a class I say go for it, it will save some time, once you get the hang of it it's pretty easy you just take it slow so you don't burn up the metal.
#5
11-10-2009, 11:06 AM
Senior User
Join Date: Jul 2007
Location: Weston-super-Mare (UK)
Posts: 310
Likes: 0
Received 0 Likes
on
0 Posts
#7
11-10-2009, 12:41 PM
Elder User
Join Date: Mar 2005
Location: Indianapolis, Indiana
Posts: 828
Likes: 0
Received 0 Likes
on
0 Posts
Trending Topics
#8
11-10-2009, 01:24 PM

Posting Guru
Join Date: Jul 2006
Location: Westminster,Md
Posts: 1,276
Likes: 0
Received 0 Likes
on
0 Posts
If and/or when you decide to do the repair with the MF replacement panel, here's a tip..screw a piece of scrap-metal, about 8" long to both ends of the hood..then scribe the placementor outline"of the original" hood leading edge/end..and cut away any overhang, This will end up looking like a "patch" over both ends. When fitting your "new" panel, just line things up with your "patch"..tack and remove the patches and finish weld.This will keep the correct and original angle where the leading edge meets the hood and grille area..Good Luck!
#9
11-10-2009, 02:25 PM

#10
11-10-2009, 02:55 PM

Postmaster
#11
11-10-2009, 02:59 PM

I did mine before the MF patch was available.
The most important thing to know is that sheet metal welding is done with tack welds. Don't get the part too hot. Take your time.
A step-by-step tutorial: 1956 Ford F100 4x2 - Hood Patch Panels

The most important thing to know is that sheet metal welding is done with tack welds. Don't get the part too hot. Take your time.
A step-by-step tutorial: 1956 Ford F100 4x2 - Hood Patch Panels
#12
11-10-2009, 03:04 PM
Here's a paraphrased reprint of some info I just recently sent to another member:
I am using a Hobart (made by Miller) 140, a 110V machine with shielding gas, and is a perfect size for almost all welding on your truck.
The wire I keep recommending is made by ESAB,
it is called Spoolarc Easy Grind. It comes in 8" spools in .025 and .030 size. I use the smaller size for sheet metal work.
Note that many ESAB dealers are not familiar with the Easy Grind wire. It does not have a universal alloy # like most wires. There is no equivilent wire or substitute no matter what the dealer says. Most will need to order it I have only heard of one person that found it in stock at his dealer. Tell them to check the ESAB catalog or web site for item 1302F83
(.025 wire, 2# spool)
This wire will not work without shielding gas.
It's really worth whatever effort it takes to get it.
Get some cold rolled 20 ga mild steel (cold rolled has a silver color vs hot rolled which has a blackish hard coating. Hot rolled is much harder to form and the coating must be removed for welding.) And practice, practice, practice. Try different types of joints, butt, T, inside angles, outside angles. Check your penetration on the back side, the bead should fill the seam, there should be no recesses or holes in the seam when it is sanded smooth. Put one piece in a vise and bend the other with a pair of pliers. It should bend along side the bead rather than crack along the original seam. You may want to start with some 1/8" (10ga) material until you get used to moving the torch along then switch to thinner material. You can use the .025 wire for both sizes of material. Hold the torch tip at a 45 degree angle to the material surface and pointed in the direction of the center of your body. Push the bead (point the torch in the direction of travel) on the thicker material, pull the bead on the thinner stock. Pushing the bead preheats the metal in front of the bead to increase penetration, pulling does not so you will get less burn thrus. Keep a pair of long nosed needle nose pliers with wire cutting area with your welder dedicated to welding. cut the ball off the end of the wire and trim back to 1/4" of wire poking out of the stinger before each weld. A fresh cut will aid starting the bead, and the balled tip will create extra heat just like using a thicker wire, so remove it. Use the plier tips to clean off any splatter on the shield nozzle and to change tips when needed (be sure to match the tip size to your wire size) Avoid the tendency to back the torch away as you weld. Keep it ~ 3/8" above surface when pushing a bead, you can lay it right on the material when pulling the bead if you want. Adjust your wire feed speed and/or weld speed so you still have 1/4 - 3/8" of wire sticking out of the stinger at the end of the bead. If you have a long piece of wire sticking out, you are backing away or your feed is too fast. If the arc keeps sputtering you are moving too fast or your feed is too slow. You will have to examine your weld bead to determine which needs adjusting.
A steel plate topped welding bench is a worthwhile project and a good weld practice project. Make it out of 1" square 1/8" wall tubing with a flat 1/8" or thicker steel plate top 2'x3' or larger. let the top overhang the base a couple inches all around so you can clamp pieces to it with various clamps and vice-grips. You can also hold pieces in place on it with welder's triangular magnets.
I do hope you have also gotten yourself a self darkening helmet, if not, go get one immediately. One in the 60.00 up price range will work fine, make sure the batteries are commonly available (I get the large button cells mine requires at my local Radio Shack).
#14
11-10-2009, 05:52 PM

#15
11-10-2009, 06:26 PM