
My GT500 truck build thread...picture intensive!!!!
#1
 08-29-2009, 03:40 PM

My GT500 truck build thread...picture intensive!!!!
As most of you know by now, I am in the process of building my truck into what I think Carroll Shelby would have done if he had actually made one. Please keep in mind that this is my interpretation of what it might be, and is in no way a basis for any kind of "factory correctness."
I have been making some progress, but there is still a lot left to do. Originally I was going to keep the details of the process to myself, but I figured what the heck...let everybody see, and if somebody wants to use my ideas, so be it.
The most labor intensive part has been the inboard headlights, as were seen on the early '67 GT500s. Luckily, the '73-'75 grille is a great platform to start with. This is what original GT500 inboard lights look like.
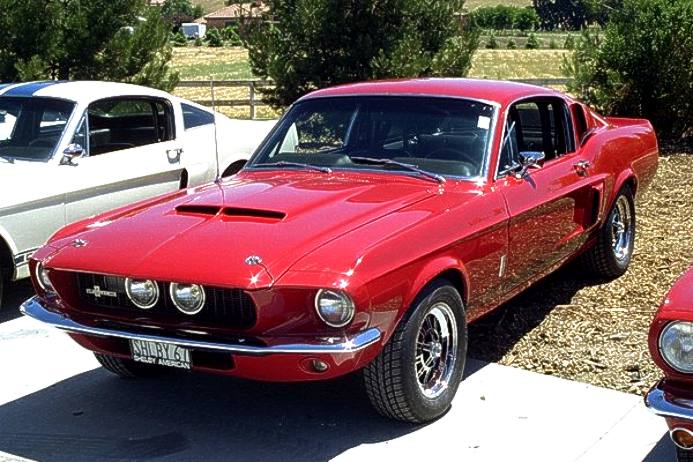
As you can see, the inboard lights are the same as the regular headlights, and they use the same retainer rings.
This is my interpretation...

My lights are also identical to the regular headlights and share a similar type of retainer ring.
So how did I do this? Here are the steps.
1. Bought two replacement headlights from AutoZone: Sylvania 2D1.
2. Went to Lowe's and found PVC pipe that would fit a 6" standard headlamp: NDS L6P07 6" to 4" reducer.

You can also use a 6" collar, which does not have the taper. If I were to do this again, I would probably use a straight collar piece.
3. Place the headlamp on the collar and mark cutouts for the locating tabs. Be sure to keep the bulb level and hold it in place as you make your marks. I taped mine.

4. Cut out the slots for the bulb tabs. I used a hack for the sides, then cut out the rest with my dremel and a side cutting bit. This doesn't have to be precise, but you do want to make them deep enough for the bulb to seat properly.

5. Use the large end of the PVC pipe and a fine point Sharpie to mark where to cut on the grille. Here are the measurements I used to position the pipe and mark mine:
-1 3/8" from inside center of grille on center horizontal bar
-1 1/8" from inside top of grille
-11/16" from inside bottom of grille
6. From the marks you made on the grille bars, use a straightedge to transfer the outsides of the marks to the top and bottom of each bar. This way you will have a guide to help you cut it straight and keep the angles right. I didn't do this, and I paid the price in hours of trimming and fitting, retrimming and refitting...uuuuuuuugggggghhhhhhh...........
7. Cut the grille bars on the inside of the marks you made. You can always fine tune and take a little more out, but you can't put any back in! I used a hack and I had to take the blade off, feed it inside the bars, and put it back on to do the cutting on the very top and bottom bars. For the center bar (once I had room), I used a Dremel with a cutting wheel...much easier and much faster. Here's what the grille will look like after cutting.

8. This is where the fitting and trimming come in. You'll have to keep putting the PVC reducer in and and taking it out until you get a snug fit that doesn't distort the bars. In other words, you should have to apply a little bit of pressure to get it in, but you shouldn't have to crank on it. I installed the cut grilles back in the grille shell so they were being trimmed in the position they would ultimately be installed in permanently. Why? If I got everything to fit well outside the grille shell but something got distorted in the process, the inserts would no longer fit right...so I did my fine tuning there. I used a sanding barrel bit on my Dremel to trim areas on the grille that didn't fit very well.

9. Once I got everything to fit properly, I taped the headlights in position, installed the new headlight "buckets" in the grille inserts and rotated them until the logos on the lights were level and even, and pushed on two '70s Dodge van headlight retainer rings. I could have used original Ford rings, but the Dodge rings are thicker on the outside, which helps to cover the bulb cutouts (especially if you cut them a bit deep!) They are a heck of a lot easier to find, too...around here, at least. I had to fiddle with the positioning so they were both in the same position (opposite) and there was enough room to install mounting pads for them. I then taped them in place, removed the entire bucket/bulb/ring assembly from both sides, and using the bottom of the retainer ring mounting tabs, marked the position for each of the retainer ring mounting pads with a straight line.
MORE TO COME TONIGHT...GOTTA TAKE A BREAK AND FINISH TRIMMING THE LAWN...
Next, making the mounting pads.
I have been making some progress, but there is still a lot left to do. Originally I was going to keep the details of the process to myself, but I figured what the heck...let everybody see, and if somebody wants to use my ideas, so be it.
The most labor intensive part has been the inboard headlights, as were seen on the early '67 GT500s. Luckily, the '73-'75 grille is a great platform to start with. This is what original GT500 inboard lights look like.
As you can see, the inboard lights are the same as the regular headlights, and they use the same retainer rings.
This is my interpretation...
My lights are also identical to the regular headlights and share a similar type of retainer ring.
So how did I do this? Here are the steps.
1. Bought two replacement headlights from AutoZone: Sylvania 2D1.
2. Went to Lowe's and found PVC pipe that would fit a 6" standard headlamp: NDS L6P07 6" to 4" reducer.
You can also use a 6" collar, which does not have the taper. If I were to do this again, I would probably use a straight collar piece.
3. Place the headlamp on the collar and mark cutouts for the locating tabs. Be sure to keep the bulb level and hold it in place as you make your marks. I taped mine.
4. Cut out the slots for the bulb tabs. I used a hack for the sides, then cut out the rest with my dremel and a side cutting bit. This doesn't have to be precise, but you do want to make them deep enough for the bulb to seat properly.
5. Use the large end of the PVC pipe and a fine point Sharpie to mark where to cut on the grille. Here are the measurements I used to position the pipe and mark mine:
-1 3/8" from inside center of grille on center horizontal bar
-1 1/8" from inside top of grille
-11/16" from inside bottom of grille
6. From the marks you made on the grille bars, use a straightedge to transfer the outsides of the marks to the top and bottom of each bar. This way you will have a guide to help you cut it straight and keep the angles right. I didn't do this, and I paid the price in hours of trimming and fitting, retrimming and refitting...uuuuuuuugggggghhhhhhh...........
7. Cut the grille bars on the inside of the marks you made. You can always fine tune and take a little more out, but you can't put any back in! I used a hack and I had to take the blade off, feed it inside the bars, and put it back on to do the cutting on the very top and bottom bars. For the center bar (once I had room), I used a Dremel with a cutting wheel...much easier and much faster. Here's what the grille will look like after cutting.
8. This is where the fitting and trimming come in. You'll have to keep putting the PVC reducer in and and taking it out until you get a snug fit that doesn't distort the bars. In other words, you should have to apply a little bit of pressure to get it in, but you shouldn't have to crank on it. I installed the cut grilles back in the grille shell so they were being trimmed in the position they would ultimately be installed in permanently. Why? If I got everything to fit well outside the grille shell but something got distorted in the process, the inserts would no longer fit right...so I did my fine tuning there. I used a sanding barrel bit on my Dremel to trim areas on the grille that didn't fit very well.
9. Once I got everything to fit properly, I taped the headlights in position, installed the new headlight "buckets" in the grille inserts and rotated them until the logos on the lights were level and even, and pushed on two '70s Dodge van headlight retainer rings. I could have used original Ford rings, but the Dodge rings are thicker on the outside, which helps to cover the bulb cutouts (especially if you cut them a bit deep!) They are a heck of a lot easier to find, too...around here, at least. I had to fiddle with the positioning so they were both in the same position (opposite) and there was enough room to install mounting pads for them. I then taped them in place, removed the entire bucket/bulb/ring assembly from both sides, and using the bottom of the retainer ring mounting tabs, marked the position for each of the retainer ring mounting pads with a straight line.
MORE TO COME TONIGHT...GOTTA TAKE A BREAK AND FINISH TRIMMING THE LAWN...
Next, making the mounting pads.
#4
08-29-2009, 06:37 PM
OK...on to the next step.
10. Making the mounting pads for the headlight retainer ring.
I got a piece of 1/2" X 1/2" L-channel aluminum for the job. I cut six 1/2" pieces out of it (3 per side) using the hack and a bench vise. Then I drilled a 1/8" hole in one side of each piece for the machine screws and nuts that hold them to the PVC buckets.
Using the guide lines I marked earlier, I held each of the aluminum brackets up to the buckets and used a sharpie to mark the mounting holes in the PVC. I drilled the holes out with the same 1/8" bit, then installed each of the brackets with the machine screws and nuts.
Next, I reinstalled the headlights and rings on the buckets, lined up the rings' mounting tabs with the aluminum brackets, and marked the holes for the mounting screws. I drilled them out with a #9 drill bit, and threaded the holes with the #10 black trim screws used to hold the retainer rings.
Finally, I used a pair of tin snips to round off the mounting brackets and trim off any excess, then hit them with the sanding drum on my Dremel. DONE! Unfortunately, since I was doing these as quickly as possible, I didn't get any pics of the process, but it is pretty straightforward. There are pics of the setup in the next section.
11. Bucket to grille assembly
For this, I inserted the buckets (with headlights and rings on them) into the grille inserts, installed the grille inserts in the grille shell, and lined them up so the logos on the bulbs were even. I used a yardstick to level the bulbs vertically, and eyeballed the horizontal alignment. I carefully marked the position of the buckets so I could keep them lined up properly during the assembly process, then removed the bulbs, rings, and grille inserts. I sanded the old paint off of the grille inserts where the epoxy had to bond.
To bond the PVC to the plastic grille, I used Car-Go plastic repair epoxy putty. It's easy to mix, easy to form, sets quick, bonds great, and smoothes very well with only water and your finger...as long as you do it before it sets, obviously. Boy, does it stink, though....
I did one section at a time, being sure to keep all of the alignment marks where they belonged. Note the retainer ring mounting brackets in the pics below:


Once I had all of the joints done, I let them cure out in the shed for a few days.
12. Shaping and painting
When the epoxy was cured, I again used my Dremel and the barrel sanding bit to refine the joints and remove the excess epoxy. That, combined with 220 grit sandpaper to round off the sharp corners, gave me a good finish.
I painted the new grilles white, allowed them to dry, and then used a brush to apply Testors #1149 flat black enamel (yes, model paint!) to the retainer ring mounting tabs and the mounting brackets. That, combined with the black screws, makes them disappear in all the black on the radiator and core support.
13. Final installation
I assembled all of the grille pieces and installed the inserts in the grille shell using stainless steel screws.
Look closely...can you see the retainer ring mounting tabs, brackets, or screws?
 COMING UP...THE NEW HEADLINER.
10. Making the mounting pads for the headlight retainer ring.
I got a piece of 1/2" X 1/2" L-channel aluminum for the job. I cut six 1/2" pieces out of it (3 per side) using the hack and a bench vise. Then I drilled a 1/8" hole in one side of each piece for the machine screws and nuts that hold them to the PVC buckets.
Using the guide lines I marked earlier, I held each of the aluminum brackets up to the buckets and used a sharpie to mark the mounting holes in the PVC. I drilled the holes out with the same 1/8" bit, then installed each of the brackets with the machine screws and nuts.
Next, I reinstalled the headlights and rings on the buckets, lined up the rings' mounting tabs with the aluminum brackets, and marked the holes for the mounting screws. I drilled them out with a #9 drill bit, and threaded the holes with the #10 black trim screws used to hold the retainer rings.
Finally, I used a pair of tin snips to round off the mounting brackets and trim off any excess, then hit them with the sanding drum on my Dremel. DONE! Unfortunately, since I was doing these as quickly as possible, I didn't get any pics of the process, but it is pretty straightforward. There are pics of the setup in the next section.
11. Bucket to grille assembly
For this, I inserted the buckets (with headlights and rings on them) into the grille inserts, installed the grille inserts in the grille shell, and lined them up so the logos on the bulbs were even. I used a yardstick to level the bulbs vertically, and eyeballed the horizontal alignment. I carefully marked the position of the buckets so I could keep them lined up properly during the assembly process, then removed the bulbs, rings, and grille inserts. I sanded the old paint off of the grille inserts where the epoxy had to bond.
To bond the PVC to the plastic grille, I used Car-Go plastic repair epoxy putty. It's easy to mix, easy to form, sets quick, bonds great, and smoothes very well with only water and your finger...as long as you do it before it sets, obviously. Boy, does it stink, though....
I did one section at a time, being sure to keep all of the alignment marks where they belonged. Note the retainer ring mounting brackets in the pics below:
Once I had all of the joints done, I let them cure out in the shed for a few days.
12. Shaping and painting
When the epoxy was cured, I again used my Dremel and the barrel sanding bit to refine the joints and remove the excess epoxy. That, combined with 220 grit sandpaper to round off the sharp corners, gave me a good finish.
I painted the new grilles white, allowed them to dry, and then used a brush to apply Testors #1149 flat black enamel (yes, model paint!) to the retainer ring mounting tabs and the mounting brackets. That, combined with the black screws, makes them disappear in all the black on the radiator and core support.
13. Final installation
I assembled all of the grille pieces and installed the inserts in the grille shell using stainless steel screws.
Look closely...can you see the retainer ring mounting tabs, brackets, or screws?
COMING UP...THE NEW HEADLINER.
#5
08-29-2009, 06:50 PM
I've already done a ton of work mechanically, a good amount of body work/ part replacement, paint/undercoat, rust repair, etc...
I'm moving right along, with the minor inconvenience of needing a new bed and tailgate...
#6
08-29-2009, 07:21 PM
Update
HEADLINER
Realizing that my old headliner had seen better days, I decided to try continuing the Shelby theme on that. For quite some time, I had struggled with how to do it, materials, etc. So one day I decided to quit thinking about it and get to doing something.
I went to Lowes and found some wallboard that had a laminated white finish on one side. I figured that would be perfect, so I had them cut the material to the dimensions I needed (54" x 29") and I was on my way back to the house.
Using the old headliner, I traced the pattern out on the new board and marked the hole for the center screw, then cut it with the jigsaw and a scroll blade. I cleaned up the edges with 220 grit and bingo bango...new headliner, already white...(with crud on it from sanding...sorry)

But then I thought...I can do better than that. A white headliner on a white ceiling is a bit anticlimactic and sterile. So I decided to blow up a snake.
I traced a picture of a Shelby snake on another piece of the wallboard, colored it in with a Sharpie, and badda bing!

I cut it out, sanded the edges smooth and round, blackened them with a Sharpie, and...

Put the headliner and the cutout together and what have you got?

Since then, I have also stripped and repainted the headliner fastening strips. They were black, latex white, and rust with rusty screws. Now they are cast aluminum gray metallic, clearcoated, and have stainless screws. I'll get pics of those up when the headliner actually goes in...which won't be until I get to painting the inside of the cab. The dash is already done, so maybe I won't have to wait THAT long...
Well, until the next update, enjoy, and I'll see you around the site!
Realizing that my old headliner had seen better days, I decided to try continuing the Shelby theme on that. For quite some time, I had struggled with how to do it, materials, etc. So one day I decided to quit thinking about it and get to doing something.
I went to Lowes and found some wallboard that had a laminated white finish on one side. I figured that would be perfect, so I had them cut the material to the dimensions I needed (54" x 29") and I was on my way back to the house.
Using the old headliner, I traced the pattern out on the new board and marked the hole for the center screw, then cut it with the jigsaw and a scroll blade. I cleaned up the edges with 220 grit and bingo bango...new headliner, already white...(with crud on it from sanding...sorry)
But then I thought...I can do better than that. A white headliner on a white ceiling is a bit anticlimactic and sterile. So I decided to blow up a snake.
I traced a picture of a Shelby snake on another piece of the wallboard, colored it in with a Sharpie, and badda bing!
I cut it out, sanded the edges smooth and round, blackened them with a Sharpie, and...
Put the headliner and the cutout together and what have you got?
Since then, I have also stripped and repainted the headliner fastening strips. They were black, latex white, and rust with rusty screws. Now they are cast aluminum gray metallic, clearcoated, and have stainless screws. I'll get pics of those up when the headliner actually goes in...which won't be until I get to painting the inside of the cab. The dash is already done, so maybe I won't have to wait THAT long...
Well, until the next update, enjoy, and I'll see you around the site!
#7
08-29-2009, 07:26 PM
Trending Topics
#8
08-29-2009, 08:59 PM
Originally Posted by Bowtie_Schmowtie
Look closely...can you see the retainer ring mounting tabs, brackets, or screws?
Thanks for the compliment, though.

#9
11-14-2009, 11:32 AM
UPDATE!!
Headliner installed...

I know, the metal around it looks crappy right now, but I just HAD to get it up there and see what it looked like!
Finished door panel scheme...at least for now...

And the dash with the new Grant stainless nostalgia wheel and Cobra horn button. I LOVE IT!

Makin' progress here...long way to go still, but gettin' there.
I have now acquired four pretty decent "dog dishes" for factory wheels and a factory aluminum air cleaner, which I have modified to a dual inlet with a polished lower section and a cast iron finish painted lid. Currently working on an engine ID plate for the lid, also.
I know, the metal around it looks crappy right now, but I just HAD to get it up there and see what it looked like!
Finished door panel scheme...at least for now...
And the dash with the new Grant stainless nostalgia wheel and Cobra horn button. I LOVE IT!
Makin' progress here...long way to go still, but gettin' there.
I have now acquired four pretty decent "dog dishes" for factory wheels and a factory aluminum air cleaner, which I have modified to a dual inlet with a polished lower section and a cast iron finish painted lid. Currently working on an engine ID plate for the lid, also.
#10
11-14-2009, 12:40 PM
Posting Guru
#11
11-14-2009, 05:26 PM
Posting Guru
Thats cool! You remind me of my grand father when he was alive, if it wasn't broke, he was still gonna fix it! He would take his cars, late 50's, or early 60's Fords and but ground traps off of the back, reflectors on the center of the wheel covers, big red foam ball on the antanna etc, etc,. My grand mother would just shake her head as he would wash and wax it all day Saturday, then turn around and wax it again on Sunday afternoon because he was bored. He was hard core Turtle wax man back in the day too.
But anyhow, I like what you do, with your ride, I am a stock original kinda guy, but it still neat to see all of your creative ideas bear fruit. Good luck, and keep up posted in your upgrades, I think its neat!!
But anyhow, I like what you do, with your ride, I am a stock original kinda guy, but it still neat to see all of your creative ideas bear fruit. Good luck, and keep up posted in your upgrades, I think its neat!!

#13
11-14-2009, 07:39 PM
Postmaster
#14
11-14-2009, 08:23 PM
Thanks for the support, fellas!
Tees, I will be a chronic waxer when it all gets done.
Still a lot of decisions to be made and a lot of resources to be found, though.
Currently on the lookout for a nice pair of gray buckets, and gotta decide on wheels.
What do you think about these options?
1.) Wheel Vintiques model 41 painted rallye
2.) Wheel Vintiques model 43 chrome rallye
3.) aluminum five-hole bullet rims (junkyard has 4 on an '88 van)
4.) stock steel wheels painted white with cast iron gray painted dog dish style center caps OR
5.) stock steel wheels painted white with chrome lug nuts and short recessed chrome center caps (think factory '64 Thunderbolt style, but with some dress-up)
#15
11-15-2009, 12:16 AM