4wd Hub replacement : HOW TO WITH PICS
#1
 07-31-2009, 11:38 PM


Join Date: Jun 2009
Posts: 336
Likes: 0
Received 0 Likes
on
0 Posts
4wd Hub replacement : HOW TO WITH PICS
(^ that should say 4wd FRONT HUB)
Rather than sending a response telling you to go RTFM, how about something useful for a change.
This is going to be 3 posts (hopefully) in order...Tools - removal - installation. It might take me a day to get pictures up as well.
HOW TO REPLACE YOUR FRONT HUBS (4WD MODEL)
***Please note, this was done on a 1998 Expy, and your bolt sizes MAY be slightly different. Also, I DID NOT do a brake job at the same time, since I did one a month ago. ***
TOOLS (I'd say minimum, but you might make do with something different)
Sockets
- 8mm socket for removing the brake shield
- 15mm socket for removing the hub / knuckle bolts
- 18mm socket for removing the brake caliper / knuckle bolts
- 36mm socket for removing the CV / Hub nut
Tools
- Ratchet Handles (duh, I already gave you a list of sockets!)
- Pliers for removing cotter pins
- Dead blow hammer (4# sledge)
- Jack & at least 1 jackstand
- Torque wrench that can go to 140 ft lbs
- anti seize
- high quality grease
- wire hanger / something to hang the brake caliper up with
- Brake Cleaner
- Plenty of Blue Towels / Rags / Etc
- Block of wood / or a brass hammer
Things that come in handy
- PB blaster (or aerokroil, NOT WD40)
- Electric or Air Impact gun
- Something to kneel on
- Pipe or something similar to act as a lever on the end of the ratchet handles
- Brake Pads / Discs if you are doing a brake job at the same time. If you are doing your brakes, the only other tool you should need is the TORX bit to remove the caliper pins if you are doing a brake job.
Let's dive in
#2
07-31-2009, 11:57 PM
Join Date: Jun 2009
Posts: 336
Likes: 0
Received 0 Likes
on
0 Posts
Hub replacement ||| removal
Hub Removal section 2 - how to remove the old hubs. You might have better luck than I did, but this was on my Expy with 110K miles on it. The Left hub was starting to make some noise, and it was (origianlly) just as easy to replace both of them at the same time, or so I thought.
Here we go (VEHICLE IS STILL ON THE GROUND)
- Remove the wheel center cover, so that you can see the lug nuts and the center bolt.
- Pull the cotter pin and remove the "castle" dust cover (some models may have an actual castle nut, mine didn't.)
- Using the 36mm socket (and impact gun if available?) break the 36mm CV to Hub Nut free. Might take a breaker bar on the socket, and I would recommend at least 1/2" type sockets for doing this.
- Break the lug nuts free
JACK UP THE VEHICLE AND PLACE A JACKSTAND UNDER THE FRAME
safety first, don't skip the jackstand. The jack will help later anyway.
- Remove the lug nuts, 36mm CV nut, and the tire.
(if you are doing a brake job, this section will be different)
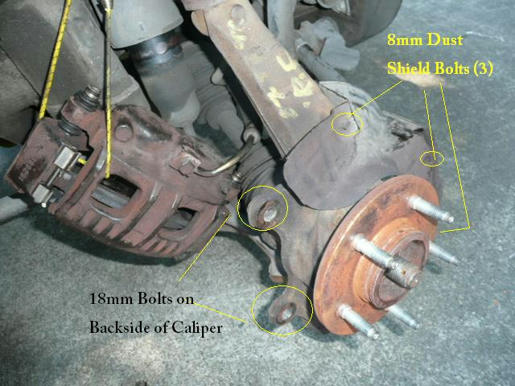
- There are two 18mm bolts on the backside of the steering knuckle that hold the caliper assembly on. Remove these - you don't need to remove the TORX bolts if you are not doing the brake pads. Strap the caliper up and out of the way using a bungee cord or similar. Bungee seemed to work best so I could move the assembly around while I removed the other bolts. It also helps to turn the steering AWAY so that there is a little more room to get at these two bolts.
- Remove the Brake Rotor - might need a little persuasion. Mine came right off though since I just did a brake job. DO NOT hit the rotors with a solid hammer if you are going to re-use them.
- Remove the dust shield. There are 3 8mm bolts that hold it on. Careful, they are really small and get caught in the crevices of the driveway
- follow the ABS sensor wire up from the hub to up under the inner fender cover and disconnect it.
Now the fun part
- Spray the PB blaster / similar into the splines of the CV / Hub area and let it soak for a bit.
- There are 3 15mm bolts that hold the hub to the steering knuckle - spray these with PB blaster as well, and break them free but don't remove them. You might need to move the steering back and forth for better access.
- Thread the axle nut back on until the face of it is flush with the end of the CV axle. When you are banging on the CV axle, this protects the threads. This way, you don't need to replace the CV as well.
- take the wood block or brass hammer, place it against the nut / cv axle, and give it a couple of good HARD whacks. You might get lucky and the CV might jump in 1/4", or you could be like me and just bang on it to no avail. Either way, this helps loosen the splines a bit.
Now the real fun
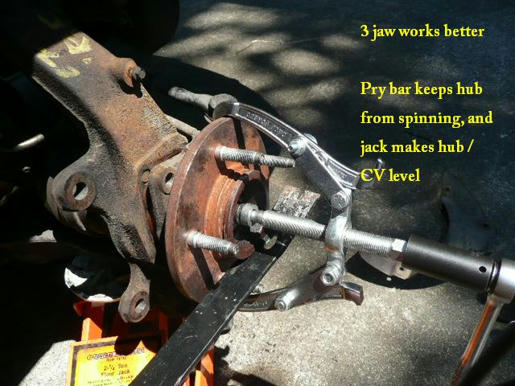
- take your gear / jaw type puller and place it around the hub with the centering pin on the axle. Tighten it up, and keep cranking. This is where the breaker bar comes in handy. Eventually, the hub will "pop" free of the splines on the CV as well as the press fitting on the knuckle, and come forward. It scared the crappers out of me when it finally did. It might take 2 or 3 rounds with the puller to get the entire hub free.
-----I started with a 2 jaw puller, got one hub off. Ended up breaking it on the other side, so I really recommend going to autozone and "renting" their 3 jaw 5 ton version. NOT THE SMALL ONE, it's worthless for this job !
- I took my jack and parked it kinda behind the hub, at the same level. Then I took my pry bar and wedged it in between two of the lugs, and braced it on the jack. This helped keep the hub from spinning while I was cranking on the puller. It also forces you to use a jackstand instead of risking just having the vehicle on a jack.
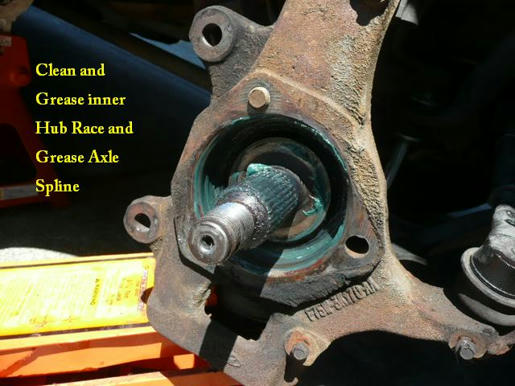
- using Brake Clean, spray the inside of the knuckle, end of the CV, etc. and wipe up the area with paper towels or rags. Mine had a lot of rust in them. You might need to replace the CV joint seals in the knuckle, so might be worth picking these up at the auto parts place before starting. You can always return them. A dremel with a wire brush might help also.
- if you have the tools, it doesn't hurt to chase the threads on the knucle at this point, but remember which way you are going!
on to re-assembly.
Here we go (VEHICLE IS STILL ON THE GROUND)
- Remove the wheel center cover, so that you can see the lug nuts and the center bolt.
- Pull the cotter pin and remove the "castle" dust cover (some models may have an actual castle nut, mine didn't.)
- Using the 36mm socket (and impact gun if available?) break the 36mm CV to Hub Nut free. Might take a breaker bar on the socket, and I would recommend at least 1/2" type sockets for doing this.
- Break the lug nuts free
JACK UP THE VEHICLE AND PLACE A JACKSTAND UNDER THE FRAME
safety first, don't skip the jackstand. The jack will help later anyway.
- Remove the lug nuts, 36mm CV nut, and the tire.
(if you are doing a brake job, this section will be different)
- There are two 18mm bolts on the backside of the steering knuckle that hold the caliper assembly on. Remove these - you don't need to remove the TORX bolts if you are not doing the brake pads. Strap the caliper up and out of the way using a bungee cord or similar. Bungee seemed to work best so I could move the assembly around while I removed the other bolts. It also helps to turn the steering AWAY so that there is a little more room to get at these two bolts.
- Remove the Brake Rotor - might need a little persuasion. Mine came right off though since I just did a brake job. DO NOT hit the rotors with a solid hammer if you are going to re-use them.
- Remove the dust shield. There are 3 8mm bolts that hold it on. Careful, they are really small and get caught in the crevices of the driveway
- follow the ABS sensor wire up from the hub to up under the inner fender cover and disconnect it.
Now the fun part
- Spray the PB blaster / similar into the splines of the CV / Hub area and let it soak for a bit.
- There are 3 15mm bolts that hold the hub to the steering knuckle - spray these with PB blaster as well, and break them free but don't remove them. You might need to move the steering back and forth for better access.
- Thread the axle nut back on until the face of it is flush with the end of the CV axle. When you are banging on the CV axle, this protects the threads. This way, you don't need to replace the CV as well.
- take the wood block or brass hammer, place it against the nut / cv axle, and give it a couple of good HARD whacks. You might get lucky and the CV might jump in 1/4", or you could be like me and just bang on it to no avail. Either way, this helps loosen the splines a bit.
Now the real fun
- take your gear / jaw type puller and place it around the hub with the centering pin on the axle. Tighten it up, and keep cranking. This is where the breaker bar comes in handy. Eventually, the hub will "pop" free of the splines on the CV as well as the press fitting on the knuckle, and come forward. It scared the crappers out of me when it finally did. It might take 2 or 3 rounds with the puller to get the entire hub free.
-----I started with a 2 jaw puller, got one hub off. Ended up breaking it on the other side, so I really recommend going to autozone and "renting" their 3 jaw 5 ton version. NOT THE SMALL ONE, it's worthless for this job !
- I took my jack and parked it kinda behind the hub, at the same level. Then I took my pry bar and wedged it in between two of the lugs, and braced it on the jack. This helped keep the hub from spinning while I was cranking on the puller. It also forces you to use a jackstand instead of risking just having the vehicle on a jack.
- using Brake Clean, spray the inside of the knuckle, end of the CV, etc. and wipe up the area with paper towels or rags. Mine had a lot of rust in them. You might need to replace the CV joint seals in the knuckle, so might be worth picking these up at the auto parts place before starting. You can always return them. A dremel with a wire brush might help also.
- if you have the tools, it doesn't hurt to chase the threads on the knucle at this point, but remember which way you are going!
on to re-assembly.
#3
08-01-2009, 12:11 AM
Join Date: Jun 2009
Posts: 336
Likes: 0
Received 0 Likes
on
0 Posts
Hub replacement ||| re-assembly
All right, let's get everything back togethor and start driving again.
- Coat the CV axle Splines and inside of the knuckle with a high quality grease. Make sure you push as much grease into the rubber grease shield as you can. The new bearings should be sealed, so you don't need to worry about those.
- Coat the CV axle Splines and inside of the knuckle with a high quality grease. Make sure you push as much grease into the rubber grease shield as you can. The new bearings should be sealed, so you don't need to worry about those.
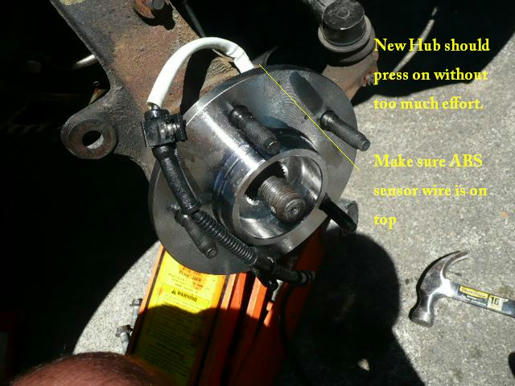
- insert the new hub assembly. It's kinda simple, and can only go in one direction. Just make sure that the ABS sensor (if equipped) is on the top of the assembly, and make sure the splines line up with the CV. It should slide right into the knuckle.
- put a little dab of anti-seize on the knuckle / hub bolts, and re insert them and tighten them down (off hand I can't give you a foot #'s number since I couldn't get my monster torque wrench in there. I got them as tight as I could with a regular 3/8" socket)
- get the axle retaining nut started (36mm nut) - I put the jack near the hub, and jammed a bar through the lugs and onto the jack to keep it from spinning while I was tightening the nut down.
- re-connect the ABS Sensor wire, and clip it into the stock retaining clips (along the brake hose)
- reinstall the brake shield with the 3 8mm bolts ( I just got them tight)
- reinstall the brake disc
- reinstall the brake caliper assembly and the two 18mm bolts that hold it on. Again, anti-seize and tight.
- Reinstall the wheel and hand tighten the lug nuts
LOWER THE VEHICLE to the ground
- torque the lug nuts to 110 foot #'s (spec on my truck, yours might be a little different)
- torque the axle nut down to 140 foot lbs, reinstall the castle nut cover and cotter pin.
Done. Go drive it around the block and make sure nothing is making noise, squeaking, squeeling, etc. When I replaced mine, it cleared up a shimmy at 50mph. At 110K miles or so, I figure $200 in parts is basic maintenance.
Editing pics, might take me a bit to get them posted.
Hope this helps someone else. It's not a hard job with the right tools (3 jaw puller is most important IMHO) and should only take about 3 or 4 hours if you don't need to make a run to the parts store.


#6
08-02-2009, 10:59 PM


#7
08-03-2009, 01:41 PM
Join Date: Jun 2009
Posts: 336
Likes: 0
Received 0 Likes
on
0 Posts
Of course, and now I can't go back and edit the originals to add the pictures hahaha either way, here's the pics to go along with the removal and reinstallation. Not much, but there really isn't much to the task!
[1] Break the CV Axle bolt free (36mm nut, have to pry out cotter pin and castle nut cover first.) Sorry, the picture got corrupted in transfer.
[2] Remove the Caliper & Dust Shield Bolts (& Rotor)
[3] remove 3 15mm hub bolts

[4] disconnect ABS wire & Pull Hub with a 3 jaw puller
[5] clean up inner race and grease race & axle splines
[6] Push on new hub, lining up axle splines & ABS Sensor Wire
the rest is just the reverse of the assembly.
It's not a bad job, but I highly recommend having a good breaker bar for the 36mm axle nut, and going and getting a 3 jaw puller BEFORE you start the project. If you have all the tools out and ready to go, you can easily do this in an hour per side.
[1] Break the CV Axle bolt free (36mm nut, have to pry out cotter pin and castle nut cover first.) Sorry, the picture got corrupted in transfer.
[2] Remove the Caliper & Dust Shield Bolts (& Rotor)
[3] remove 3 15mm hub bolts
[4] disconnect ABS wire & Pull Hub with a 3 jaw puller
[5] clean up inner race and grease race & axle splines
[6] Push on new hub, lining up axle splines & ABS Sensor Wire
the rest is just the reverse of the assembly.
It's not a bad job, but I highly recommend having a good breaker bar for the 36mm axle nut, and going and getting a 3 jaw puller BEFORE you start the project. If you have all the tools out and ready to go, you can easily do this in an hour per side.
Trending Topics
#8
08-04-2009, 07:53 AM

#9
08-04-2009, 04:47 PM

Senior User
Join Date: Feb 2004
Location: Omaha, Nebraska USA
Posts: 317
Likes: 0
Received 0 Likes
on
0 Posts
#10
08-04-2009, 07:24 PM
Join Date: Jun 2009
Posts: 336
Likes: 0
Received 0 Likes
on
0 Posts
High temp anti-seize would be fine on the splines, but there is a dust seal in the back of the hub that needs to be greased to keep it from drying out and cracking.
#11
08-04-2009, 09:46 PM

Posting Guru
Join Date: Jun 2005
Location: Location, Location.
Posts: 1,254
Likes: 0
Received 0 Likes
on
0 Posts
[5] clean up inner race and grease race & axle splines
My interest is that a recent grinding noise in the front left wheel I believe to be the bearing going - so I figured I'd be replacing the bus - but an inner race? What if it's the one grinding? Is it replaceable too?
Thanks

#13
08-05-2009, 12:20 PM


#14
08-05-2009, 12:59 PM
Join Date: Jun 2009
Posts: 336
Likes: 0
Received 0 Likes
on
0 Posts
"inner hub race"??? There's ANOTHER bearing race in behind the hub? Is it load bearing?
My interest is that a recent grinding noise in the front left wheel I believe to be the bearing going - so I figured I'd be replacing the bus - but an inner race? What if it's the one grinding? Is it replaceable too?
Thanks
My interest is that a recent grinding noise in the front left wheel I believe to be the bearing going - so I figured I'd be replacing the bus - but an inner race? What if it's the one grinding? Is it replaceable too?
Thanks
The grinding you are getting is most likely the bearing in the hub assembly. The CV will "squeak" or "chirp" when it's going, and usually only presents itself when making tight radius turns. I shoulda taken some pictures of the old bearings before they went in the trash - they were full of rust and dirt, so I know why they sounded awful!
you should only need the hub assembly, some grease, and anti-seize and be good to go (along with the tools!)
_BN
#15
09-29-2009, 03:35 PM

I have a 4x2 2003 with a bad rear drivers side hub. I was wondering if this procedure is similar to what I'll have to do. Also, I read somewhere that pushing in on the axle shaft will cause it to shoot out the back? Would you know anything about how the parking brake is integrated with the hub? Thanks