Crank and pulley seperation. can't do it.
#16
 04-30-2009, 12:02 AM

Holy crap, I think you all are right again, and I'm wrong, but this time, it's wierd....
Where's my bolts, I see holes, but no bolts...
I just took these a couple minutes ago with my flashlight and cameraphone.


I used a 2 foot pry bar to try and pry both of them, and then the pully just itself earlier, and neither budged AT ALL. So if the pulley is supposed to just fall off... Well, it must by pressed on there too.
P.S. If you want, I can clean it up a little more and get a couple more pics if needed.
Where's my bolts, I see holes, but no bolts...
I just took these a couple minutes ago with my flashlight and cameraphone.
I used a 2 foot pry bar to try and pry both of them, and then the pully just itself earlier, and neither budged AT ALL. So if the pulley is supposed to just fall off... Well, it must by pressed on there too.
P.S. If you want, I can clean it up a little more and get a couple more pics if needed.
#17
04-30-2009, 12:06 AM

#18
04-30-2009, 12:15 AM

Post Fiend
Yeah, and he shoudl have to use those bolt holes to mount the puller!
I have a few suggestions for you as you disassemble. First take pictures of everything from all different angles.
Second, buy a good supply of marking pens. Yo uwill need at least three colors of "Sharpie's" and a black, a red and a yellow grease pencil. Mark everything - with numbers and letters and arrows then take a picture before you disassemble.
I built up my motor and I had an excellent modern paperback book that went step by step and gave you all the little secrets as you went. Shoot I started reading the book and did each step and before I knew it, the thing was back together! As I did each step, I put a light pencil line around the instructions and a faint diagonal line. That way if I had to skip something, I would know to come back to it - it's like a cookbook!
The book will probably be available on e-bay or from Carpenter or LMC, etc. Well Worth the $15.00
#19
04-30-2009, 12:29 AM
^^^I ahve a couple pics up julie, whatdya think?
About the keeping track part, I already got too far to do that.... Good advice though, for future reference)
Alright, a fellow baker'...hahahaa. Same here if ya need help. I'm not a genious though, so I may not be as helpful as some of the people on here. I live on the east side
About the keeping track part, I already got too far to do that....
Good advice though, for future reference)Alright, a fellow baker'...hahahaa. Same here if ya need help. I'm not a genious though, so I may not be as helpful as some of the people on here. I live on the east side
#20
04-30-2009, 01:34 AM
Logistics Pro
Holy crap, I think you all are right again, and I'm wrong, but this time, it's wierd....
Where's my bolts, I see holes, but no bolts...
I just took these a couple minutes ago with my flashlight and cameraphone.
I used a 2 foot pry bar to try and pry both of them, and then the pully just itself earlier, and neither budged AT ALL. So if the pulley is supposed to just fall off... Well, it must by pressed on there too.
P.S. If you want, I can clean it up a little more and get a couple more pics if needed.
The 2 bolt holes are right there! You have the bolts in the puller kit you just got.
The bolts screw into those holes on either side of the center (you may have to clean them up with a tap)
If you don't get some local help I can put my puller on my engine and send you a picture of it installed.....
Also, I used a washer that fit in the hole against the end of the crank so I wasn't pushing on crank bolt threads. You do not want to damage them.
Also when you get the puller installed and you screw the big bolt in and nothing moves you can get a hammer and gently tap on the big bolt (the one that will screw in and push on the crank) to help loosen the pulley on the shaft......DON'T BEAT ON IT though...It's a sort of a "press fit".
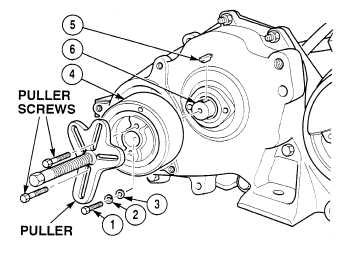
Here's an illustration I found on the web for pulling a vib damper
#21
04-30-2009, 07:00 AM

Holy crap, I think you all are right again, and I'm wrong, but this time, it's wierd....
Where's my bolts, I see holes, but no bolts...
I just took these a couple minutes ago with my flashlight and cameraphone.
I used a 2 foot pry bar to try and pry both of them, and then the pully just itself earlier, and neither budged AT ALL. So if the pulley is supposed to just fall off... Well, it must by pressed on there too.
P.S. If you want, I can clean it up a little more and get a couple more pics if needed.
Where's my bolts, I see holes, but no bolts...
I just took these a couple minutes ago with my flashlight and cameraphone.
I used a 2 foot pry bar to try and pry both of them, and then the pully just itself earlier, and neither budged AT ALL. So if the pulley is supposed to just fall off... Well, it must by pressed on there too.
P.S. If you want, I can clean it up a little more and get a couple more pics if needed.
you thread one of the puller tool bolts into one of the holes you see
(passing the bolt thru one of the eyelets on the tool flange).. you repeat for the other bolt hole, such that you can align the big center hole in the tool flange directly in line with the center bolt threads. (the flange does not need to 'touch' the center bolt face)..
you then select one of the tool alignment tips (there is a pointy one and a flat one), depending on how big the center bolt is.. this is the base that protects the crankshaft threads while removing the balancer. this goes into the end of the big center bolt. this alignment tool must press ONLY on the crankshaft, NOT on the balancer.
you then thread the big center bolt into the tool flange, and tighten to create pressure on the two side bolts to PULL the balancer off the crankshaft nose. these two bolts should be tightened the
same amount to postion the tool flange parallel to the balancer face.. you want to apply pressure in a straight line.
the picture above demonstrates all this (worth a 1000 words!)
obviously you don't want the engine to turn over, as that will defeat the purpose of the center bolt rotation. I usually use a ratchet until I get the initial movement of the balancer, and then a 3/8 drive air wrench after that (all about speed!)..
Sam
#22
04-30-2009, 08:22 AM
Elder User
Join Date: Oct 2007
Location: Highland Village, TX
Posts: 790
Likes: 0
Received 0 Likes
on
0 Posts
If you have an air hammer tool bang on the balancer aorund the edges of the crankshaft. NOT ON THE CRANKSHAFT
I've done this before and it really helps loosen it so you can pull it off using the puller.
This also works great on the crank bolt if you can't get it loose becuase the engine spins. But it looks like you got that off already.
I've done this before and it really helps loosen it so you can pull it off using the puller.
This also works great on the crank bolt if you can't get it loose becuase the engine spins. But it looks like you got that off already.
#23
04-30-2009, 09:35 AM
The single sheave pulley is part of the harmonic balancer and does not come off by itself.
If you are able to remove it...the balancer is ruined!
Three parts make up a harmonic balancer: Inner damper, outer pulley, rubber o-ring.
At the factory, the o-ring is placed between the damper and pulley...then the three parts are pressed together to form a one piece assembly.
C3AZ6312C .. 223 I-6 Harmonic Balancer & Single Sheave Pulley Assy / Obsolete
Fits: 1954/63 F Series Trucks (1964 is different) / 1954/64 Passenger Cars.
No Ford Dealer or obsolete parts vendor has any.
#24
04-30-2009, 09:59 AM
Logistics Pro
You absolutely need a good damper if you don't want the engine to self destruct.
Since you cannot buy one. don't destroy that one getting it off!
If the damper "part" of it is bad it can be rebuilt. I sent one to the Damper Doctor in Redding to get it rebuilt.
He did a nice job, has been doing it a long time and is a nice guy!
Damper Doctor Online
Cheers,
Rick
Since you cannot buy one. don't destroy that one getting it off!
If the damper "part" of it is bad it can be rebuilt. I sent one to the Damper Doctor in Redding to get it rebuilt.
He did a nice job, has been doing it a long time and is a nice guy!
Damper Doctor Online
Cheers,
Rick
#25
04-30-2009, 10:30 AM
The single sheave pulley is part of the harmonic balancer and does not come off by itself.
If you are able to remove it...the balancer is ruined!
Three parts make up a harmonic balancer: Inner damper, outer pulley, rubber o-ring.
At the factory, the o-ring is placed between the damper and pulley...then the three parts are pressed together to form a one piece assembly.
C3AZ6312C .. 223 I-6 Harmonic Balancer & Single Sheave Pulley Assy / Obsolete
Fits: 1954/63 F Series Trucks (1964 is different) / 1954/64 Passenger Cars.
No Ford Dealer or obsolete parts vendor has any.
If you are able to remove it...the balancer is ruined!
Three parts make up a harmonic balancer: Inner damper, outer pulley, rubber o-ring.
At the factory, the o-ring is placed between the damper and pulley...then the three parts are pressed together to form a one piece assembly.
C3AZ6312C .. 223 I-6 Harmonic Balancer & Single Sheave Pulley Assy / Obsolete
Fits: 1954/63 F Series Trucks (1964 is different) / 1954/64 Passenger Cars.
No Ford Dealer or obsolete parts vendor has any.
#27
04-30-2009, 11:23 AM
Number dummy---Uhhh oh, I was prying the balancer at first because I thought you HAD to replace those, as it is unsafe to use a used one that could already be damaged. I don't think I damaged it, but at the same time, I did try to pry it a few times, so it's a little scratched up!!! Nuts... I may have dug myself into the deepest hole yet.......damn.
The two holes in the pics that the bolts of the puller are supposed to go into; Are they supposed to have bolts in them, or are they there specifically for this task. Because I don't know if you all can tell, but there was no bolts in them! I had to uncover them from a CM of crud just to see them....hmmmmmm.
Thank you all for the help, I am not near the truck anymore so it'll be a couple of hours until I get to it again. Oh, and thank you VERY much for that Damper Doctor link, that may save my ****. I heard even a slight crack in that thing can cause a huge explosion(and of course a completely destroyed motor)......
#28
04-30-2009, 11:45 AM
Number dummy---Uhhh oh, I was prying the balancer at first because I thought you HAD to replace those, as it is unsafe to use a used one that could already be damaged. I don't think I damaged it, but at the same time, I did try to pry it a few times, so it's a little scratched up!!! Nuts... I may have dug myself into the deepest hole yet.......damn.
The two holes in the pics that the bolts of the puller are supposed to go into; Are they supposed to have bolts in them, or are they there specifically for this task. Because I don't know if you all can tell, but there was no bolts in them! I had to uncover them from a CM of crud just to see them....hmmmmmm.
Thank you all for the help, I am not near the truck anymore so it'll be a couple of hours until I get to it again. Oh, and thank you VERY much for that Damper Doctor link, that may save my ****. I heard even a slight crack in that thing can cause a huge explosion(and of course a completely destroyed motor)......
The two holes in the pics that the bolts of the puller are supposed to go into; Are they supposed to have bolts in them, or are they there specifically for this task. Because I don't know if you all can tell, but there was no bolts in them! I had to uncover them from a CM of crud just to see them....hmmmmmm.
Thank you all for the help, I am not near the truck anymore so it'll be a couple of hours until I get to it again. Oh, and thank you VERY much for that Damper Doctor link, that may save my ****. I heard even a slight crack in that thing can cause a huge explosion(and of course a completely destroyed motor)......
Sam
#29
04-30-2009, 12:50 PM
Since I did the Ford parts gig for 35 years, I've seen far more harmonic balancers than most of y'all will see in a lifetime...even if you live to be 100!
#30
04-30-2009, 12:54 PM
I've had 3 ford V8s, 289, 302 and my 460 (all with what I consider to be overhead valves) and in each case the pulley was not part of the balancer.. and I KNOW you have seen those..
so what V8 were you talking about?
Sam

