One piece tilt front end


#2
 04-20-2009, 07:09 AM
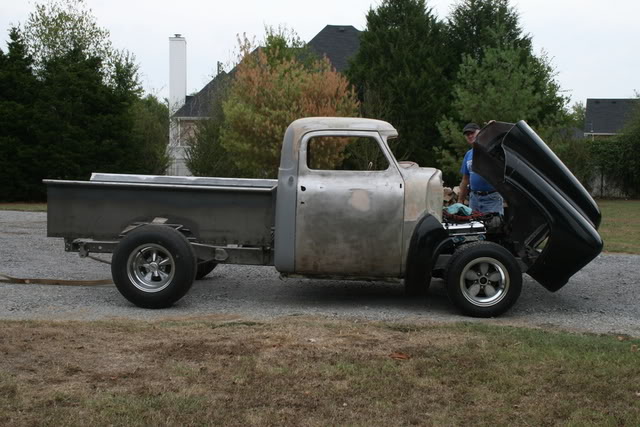
When I first got my truck the previous owner had made an attempt at building a one piece tilt. The front fenders were cut at the cowl area. The hood and fenders were bolted together. I don't recall what he had done for a hinges, but it was rather crude. It was rather heavy and hard to open and didn't have any provision for alignment as it closed. I initially was going to try to work with it, but the fenders were in sad shape so I decided to go with a glass front end. In the photo you can see where the fender was cut.

I had started welding it back together where I could make the cut straighter at the cowl area.
I think there are some others on the forum that successfully did a steel one piece tilt assembly. I just decided that it would be a lot less work to sell the good steel pieces from my front end and buy the fiberglass front.

Even the glass front has some issues to deal with. The fit at the cowl could have been better.
I know I haven't been much help, but I thought I would at least tell you about my experience since nobody has responded to your thread. You might try a search since this subject was brought up in a fairly recent thread.
Andrew
I had started welding it back together where I could make the cut straighter at the cowl area.
I think there are some others on the forum that successfully did a steel one piece tilt assembly. I just decided that it would be a lot less work to sell the good steel pieces from my front end and buy the fiberglass front.
Even the glass front has some issues to deal with. The fit at the cowl could have been better.
I know I haven't been much help, but I thought I would at least tell you about my experience since nobody has responded to your thread. You might try a search since this subject was brought up in a fairly recent thread.
Andrew
#3
04-22-2009, 02:55 AM

Post Fiend
I missed this when you wrote it. I have one on my 51 that does not have cut fenders. I have a complete write up on it with pictures. If you want a copy I'll need your real e-mail address.
There have been lots of threads about this
So send me an e-mail through FTE with your e-mail and I'll send it to you.
There have been lots of threads about this
So send me an e-mail through FTE with your e-mail and I'll send it to you.
#4
04-22-2009, 08:07 AM
The 53-56 requires the fenders to be cut somewhere since the fenders curve under the cowl. You can cut them as shown above, or vertically from the widest point on the cowl down. That's the way a PO did my fenders. Unless you do some significant underbracing and add mechanical assist it will require two people to raise and lower the steel front end to guide it to keep from damaging the cowl (it is also quite heavy!). What is not shown in Drewski's FG pics is any inside fenders? If you use the steel parts, you must include the inner fenders which also will require cutting at the firewall. After all of this you will end up with a front clip that will always have alignment and movement/vibration problems since it will be attached to the frame, whereas Ford designed the clip to hang off the cab and both to float free of the frame. If you insist on doing it, I'd suggest buying a FG onepiece like Drewski, and save the steel parts uncut for someone who want/needs them whole.
My front clip has since been disassembled (thank goodness the PO bolted the parts together rather than welding them) the inner fenders and firewall supports repaired/replaced to return them to their original state. I may front hinge the hood depending on if I can design a better set of hinges than what are currently available, I don't like any of the current designs. Meanwhile I have the chromed front clip flip hinges I took off, if you are interested in them, drop me a PM.
My front clip has since been disassembled (thank goodness the PO bolted the parts together rather than welding them) the inner fenders and firewall supports repaired/replaced to return them to their original state. I may front hinge the hood depending on if I can design a better set of hinges than what are currently available, I don't like any of the current designs. Meanwhile I have the chromed front clip flip hinges I took off, if you are interested in them, drop me a PM.
#5
04-22-2009, 08:15 AM
ccaappyy,
Please add what year and model you have to your signature and location to your profile. Since this forum covers three major design changes and numerous models, you will then get answers that are for the model you have. It also helps if you add year and model to posts asking for info.
Please add what year and model you have to your signature and location to your profile. Since this forum covers three major design changes and numerous models, you will then get answers that are for the model you have. It also helps if you add year and model to posts asking for info.
#6
04-22-2009, 10:53 AM
Post Fiend
HI AX,
Those are interesting points about the F-100 VS the F1s (et. al.).
When I got my truck the front tilt was half done and it was a disaster (like everything else the PO did).
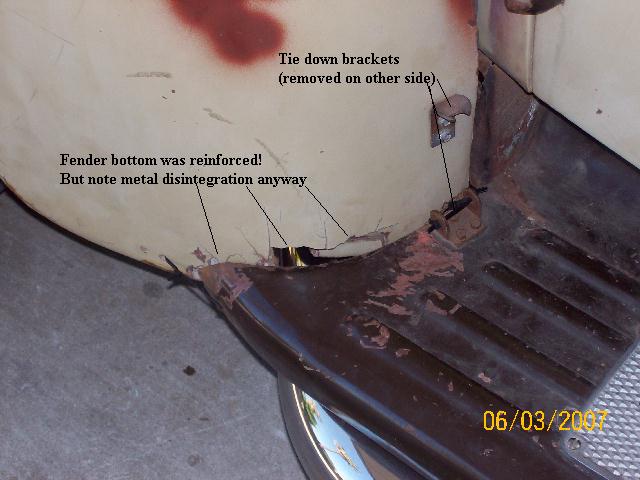
One of the MAJOR design problems to get past was how to pull the bottom of the fender in and lock it in place - and to do so without damaging the cowl sides. Unfortunately, when you anchor the clip up forward, and try to lock it at the running board, the structural dynamics lead to very severe metal fatigue to the bottoms of the fenders.
I looked around, went to car shows, researched designed trying to get past these problems.
What I finally ended up doing was actually making a little sacrifice in "Coolness" (which I am still thinking about trying to fix) and now with the modifications I made, have a completely successful front tilt - on the 51. Like putting together a big design puzzle, you just have to figure out the pieces and put them in the right place.
First thing I had to do was replace my front fenders - a costly undertaking since 51/52 steel F1 front fenders are not being reproduced and are difficult to find.
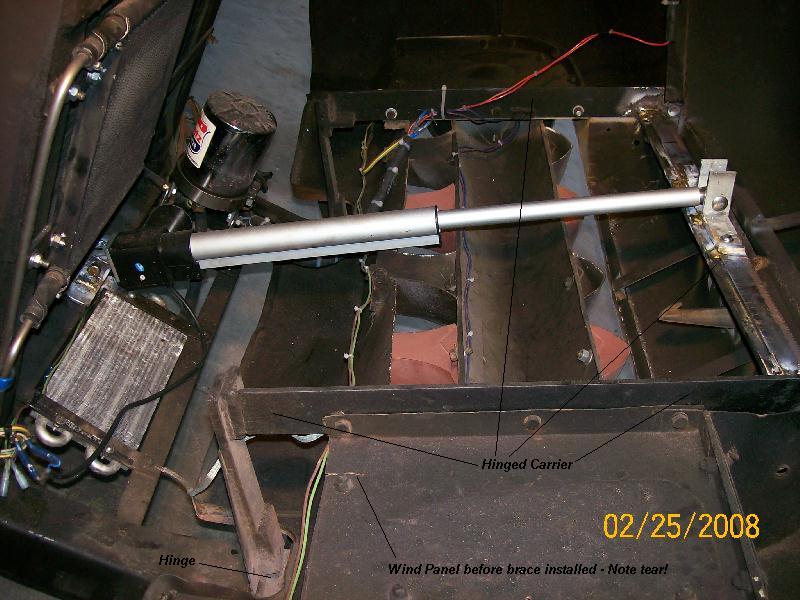
I also found that I had to strengthen the lower edge of the wind break panels (behind the headlights) as the load carrying line that low in the clip is very weak - usually bolted to the radiator support.
I used a light weight 400 pound rated single electric lineal actuator - mounted in the center in front of the radiator. I thought that lifting from the center would tend to reduce any side to side motion or twisting motions while lifting.
The inner fenders have been removed and it didn't seem to present any problems this year in the harsh San Diego Winter weather (might be more of a factor where you live).
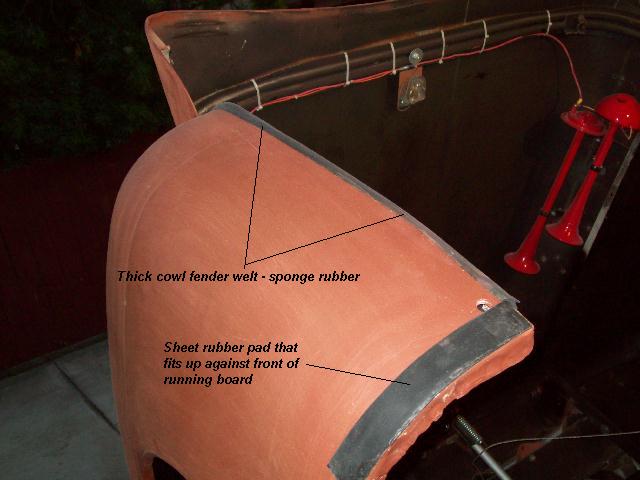
And the final problems - aligning and locking the fenders while lowering the clip - and this is where I made the sacrifice. I don't think the F-100s had this (at least I don't remember having on eon my 55 or 56) but the F1 has a thick soft sponge rubber welt that goes between the cowl and front fender. It used to be stapled on but I glued mine to the inside edge of the fender this time with 3M WS adhesive. It completely protects the cowl as I lower the clip.
But also, with the cowl being slightly curved as well, I find when the clip is almost all the way down, the bottoms of the fenders will sit on top of my running boards -only about 1 inch away from the cowl lower corner. I tried to design some type of "guide" to pull the bottom of the fender in and lock it down, but everything I came up with seemed to generate more problems - especially metal fatigue in the rear of the fender.
Now the F1 running boards are more curved in the front than an F-100s (it's a hook type of shape). So I just stop the actuator when the fenders just touch the running board corner, then get out and gently lift and tuck the fender behind the running board. The rubber welt seals tight, and provides just enough "push" to press the bottom of the fender out against the running board face. I have glued two pieces of Velcro - the soft fabric half face to face on the back of the fender and running board to cushion that contact.
It's a perfect fit with just enough pressure on the cowl welt and Velcro pads to keep the fenders from moving or rattling. And the actuator keeps downward pressure on the hood while it is off keeping it in place.
So, I guess I went the other direction, and was able to because of a few of the F1 features. I went with a non rigid fender set up to keep it light AND allow flexibility to prevent metal fatigue in critical places.
PS as AX mentioned, I would NOT weld this stuff together - bolt it and use fender washers.
Here's some pics:
Those are interesting points about the F-100 VS the F1s (et. al.).
When I got my truck the front tilt was half done and it was a disaster (like everything else the PO did).
One of the MAJOR design problems to get past was how to pull the bottom of the fender in and lock it in place - and to do so without damaging the cowl sides. Unfortunately, when you anchor the clip up forward, and try to lock it at the running board, the structural dynamics lead to very severe metal fatigue to the bottoms of the fenders.
I looked around, went to car shows, researched designed trying to get past these problems.
What I finally ended up doing was actually making a little sacrifice in "Coolness" (which I am still thinking about trying to fix) and now with the modifications I made, have a completely successful front tilt - on the 51. Like putting together a big design puzzle, you just have to figure out the pieces and put them in the right place.
First thing I had to do was replace my front fenders - a costly undertaking since 51/52 steel F1 front fenders are not being reproduced and are difficult to find.
I also found that I had to strengthen the lower edge of the wind break panels (behind the headlights) as the load carrying line that low in the clip is very weak - usually bolted to the radiator support.
I used a light weight 400 pound rated single electric lineal actuator - mounted in the center in front of the radiator. I thought that lifting from the center would tend to reduce any side to side motion or twisting motions while lifting.
The inner fenders have been removed and it didn't seem to present any problems this year in the harsh San Diego Winter weather (might be more of a factor where you live).
And the final problems - aligning and locking the fenders while lowering the clip - and this is where I made the sacrifice. I don't think the F-100s had this (at least I don't remember having on eon my 55 or 56) but the F1 has a thick soft sponge rubber welt that goes between the cowl and front fender. It used to be stapled on but I glued mine to the inside edge of the fender this time with 3M WS adhesive. It completely protects the cowl as I lower the clip.
But also, with the cowl being slightly curved as well, I find when the clip is almost all the way down, the bottoms of the fenders will sit on top of my running boards -only about 1 inch away from the cowl lower corner. I tried to design some type of "guide" to pull the bottom of the fender in and lock it down, but everything I came up with seemed to generate more problems - especially metal fatigue in the rear of the fender.
Now the F1 running boards are more curved in the front than an F-100s (it's a hook type of shape). So I just stop the actuator when the fenders just touch the running board corner, then get out and gently lift and tuck the fender behind the running board. The rubber welt seals tight, and provides just enough "push" to press the bottom of the fender out against the running board face. I have glued two pieces of Velcro - the soft fabric half face to face on the back of the fender and running board to cushion that contact.
It's a perfect fit with just enough pressure on the cowl welt and Velcro pads to keep the fenders from moving or rattling. And the actuator keeps downward pressure on the hood while it is off keeping it in place.
So, I guess I went the other direction, and was able to because of a few of the F1 features. I went with a non rigid fender set up to keep it light AND allow flexibility to prevent metal fatigue in critical places.
PS as AX mentioned, I would NOT weld this stuff together - bolt it and use fender washers.
Here's some pics:
#7
04-22-2009, 11:29 AM
Post Fiend
I thought I'd be a little greedy with the real estate here and post a second reply as well.
This week I finally finished the modifications to the truck as a result of the full front tilt.
I'm kind of a stickler for having everything on the truck work properly. Well, I have a Magic Aire heater in it with the outside fresh air option. Now for those of you that aren't familiar with that heater in the Bonus Builts, it uses a long 3 inch diameter duct that bolts to the side of the cowl inside and under the back side of the passenger side fender, then runs up to the front of the fender where it bolts on just above the headlight.
Ok so how do you make the fresh air work if you have a full front tilt and had to remove the duct?
Well! I am proud to unvail my latest hairbrained invention!
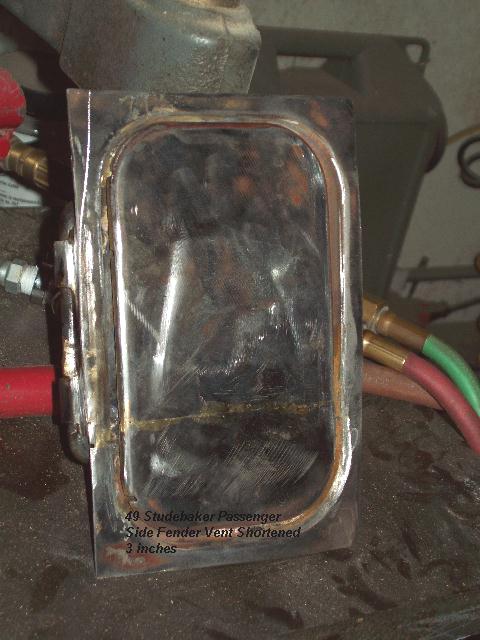
I bought a front fender off a 1949 Studebaker. It had that fender mounted door type vent - much the same as our cowl vents but on the lower front fender. I cut it down to 3"x5" and rebuilt it's framework and hinging system to those dimentions. Here's a picture of the result (and NO laughing at my sloppy brazing guys, I grind alot, but it holds and works):
I cut the cowl and just had enough room to fit it in (I planned it that way - tee hee)
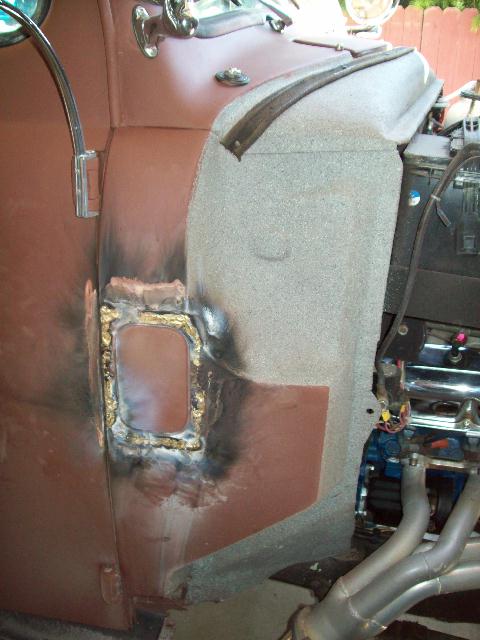
Grind grind grind.......grind grind grind...snad sand sand...fill a little, feather prime feather prime feather prime and walla (my finger prints are gone!):
My firewall center section is undercoated, and the outer panels are painted with Gray Zolatone (like spatter paint) which hides a multitude of sins.
I built a duct out of a Bisquik box (trust me, Mac and Cheese boxes will NOT work) and fiberglassed it up. Then connected it to the new door and heater intake. Here's two more pics of the duct - in build and installed:


There's just a slight slight dash of expanding foam to hold it in and water proof it (and yes I installed a drain tube to the drain hole in the front corner).
Here is the control cable ****...looks like it belongs, but any F1 purist will know it doesn't.

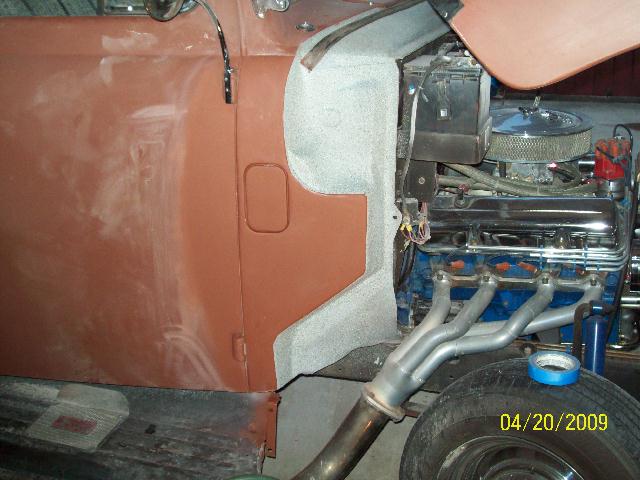
And the final look and alignment with the front fender down:

Cool!
This week I finally finished the modifications to the truck as a result of the full front tilt.
I'm kind of a stickler for having everything on the truck work properly. Well, I have a Magic Aire heater in it with the outside fresh air option. Now for those of you that aren't familiar with that heater in the Bonus Builts, it uses a long 3 inch diameter duct that bolts to the side of the cowl inside and under the back side of the passenger side fender, then runs up to the front of the fender where it bolts on just above the headlight.
Ok so how do you make the fresh air work if you have a full front tilt and had to remove the duct?
Well! I am proud to unvail my latest hairbrained invention!
I bought a front fender off a 1949 Studebaker. It had that fender mounted door type vent - much the same as our cowl vents but on the lower front fender. I cut it down to 3"x5" and rebuilt it's framework and hinging system to those dimentions. Here's a picture of the result (and NO laughing at my sloppy brazing guys, I grind alot, but it holds and works):
I cut the cowl and just had enough room to fit it in (I planned it that way - tee hee)
Grind grind grind.......grind grind grind...snad sand sand...fill a little, feather prime feather prime feather prime and walla (my finger prints are gone!):
My firewall center section is undercoated, and the outer panels are painted with Gray Zolatone (like spatter paint) which hides a multitude of sins.
I built a duct out of a Bisquik box (trust me, Mac and Cheese boxes will NOT work) and fiberglassed it up. Then connected it to the new door and heater intake. Here's two more pics of the duct - in build and installed:
There's just a slight slight dash of expanding foam to hold it in and water proof it (and yes I installed a drain tube to the drain hole in the front corner).
Here is the control cable ****...looks like it belongs, but any F1 purist will know it doesn't.
And the final look and alignment with the front fender down:
Cool!
Trending Topics
#8
04-22-2009, 05:17 PM

Senior User
#9
04-22-2009, 09:38 PM
Julie,
My email address is rag@netins.net.Thanks for the great post.You are doing an awesome job on that 51. ccaappyy
My email address is rag@netins.net.Thanks for the great post.You are doing an awesome job on that 51. ccaappyy
#10
04-23-2009, 12:52 AM
Post Fiend
Thanks so much!
I have a rule - never cut a dash - for gauges or radios or ANYTHING! And I wanted a clock in my 51. So I bought another complete set of dash stuff (glove box door, ash tray, speaker grille and radio delete plate) had the locks rekeyed the same and restored one set to absolute stock. The other set, I had the speaker grill and radio delete plate chromed, put my "Ford Deluxe" on the glove box door and mounted the clock in the ash tray. It fit great with a little cutting in the back - the light in it even works with my interior lights.
The clock is a stock clock out of a 1951 Ford Car - the face matches the truck speedo and gauge cluster closely enough so you can't tell it doesn't belong. Since I have a 12 volt conversion, and the electric clocks never worked very long, I used the "wind-up" version. I had it cleaned and oiled and it keeps perfect time for about 5 days when wound up (like an old wrist watch used to get wound).
The 51 car clock case is pear shaped with the pointy end on top. So, I took the works out of the case and turned the face upside down and reinstalled the works - then installed the clock upside down (pointy end down in the ash tray). The cut on the ash tray face was easy but took a lot of hand filing to get just perfect. I have a compfortable chair out in the garage and with the weather as nice as it is here, I like to sit out there and just "putz" on stuff. You can get one of those clocks on e-bay for about $25.
When I started my truck, I looked around at tons of pictures and collected thoughts on all the little cool doo-dads I wanted to have on my truck, but I wanted them to look old/restored and original. I also mounted a glove box light from a 58 T-bird and all kinds of other little things. I have converted my oil and temp gauges to mechanical - using the original faces.
It's rediculous! I even have a 5 tooth grille and a stock 3 tooth grille. I welded the mounting bolts to the inside of the headlight buckets and use wing nuts to hold them on. They are wired the same with quick disc plugs so I can swap out my grille and put the stock one back on is 5 minutes!
I guess some day I need to go through my restoration journal and make a list of all the junk I've put on this thing...You'd never notice 90% of it - like that extra **** for the heater outside door. But if some F1 " purist affictionado" went through it, he'd probably flip!
Here's a better picture of the clock:

Julie,
My email address is rag@netins.net.Thanks for the great post.You are doing an awesome job on that 51. ccaappyy
My email address is rag@netins.net.Thanks for the great post.You are doing an awesome job on that 51. ccaappyy
The write up is "in the mail". It's about 3 to 4 MB so if your e-mail provider tilts, let em know and I'll break it up and resend it.
I LOVE before and after pics:

#11
04-24-2009, 02:30 PM
Senior User
Julie, that you very much for the information I appreciate it. I agree with you about not butchering the dash for radios and other assorted gadgetry. If you don't mind I have a few extra ashtrays so I'd like to borrow your idea for my truck. You did a great job on it and it looks like it belonged there from the factory. How did you go about modifying the gauges using the original faces? I'd like to do that too. By chance you wouldn't have an extra stainless trim piece that goes across the dash from the ignition switch to the ashtray you'd be willing to sell?
#12
04-24-2009, 02:44 PM
Senior User
Join Date: Apr 2009
Location: Ashland, KY
Posts: 377
Likes: 0
Received 0 Likes
on
0 Posts
#13
04-24-2009, 04:52 PM
Senior User
Hey that would be great and I really appreciate it! You can send me PM instead of doing a repost.
#14
04-24-2009, 10:35 PM
Post Fiend
Oh that worked out well! Actually that's the only piece I don't have a spare of. I'm looking for anothe rone, but they are just selling for too much on e-bay lately.
I like you rdash mostly52f1. I like the complete custome mods and I'm fine with that. What I hate is someone who doesn't restore or fix up the truckm and then just drills a hole in the middle of the dash to put in an aftermarket oli pressure gauge or something.
I have a picture file I can send you on the gauge conversion Flatheadjohn. Send me a PM with your real e-mail again. I probably have it, but I have trouble sorting out e-mail addrersses with names and FTE handles.
#15
08-08-2013, 08:15 PM

Flatheadjohn do you by any chance have info on tilting steel front end 1951f1 any info would be greatly appriceated my email 13mols13@gmail.com
Thanks
Mike
Thanks
Mike