chop top
#16
 04-15-2009, 12:33 PM

#17
04-15-2009, 01:58 PM
I hate playing devils advocate, but when you notch and reangle the windshield posts rather than widening/lengthening the roof all kinds of ugly issues arise when you try to fit a windshield into the opening. I'd suggest laying the windshield in place and see what I mean. Short of having a new custom shaped windshied made ($$$) there isn't any good fix for this problem, you can't bend glass. Sorry.
For anyone planning a DIY top chop I'd suggest either: 1. leave the windshield frame intact and take the chop out of the cowl below the windshield a la Chip Foose's 56, or 2. have the windshield cut first and fit the frame to it during the chop. This will require widening the top. or else: 3. Start searching for another good cab to replace the goobered up one.
For anyone planning a DIY top chop I'd suggest either: 1. leave the windshield frame intact and take the chop out of the cowl below the windshield a la Chip Foose's 56, or 2. have the windshield cut first and fit the frame to it during the chop. This will require widening the top. or else: 3. Start searching for another good cab to replace the goobered up one.
#18
04-15-2009, 03:17 PM
I hate playing devils advocate, but when you notch and reangle the windshield posts rather than widening/lengthening the roof all kinds of ugly issues arise when you try to fit a windshield into the opening. I'd suggest laying the windshield in place and see what I mean. Short of having a new custom shaped windshied made ($$$) there isn't any good fix for this problem, you can't bend glass. Sorry.
For anyone planning a DIY top chop I'd suggest either: 1. leave the windshield frame intact and take the chop out of the cowl below the windshield a la Chip Foose's 56, or 2. have the windshield cut first and fit the frame to it during the chop. This will require widening the top. or else: 3. Start searching for another good cab to replace the goobered up one.
For anyone planning a DIY top chop I'd suggest either: 1. leave the windshield frame intact and take the chop out of the cowl below the windshield a la Chip Foose's 56, or 2. have the windshield cut first and fit the frame to it during the chop. This will require widening the top. or else: 3. Start searching for another good cab to replace the goobered up one.
#19
04-15-2009, 04:31 PM
So, how does he tell you to fit a windshield back in? No disrespect of your friend: Of the chops he's done, how many were on curved glass windshields where he changed the inward lean of the A pillars?? (flat glass is a piece of cake, change the windshield frame shape all you'd like.) How many did he get glass to fit back in? I'm a bit surprised that someone with that many chops under his belt wouldn't have had you split the roof? I assume you leaned the top of the doors in as well, Have you checked to see if the door glass will still go all the way up and down? When you lean in the top of the doors, you need to re-angle the regulators to match the new angle of the glass path, doing so sometimes the glass will hit the inside of the door skin when the glass comes down or the regulator cannot be angled enough so it binds before the glass goes all the way up. Lowering the top is just the first stage of a chop. I'm just trying to point out all the pitfalls and problems before anyone else breaks out the hacksaw and starts cutting.
#20
04-17-2009, 01:13 AM
Elder User
Join Date: May 2004
Location: Rancho Cucamonga ca.
Posts: 601
Likes: 0
Received 0 Likes
on
0 Posts
#21
04-17-2009, 06:07 AM
 OOPs sorry, I have a bad habit of telling the ending and spoiling the surprise...
Oh well at least when they don't cut the top apart it adds to the supply of replacement stock roof skins available.

#22
04-17-2009, 12:21 PM

Senior User
Join Date: Aug 2007
Location: Petaluma, CA
Posts: 108
Likes: 0
Received 0 Likes
on
0 Posts
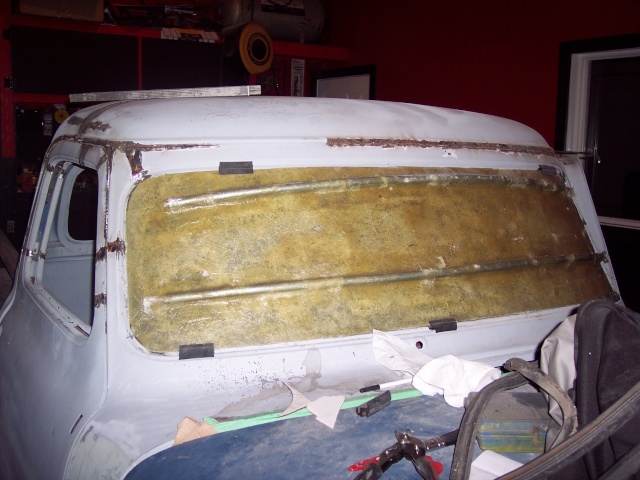
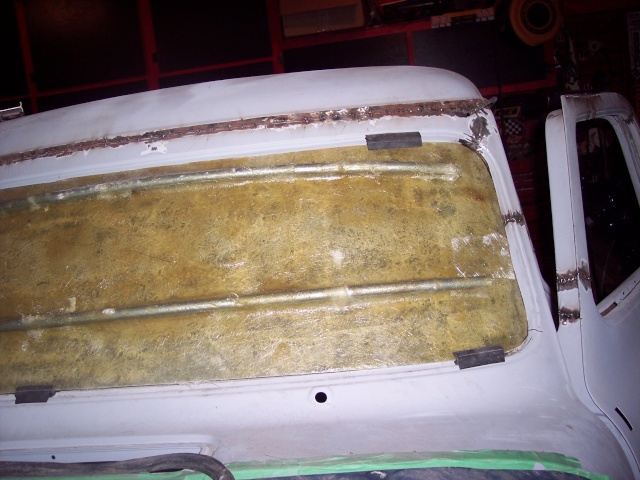
About 8 months ago I helped a friend make a headliner out of fiberglass for his 36 International p/u that he chopped. It was actually quite easy. We laid the glass on the roof for the proper shape (using a release agent), then sectioned the liner with cross cuts and whala it looks great after putting some cloth on it.
#23
04-18-2009, 07:40 AM
About 8 months ago I helped a friend make a headliner out of fiberglass for his 36 International p/u that he chopped. It was actually quite easy. We laid the glass on the roof for the proper shape (using a release agent), then sectioned the liner with cross cuts and whala it looks great after putting some cloth on it.


#24
04-18-2009, 09:52 AM
Yes, the 53 has a split windshield, so it can be narrowed in the center. Your windshield is one piece, it cannot be narrowed to fit. I suggest you do a search on keith56_cruz_cab for the posts he made recently when he ran into the same issues. That's what he was refering to when he said I was spoiling the surprise, he already has the T-shirt... Lay your stock windshield back in place and look along the sides.
#27
04-18-2009, 11:19 AM
I hope this simplified drawing will explain the fit issues more clearly:

Note the curved lines indicate the curve in the windshield.
The black outline is the original windshield shape.
The red outline is the new windshield shape after dropping the original width roof and upper windshield frame and tipping in the A posts to align.
Note the centerline of the original windshield curve, blue dotted line, and where the upper frame now wants it to be, red dotted line. Since you can't move/recurve the windshield, no matter how you cut it it will not fit, the curve centerline will be too far to the outside at the top to fit the new frame shape.
#28
11-25-2009, 09:26 AM
update on my chop, after a few guys scarring the crap out of me that the windshield would not fit, i finally got time to make a windshield buck, well i don`t really have to do mutch to get the windshield to fit, a bit off the sides and some off the top and it will all be good! it all worked out as planned at the end now to find myself a lile saw and cut the windshield!
now to find myself a lile saw and cut the windshield!
#29
11-25-2009, 10:04 AM


custom one i guess?? could always buy the urethane one from mid 50`s and add a section to it in the front, pie cut the sides and add a bit of material to them, i was thinking of that on the weekend? still not sure? i will probably build a roof top console which might take away some of the pain!
I stretched the vacuum bagging film over the roof and taped it in place, the film is very durable and will shape to the contours of the roof. This film is also chemically resistant to any resins and will not decompose at an inopportune moment. I used 3 layers of fabric in the layup; the first was a woven fabic that I saturated in the epoxy first and then laid across the roof, the second layer was CSM (chopped strand mat) that I rolled onto the woven fabric, the last layer was another woven fabric soaked in the epoxy resin. This technique made the layup fairly simple because I got the layers of material to lay out very easily, got good resin saturation, and didn't have to hassle with a bucket and brush on top of the roof.
Once the part cured I removed it from the roof and pealed off the bagging film. I brought the part into the inside of the cab and placed it up against the underside of the roof...I was surprised to see how much material needed to be trimmed to get the part to fit as a "headliner". I cut the part and sectioned it as needed to fit the headliner, I now have a piece that I will use as a mold to cast another part that will become the foundation of the headliner that I can deliver to the upholstery shop when I have the interior done.
If you know fiberglass, then this shouldn't be a big deal for you. If your truck is stock then maybe an ABS headliner is a less costly solution. BUT if you have a chopped top or want a custom headliner with center console or light mounts, etc. then maybe a fiberglass "one off" headliner is the way to go.
#30
11-25-2009, 10:40 AM