LFD's T-Bird IRS install How-To
#16
 02-04-2009, 07:43 AM

I really like the irs swap, but have a couple of questions, please.How did you change the wheel bolt pattern ? I thought the T-birds had a 5 on 4.25 pattern. Is the common Ford pattern not 5 on 4.5 ? Also , if I use the T-bird springs and mount the unit lower in my frame , which would make the truck sit a little higher than yours, the c-notch would be less material removed , and the bed floor would not have to be notched , right? Thanks.
#17
02-04-2009, 08:29 AM
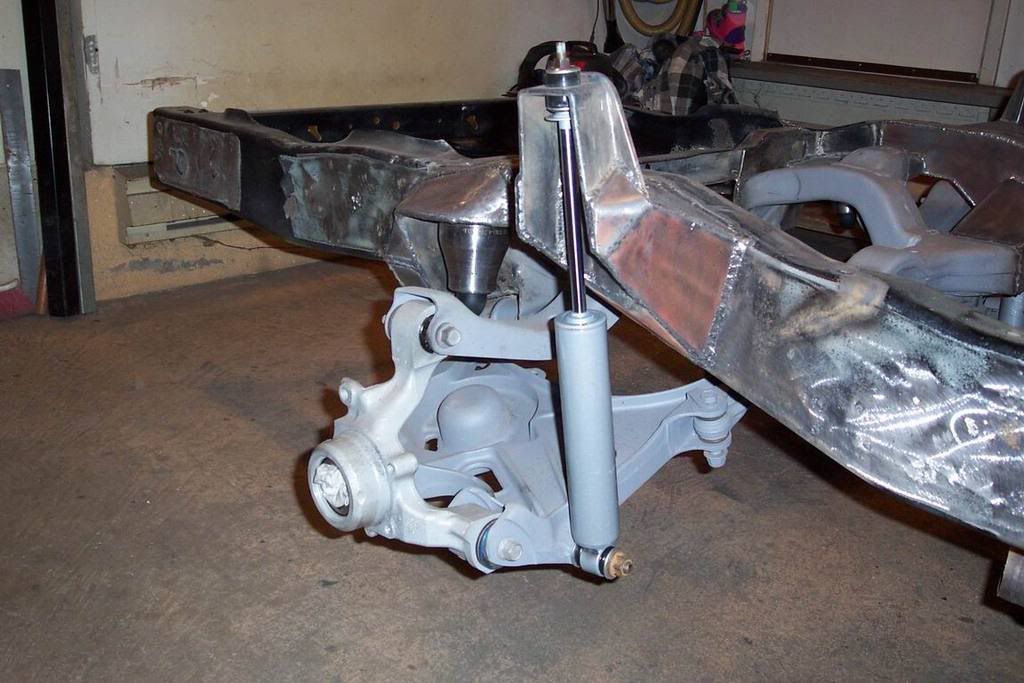
Rokcrln, great job on the install. I did the same to the rear of my '88. I didn't want to loose my rear tank, so it was a little more involved. As for the shock mount, here's what I did. I used a piece of 2x1/4" angle iron, bent and trimmed, then boxed back to the frame. It takes up the same amount of space as the upper control arm, so it doesn't take up any more space in the box. I had to tub the box 3.5" on both sides. I wanted 8" of travel, so a 6 " travel shock was used. I originally installed it with coils, then changed to bags a year later.
IRS Axle pictures by Sportruk1 - Photobucket

IRS Axle pictures by Sportruk1 - Photobucket
#18
02-04-2009, 08:33 AM

Join Date: Sep 2006
Location: Winters Ca
Posts: 423
Likes: 0
Received 0 Likes
on
0 Posts
I really like the irs swap, but have a couple of questions, please.How did you change the wheel bolt pattern ? I thought the T-birds had a 5 on 4.25 pattern. Is the common Ford pattern not 5 on 4.5 ? Also , if I use the T-bird springs and mount the unit lower in my frame , which would make the truck sit a little higher than yours, the c-notch would be less material removed , and the bed floor would not have to be notched , right? Thanks.
As far as mounting it lower and using springs you are right about the bed notch depending how much lower you mount it. I did mine this way so it would be as low as it is but if you want it higher their is a guy here on the boad (I think it is Dave and the board name is like team123 or somthing like that) who sells a kit to just mount the unit in your truck with very little mods needing to be done. It is a well thought out kit but would not work for what I wanted to do.
Kevin
LFD Inc.
#19
02-04-2009, 08:41 AM
Join Date: Sep 2006
Location: Winters Ca
Posts: 423
Likes: 0
Received 0 Likes
on
0 Posts
Rokcrln, great job on the install. I did the same to the rear of my '88. I didn't want to loose my rear tank, so it was a little more involved. As for the shock mount, here's what I did. I used a piece of 2x1/4" angle iron, bent and trimmed, then boxed back to the frame. It takes up the same amount of space as the upper control arm, so it doesn't take up any more space in the box. I had to tub the box 3.5" on both sides. I wanted 8" of travel, so a 6 " travel shock was used. I originally installed it with coils, then changed to bags a year later.
IRS Axle pictures by Sportruk1 - Photobucket
IRS Axle pictures by Sportruk1 - Photobucket
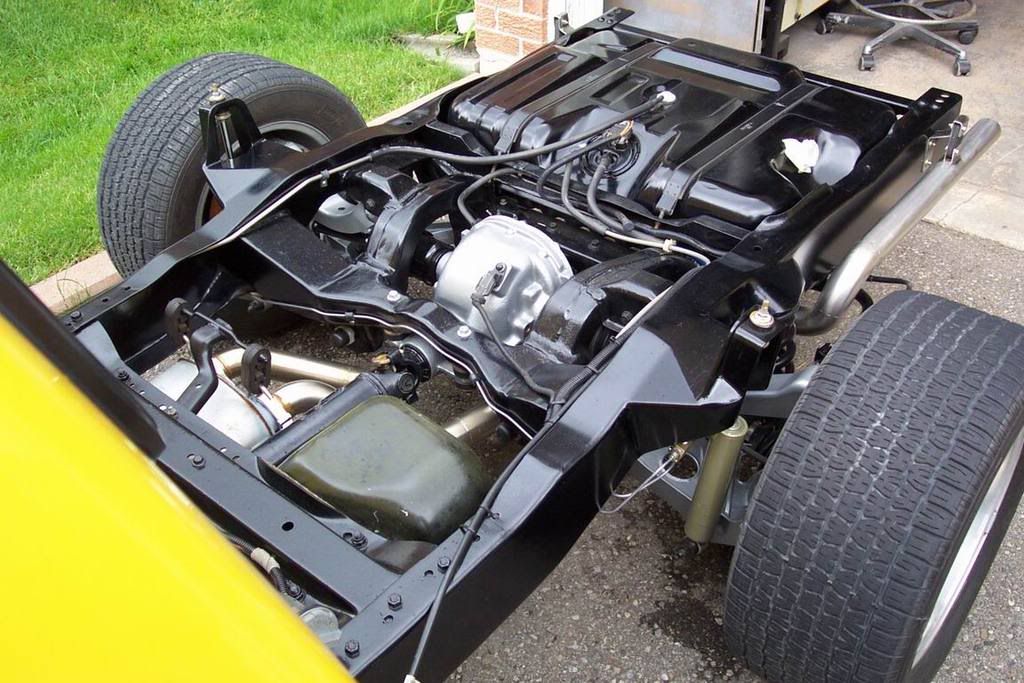
That is one clean install! I like your tank set up, I was going to do somthing simular but I will be building a SS tank for the TBI injection set up so I figured I would just build to fit. I will do some mock ups for the shocks like you have it and see were it ends up. Thanks for the pic's.
Are you running the mustange disk's? I might have to revisit my rear crossmember set up for a bigger tank now that I look at your photo bucket. Thanks and here I thought I was done!!
Kevin
LFD Inc.
#20
02-04-2009, 09:00 AM
Posting Guru
More nice work...
Hi Sportruk,
I just took a look at you photo presentation of your project on Photobucket. Great work and attention to detail. Both you an Kevin have been a definite inspiration for me as I have two very different frame modification projects in mind for my two '53 F-100s. Neither will be using the T-bird components but they will be extensive modifications. I especially like your attention to detail in your finish work. Although you refrained from using a lot of glitzy aftermarket stuff you more than made up for it with the quality of your work. Any fool can buy BLING and bolt it on. Both you and Kevin should be proud of your work, your presentations and the results.
I really like seeing this sort of thing and I hope to see a lot more of it here. For me this is truly waht this forum is about. You guys are a credit to the Darkside.
Later Men...

#23
02-09-2009, 12:06 AM
Thanks for the great comments, guys.
Yes, they are the Cobra 11.65" discs. While doing the install research, I found out about the disc upgrade by making a extension plate for the caliper mounts. I went a little overboard and milled them out of 2" square stock. It can be made up with 3/16" plate and some hex nuts.
Here's the writeup on the brake upgrade.
MN-12 Bolt Circle Change and Brake Upgrades
Here's the writeup on the brake upgrade.
MN-12 Bolt Circle Change and Brake Upgrades
#24
02-20-2009, 11:51 AM
Senior User
Join Date: Jan 2008
Location: Burleson,Tx
Posts: 457
Likes: 0
Received 0 Likes
on
0 Posts
You guys that have installed this suspension and welded the subframe directly to the truck frame. Does the suspension still give a nice smooth ride? I am about to try this suspension on my 67 F100 and think it would be much cleaner to just cut the stock rubber mounts off and weld the subframe to the truck frame like you guys did. I was also thinking that eliminateing the stock rubber mounts would help take some wheel hop out that the IRS is famous for with more power.
I guess I am mainly interested in the ride and I dont want it to suffer, I would assume welding directly to the frame doesnt hurt anything just makes the suspension work more and do its job better.
Do you hear any odd noises with it welded to the frame?
Thanks
Randy
I guess I am mainly interested in the ride and I dont want it to suffer, I would assume welding directly to the frame doesnt hurt anything just makes the suspension work more and do its job better.
Do you hear any odd noises with it welded to the frame?
Thanks
Randy
#25
02-20-2009, 08:29 PM
I would say it's firm ride but not harsh, like the stock axle. It all depends on your shocks. I have QA1 racing shocks, so it's firm ride. I originally had 6" Slam Speciallties bags in the back, running close to 100 psi. I switched to 7" bags Slam bags and greatly improved the ride. My frontend is very firm and my teeth are still rattling when the rear hits, so it's hard to judge the overall feel of the rear, but it is definaitly a better ride in the rear, than the front.
When I first installed the IRS, I used the springs that came with it, but the were to soft and the rear sat lower than I wanted. I went to the parts supplier and found out the was a trailer tow spring available and that brought the height up to where I wanted.
The wheel hop in the IRS is different than leaf spring hop. As you accelerate, the suspension moves forward under load. When the tire looses traction, the suspension snaps back. It's a back and forth motion, as opposed to an up down motion on a straight axle. There is a poly uethane kit available for the spindle that greatly helps the wheel hop.
One of the design features of this IRS is, active toein. This greatly improves straight line tracking on hard acceleration, but it does lead to the wheel hop if it gets to loose. There is also a short link in the front mount of the lower control arm that helps control the toein. When it wears out, it leads to more wheel hop. I plan on replacing mine with a pair of rod ends because mine are shot.
As for noises in the back end, it's silent. Welding the subframe in greatly strengthens the frame and keeps other creaks under control.
#26
02-22-2009, 09:10 AM
Senior User
Join Date: Jan 2008
Location: Burleson,Tx
Posts: 457
Likes: 0
Received 0 Likes
on
0 Posts
Any suggestions on locating the upper spring mount? I can get the hubs in the location I want by putting the wheels on and setting the frame at the height I want then welding the lincoln subframe in place but I am unsure how high the upper spring mounts should be above the lower control arm spring mount. Thanks for the help guys.
#27
02-22-2009, 02:09 PM
Have you cut off the subframe mounting points yet? The spring mounting height is the same height as the top of the subframe rear mount bushing.
I set the subframe height so the differential centerline was 1" higher than the hub centerline.
Also, the spring pad is tilted to the outside 7 degree, so the spring has a natural arc to it. This picture make it look like more angle than it is, due to the angle I took the picture at.
I made the bumpstop fitting from a 3"x2" schedule 40 pipe reducer. The 3.5" diameter was a perfect fit for the inside of the rubber spring bushing.
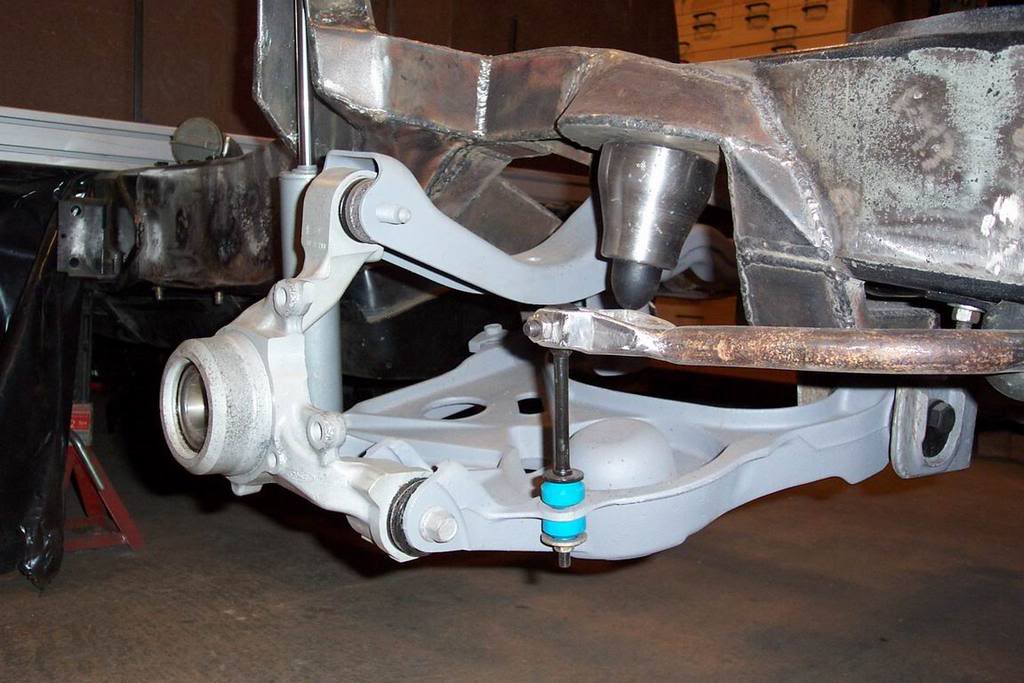
#28
02-22-2009, 11:49 PM
Senior User
Join Date: Jan 2008
Location: Burleson,Tx
Posts: 457
Likes: 0
Received 0 Likes
on
0 Posts
You are great Shawn. You just answered all the questions I have at the moment in that one paragragh even the one about the spring retainer, which I will have to copy now  .
.
I still have all the mounting points in tact so I can do some measuring and will follow your instructions to get it in place. I plan on my setup looking very similar to yours so I will have to cut off the original mounting points for a much cleaner look.
I sure do appreciate all the help.
Randy
Oh if your interested in seeing my IRS progress I am posting updates in my buildup thread about the crown vic front suspension into a 67 F100 on this site.
.I still have all the mounting points in tact so I can do some measuring and will follow your instructions to get it in place. I plan on my setup looking very similar to yours so I will have to cut off the original mounting points for a much cleaner look.
I sure do appreciate all the help.
Randy
Oh if your interested in seeing my IRS progress I am posting updates in my buildup thread about the crown vic front suspension into a 67 F100 on this site.
#29
01-17-2010, 10:50 AM
New User
Join Date: Jan 2010
Location: Trenton, MI.
Posts: 19
Likes: 0
Received 0 Likes
on
0 Posts
Hey Kevin, I was wondering. Do you think I would run into any clearance problems installing this Bird IRS the way you did without the air bags? I want the truck low, but want to stay away from the bags. Your upper bag mount looks like it is mounted roughly in the middle of the frame. I'm assuming that with a coil, it would have to be mounted a little higher.
The kit that 321 ifs sells is nice, but want the rear to sit as low as possible.
The kit that 321 ifs sells is nice, but want the rear to sit as low as possible.
#30
05-03-2010, 12:28 PM

rokcrln do you think i can use these same directions you posted. that the way you did it will work with my 67 ford truck but i dont want it as low as yours is im looking for a little drop i have already installed the crown vic ifs in my truck and i have alot of time and money in the rear not to use it any help here i thank you Tracy, by the way awesome job on your truck lov it.