Clutch not disengaging
#1
 01-28-2009, 06:15 PM


Join Date: Jan 2009
Posts: 25
Likes: 0
Received 0 Likes
on
0 Posts
Clutch not disengaging
This morning, I shifted into neutral and left the truck running. When I got in it put it in reverse, the shifter peddle went all the way to the floor and the clutch did not engage. I turned off the engine, and the transmission shifted easily. I put it into reverse, started the engine, and when I tried to shift back into first, the same thing happened. Peddle to the floor with no resistance, and I could not get it into gear. I finally forced it into 1st to get back into the driveway, but had to stall the engine to keep from going through the garage door. The clutch would not disengage at any time. I checked the master cylinder and it is 1/2 full. Has my clutch gone out?
#2
01-28-2009, 07:13 PM
Posting Guru
Do you have leakage of clutch (brake) fluid around the flywheel housing or around the clutch master unit on the firewall? If so, it looks like either the slave unit or the master is shot. That or the tube that connects the two has a leak and needs to be replaced. Have you noticed any signs of clutch slippage? If so, probably the clutch itself has had it.
#3
01-28-2009, 09:48 PM

Ford bulletin #93-12-19
ISSUE:
A "soft" unresponsive clutch pedal may be felt or the driver may be unable to release the clutch. This is caused by air entrapped in the clutch hydraulic system.
ACTION:
Use the information in this TSB article in addition to the bleed procedure specified in the 1993 Service Manual. This article includes detail as well as extra service tips for easier hydraulic clutch bleeding.
The clutch hydraulic system for the 1993 model year is new and more difficult to bleed than the previous hydraulic system. Therefore, a different bleeding procedure is required for these vehicles.
RANGER, EXPLORER, AEROSTAR
The most difficult systems to bleed are on the Rangers, Explorers and Aerostars. Follow the bleed procedure as outlined in the 1993 Service Manual, This procedure with the addition of the bench bleed process is included in this TSB article.
NOTE: WHEN INSTALLING DRY CLUTCH CYLINDER OR TUBE SERVICE PARTS, DO THE BENCH BLEED PROCEDURE FIRST.
BENCH BLEED
The compact vehicles are more difficult to bleed because the downward angle of the master cylinder makes it difficult for air to escape up into the reservoir. Therefore, if the master cylinder is removed from the vehicle and bled while held in a vertical orientation (a bench bleed) air can escape much more efficiently.
BENCH BLEEDING PROCEDURE (CONCENTRIC SLAVE CYLINDER)
1. Remove master cylinder, line and reservoir from vehicle and assemble with replacement parts required based on initial concern.
2. Hold the master cylinder vertically with the reservoir feed hose in the highest position on the body,
3. Fill the reservoir and extend above the master cylinder and assure the quick connect on the clutch line is below the master cylinder. (Lightly clamp reservoir in a vice).
4. Using a small screwdriver, depress the internal mechanism of the male quick connect coupling to open the valve,
5. Stroke and hold master cylinder pushrod.
6. Close quick connect valve.
7. Release master cylinder pushrod.
8. Fill reservoir.
Repeat Steps 4 through 8 four more times.
9. With the master cylinder still being held with the outlet tube and reservoir feed tube ends high, quick connect closed and the reservoir full, proceed as follows:
10. Push the pushrod into the body several times quickly to expel any remaining air.
If it is a remote reservoir, pinch the supply hose with your fingers two or three times to help move air into reservoir.
When the movement of the pushrod is .160" (4mm) or less when stroked in Step 10, reinstall the master cylinder into the vehicle and couple it to the slave cylinder.
ON VEHICLE BLEED PROCEDURE, CONCENTRIC SLAVE CYLINDER
Under normal conditions, disconnecting the clutch coupling will not introduce air into the system. However, if there appears to be air in the system (spongy pedal or insufficient bearing travel), the system must be bled. The following procedure is used with the hydraulic system installed on the vehicle.
1. Disconnect the coupling at the transmission with a coupling disconnect tool (T88T70522A) or equivalent by sliding the white plastic sleeve toward the slave cylinder while applying a slight tug on the clutch tube.
2. Clean dirt and grease from around the reservoir cap.
3. Remove cap and diaphragm and fill reservoir to the step with Heavy Duty Brake Fluid (C6AZ-19542-AA or BA) (ESA-M6C25-A) or equivalent.
CAUTION: BRAKE FLUID MUST BE CERTIFIED TO DOT 3 SPECIFICATION.
4. By hand, apply 10-15 lbs. to clutch pedal.
If pedal is hard (.25-.50 "movement), skip to Step 9.
If pedal is spongy, proceed to the next step.
5. Using a small screwdriver....
Depress the internal mechanism of the male coupling to open the valve.
6. While continuing to hold the valve open, slowly depress the clutch pedal to the floor and hold.
7. Remove the screwdriver from the coupling, closing the valve.
8. Release the clutch pedal.
9. Refill the reservoir to level at step.
NOTE: THE RESERVOIR MUST BE KEPT FULL AT ALL TIMES TO ENSURE THAT THERE WILL BE NO ADDITIONAL INTRODUCTION OF AIR INTO THE SYSTEM.
Repeat Steps 4 through 7.
Install cap on reservoir.
Reconnect the coupling to the slave cylinder.
Check that the connection is secure by applying a slight tug to the clutch tube.
Stroke the clutch pedal as rapidly as possible for five to ten strokes.
Wait one to three minutes.
Repeat Steps 10 and 11 three more times.
Loosen the bleed screw which is located in the slave cylinder body next to the inlet connection.
Depress and hold the clutch pedal while tightening the bleed screw 3-5 N-m (2.2-3.7 lb-ft).
Refill the reservoir to level at step.
The hydraulic system should now be fully bled and should release the clutch. Check the clutch reserve per the instruction in the 1993 Service Manual, Section 08-00.
F-SERIES, BRONCO
Since full size vehicles have master cylinders which are mounted in a level attitude, they bleed more efficiently than do compact vehicles. However, some difficulties may still be encountered if the new procedure is not used.
VEHICLES WITH CONCENTRIC SLAVE CYLINDERS
The procedure given in the Service Manual on page 08-00-9 is incorrect. Use the same bleed procedure as specified for the compact vehicles which is included in this article. The optional bench bleed procedure may be used, but is probably not necessary.
VEHICLES WITH EXTERNAL SLAVE CYLINDERS
The procedure in the 1993 Service Manual should be modified as follows:
Do not use the Alternate Method.
After Step 7 and before Step 8, do the following...
Remove the slave cylinder from the transmission.
Holding the cylinder so that the port for the tube is at the highest point, slowly push the pushrod into the cylinder and slowly let it return. Be sure the reservoir is full of fluid beforehand. Repeat this step two more times.
Reattach the slave cylinder to the transmission.
Rapidly depress the clutch pedal 10 times through a travel of about 1" (25.4mm).
If the pedal is not hard within .25" (6.35mm) to .5" (12.7mm) of travel, repeat Step d.
#4
01-29-2009, 08:26 AM
Posting Guru
#5
01-29-2009, 10:40 AM

Post Fiend
Join Date: Oct 2005
Location: Kiev, Ukraine
Posts: 5,242
Likes: 0
Received 0 Likes
on
0 Posts
step #1
check fluid level, add if necessary
Step#2
try to bleed
Step #3 check for leaks
Step#4 check clutch rod. be sure MC piston is moved with pedal and it is not stuck
well, now get a handlight and lay down under truck ore use a pit to look inside bellhousing. I'm not sure about your truck, but I can see SC in bellhousing of aero... Does it moves? Onese I saw broken pressure plate with the same symptoms.
If nothing helps but no leak, try to swap MC with good one, check also is its piston stuck.
bad Slave leaks usually... so U'll see if it is bad
#7
01-29-2009, 06:44 PM
Join Date: Jan 2009
Posts: 25
Likes: 0
Received 0 Likes
on
0 Posts
Do you have leakage of clutch (brake) fluid around the flywheel housing or around the clutch master unit on the firewall? If so, it looks like either the slave unit or the master is shot. That or the tube that connects the two has a leak and needs to be replaced. Have you noticed any signs of clutch slippage? If so, probably the clutch itself has had it.
Also, when I looked that the transmission casing, it looked like it had a thin layer of liquid that ran from the bottom up the right side to what looked like a vent in the casing. Also, there is a plug on the drive side of the casing that says fill. It is wet on the bolt and there is some blue bonding agent on it.
Trending Topics
#8
01-29-2009, 08:14 PM

That "smaller" resevoir is the master cylinder for the hydraulic clutch, and it should be full-you take off the cap, and there should be what looks like a screen thats pushed in the resevoir-remove the screen, and fill with DOT 3 brake fluid to the "step" in the resevoir-DO NOT FILL TO THE TOP!!! It should be filled about 1/2 to 2/3 of the way up, as where there is a little "step" as they call it, inside the resevoir..Clean and replace the screen, and the fluid should rise up, but not go out of the resevoir, and then replace the cap..The casing that you saw the word "fill" is the gear box for your transmission, and that bolt should not be wet with any fluid..find the right size wrench and snug it up.. You should also see another bolt down and to the right, that says "drain", that's so you can drain the gear box as part of regular maintenance..
#9
01-30-2009, 04:54 AM
Post Fiend
Join Date: Oct 2005
Location: Kiev, Ukraine
Posts: 5,242
Likes: 0
Received 0 Likes
on
0 Posts
#10
01-31-2009, 11:02 AM
Join Date: Jan 2009
Posts: 25
Likes: 0
Received 0 Likes
on
0 Posts
Did the following
Remove rubber plug from inspection port in tranny bell housing
using rear edge of black plastic retainer as an indicator take a reading with the clutch pedal fully released
then fully depress the clutch and take another measurement
the difference between the 2 readings is total bearing travel
if bearing travel is greater than (0.3" 7.5 mm )its pressure plate and or tranny issue
if bearing travel less than (0.3" 7.5mm)its hydraulic issue
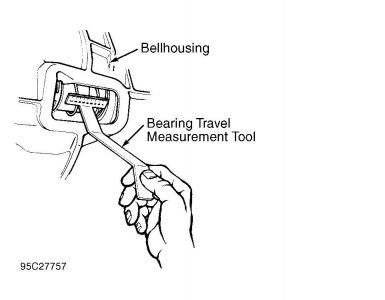
movement was less that 7.5MM. I am going try and bleed the system now with the above tech sheet.
Remove rubber plug from inspection port in tranny bell housing
using rear edge of black plastic retainer as an indicator take a reading with the clutch pedal fully released
then fully depress the clutch and take another measurement
the difference between the 2 readings is total bearing travel
if bearing travel is greater than (0.3" 7.5 mm )its pressure plate and or tranny issue
if bearing travel less than (0.3" 7.5mm)its hydraulic issue
movement was less that 7.5MM. I am going try and bleed the system now with the above tech sheet.
#11
01-31-2009, 11:34 AM
Join Date: Jan 2009
Posts: 25
Likes: 0
Received 0 Likes
on
0 Posts
Did the following with no luck:
1. Disconnect the coupling at the transmission with a coupling disconnect tool (T88T70522A) or equivalent by sliding the white plastic sleeve toward the slave cylinder while applying a slight tug on the clutch tube.
2. Clean dirt and grease from around the reservoir cap.
3. Remove cap and diaphragm and fill reservoir to the step with Heavy Duty Brake Fluid (C6AZ-19542-AA or BA) (ESA-M6C25-A) or equivalent.
CAUTION: BRAKE FLUID MUST BE CERTIFIED TO DOT 3 SPECIFICATION.
4. By hand, apply 10-15 lbs. to clutch pedal.
If pedal is hard (.25-.50 "movement), skip to Step 9.
If pedal is spongy, proceed to the next step.
5. Using a small screwdriver....
Depress the internal mechanism of the male coupling to open the valve.
6. While continuing to hold the valve open, slowly depress the clutch pedal to the floor and hold.
7. Remove the screwdriver from the coupling, closing the valve.
8. Release the clutch pedal.
9. Refill the reservoir to level at step.
NOTE: THE RESERVOIR MUST BE KEPT FULL AT ALL TIMES TO ENSURE THAT THERE WILL BE NO ADDITIONAL INTRODUCTION OF AIR INTO THE SYSTEM.
Repeat Steps 4 through 7.
Install cap on reservoir.
Reconnect the coupling to the slave cylinder.
Check that the connection is secure by applying a slight tug to the clutch tube.
Stroke the clutch pedal as rapidly as possible for five to ten strokes.
Wait one to three minutes.
Repeat Steps 10 and 11 three more times.
Loosen the bleed screw which is located in the slave cylinder body next to the inlet connection.
Depress and hold the clutch pedal while tightening the bleed screw 3-5 N-m (2.2-3.7 lb-ft).
Refill the reservoir to level at step.
The hydraulic system should now be fully bled and should release the clutch. Check the clutch reserve per the instruction in the 1993 Service Manual, Section 08-00.
#12
01-31-2009, 11:38 AM
Join Date: Jan 2009
Posts: 25
Likes: 0
Received 0 Likes
on
0 Posts
Before I do the following, let me explain the previous step. After I disconnected the slave hose in step 1 and depressed the peddle, it went almost all the way to the floor and then became very hard. When I bled the line to the slave, fluid came out immediately, no air at all. I reconnected and bled the slave and some air did spurt out before fluid started to bleed out. Tightened the slave bleed screw and tried it again. The peddle still goes all the way to the floor and the clutch will not release. It still shifts into gear no problem when the engine is off, but will not shift from neutral when the engine is running. If I put it in gear and try to start, it stalls out. Below is the only other thing I can think, but the peddle returns no problem. Any ideas?
Found this on another site, will try to bleed again using these instructions.
NO RELEASE / AIR TRAPPED IN HYDRAULIC RELEASE SYSTEM
Applications:
1983-94 Ford Ranger - 2.8L and 3.0L
1991-94 Ford Explorer - 4.0L
1991-94 Ford Bronco II - 2.9L
1993-97 Ford Explorer - F150-350 - Ranger
1986-95 Ford Aerostar
Ford Clutch Master Cylinder
These applications require special procedures to bleed the hydraulic system properly. The mounting position of the master cylinder on the firewall traps air in the rear portion of the cylinder. Before bleeding the system, remove the master cylinder from the firewall and position it so the reservoir end is higher than the push rod end. This will enable air to escape from the rear position of the cylinders. Use only approved hydraulic fluid recommended by the manufacturer. We highly recommend the use of a Phoenix™ injection-bleeding tool, which is available through your Perfection Clutch distributor. For additional information, refer to Ford bulletin #93-12-19.
Perfection Clutch - Brute Power - ZOOM - Super Brute
Last edited by colbyclay; 01-31-2009 at 11:56 AM. Reason: adding first paragraph
#13
01-31-2009, 04:38 PM
Join Date: Jan 2009
Posts: 25
Likes: 0
Received 0 Likes
on
0 Posts
UPDATE: When I looked at the fluid in the reservoir it was pretty filthy. We flushed the system until it came out clear from the slave bleed valve. There must have been a clog, because it started flowing out the valve. We closed everything and it shifts just fine now. Thanks for all your help, I appreciate it!!
#14
02-04-2009, 08:42 AM
Join Date: Jan 2009
Posts: 25
Likes: 0
Received 0 Likes
on
0 Posts
#15
02-04-2009, 09:54 AM