correct routing of ebrake cable from drum to bracket??
#1
 06-15-2008, 10:44 PM


Join Date: Sep 2007
Location: medicine hat, ab
Posts: 59
Likes: 0
Received 0 Likes
on
0 Posts
correct routing of ebrake cable from drum to bracket??
Hi All...
Getting closer to getting this thing on the ground!!!
Trying to install the repro ebrake cables. Drums are all back together, cable is ready to be hooked up to the bracket system on the underside of the bed. Having never seen one, and my truck came with the ebrake cables cut, i am curious on the routing of the cable? Up and over the frame in between the bed and frame? Just let it come out of the drum and hood it straight up to the yoke??
Sorry if the terminology isn't correct...lol...or spelling...but if anyone has any pics of the routing that would be fantastic.
Also, of the cables all hooked up to the braket would be cool too.
Thx in advance...
Rick
ps...it is a 51 mercury M1

#4
06-16-2008, 12:23 PM

Post Fiend
Funny you should mention this! I just adjusted mine yesterday and took these pictures. They may help as well:


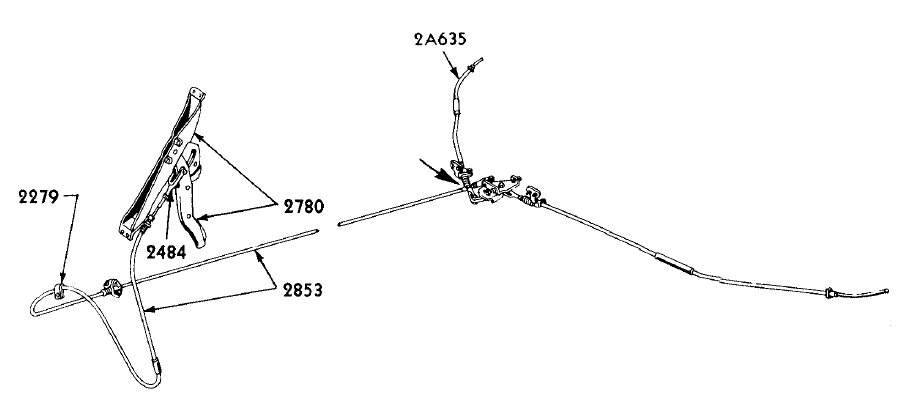
The cables just run straight up with a gentle curve as mentioned. The chaffing strip on mine is over by the frame. The picture is a little distorted with the drive shaft in the way.
If you need more pics, let me know. The bed is off and they are easy to take. Also, if you don't have a shop manual I can write the adjustment procedure out for you - it's easy (as long as all your hardware turns ok).
J!
#5
06-17-2008, 12:57 AM
Join Date: Sep 2007
Location: medicine hat, ab
Posts: 59
Likes: 0
Received 0 Likes
on
0 Posts
#6
06-17-2008, 03:41 AM
Post Fiend
[quote=51merc;6261143]Hi Julie...yes...your help from the manual on the adjustment procedure would be much appreciated.
thx.
rickquote]
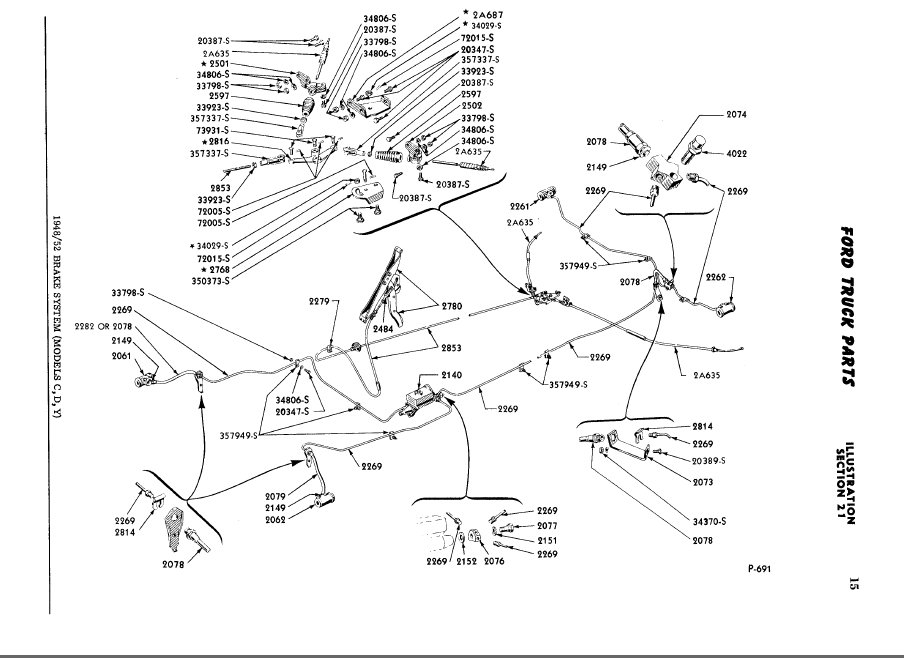
Ok - here we go...From the 49-51 F-Series Trucks Shop Manual, Chapter 3 Section 8, Parking Brakes; Page 249; a. Internal Expanding Shoe Type; (1) ADJUSTMENT (shall we all read together brothers!):
[my comments are in brackets like these]

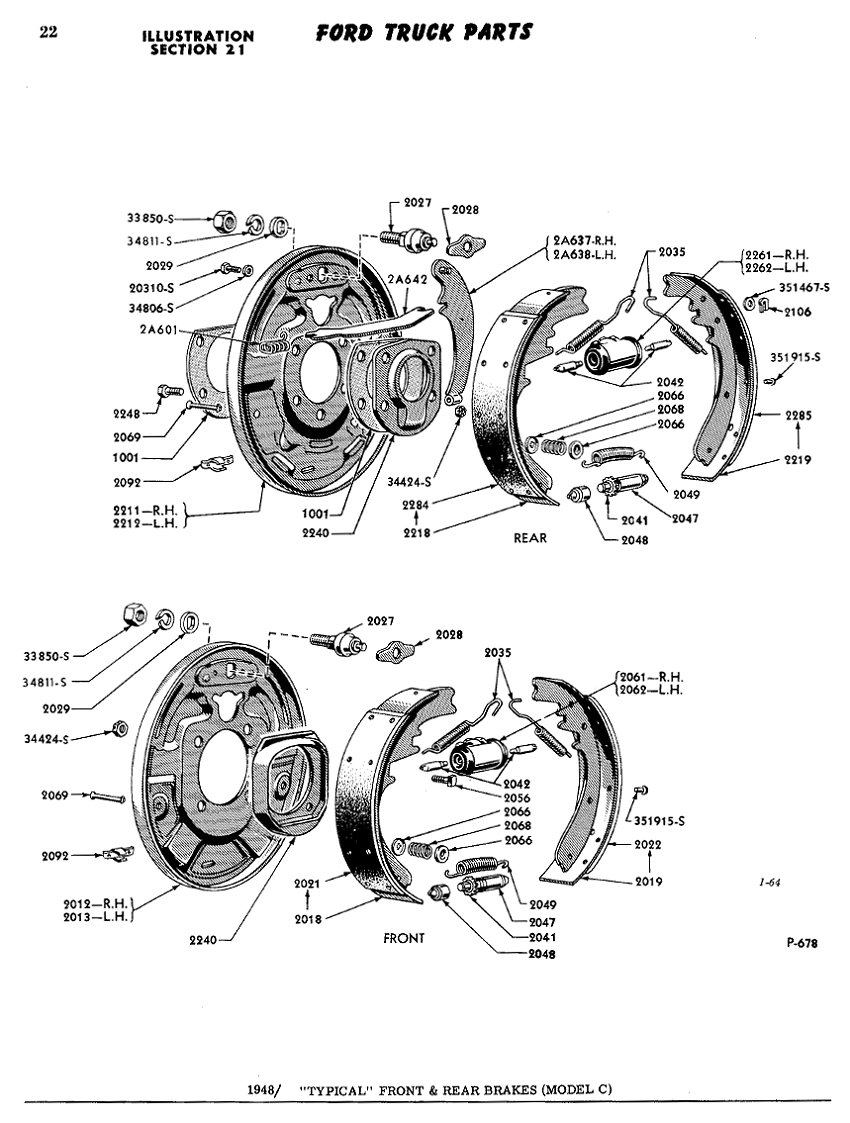
"NOTE: Adjust the service brakes before attempting to adjust the hand brake."
"Apply just enough pressure to the brake pedal to position the rear brake shoes firmly against the brake drums. With the brake shoes contacting the brake drums, adjust each rear brake cable until the excess slack is removed from the cable."
[If the brake drum ends of your cables turn freely, you don't need to remove the clevis pins and clevis. Just loosen the nut behind the clevis and turn the unthreaded part of the cable end with vise grips]
[If not, remove the cotter pin from the clevis pin holding the clevis on the equalizer (the three fingered thingy all the cables attach to). Remove the clevis from the equalizer. Pull the cable tight by hand and loosen the nut behind the clevis and screw the clevis farther onto the threaded end of the cable until there is no slack BUT the holes on BOTH rear cable clevis still align with the holes on the equalizer when it is positioned to it's farthest "off" position (counterclockwise as far as it will rotate when looking up from underneath). Try to get close to the same amount on both sides. Align the Clevis holes insert the pin and replace the cotter pin]
"Check the brakes to make sure they are not dragging."
"With the hand brake lever applied, adjust the cables so that the bolt will be in the center of the equalizer [bracket #70215S on the drawing above] slot."
[The equalizer bracket is bolted to the frame with two cap bolts - one anchors it (and is toward the front of the truck), and the other is in a rounded slot (aft) . Apply the hand brake, loosen the aft bolt in the slide and position the equalizer bracket so the back bolt is in the center of the slide - tighten it. Then, make a final fine adjustment on the back cable slack. They should be ok if you adjusted them an equal amount up the threads on each side]
"Adjust the hand lever to equalizer [front] cable so that, with the foot break applied, 1/2 inch of movement of the hand break lever is possible before all the slack in the cables is removed."
See Piece of cake - it really is easier than it sounds.
Good luck,
J!
thx.
rickquote]
Ok - here we go...From the 49-51 F-Series Trucks Shop Manual, Chapter 3 Section 8, Parking Brakes; Page 249; a. Internal Expanding Shoe Type; (1) ADJUSTMENT (shall we all read together brothers!):
[my comments are in brackets like these]
"NOTE: Adjust the service brakes before attempting to adjust the hand brake."
"Apply just enough pressure to the brake pedal to position the rear brake shoes firmly against the brake drums. With the brake shoes contacting the brake drums, adjust each rear brake cable until the excess slack is removed from the cable."
[If the brake drum ends of your cables turn freely, you don't need to remove the clevis pins and clevis. Just loosen the nut behind the clevis and turn the unthreaded part of the cable end with vise grips]
[If not, remove the cotter pin from the clevis pin holding the clevis on the equalizer (the three fingered thingy all the cables attach to). Remove the clevis from the equalizer. Pull the cable tight by hand and loosen the nut behind the clevis and screw the clevis farther onto the threaded end of the cable until there is no slack BUT the holes on BOTH rear cable clevis still align with the holes on the equalizer when it is positioned to it's farthest "off" position (counterclockwise as far as it will rotate when looking up from underneath). Try to get close to the same amount on both sides. Align the Clevis holes insert the pin and replace the cotter pin]
"Check the brakes to make sure they are not dragging."
"With the hand brake lever applied, adjust the cables so that the bolt will be in the center of the equalizer [bracket #70215S on the drawing above] slot."
[The equalizer bracket is bolted to the frame with two cap bolts - one anchors it (and is toward the front of the truck), and the other is in a rounded slot (aft) . Apply the hand brake, loosen the aft bolt in the slide and position the equalizer bracket so the back bolt is in the center of the slide - tighten it. Then, make a final fine adjustment on the back cable slack. They should be ok if you adjusted them an equal amount up the threads on each side]
"Adjust the hand lever to equalizer [front] cable so that, with the foot break applied, 1/2 inch of movement of the hand break lever is possible before all the slack in the cables is removed."
See Piece of cake - it really is easier than it sounds.
Good luck,
J!
#7
09-25-2016, 11:58 AM
Trending Topics
#8
09-25-2016, 12:31 PM

Fleet Owner


#9
09-25-2016, 01:23 PM
Thanks for the pictures. Mine is already routed, the cables are in good shape too. So if I read the post correct on adjusting, step one release the hand brake, second have a second person apply slight pressure to the brake pedal to where the wheels won't move freely, third, adjust or tighten the cables going to the brakes on the equalizer. Is that it? Do the rear wheels need to be removed when doing this process?
Thanks again
Thanks again

Thread
Thread Starter
Forum
Replies
Last Post
yamagrant
1948 - 1956 F1, F100 & Larger F-Series Trucks
3
09-09-2017 07:56 AM
56panelford
1948 - 1956 F1, F100 & Larger F-Series Trucks
1
09-07-2017 08:12 PM
Don Vito
1948 - 1956 F1, F100 & Larger F-Series Trucks
4
12-07-2016 11:48 PM

