Body lifts, the why not and the how to
#1
 03-25-2008, 11:16 PM


Body lifts, the why not and the how to
Ok. Given recent discussion I felt it best if we had a thread discussing body lifts, the merits of them, and if you are going to do it, how to do it in a safe manner… and discussing how to and why not do them in an unsafe manner.
This way if in the future threads come up regarding them (body lifts) we have a simple direction to answer most questions.
Why would you want to do a body lift?
The answer to this is pretty obvious, you want the body to sit higher, be it so that it is for looks, or you want more clearance for larger tyres etc.
What are the implications of performing a body lift?
1. Higher Centre of Gravity – that is pretty obvious, but needs to be taken into consideration when considering what tasks your vehicle is performing and how it is driven.
2. Moving controls/wiring etc. that are mounted, or get access through both the body and the chassis frame rails. (Transmission shifters, the main wiring loom etc.)
3. The most serious (as it has serious safety implications) is the fact that now the body, and all that it attaches too will now not be sitting in their standard locations, and you have the 2 largest, heaviest and critical systems of a truck (the body and the frame) separated. More on this further down. This has significant impact under acceleration/braking, loading and more importantly… crashing.
4. You need to make sure that it does not effect anything that is packaged around the body/chassis. i.e. engine clearance etc. On most Ford Trucks this is not a significant problem.
Now, it is almost always advisable to perform a lift using the suspension and its mounting hardware and/or axles (if applicable) and I strongly encourage anyone to research doing that before contemplating a body lift (assistance on this can be gained in this forum).
Now, despite all this you would still like a body lift.
How should I go about undertaking it?
Bear in mind a Body lift has much greater impact than the apparent "ease" of performing such an operation suggests, and it is not something to be undertaken lightly, because it's cool or anything else. If in doubt ASK!
Critical components and things to watch out for –
1.Bolts.
a.Use nothing less than grade 8 bolts, this is a non-negotiable item. You are substantially increasing the load in the body attachment bolts.
b.Use external drive bolts, preferably with a flange on the head
c.Use a coarse pitch thread. (either UNC, or course thread metric)
d.Use the largest diameter bolts possible. The aim of doing a "good" body lift is to maintain the body attachment bolts in pure tension as they are standard, the reality of it will be you will induce SOME bending, as such you want the greatest diameter possible to deal with that.
(see simple diagram for difference between tension on the left and bending on the right)
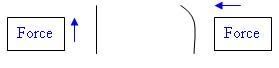
To illustrate the importance of this, get some wire, try pulling it apart to break it.
Now try bending it. Is it easier to bend, than it is to pull it apart?
Now, get a large diameter bolt. Try bending it. Is it easier to bend than the wire?
e.Select the right length bolts that go right through the body attachment points on both the body and the chassis (i.e. DO NOT tap a thread into two ends of a spacer, and clamp it from both sides). Allow at least 6 threads between the last screw thread and the first engaged nut thread, and ensure at least 2 threads between the tapered thread section and the last engaged nut thread. See diagram below.

f.The bolt needs to be corrosion resistant. Magni 560 or 565 coating is preferred.
2.Nuts/washers
a.Use a flanged hex nut.
b.Use washers on both the bolt head and the nut side. This is to provide clearance for the bolt head fillet and to provide greater stress equalisation and transfer through the spacer.
c.Use a spring washer on the nut side, between the flat washer, and the nut..
d.Ensure, like the bolt, that the nuts/washers are corrosion resistant (again, Magni 560/565).
e.Ensure it is also Grade 8!
3.Body spacing hardware
a.PAD AREA! To prevent the bolt being in significant bending, ensure that the spacer you are using is as large as it can feasibly be in all directions. This is absolutely critical.
b.Ensure that it is flat, and sits flush with both the body and the chassis.
c.Ensure that the hole clearance diameter in the spacer is no greater than 1mm (~1/32") in diameter than the bolt size to distribute stress throughout the spacer (and bolt) in the best manner possible.
d.Ensure they aren't a generic item (don't use hockey pucks or anything similar… please!).
e.The material needs to be as stiff as possible, don't use rubber, wood, aluminium or anything similar. Make sure it is at a minimum out of mild steel, exotic steels/materials that you can get your hands on are only a bonus!
f.They need to be solid. Not RHS, not I-beams, SOLID machined steel! This ensures the best transfer of bolt tension.
4.Fitment, engineering practices, and other worthwhile info.
a.Ensure the areas, and all hardware are wiped clean of any dirt/grease/oil etc, and are free of any surface imperfections (bubbled paint, rust etc.) before commencing.
b.Use loctite threadlocker or similar on the thread of the bolt..
c.Torque. Given the application, its not appropriate to TTY (Torque to Yield), as if you get airborne, or experience significant force attempting to separate the chassis/body, your bolts will fail. Torque to ~75% of yield torque.
d.Tighten from the nut side only.
e. Take time during and after fitment to check for things such as:
i.Cross-threading, was it excessively hard to torque from the start?
ii.Correct fitment and alignment
iii.After 1 week of standard vehicle use, re-torque nuts.
f.DO NOT stack blocks/spacers. It adds undue variables, and reduces the likelihood of the joint being a true friction-type joint.
g.DO NOT stack frames. What appears to be a simple solution, means significantly longer bolts, poor transfer of bolt tension, and a plethora of other problems.
h.Attempt to keep your body lift as small as possible.
Now, body lifts have their applications – I even know of at least one instance where they were used by Ford on production vehicles, however they are something that should definitely be treated with respect. Failure to do so can result in serious consequences, potentially up to the death of yourself, your family and other road users. This basic guide here is not a be all and end all document either, but it assists in preventing the most common type of failures I can foresee.
Ok guru's, have I missed anything?
This way if in the future threads come up regarding them (body lifts) we have a simple direction to answer most questions.
Why would you want to do a body lift?
The answer to this is pretty obvious, you want the body to sit higher, be it so that it is for looks, or you want more clearance for larger tyres etc.
What are the implications of performing a body lift?
1. Higher Centre of Gravity – that is pretty obvious, but needs to be taken into consideration when considering what tasks your vehicle is performing and how it is driven.
2. Moving controls/wiring etc. that are mounted, or get access through both the body and the chassis frame rails. (Transmission shifters, the main wiring loom etc.)
3. The most serious (as it has serious safety implications) is the fact that now the body, and all that it attaches too will now not be sitting in their standard locations, and you have the 2 largest, heaviest and critical systems of a truck (the body and the frame) separated. More on this further down. This has significant impact under acceleration/braking, loading and more importantly… crashing.
4. You need to make sure that it does not effect anything that is packaged around the body/chassis. i.e. engine clearance etc. On most Ford Trucks this is not a significant problem.
Now, it is almost always advisable to perform a lift using the suspension and its mounting hardware and/or axles (if applicable) and I strongly encourage anyone to research doing that before contemplating a body lift (assistance on this can be gained in this forum).
Now, despite all this you would still like a body lift.
How should I go about undertaking it?
Bear in mind a Body lift has much greater impact than the apparent "ease" of performing such an operation suggests, and it is not something to be undertaken lightly, because it's cool or anything else. If in doubt ASK!
Critical components and things to watch out for –
1.Bolts.
a.Use nothing less than grade 8 bolts, this is a non-negotiable item. You are substantially increasing the load in the body attachment bolts.
b.Use external drive bolts, preferably with a flange on the head
c.Use a coarse pitch thread. (either UNC, or course thread metric)
d.Use the largest diameter bolts possible. The aim of doing a "good" body lift is to maintain the body attachment bolts in pure tension as they are standard, the reality of it will be you will induce SOME bending, as such you want the greatest diameter possible to deal with that.
(see simple diagram for difference between tension on the left and bending on the right)
To illustrate the importance of this, get some wire, try pulling it apart to break it.
Now try bending it. Is it easier to bend, than it is to pull it apart?
Now, get a large diameter bolt. Try bending it. Is it easier to bend than the wire?
e.Select the right length bolts that go right through the body attachment points on both the body and the chassis (i.e. DO NOT tap a thread into two ends of a spacer, and clamp it from both sides). Allow at least 6 threads between the last screw thread and the first engaged nut thread, and ensure at least 2 threads between the tapered thread section and the last engaged nut thread. See diagram below.
f.The bolt needs to be corrosion resistant. Magni 560 or 565 coating is preferred.
2.Nuts/washers
a.Use a flanged hex nut.
b.Use washers on both the bolt head and the nut side. This is to provide clearance for the bolt head fillet and to provide greater stress equalisation and transfer through the spacer.
c.Use a spring washer on the nut side, between the flat washer, and the nut..
d.Ensure, like the bolt, that the nuts/washers are corrosion resistant (again, Magni 560/565).
e.Ensure it is also Grade 8!
3.Body spacing hardware
a.PAD AREA! To prevent the bolt being in significant bending, ensure that the spacer you are using is as large as it can feasibly be in all directions. This is absolutely critical.
b.Ensure that it is flat, and sits flush with both the body and the chassis.
c.Ensure that the hole clearance diameter in the spacer is no greater than 1mm (~1/32") in diameter than the bolt size to distribute stress throughout the spacer (and bolt) in the best manner possible.
d.Ensure they aren't a generic item (don't use hockey pucks or anything similar… please!).
e.The material needs to be as stiff as possible, don't use rubber, wood, aluminium or anything similar. Make sure it is at a minimum out of mild steel, exotic steels/materials that you can get your hands on are only a bonus!
f.They need to be solid. Not RHS, not I-beams, SOLID machined steel! This ensures the best transfer of bolt tension.
4.Fitment, engineering practices, and other worthwhile info.
a.Ensure the areas, and all hardware are wiped clean of any dirt/grease/oil etc, and are free of any surface imperfections (bubbled paint, rust etc.) before commencing.
b.Use loctite threadlocker or similar on the thread of the bolt..
c.Torque. Given the application, its not appropriate to TTY (Torque to Yield), as if you get airborne, or experience significant force attempting to separate the chassis/body, your bolts will fail. Torque to ~75% of yield torque.
d.Tighten from the nut side only.
e. Take time during and after fitment to check for things such as:
i.Cross-threading, was it excessively hard to torque from the start?
ii.Correct fitment and alignment
iii.After 1 week of standard vehicle use, re-torque nuts.
f.DO NOT stack blocks/spacers. It adds undue variables, and reduces the likelihood of the joint being a true friction-type joint.
g.DO NOT stack frames. What appears to be a simple solution, means significantly longer bolts, poor transfer of bolt tension, and a plethora of other problems.
h.Attempt to keep your body lift as small as possible.
Now, body lifts have their applications – I even know of at least one instance where they were used by Ford on production vehicles, however they are something that should definitely be treated with respect. Failure to do so can result in serious consequences, potentially up to the death of yourself, your family and other road users. This basic guide here is not a be all and end all document either, but it assists in preventing the most common type of failures I can foresee.
Ok guru's, have I missed anything?
Last edited by BigF350; 03-26-2008 at 01:26 AM.
#2
03-25-2008, 11:32 PM
Post Fiend
Awesome write up Fred. Two questions for you
1) Can you explain why you want 6 threads between the nut and the smooth part of the bolt?
2) Whats the reason for tightening only from the nut side?
Also to add - An example of a legitimate reason for adding body lift is adding clearance for a large engine swap (usually a diesel of some sort that wouldn't normally fit).
oh and I tried to rep you but I have to spread it around
#3
03-25-2008, 11:52 PM
Originally Posted by captain p4
Awesome write up Fred. Two questions for you
1) Can you explain why you want 6 threads between the nut and the smooth part of the bolt?
1) Can you explain why you want 6 threads between the nut and the smooth part of the bolt?
Where will it stretch?
Where its the smallest diameter... i.e. not at the shank, but at the threaded area.
What this means if you don't leave at least 6 threads is that they stretch the threads in contact with the threads in the nut. Meaning they excessively load the top threads (and strip them) and don't load the bottom threads (but they do eventually when the top threads get stripped!)
2) Whats the reason for tightening only from the nut side?
When you tighten from the bolt head, and the nut, you are spinning the bolt inside ..... (in this case the body spacer) meaning that depending upon tolerances there will be more friction, and its potentially inconsistent too.
(to get accurate torque you want minimal friction, as it is hugely variable)
Also to add - An example of a legitimate reason for adding body lift is adding clearance for a large engine swap (usually a diesel of some sort that wouldn't normally fit).
Actually the instance that I am aware of Ford doing it in a production model is to do the above (fit a larger engine in)
#5
03-26-2008, 12:00 AM
Post Fiend
#6
03-26-2008, 12:00 AM
#7
03-26-2008, 06:41 AM
just another Rockwell looser
Join Date: Feb 2003
Location: Cocoa, FL
Posts: 4,042
Likes: 0
Received 0 Likes
on
0 Posts
id hate to pay for all of those big grade 10 bolts......that cant be cheap, might as well go suspension lift 
so, you cant use the blocks that come in kits? they are pretty hard, but still light....
other comments:
-if you have a manual trans you will most likely have to "extend" your shifter or get a new one, in some cases, same with the tcase shifter.
-one thing good about them, it makes it much easier to clean in hard to reach spots like on top of the gas tank.
-creates ugly gaps between body and frame.
-bumper relocation makes it hella weaker.
-have to relocate fan shroud down to stay with engine, becomes less effective
-im not aware of any kit coming with grade 10 or "machined blocks" so cost is no longer a advantage.
-easy to install, good time to replace all body mounts with some polyurethane ones
Trending Topics
#9
03-26-2008, 10:55 AM
Post Fiend
Join Date: May 2004
Location: St George, SC I-95
Posts: 5,277
Likes: 0
Received 0 Likes
on
0 Posts
#10
03-26-2008, 10:57 AM
just another Rockwell looser
Join Date: Feb 2003
Location: Cocoa, FL
Posts: 4,042
Likes: 0
Received 0 Likes
on
0 Posts
#11
03-26-2008, 11:00 AM
Post Fiend
Join Date: May 2004
Location: St George, SC I-95
Posts: 5,277
Likes: 0
Received 0 Likes
on
0 Posts
#12
03-26-2008, 11:02 AM
Post Fiend

#14
03-26-2008, 11:03 AM
Post Fiend
Join Date: May 2004
Location: St George, SC I-95
Posts: 5,277
Likes: 0
Received 0 Likes
on
0 Posts
