help
#1
 03-06-2008, 10:30 AM


Join Date: Mar 2008
Location: Crowborough East Sussex u
Posts: 185
Likes: 0
Received 0 Likes
on
0 Posts
#2
03-06-2008, 11:00 AM
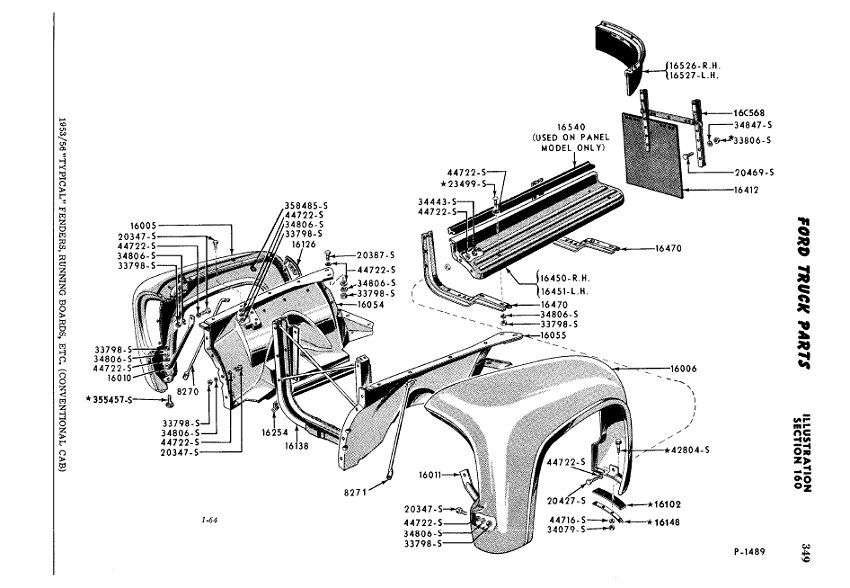
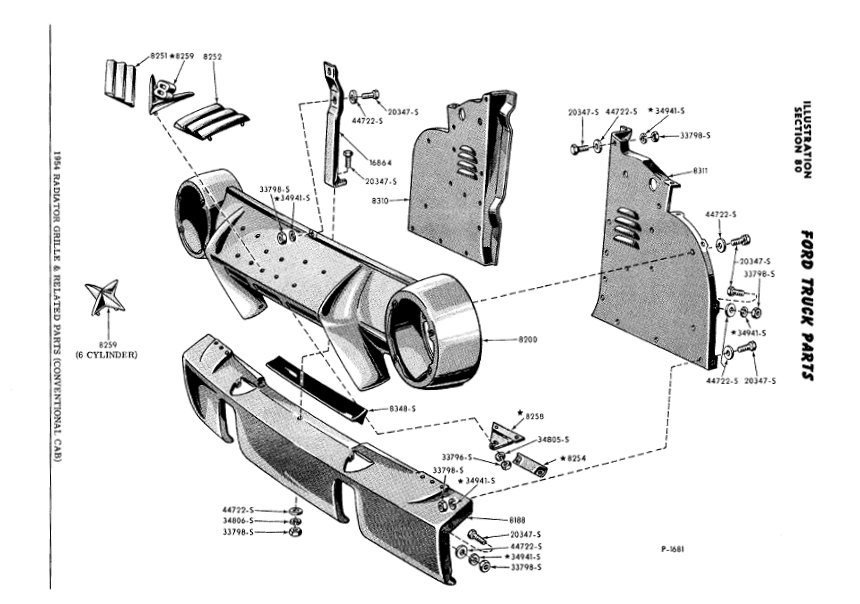
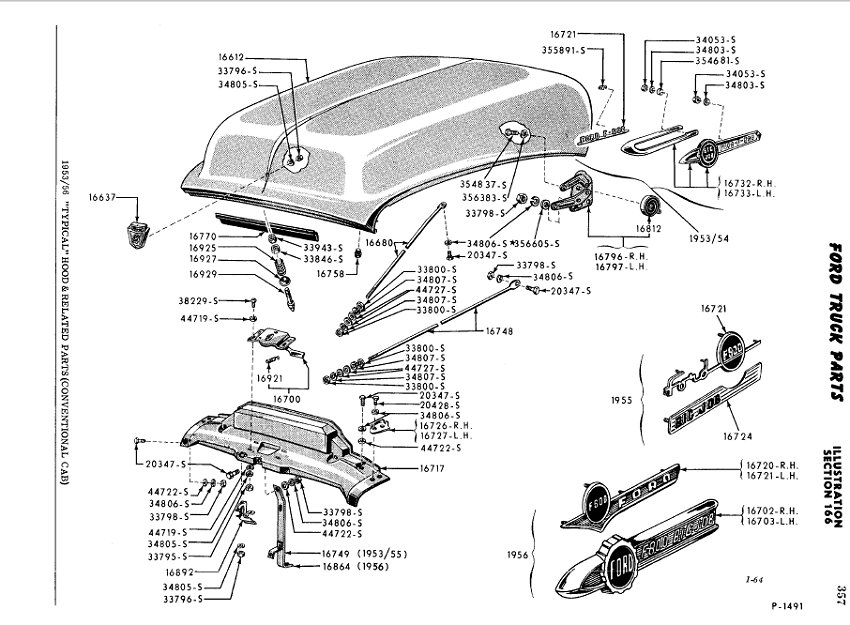
I have experience with the '48-52 models. With them I would start by installing the radiator support, inner fender panels to the cab and radiator support, grill to the radiator support and inner fender panels, fenders, upper and lower grill filler panels. The newer models might go together slightly different, I am sure some one with one of those models will be on shortly.
Here are the diagrams for the front sheet metal for your truck:
Hope this helps.
Here are the diagrams for the front sheet metal for your truck:
Hope this helps.
#4
03-06-2008, 11:10 AM

Hi 54. Welcome to FTE! 
I don't know what the "official" method is, but I have had the front sheet metal on and off my truck numerous times and I can tell you how I do it. The sheet metal on your 54 will be identical to my 56.
First, use masking tape on the edges of the pieces that can scratch each other as you do this assembly. Apply it to the cab cowl across top where the hood will sit and the rear edge of the hood, the outer edges of the hood, where they meet the fender seam, the same ridge on each outer fender, the ends of the gravel pan, and on the rear edges of the front outer fenders where they will lay against the cab.
You will need a buddy to help jockey the pieces into position and get nuts on the attach bolts.
As you install the pieces, put a few bolts in each seam and only snug them finger tight. Once everything looks good, you will go around and tighten all the bolts and add the ones you didn't install initially, but you need them just snugged so you can jockey stuff for best fit.
I position the radiator support (preferrably without the radiator in it) first. (You will find it handy to be able to work thru the radiator opening to get to the inside bolts for the inner fenders/air dam, etc.) Measure diagonally from the cowl corners to ensure the radiator support is centered. Snug the lower attach bolts.
Install the air dams (left and right). Install the inner fenders. Install the outer fenders. Install the upper radiator support that goes between the front fenders across the top of the radiator. Install the struts from firewall to fender corners. Install the hood. That all sounds easy as I write it, but this will take some time to do carefully.
Now the "fun" part: start by adjusting the hood at the hinge bolts to get a good gap at the cab cowl. Adjust the rear of the outer fenders to get a nice gap between the fender rear and the hood. Adjust the fender/cab struts to bring in the gaps at the front of the hood and fender seams and to get the front line across the fender and hood front looking good. This is basically just pushing/pulling the two front corners of the assembly to align everything. You'll be opening/closing the hood a lot here. Once you like how the hood/fenders look, install the gravel pan. Last, install the grill.
It may take awhile to jockey everything around to get it all looking nice, but when you like it, install the rest of the bolts, remove the masking tape (carefully) and tighten all the bolts.
You should figure on a full day of playing around to get it all nice, but it is very rewarding work.
BTW, I found out that drilling (2) 1/8" dia holes thru each mating seam allows me to use clecoes to index all of the sheet metal stuff so that it comes back exactly to the best fit position the next time I reinstall everything. I also did that with the doors so they reinstall to exactly where they gap the best. You may want to drill these holes as a last step once you have everything perfect just so if/when you have to take it apart againg, you won't spend very much time repeating the positioning that took so much work here.
Good luck. Have fun.
P.S.: If you haven't seen clecoes, here's a picture. You can get them thru Eastwood. https://www.ford-trucks.com/user_gal...124609&width=2

Thread
Thread Starter
Forum
Replies
Last Post
kb1jid
Pre-Power Stroke Diesel (7.3L IDI & 6.9L)
16
03-17-2012 09:10 AM
Scoarch
Big Block V8 - 385 Series (6.1/370, 7.0/429, 7.5/460)
9
08-18-2004 03:41 PM