Rear bumper/metalworking question
#1
 01-15-2008, 10:28 AM

Join Date: Sep 2007
Location: Indiana
Posts: 1,595
Likes: 0
Received 0 Likes
on
0 Posts
Rear bumper/metalworking question
Hi all,
As all my whining has shown, I need a ribbed rear bumper for my '51. I have managed to find an extra front bumper, has some extra holes etc, drilled in it. It's curved for the front, and the stock rear is straight, except for the ends.
Now, I'm thinking that I might be able to straighten the front one. I won't be able to get it hot enough, I don't think, to straighten it as one piece, like I thought at first. However, I think if I can pie-slice the top and bottom flat metal, then straighten it, then weld/fill the slices, I can possibly get it close enough for paint, as mine's going to be painted anyway.
What do you'all think??
R
#2
01-15-2008, 02:03 PM
If it's a C shaped channel cross section You can stretch it straight, don't even need (or want) heat.
You'll need a heavy anvil of some sort, an actual blacksmith's anvil, a short section of heavy I beam, a heavy steel slug ~ 12x12 x 2" or so as a dolly surface, a hand maul (a heavy small sledge hammer with a V or wedge shaped back of the head).
You want the surface of your dolly and the head of the hammer to be ground clean and sanded smooth just like any body tool. Rig the dolly surface parallel to the ground and at or slightly below elbow height (height is very critical for control) on a very solid surface, a section of log about 12-16" in diameter cut to the right height and straight across so it stands up. You do not want any flex or bouncing while hammering on the dolly. You'll also need a helper with a lot of patience or rig supports so you can move the flange of the bumper across the dolly surface from end to end without falling over. You will be doing this a number of times so take the time to rig it solid.
To do the actual stretching you will be doing a series of overlapping hammer strikes along the inside edge of the flange. Don't hammer too hard! you should barely see a mark. Work from one end to the other trying to make the same strength strikes each time. When you get to the other end, turn the bumper over and do a row down the other flange. You can check your progress each time by rigging a straight edge or string from one end to the other and checking the depth of the curve with a ruler.
Have patience! The best results come from many repetitions of hammering the flange with uniform light blows than from trying to beat it senseless. As it straightens watch for uneven straightening or twisting, work any area that is not moving as quickly by running a couple extra rounds of hammering over those areas. Keep it under control work the uneven areas as you notice them! It will likely take several hours and as many as 50 rounds of hammering end to end, but there should be little to no evidence it wasn't straight to begin with.
#3
01-15-2008, 02:30 PM
Posting Guru
Join Date: Feb 2002
Location: Michigan
Posts: 1,392
Likes: 0
Received 0 Likes
on
0 Posts
#5
01-15-2008, 03:12 PM
Join Date: Sep 2007
Location: Indiana
Posts: 1,595
Likes: 0
Received 0 Likes
on
0 Posts
Originally Posted by AXracer
If it's a C shaped channel cross section You can stretch it straight, don't even need (or want) heat.

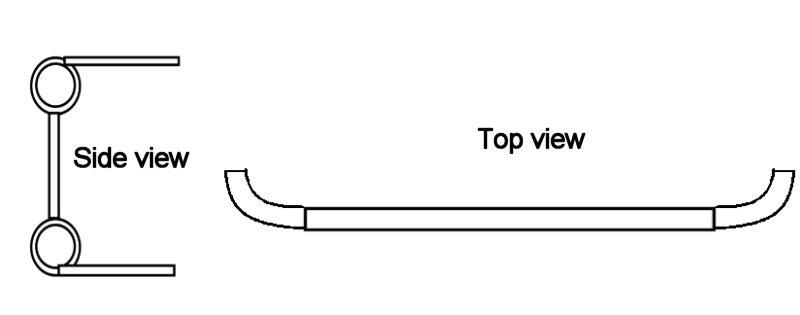
Needs to look like this:

If it was C-Channel, I wouldn't have any trouble. But, with the ribs it's a whole different ballgame.
Now, back to the original question....

R
Last edited by rcav8or; 01-15-2008 at 03:15 PM.
#6
01-15-2008, 03:15 PM
Fleet Owner
I have to straighten a gentle bend on mine, and I would not even try it myself. I'm going to take it to an outfit with a BIG press.
Compared to the repro '48-50 (non-ribbed) bumper I bought, the stock ribbed bumper is massive. It weighs easily double the repro and is near 1/8"-thick. The ribs make it very strong, particularly in terms of straightening the stock curve out of it. I think you would be better off waiting for a stock rear to show up, or using an aftermarket step bumper.
Edit: Roger, what about taking some channel and welding two 1/2-pipes to make the ridges?
Last edited by ALBUQ F-1; 01-15-2008 at 03:20 PM.
#7
01-15-2008, 03:22 PM
Join Date: Sep 2007
Location: Indiana
Posts: 1,595
Likes: 0
Received 0 Likes
on
0 Posts
I'm tired of waiting for a stock one to show up. It may show up the day I'm finished with this one, or it may NEVER show up. I'm only going to be painting this one, so I'm not too concerned with perfect looks, I just won't even think about having a repop without ribs on it.
Sure, the bumper is stout, but I've done a lot more to a lot thicker. By comparison, this is simple, easy work compared to some of the rusted out hunks a lot of guys have brought back to life. A rear bumper is one of the few things I still need and since I have the front spare, that's far from nice, I feel it would work. I'm-a gonna do it, I'm-a just hoping someone had maybe a little easier way to do it. I have a 20 ton press, but I really don't want to machine the dies, to use the press to do it. Heck, I've built helix staircases with a million cuts in oak, surely I can straighten a bumper with a million cuts, I would think....
EDIT for the EDIT: Thought about that, but it's not truly two 1/2 rounds, it has several flats, towards the middle, that are apparent when close-up. Only took me 10 pictures to show a buddy the flats. I want to preserve those.
R
Trending Topics
#8
01-15-2008, 03:54 PM
Fleet Owner
#9
01-15-2008, 03:57 PM
#10
01-15-2008, 04:15 PM
Join Date: Sep 2007
Location: Indiana
Posts: 1,595
Likes: 0
Received 0 Likes
on
0 Posts
Originally Posted by ALBUQ F-1
Mine doesn't have any flats??
Ax - if anything, I'd make what we call "junk dies" - along the lines of what Ross is talking about, a piece of channel, with two 1/2" pipes split lengthwise, filled, and welded on, just to help keep the profile. I'm not concerned too much with "kinks" as long as they aren't too big. And that would be a factor of how many cuts/how close together. Again, we're talking paint-grade, non-restoration. ANYthing would be better than the angle iron that's on it now!
As Joel pointed out, with a blacksmith forge, it would be easy, but I don't have one, and the one smithy I knew, has evidently moved, and I can't find him. He does nice work, but not if you can't locate him.
R
#11
01-15-2008, 04:29 PM
#12
01-15-2008, 04:31 PM
I still think you are fighting a losing battle. I've shaped a lot of metal, I don't see what a blacksmith or his forge would give you. A close fitting male and female die in a large press or roller dies in a rolling machine would have the best chance of sucess, but it would need to have a slight concave to compensate for the springback. If you want it to be pefectly straight like the one in your picture good luck, IMHO it ain't gonna happen.
#13
01-15-2008, 10:47 PM
Join Date: Sep 2007
Location: Indiana
Posts: 1,595
Likes: 0
Received 0 Likes
on
0 Posts
I'm not asking for perfectly straight - just reasonably so.
Got to thinking - the biggest thing holding it back, is the depth of the flanges, perhaps cut them off, so I'm just dealing with the "face", then weld the flanges back on...new stock, probably...
I've shaped a lot of metal, myself, for a lot of years, thick and thin, hammers, mills and lathes. 200 ton presses, etc, etc. There's not much that can't be done, given time and effort. And a GOOD blacksmith could massage the bumper straight, believe me! My friend has done some amazing things, that I never would have thought possible. Needhelp49 suggested it too, and he has (had) his own forge.
Maybe I'll attempt it, just because it can't be done - can't be any worse than a frame swap, and not NEAR the size project...
Thanks all, for your inputs.
R
#14
01-16-2008, 06:59 AM
Cutting off the flanges and replacing them would make it a more feasable project and you would have straight metal as a reference. I might use a slightly heavier stock for the new flanges. The problem is that you need to stretch the flanges while shrinking the centers of the "tubes" to keep them from collapsing or kinking.
#15
01-16-2008, 08:22 AM

Roger,
Have you thought about building a bumper? From what it sounds like you are going to have to go through a lot of work to make the front bumper work for the back and it's not going to look perfect. I would just build a replica from scratch, or at least one that looks close to original.
All you have to do is buy a couple of pieces of black pipe close to the same diameter as the ridges in the original bumper, either bend the ends or buy pre-bent elbows and some flat stock.
You could build a really heavy duty bumper that could be used for a trailer hitch and give added protection for the rear of your truck. I build the rear bumper for my F-2 and it has saved my truck at least once. You should have seen the other truck.