Window Motor Tech
#1
 10-11-2007, 08:58 AM

Join Date: May 2005
Location: KCMO
Posts: 275
Likes: 0
Received 0 Likes
on
0 Posts
Window Motor Tech
I didn't find any pics on the many many window issue threads, so here is a short tech thread that should be turned into a tech artical and saved.
1989 F150
WIndow motor spins to all get out, but no window motion - OR - no motor sound.
-Remove door panel
One screw in door handle pocket, one screw under wing window.
About 12 panel push pins on the back side...lucky the door panel is made of plastic and not cardboard - so work around the edges and pull.
Once loose, hold door handle out (the handle that opens the door), push up on panel up over door lock (easier with door locked accualy, but don't forget).
Reach around grab door handle from inside, twist pull panel off.
Remove 3 screws on back of switch assembly, pull. Put panel in safe place.
-Rip plastic moisture barrier off...just toss it all, cause it will **** you off.
-If your motor made NO SOUND, Unplug motor and use a test light on the connector and see that it is indeed lighting up....the hot lead swaps terminals as you accuate switch up or down. If you have no light. Stop here and diagnose fuse or wireing harness....good luck
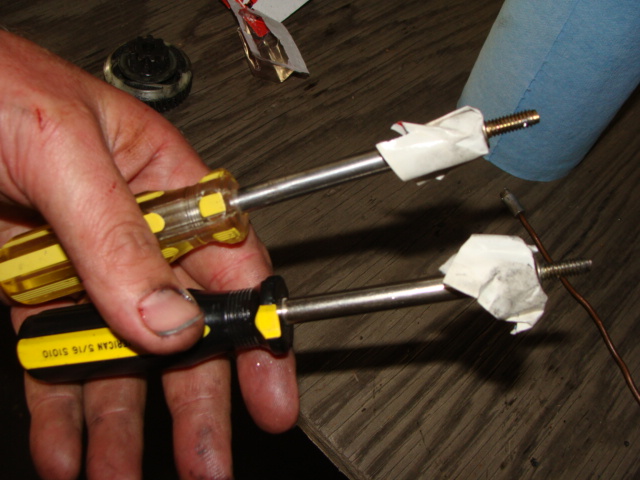
You will find some aluminum RIVETS, the window motor is toward the hing from there, just behind a squarish hole closest to the front of the door. There is 3 bolts, gold in color, only one is visible, the other two are obscured by the door metal. If you look inside you can see the upper most bolt, and you will notice a DIMPLE just outside that point in the door metal. use the appropriate sized drill bit for your 5/16" socket and drill that dimple and the lower dimple you will find below.

-Remove the three bolts, the visible one is accualy the hardes to remove, so do it first - unless you decide to drill it as well, like in my pic.
There is two way to remove the motor from the bottom of the door now.
1) Let the motor fall into the door, reach through squarish hole and follow the wire that you didn't unhook and pull it up through the squarish hole.
2) with motor unhooked, reach from the rear of door and pull out the long way.
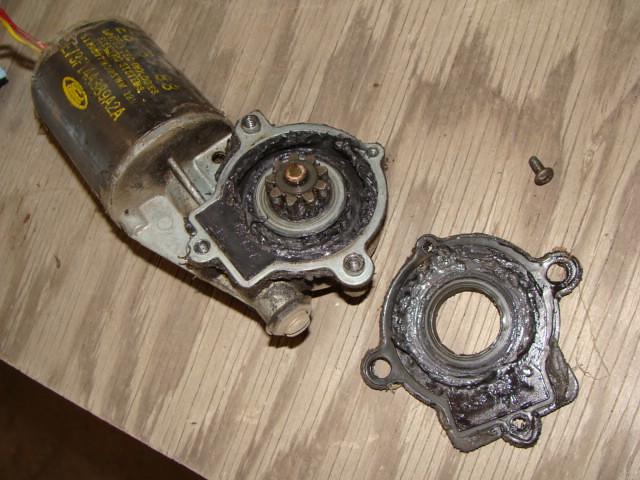
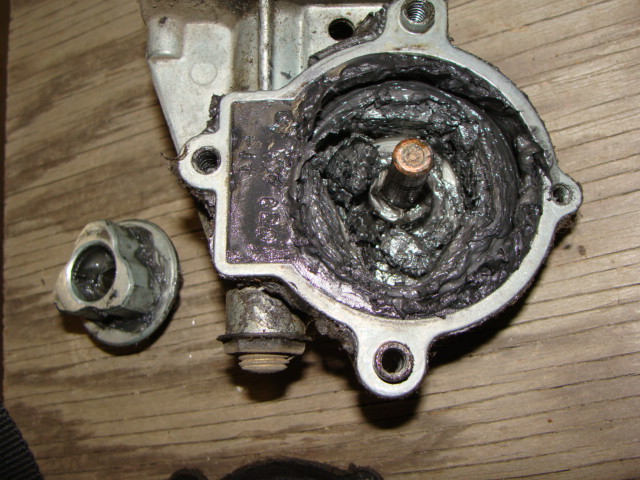
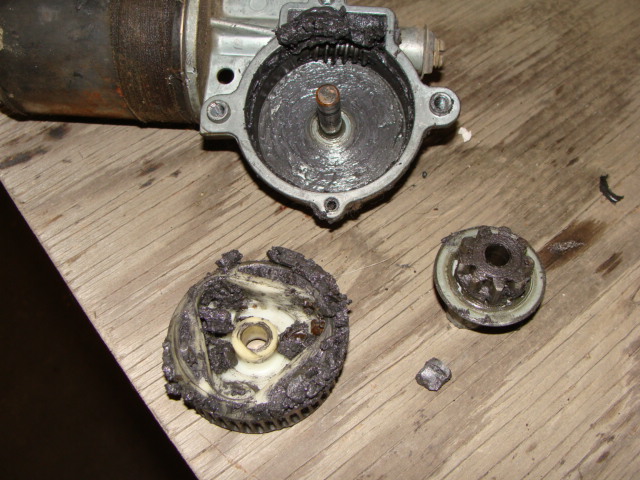
-Put on bench and remove 1 small screw, pull cover off.....wow, messy.
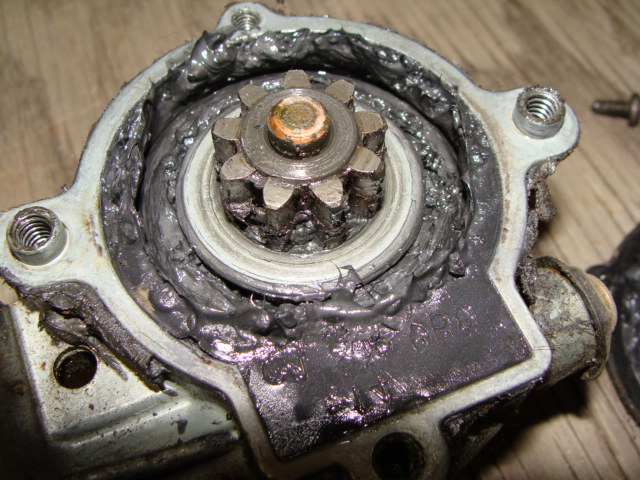
Pull gears out, clean well, replace with new gear and grease.


Be sure to USE THE GREASE PROVIDED or silcone grease. Please do not use petroleum based grease....it will just break the plastic and rubber gear down in a chemical fashion and lead to failure again.
Note the $17 gear kit is COMPLETE with drive gear, bumpers, and cast metal drive gear. I noticed on my other window install the bumpers had failed and the driven gear was still in good shape....and handy guy could make something work for free.
-Adjust, I added the extra step of wiggling the gear in it bore and you can see the worm gear might have some play....on the top of the motor unit you will see a gold cap screw and cinch nut. I adjusted this to the point there was ever so slight any endplay...this will keep the motor bushes in good shape and prevent any slop in the gear drive.
-Reinstall, put a peice of tape in the end of your socket to keep the bolts secure while you work them through the holes. If you haven't needed a magnet on a stick yet.....here is where you will need it. Install the two easy bolts LOOSELY!!! Reach inside and wiggle and hold the motor as you tighten the bolts. This will help engage the gears and mesh them as you tighten. Once close to tight, install the 3rd bolt and finish up.
- Hook harness back up to motor
- Test and install panel
SEARCH TERMS
window, gear, rivet, cardone, regulator, gear kit
1989 F150
WIndow motor spins to all get out, but no window motion - OR - no motor sound.
-Remove door panel
One screw in door handle pocket, one screw under wing window.
About 12 panel push pins on the back side...lucky the door panel is made of plastic and not cardboard - so work around the edges and pull.
Once loose, hold door handle out (the handle that opens the door), push up on panel up over door lock (easier with door locked accualy, but don't forget).
Reach around grab door handle from inside, twist pull panel off.
Remove 3 screws on back of switch assembly, pull. Put panel in safe place.
-Rip plastic moisture barrier off...just toss it all, cause it will **** you off.
-If your motor made NO SOUND, Unplug motor and use a test light on the connector and see that it is indeed lighting up....the hot lead swaps terminals as you accuate switch up or down. If you have no light. Stop here and diagnose fuse or wireing harness....good luck
You will find some aluminum RIVETS, the window motor is toward the hing from there, just behind a squarish hole closest to the front of the door. There is 3 bolts, gold in color, only one is visible, the other two are obscured by the door metal. If you look inside you can see the upper most bolt, and you will notice a DIMPLE just outside that point in the door metal. use the appropriate sized drill bit for your 5/16" socket and drill that dimple and the lower dimple you will find below.
-Remove the three bolts, the visible one is accualy the hardes to remove, so do it first - unless you decide to drill it as well, like in my pic.
There is two way to remove the motor from the bottom of the door now.
1) Let the motor fall into the door, reach through squarish hole and follow the wire that you didn't unhook and pull it up through the squarish hole.
2) with motor unhooked, reach from the rear of door and pull out the long way.
-Put on bench and remove 1 small screw, pull cover off.....wow, messy.
Pull gears out, clean well, replace with new gear and grease.
Be sure to USE THE GREASE PROVIDED or silcone grease. Please do not use petroleum based grease....it will just break the plastic and rubber gear down in a chemical fashion and lead to failure again.
Note the $17 gear kit is COMPLETE with drive gear, bumpers, and cast metal drive gear. I noticed on my other window install the bumpers had failed and the driven gear was still in good shape....and handy guy could make something work for free.
-Adjust, I added the extra step of wiggling the gear in it bore and you can see the worm gear might have some play....on the top of the motor unit you will see a gold cap screw and cinch nut. I adjusted this to the point there was ever so slight any endplay...this will keep the motor bushes in good shape and prevent any slop in the gear drive.
-Reinstall, put a peice of tape in the end of your socket to keep the bolts secure while you work them through the holes. If you haven't needed a magnet on a stick yet.....here is where you will need it
. Install the two easy bolts LOOSELY!!! Reach inside and wiggle and hold the motor as you tighten the bolts. This will help engage the gears and mesh them as you tighten. Once close to tight, install the 3rd bolt and finish up.- Hook harness back up to motor
- Test and install panel
SEARCH TERMS
window, gear, rivet, cardone, regulator, gear kit
Last edited by 1965F100; 10-11-2007 at 09:03 AM.
#2
10-11-2007, 09:23 AM
Post Fiend
#3
10-11-2007, 09:54 AM
Join Date: May 2005
Location: KCMO
Posts: 275
Likes: 0
Received 0 Likes
on
0 Posts
#4
10-11-2007, 01:05 PM

and handy guy could make something work for free.
#5
10-11-2007, 01:35 PM
Join Date: May 2005
Location: KCMO
Posts: 275
Likes: 0
Received 0 Likes
on
0 Posts
I am guessing they are there to absorbe any harsh movement of the window or motor as the 3 bumbers are softer than the plastic gear. It all makes sense for those to destroy themselves instead of blowing out the gear and possibly hurting the worm drive.
My passenger window motor looked like it was fished out of a lake and left to dry in my door panel. It was fvcked...even after I tried to resurect it, it remained dead.
My passenger window motor looked like it was fished out of a lake and left to dry in my door panel. It was fvcked...even after I tried to resurect it, it remained dead.
#6
02-23-2008, 02:59 PM

Thanks for the write-up. I ordered the plastic gear on eBay for $15 shipped and the window now works. 
The information here was vital, especially the pointer to drill out the dimples--I would have never thought of that. I couldn't find any silicon based grease so I used white lithium grease with teflon from a spray can. I hope this doesn't attach the plastic or I will repairing this window again.
The comment above about using three ball bearing became obvious when I opened the gear housing. My kit came with three hard plastic cylinders which filled the viod in the corners of the triangular gear "hole" and the part that fits into the window crank (sorry about my use of less than technical terms). I didn't think to measure the diameter of the cylinders before I reinstalled the motor.
I was going to buy the entire assemply, the motor and window raising apparatus. This how-to saved me lots of money and I have the pride in fixing the window myself with the fewest number of parts. Okay, I could have completed this repair without the $15 kit from eBay but this is pretty good so give me a frickin' break (with pinky raised to corner of mouth).
#7
02-25-2008, 08:28 AM
Join Date: May 2005
Location: KCMO
Posts: 275
Likes: 0
Received 0 Likes
on
0 Posts
Trending Topics
#8
02-25-2008, 03:09 PM
One day after completing my repair, the repaired motor is making a droning noise as the window is raised, maybe like something binding. Is the lithium grease from a rattle can not agreeing with the plastic gears or worm gear, could I have assembled something incorrectly?
I can deal with the noise, but would hate to be doing other damage that can be corrected.
I can deal with the noise, but would hate to be doing other damage that can be corrected.
#10
02-25-2008, 03:27 PM
Originally Posted by 1965F100
COULD BE IN A BIND, not bolted up straight..or your motor is just junk also.
Water intrusion is a problem here many cases.
Water intrusion is a problem here many cases.
If the motor is just junk, then it will run until it stops. Some people do preventitive maintenance, other JIT repairs (just in time), me, I going for RTF (run to failure).
Thanks for your help 1965F100
#13
08-20-2008, 12:59 PM

Senior User
Join Date: Oct 2005
Location: Idabel, OK
Posts: 434
Likes: 0
Received 0 Likes
on
0 Posts
I found this kit by Rodney Dickman a few years ago while looking for corvette headlight gears and bought it. I hate to admit, I still havent installed it.
I just assumed the Ford-Truck Forum guys were probably already on top of it.
Here's the link: Rodney Dickmans Automotive Accessories
I just assumed the Ford-Truck Forum guys were probably already on top of it.
Here's the link: Rodney Dickmans Automotive Accessories
#14
11-17-2010, 03:31 AM

#15
11-17-2010, 03:36 AM