Cool Tips and tricks
#271
 11-21-2012, 09:16 AM


#273
12-03-2012, 09:32 PM

#274
12-31-2012, 03:50 PM
Credits: (and all that legal stuff) this is a slight variation on a similar tool by Per (Metalman Sweden) and Bill Gibson, as shown on Metalmeet.
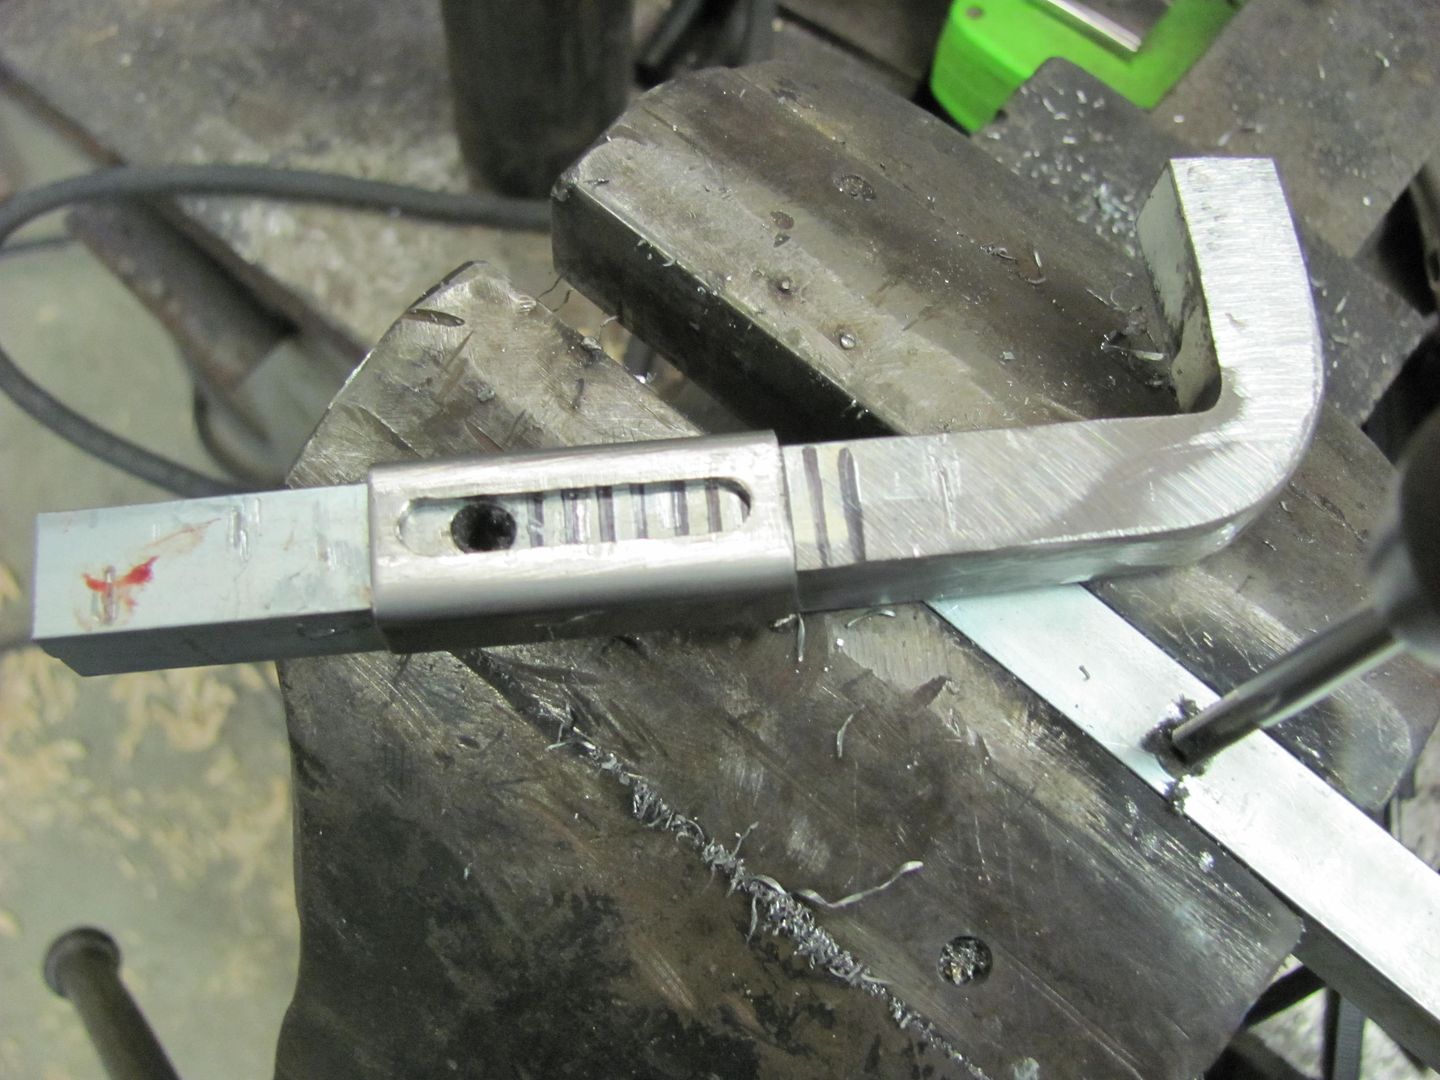
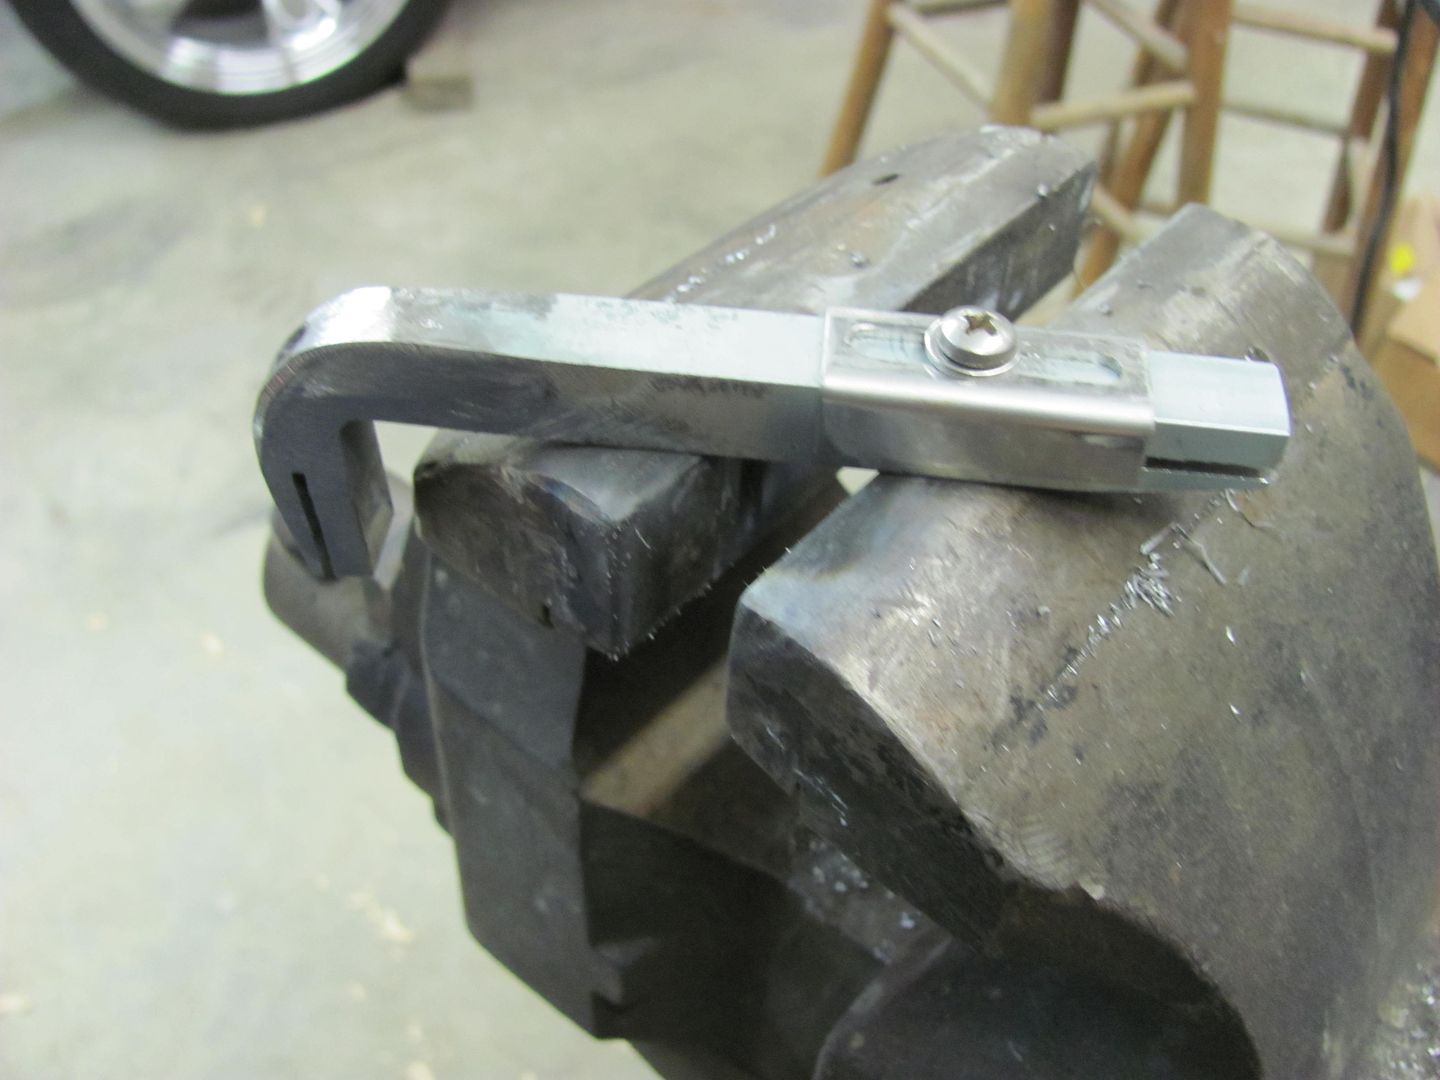
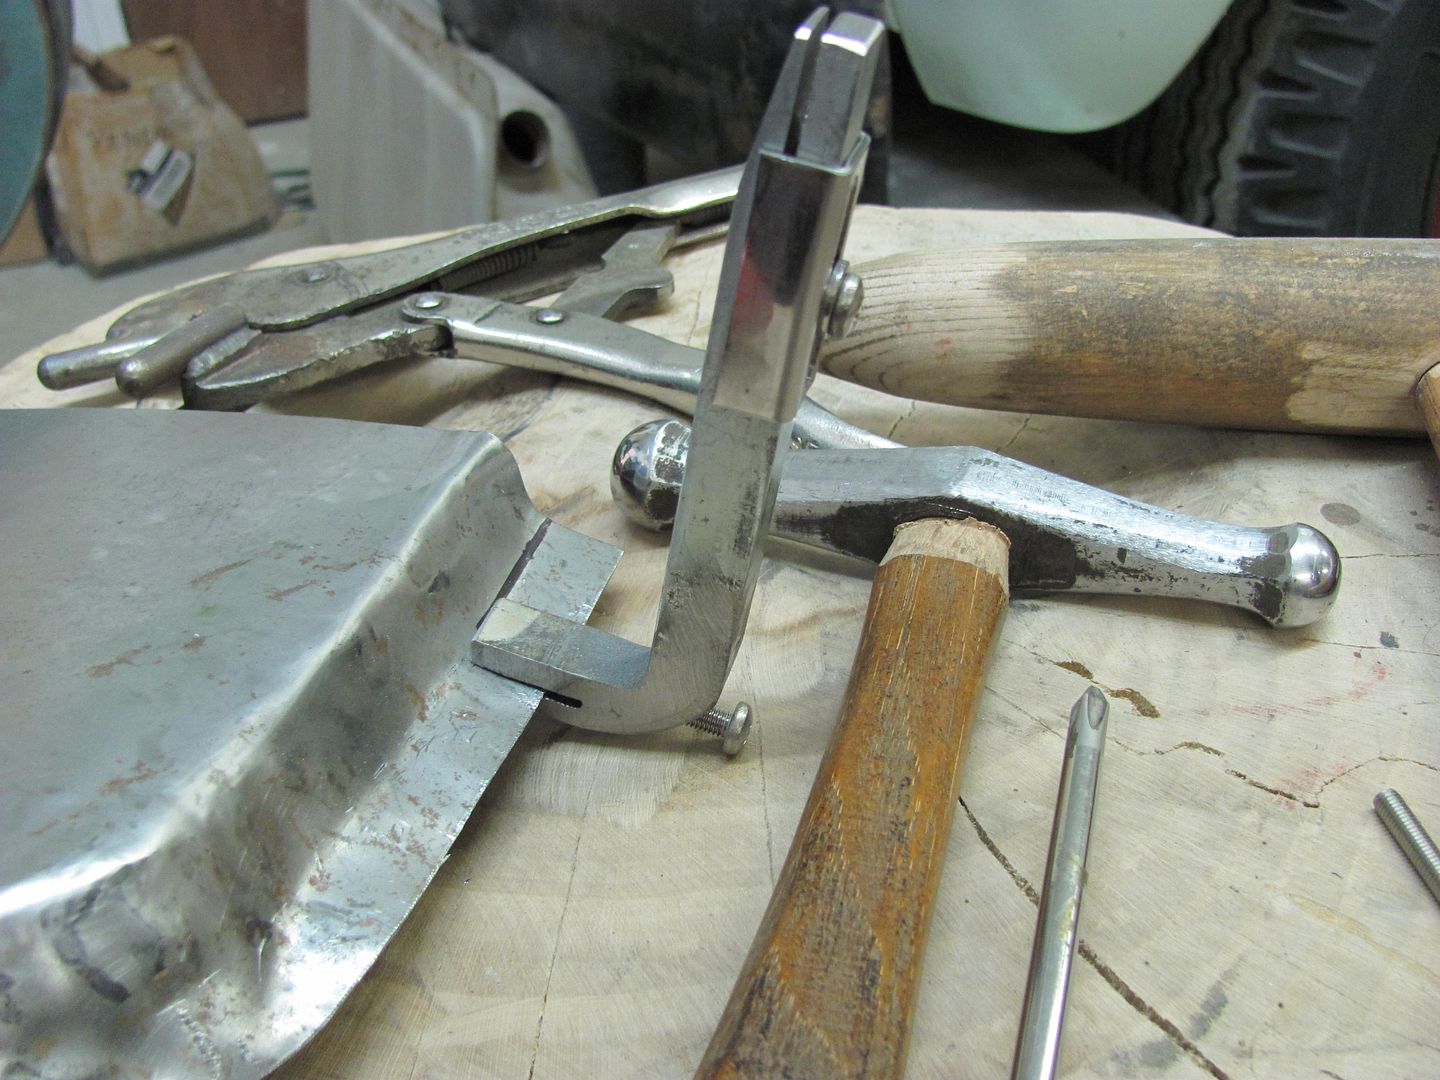
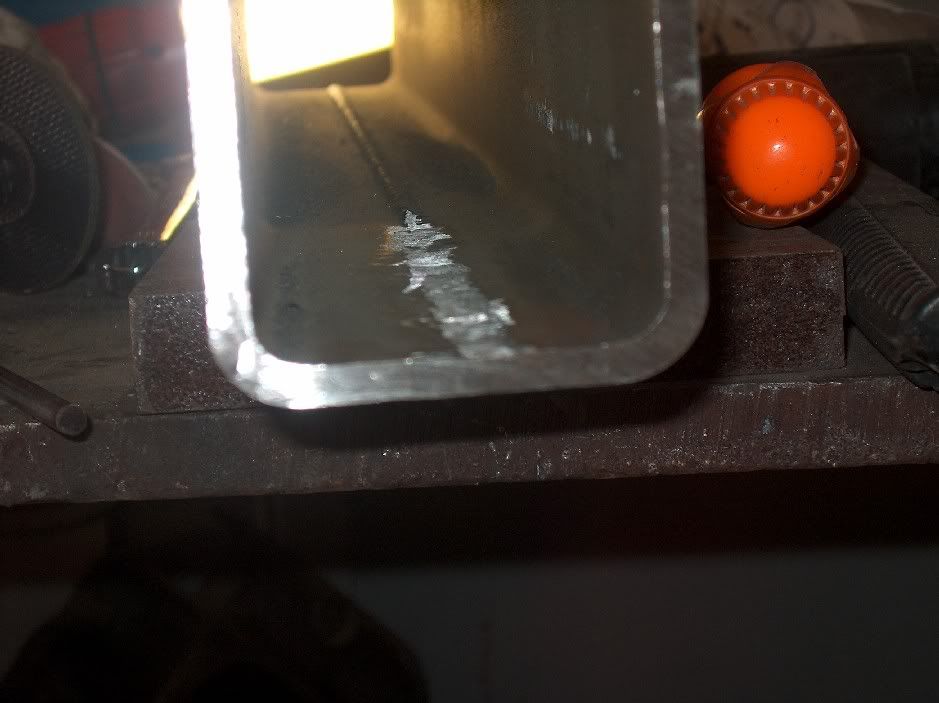
This is a tool for tipping flanges, as one would do on door skins or inner doors, offered as a low buck alternative for those who may only need a one-time/limited use of such a device. I started with 1/2" key stock, which came in a one foot length. The gave me enough material for two, if I ever get to finishing both.
The short leg was marked at about 1-1/2" in, clamped in the vise, heated with a rosebud torch and persuaded to a 90 degree angle with a hammer.
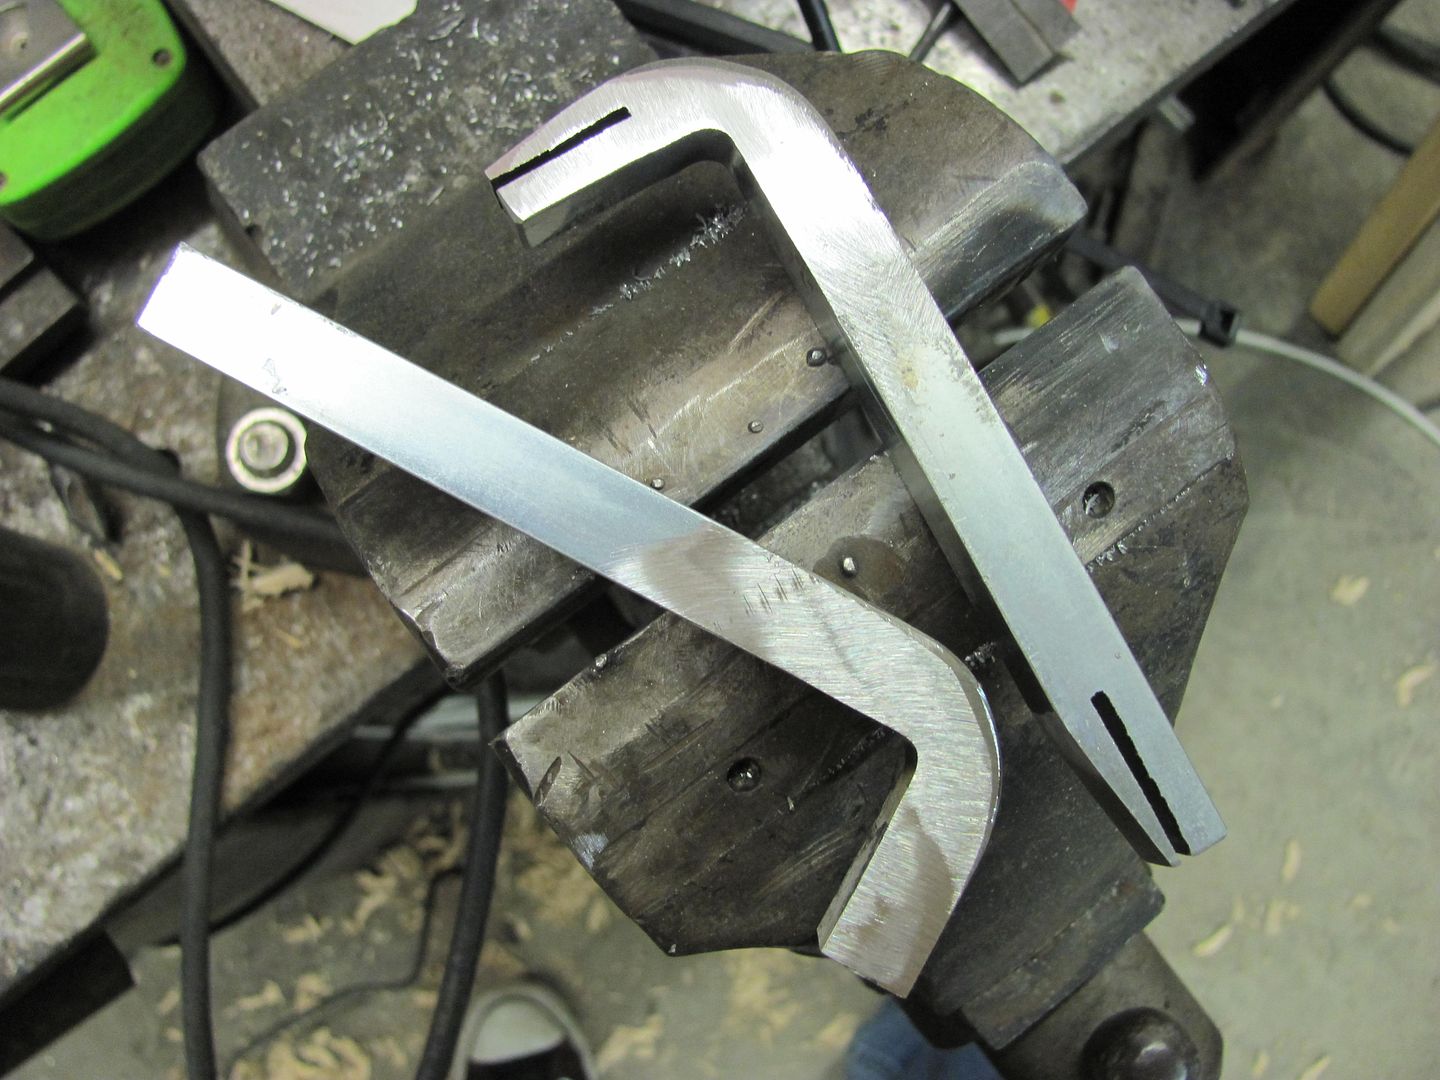
Used the bandsaw to cut some notches about an inch in. These should be about twice the thickness (or so) of the metal you plan on using, to allow some free play in using the device.
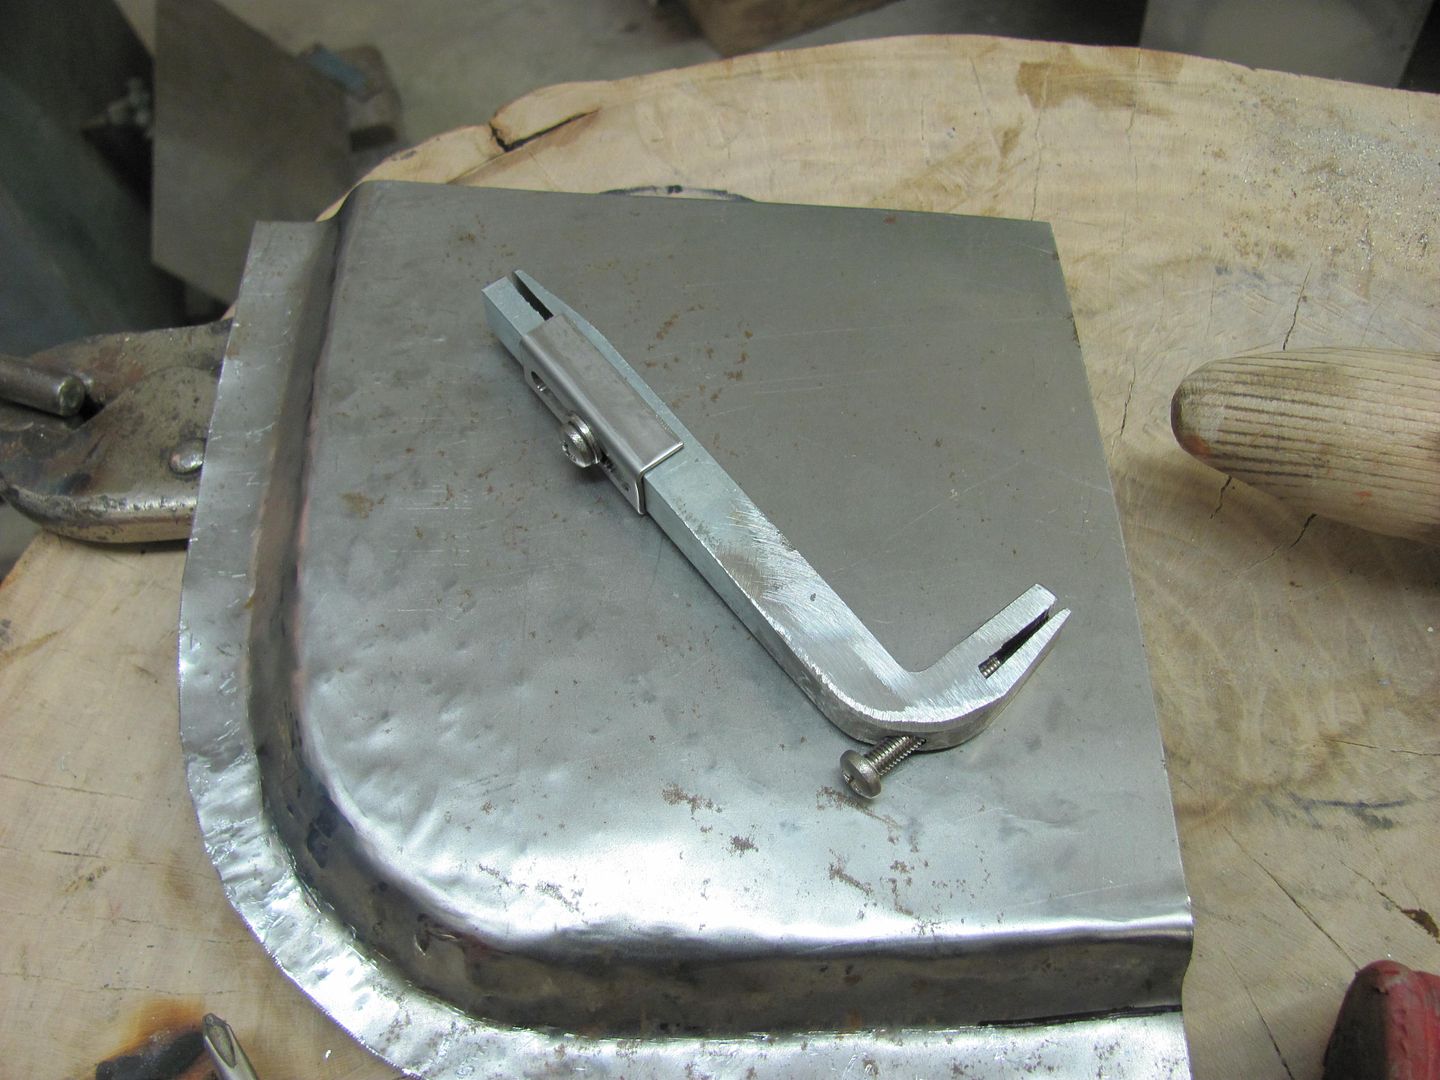
The short end had a #21 hole drilled through the slot and tapped for 10-32 screw to use as a "distance stop". The long end would use a tapped hole to secure a separate stop device.
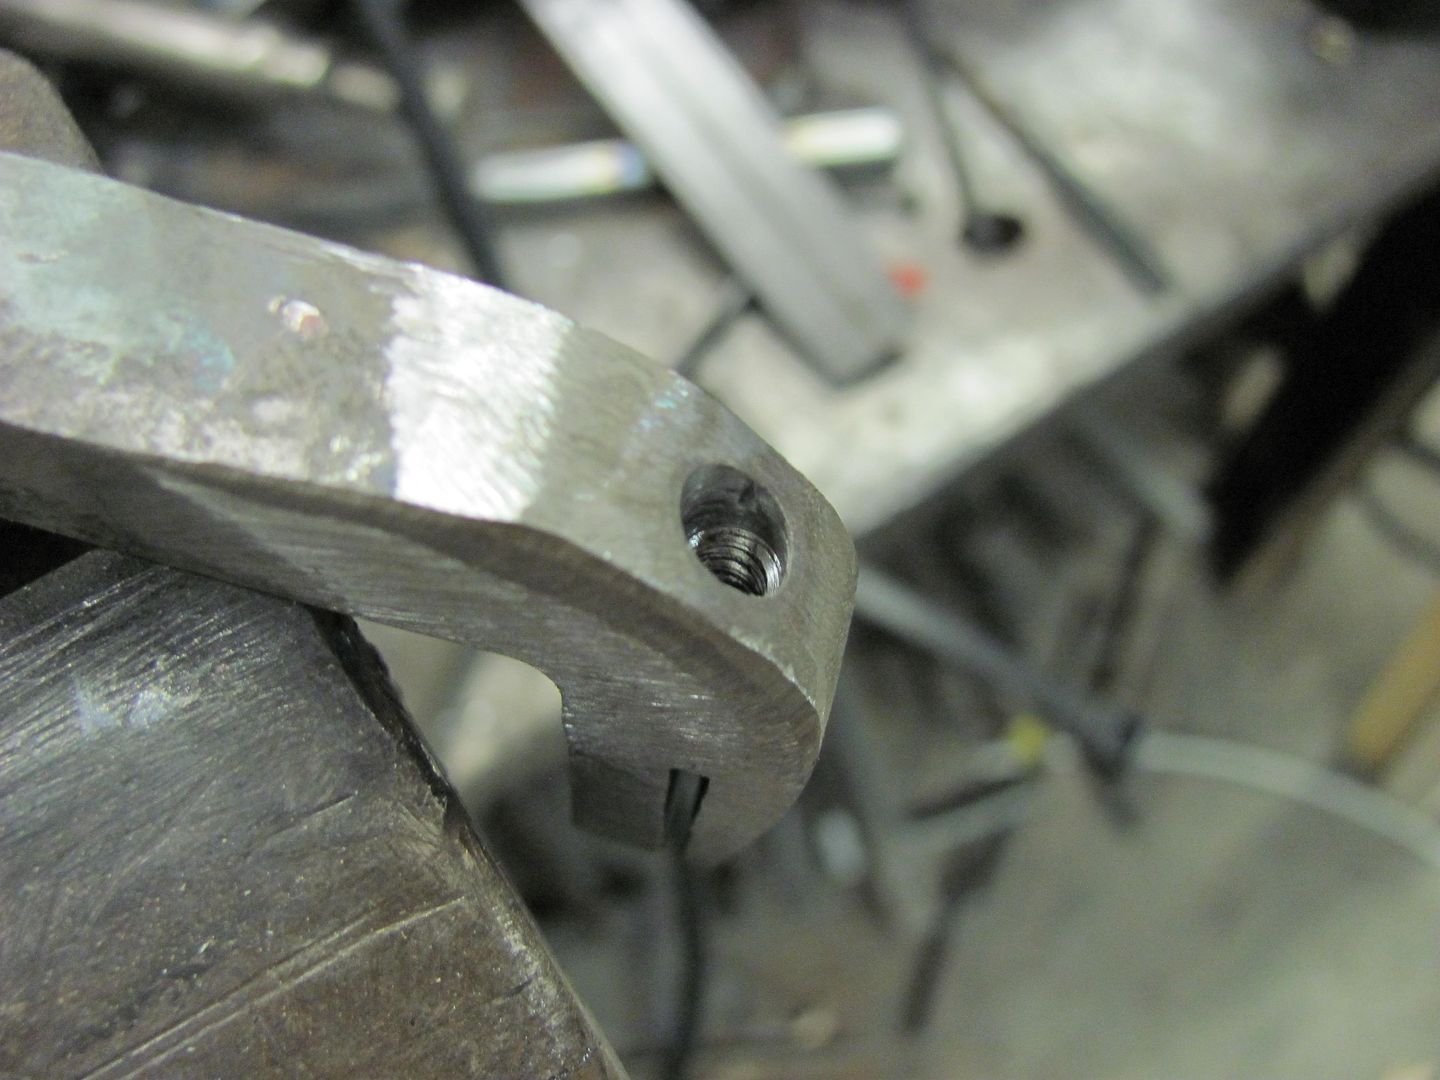
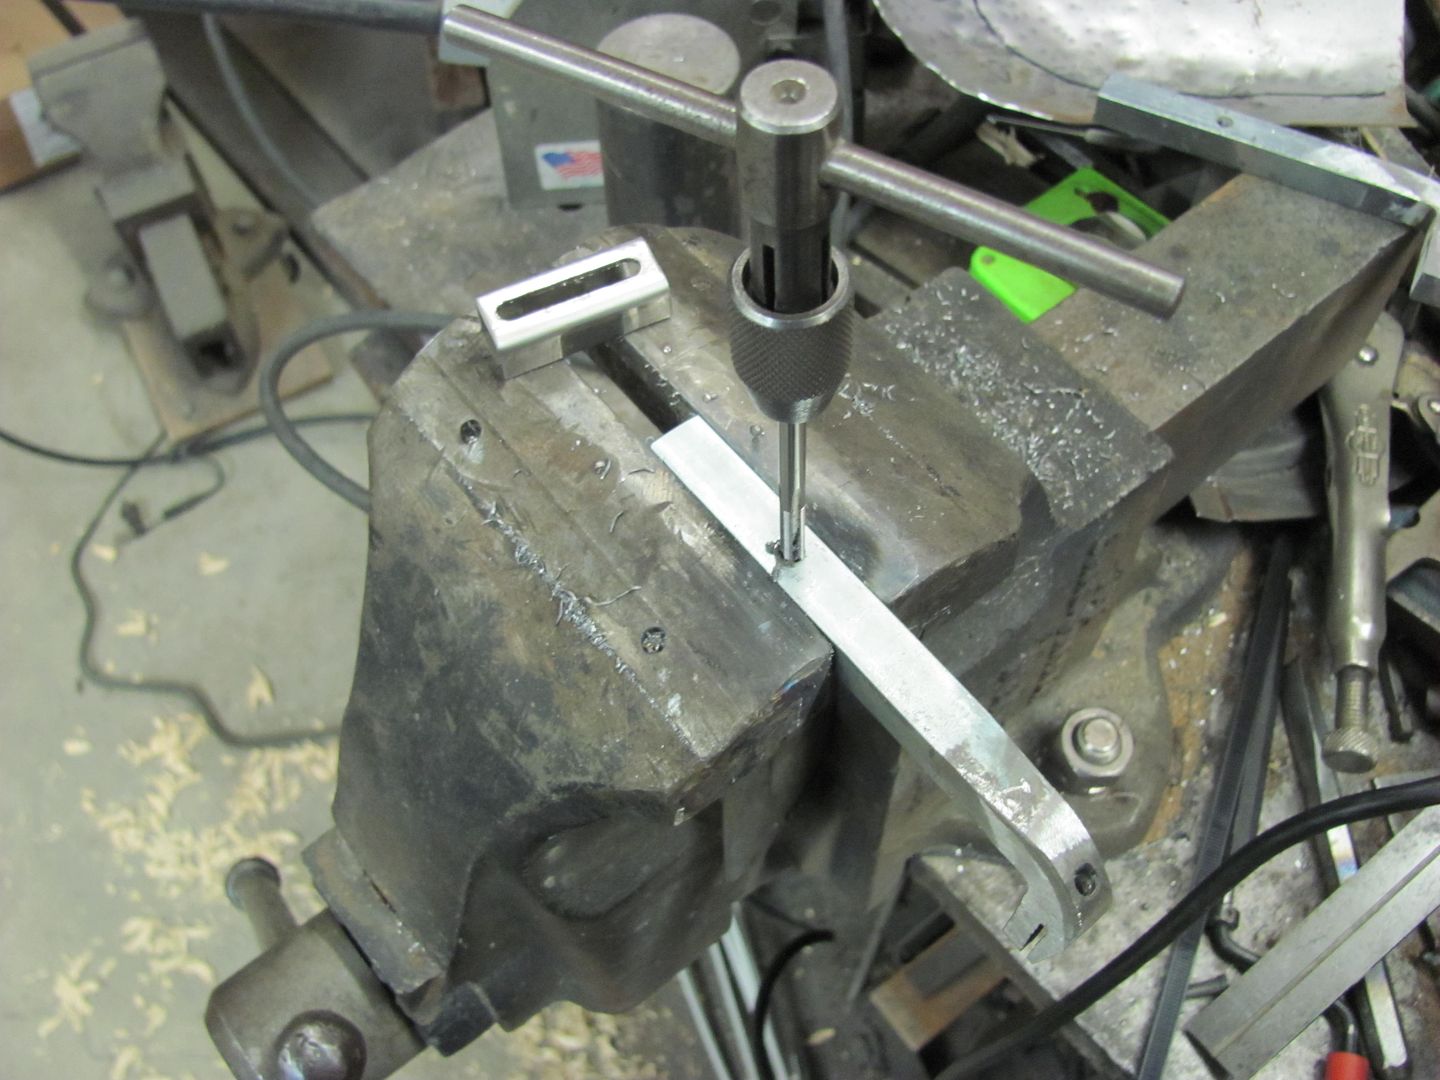
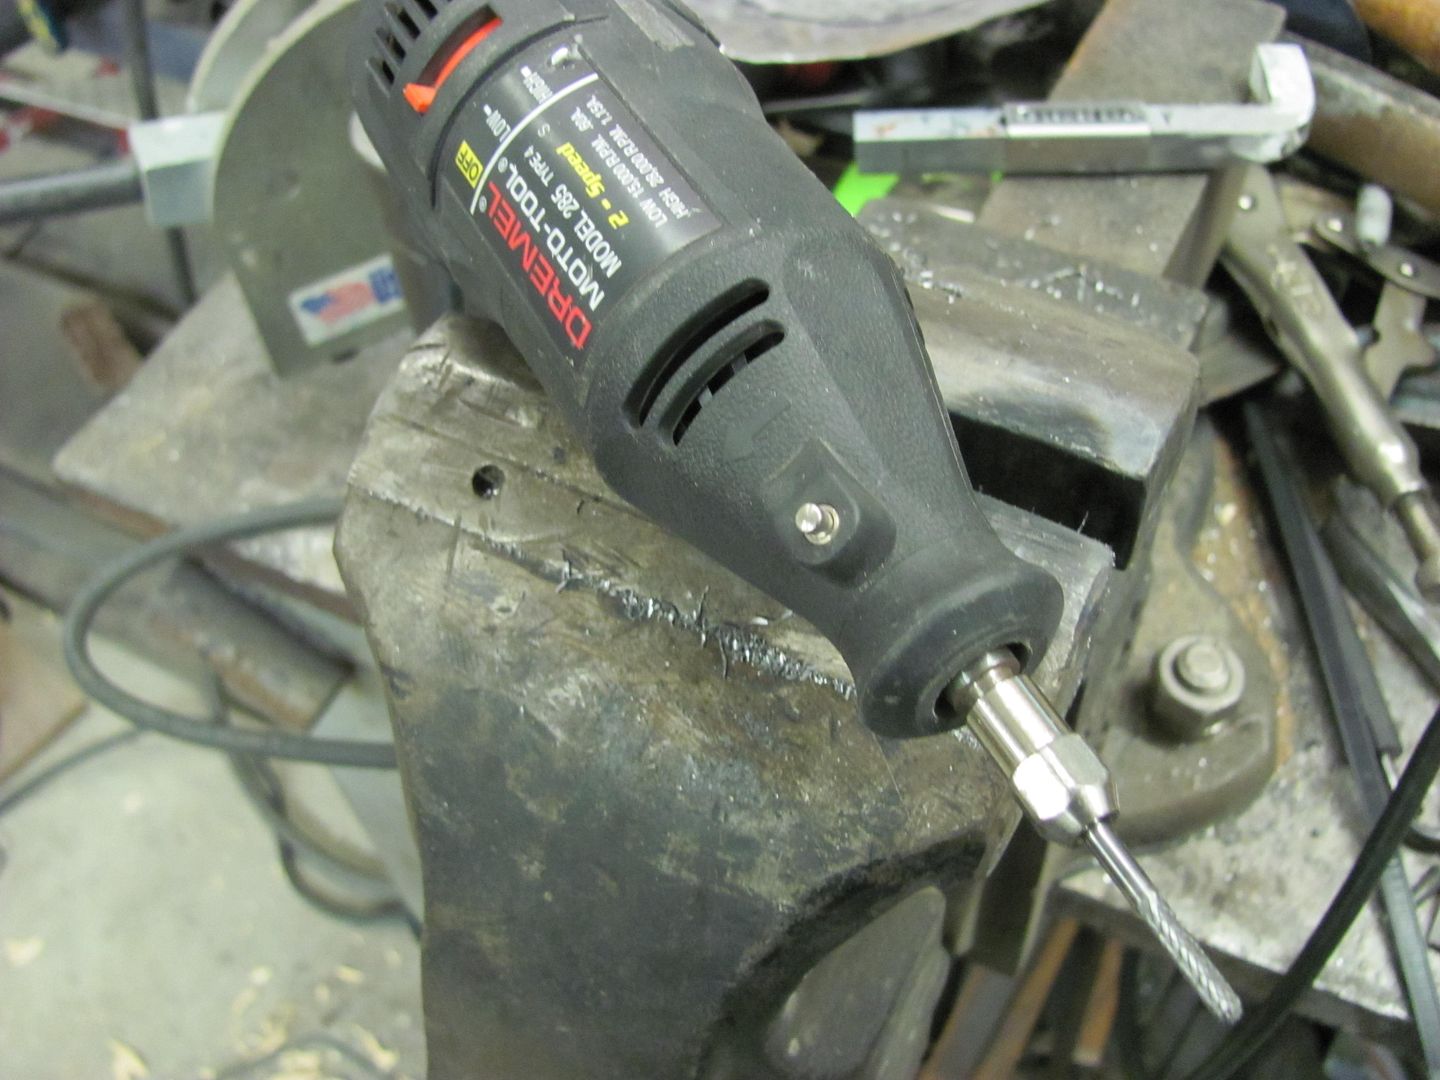
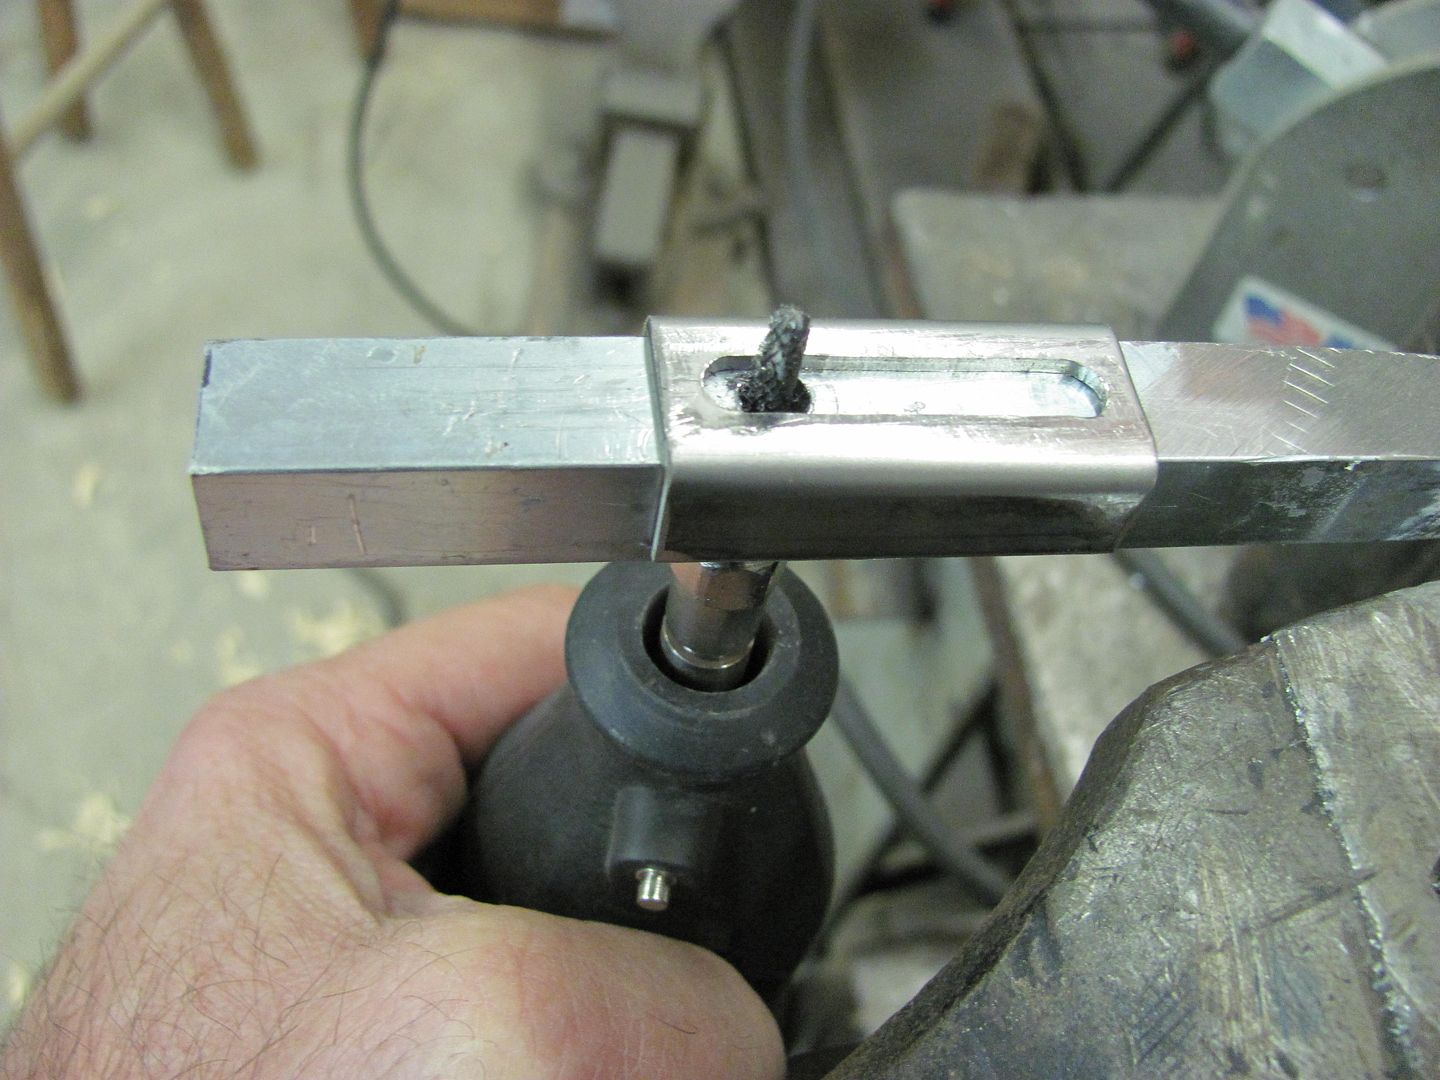
The second tool was used as a drilling/milling fixture for making the stop device for the long arm. A tight clearance hole was drilled centered on the 1/2 stock, a cap device was bent to fit snugly and come down the sides past the slot, and it was clamped in the vise at the various marks shown to start the slot. Although I neglected in-process pictures of this step, follow along with the descriptions.
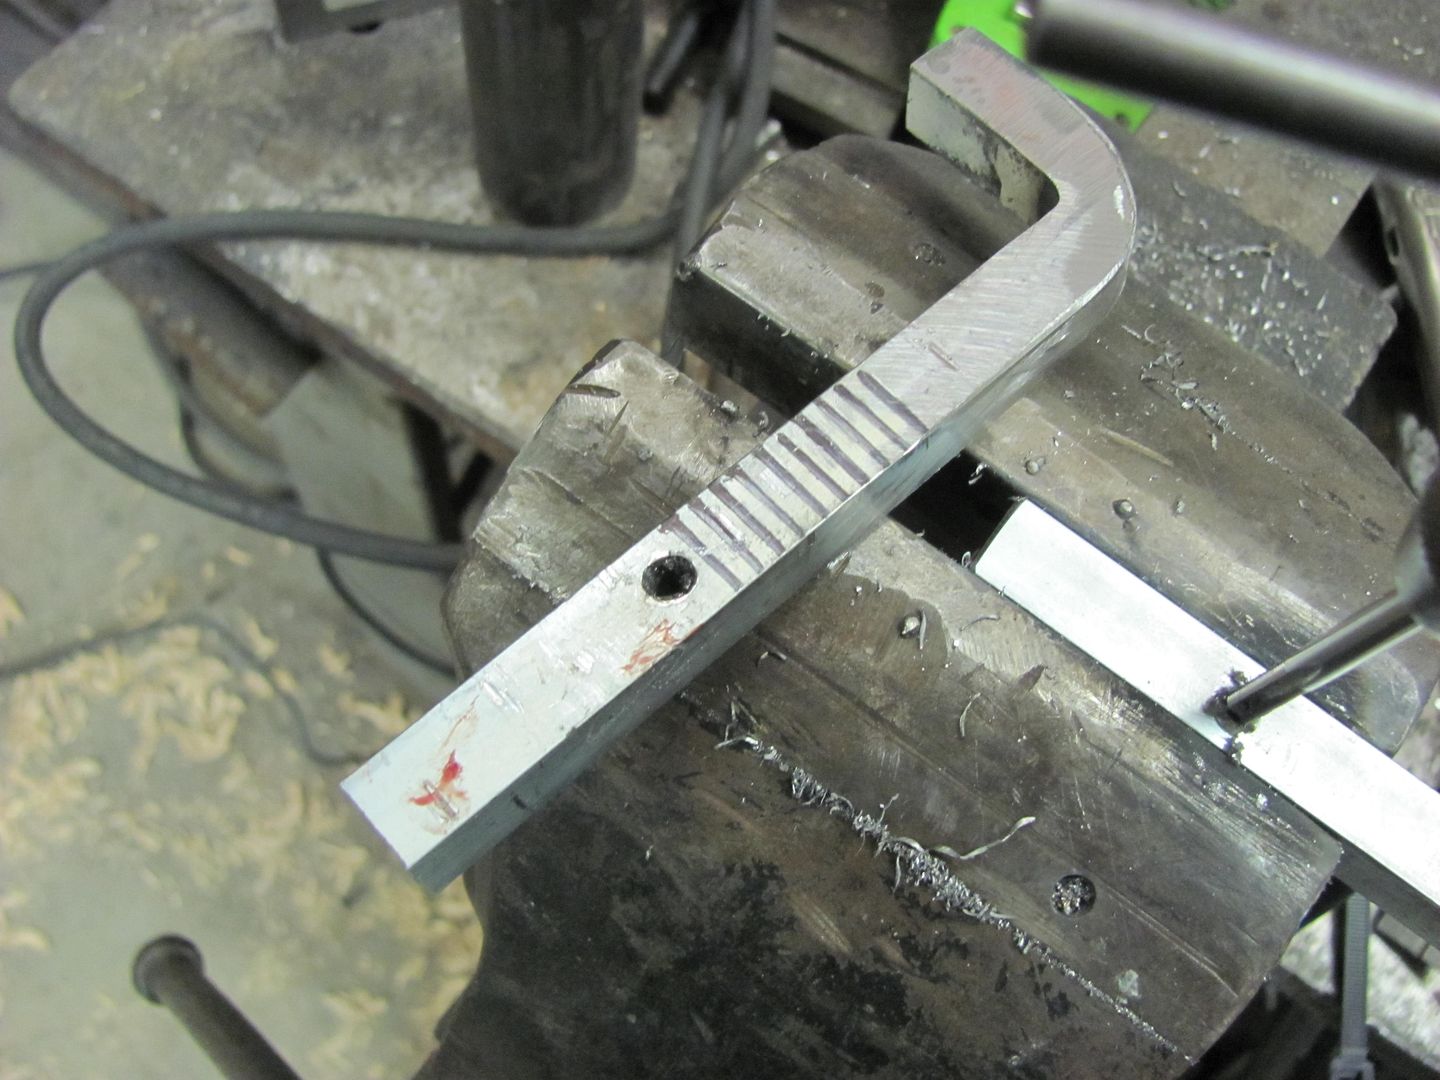
Then, to clean between the holes, a dremel with an 1/8 diameter ball end burr was used as a "milling" bit. Be sure to extend a good (safe) amount of the smooth side, so the cutter has less tendency to eat away at the drill guide. Then with the dremel bit inserted, place stop device over and work back and forth to open up the slotted hole. Repeat for other side of the slot, as this cutter is considerably smaller than our clearance hole.
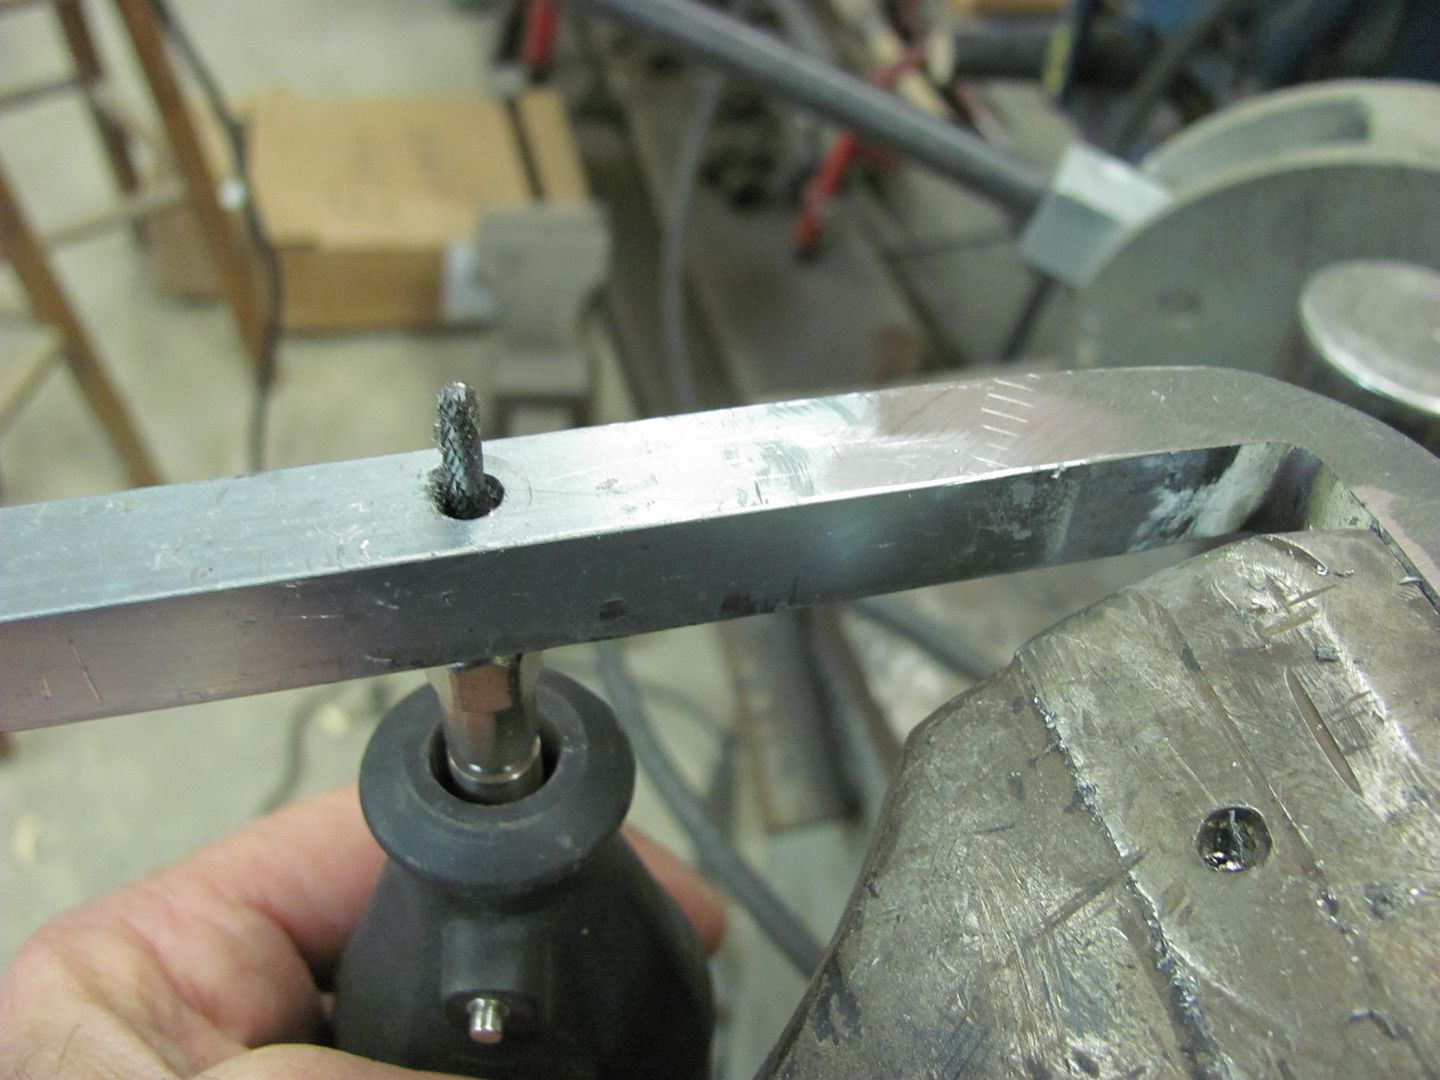
Use caution with moving fingers in close proximity of metal cutting devices, as I did draw a bit of blood (note pictures 4 and 5). Your results may vary, better or worse, so take appropriate precautions. (have band-aids handy or 911 pre-dialed, depending on how your luck runs)
Short 10-32 screw and washer added to secure the stop at dimension desired.

Here's an "inner door" sample I whipped up real quickly, sorry for the lack of precision
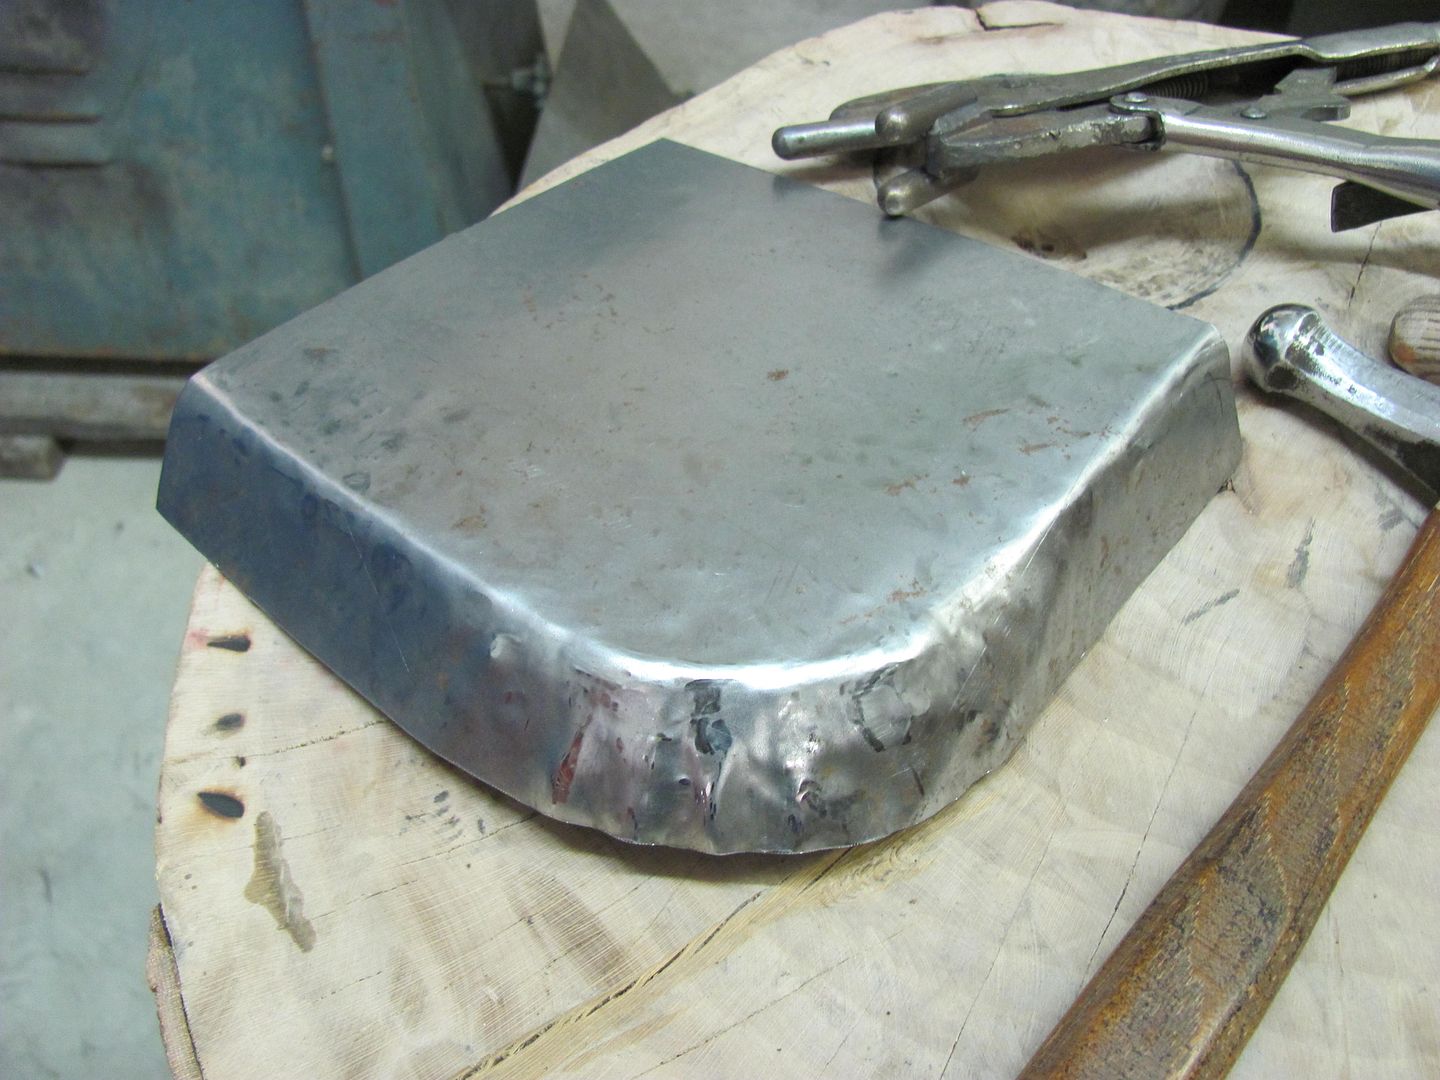
After panel and folded edge is cut to correct size for the application, mark desired flange width and adjust tool stops accordingly.
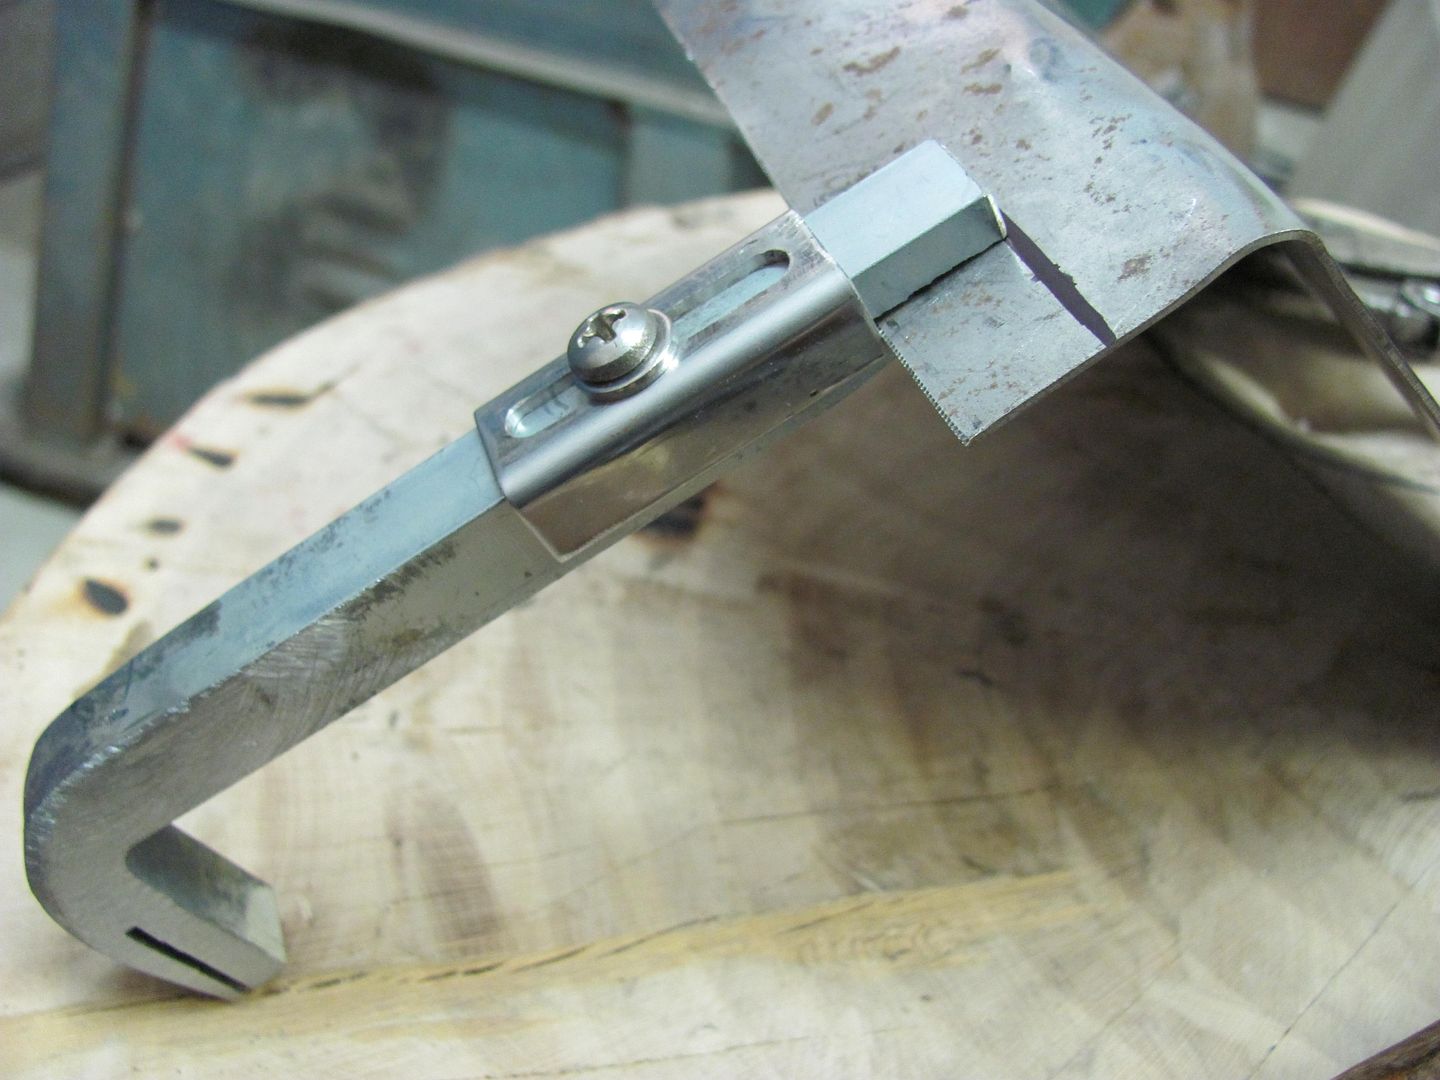
Bend slightly, working from one end to the other. Repeat repeatedly.
Two-ended tool allows you to use whichever end provides best leverage.
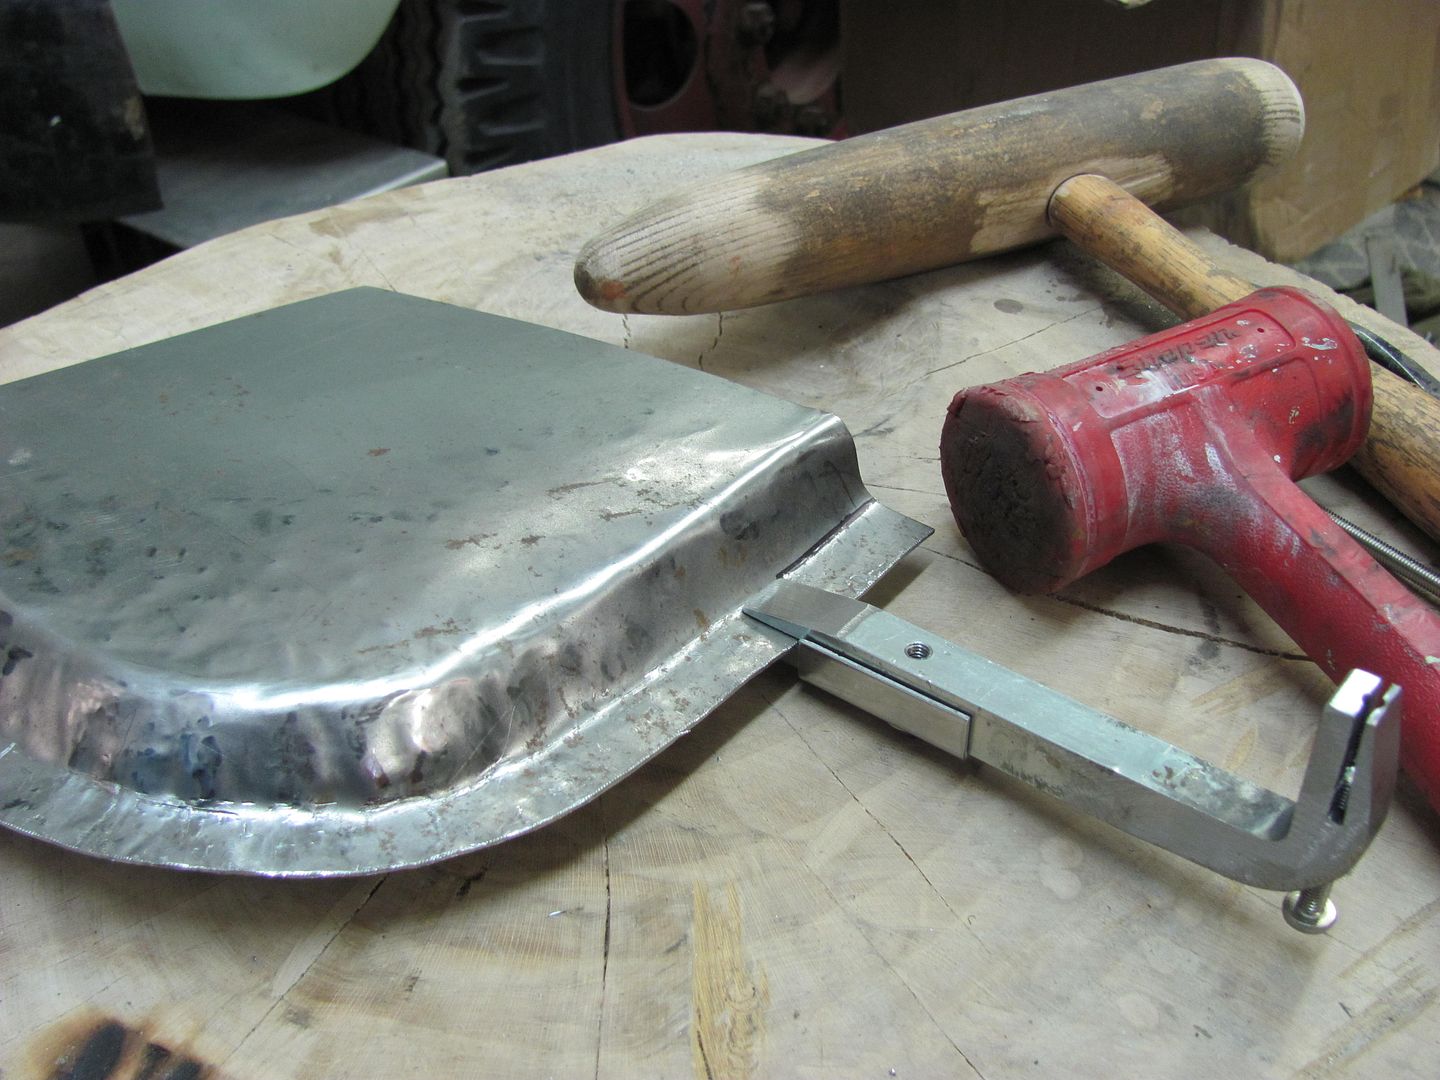
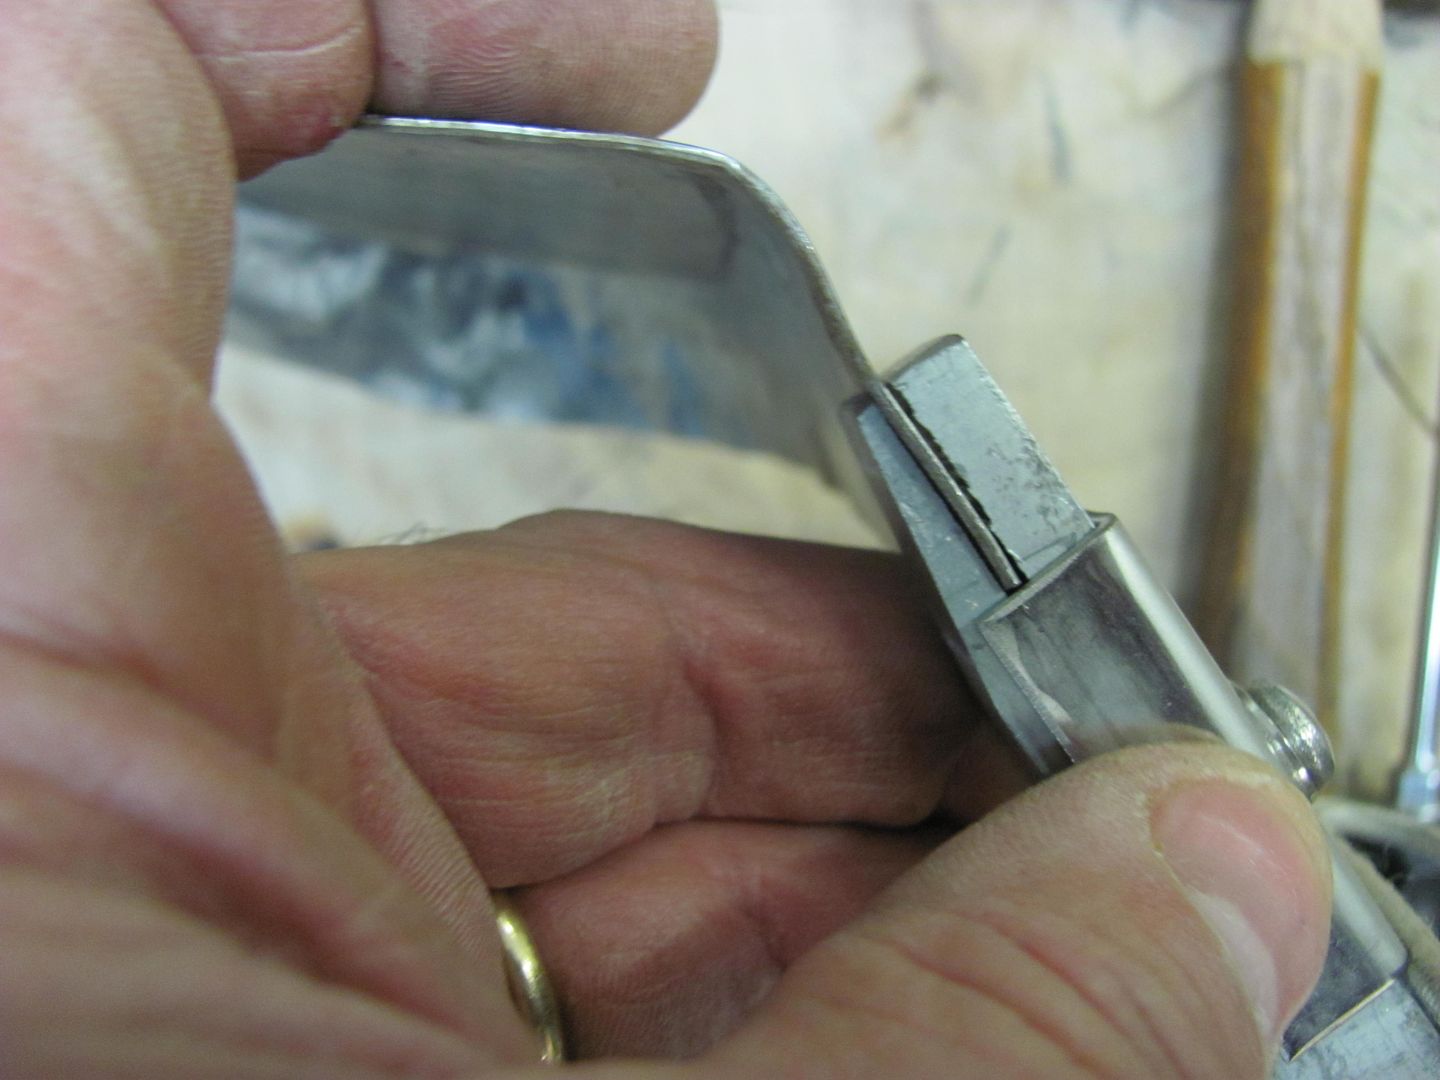
All ready for the "door skin" ............
This is a tool for tipping flanges, as one would do on door skins or inner doors, offered as a low buck alternative for those who may only need a one-time/limited use of such a device. I started with 1/2" key stock, which came in a one foot length. The gave me enough material for two, if I ever get to finishing both.
The short leg was marked at about 1-1/2" in, clamped in the vise, heated with a rosebud torch and persuaded to a 90 degree angle with a hammer.
Used the bandsaw to cut some notches about an inch in. These should be about twice the thickness (or so) of the metal you plan on using, to allow some free play in using the device.
The short end had a #21 hole drilled through the slot and tapped for 10-32 screw to use as a "distance stop". The long end would use a tapped hole to secure a separate stop device.
The second tool was used as a drilling/milling fixture for making the stop device for the long arm. A tight clearance hole was drilled centered on the 1/2 stock, a cap device was bent to fit snugly and come down the sides past the slot, and it was clamped in the vise at the various marks shown to start the slot. Although I neglected in-process pictures of this step, follow along with the descriptions.
Then, to clean between the holes, a dremel with an 1/8 diameter ball end burr was used as a "milling" bit. Be sure to extend a good (safe) amount of the smooth side, so the cutter has less tendency to eat away at the drill guide. Then with the dremel bit inserted, place stop device over and work back and forth to open up the slotted hole. Repeat for other side of the slot, as this cutter is considerably smaller than our clearance hole.
Use caution with moving fingers in close proximity of metal cutting devices, as I did draw a bit of blood (note pictures 4 and 5). Your results may vary, better or worse, so take appropriate precautions. (have band-aids handy or 911 pre-dialed, depending on how your luck runs)
Short 10-32 screw and washer added to secure the stop at dimension desired.
Here's an "inner door" sample I whipped up real quickly, sorry for the lack of precision
After panel and folded edge is cut to correct size for the application, mark desired flange width and adjust tool stops accordingly.
Bend slightly, working from one end to the other. Repeat repeatedly.
Two-ended tool allows you to use whichever end provides best leverage.
All ready for the "door skin" ............
#276
01-04-2013, 06:23 PM
Thanks!
When I built my rotisserie, I used 1/4" wall square tubing (actually .22) which gives a slight clearance except for the welded seam down the inside. I had to make a tool to remove this weld for the various pieces to be able to telescope inside each other. My solution was to Tig a 1/4 diameter rod to the end of my cutoff wheel arbor. Got it right the first time, no wobble at all. Added a cheap 1/4" id bearing to the rod (not shown in picture) to be able to slide the bearing where needed, & apply pressure to the weld without the rotating rod burning your hand.
Works well for accessing those hard to reach areas
#277
01-04-2013, 08:29 PM
#278
01-04-2013, 09:29 PM
MP&C,
I need a "tipping tool" to do similar work to your tool, but not often enough to spend the time to make a special tool to do it. I simply use an adjustable wrench of an appropriate size adjusted to be a slip fit on the metal. I draw a line where the bend is desired with an ultra fine sharpie marker and slip the wrench on up to the line and lift or drop the handle to start the bend. I start at the tightest curve and work towards the straight sections. Bend about 5 degrees a pass. Working slowly away from the center of a tight curve you can turn a lip around almost any curve. You can easily turn a smooth 90 degree 1/2" wide lip around a 4" disk of 20 ga cold rolled, just don't rush it.
I need a "tipping tool" to do similar work to your tool, but not often enough to spend the time to make a special tool to do it. I simply use an adjustable wrench of an appropriate size adjusted to be a slip fit on the metal. I draw a line where the bend is desired with an ultra fine sharpie marker and slip the wrench on up to the line and lift or drop the handle to start the bend. I start at the tightest curve and work towards the straight sections. Bend about 5 degrees a pass. Working slowly away from the center of a tight curve you can turn a lip around almost any curve. You can easily turn a smooth 90 degree 1/2" wide lip around a 4" disk of 20 ga cold rolled, just don't rush it.
#279
01-14-2013, 06:16 PM

Join Date: Jul 1997
Location: Beautiful Hueytown Alabam
Posts: 5,668
Received 727 Likes
on
259 Posts
removing large allen head bolts..
here's one that made me say 'duh' I'd never thought of this... If you have a large allen head bolt and no wrench... use an appropriate sized bolt head for the wrench...double nutted on the other end to turn it...
from the Homemade Tool Website Homemadetools.net A really neat website if you haven't visited with nothing but homemade tools... something we all love
here's the link to the page on the allen wrench substitute..
Large Allen Bolt Removal - by irmiger
later
John
from the Homemade Tool Website Homemadetools.net A really neat website if you haven't visited with nothing but homemade tools... something we all love
here's the link to the page on the allen wrench substitute..
Large Allen Bolt Removal - by irmiger
later
John
#280
01-14-2013, 07:55 PM
Postmaster
VW steering gear. :) That one was from when I was a kid. :)
from the Homemade Tool Website Homemadetools.net A really neat
website if you haven't visited with nothing but homemade tools...
something we all love
here's the link to the page on the allen wrench substitute..
Large Allen Bolt Removal - by irmiger
later
John
website if you haven't visited with nothing but homemade tools...
something we all love
here's the link to the page on the allen wrench substitute..
Large Allen Bolt Removal - by irmiger
later
John
Well I guess I should add something to this thread huh?
Uhhh...
http://www.panix.com/~alvinj/file12/DoALL1.jpg
http://www.panix.com/~alvinj/file12/DoALL2.jpg
...scanned big for printing. ;)
To remove the bronze oil-lite bearing from an FE...
http://www.panix.com/~alvinj/file12/bushing&remover.jpg
...BTW use a sealed ball bearing instead, 6303 in the case of an FE/FT. :)
How about 5/8" i.d. A/C hose for a bypass hose? LOL :)
http://www.panix.com/~alvinj/file12/bypass.jpg
This one is just plain ol' weird...
http://www.panix.com/~alvinj/file12/extensioncord.jpg
...but I like the heck out of it. :)
With the front of my T18 resting on these and the rear resting on its rear
mount and crossmember the dangged thing slides in and out of place like
it's on rails! No kidding. :)
http://www.panix.com/~alvinj/file12/guidepins.jpg
http://www.panix.com/~alvinj/file12/guidepin.jpg <--351w+ZF
http://www.panix.com/~alvinj/file12/Ford9inch.jpg
http://www.panix.com/~alvinj/file12/Ford9inch-B.jpg
http://www.panix.com/~alvinj/file12/Ford9inch-S.jpg
Tapped the normalized file, jammed the bolts in, double-nutted 'em then
cut 'em short. It needs a cheater pipe to use it, they need to be cranked
down that hard. LOL :) Ok, so it was fine the first several times cranking
it down but after that my hand hurt. LOL :)
Here's another tool from a normalized file...
http://www.panix.com/~alvinj/file12/...icbalancer.jpg
...it was already sway-backed and the tool needed that "relief".
The holes need to be just right to allow 3/8" bolts to slip though the
harmonic balancer on an FE and the tool at the same time and not be
sloppy. The tool fits my '91 351w real nice but didn't need to be sway
backed?
Alvin in AZ
ps-
This is for MP&C. :)
A 4+1/2" handgrinder extension made from a hunk of 5/8" grade-8 bolt,
a 1/4"-28 set screw and a grade-5 or better coupling nut from McMaster
-Carr, I've only used "plugs" (mounted grinding wheels) on it...
http://www.panix.com/~alvinj/file12/BroncoYd.jpg
pps-
I made it when I did this...
http://www.panix.com/~alvinj/file12/exhaustY.jpg
http://www.panix.com/~alvinj/file12/exhaustY1.jpg
Ever cut a factory Y pipe apart and check it out? :/
I did that on my '75 F150, man did they ever rip me off! :/
The hole in the pipe was football shaped and no way a golf ball would
go through it, even being mashed with a vice. It was like turning the
old 360FE from a 6 cylinder into an 8 cylinder. No less than that, what
a friggin' rip--off. :/ Ripped off of two-cylinders from Feb '75 to Jan '09.
I don't bleed blue. ;) YMMV
#281
01-14-2013, 10:15 PM
Postmaster
Whew, took almost two hours to read this whole crazy thread. LOL :)
Early in the thread there was a couple posts about bezel tools and
I just happen to have a couple pictures so here they are...

That first one is made from a junk shorty double boxed end the other
end was bent to hell an' gone. ;) This end is the 7/16" end, just pick
the size you need and go to hacksawing and filling away the steel
you don't need. LOL :)
Here's the switch and the threaded "nut" it fits...
http://www.panix.com/~alvinj/file12/switch.jpg
...also fits the wiper switch. (this stuff is for my '75 F150 mostly, sorry)
Here's one for my '75's ignition switch made it from 1" black steel pipe...

...worked at it quite a while to get those three center punched holes
evenly spaced then just went to hacksawing and filing. Used an
automatic type center punch, I use those almost every time I need a
center punch. ;)
Alvin in AZ
Early in the thread there was a couple posts about bezel tools and
I just happen to have a couple pictures so here they are...
That first one is made from a junk shorty double boxed end the other
end was bent to hell an' gone. ;) This end is the 7/16" end, just pick
the size you need and go to hacksawing and filling away the steel
you don't need. LOL :)
Here's the switch and the threaded "nut" it fits...
http://www.panix.com/~alvinj/file12/switch.jpg
...also fits the wiper switch. (this stuff is for my '75 F150 mostly, sorry)
Here's one for my '75's ignition switch made it from 1" black steel pipe...
...worked at it quite a while to get those three center punched holes
evenly spaced then just went to hacksawing and filing. Used an
automatic type center punch, I use those almost every time I need a
center punch. ;)
Alvin in AZ
#282
01-15-2013, 10:00 AM
ps-
This is for MP&C.
A 4+1/2" handgrinder extension made from a hunk of 5/8" grade-8 bolt,
a 1/4"-28 set screw and a grade-5 or better coupling nut from McMaster
-Carr, I've only used "plugs" (mounted grinding wheels) on it...
http://www.panix.com/~alvinj/file12/BroncoYd.jpg
pps-
I made it when I did this...
http://www.panix.com/~alvinj/file12/exhaustY.jpg
http://www.panix.com/~alvinj/file12/exhaustY1.jpg
Ever cut a factory Y pipe apart and check it out? :/
I did that on my '75 F150, man did they ever rip me off! :/
The hole in the pipe was football shaped and no way a golf ball would
go through it, even being mashed with a vice. It was like turning the
old 360FE from a 6 cylinder into an 8 cylinder. No less than that, what
a friggin' rip--off. :/ Ripped off of two-cylinders from Feb '75 to Jan '09.
I don't bleed blue. YMMV
YMMV
This is for MP&C.
A 4+1/2" handgrinder extension made from a hunk of 5/8" grade-8 bolt,
a 1/4"-28 set screw and a grade-5 or better coupling nut from McMaster
-Carr, I've only used "plugs" (mounted grinding wheels) on it...
http://www.panix.com/~alvinj/file12/BroncoYd.jpg
pps-
I made it when I did this...
http://www.panix.com/~alvinj/file12/exhaustY.jpg
http://www.panix.com/~alvinj/file12/exhaustY1.jpg
Ever cut a factory Y pipe apart and check it out? :/
I did that on my '75 F150, man did they ever rip me off! :/
The hole in the pipe was football shaped and no way a golf ball would
go through it, even being mashed with a vice. It was like turning the
old 360FE from a 6 cylinder into an 8 cylinder. No less than that, what
a friggin' rip--off. :/ Ripped off of two-cylinders from Feb '75 to Jan '09.
I don't bleed blue.
YMMV
#283
01-15-2013, 12:06 PM
Postmaster
http://new.grainger.com/search/grind.../N-i6qZ1z13l16
Wow, most of my "cone and plug grinders" are really old, looks like
they've lowered the RPM ratings on 'em, or something?
Mine are rated at like 33K+ RPMs. LOL :)
----------------------------
This is a Y pipe off a '91 351w that I added 2 more oxygen sensor
bungs to, and just laid out some tools I had out for show and tell...

Four grind stones/wheels called "plugs" and a one wire brush and
two of the extensions that MP&C's last-post reminded me of. :)
What's not shown is one of my little 4+1/2" hand grinders that the
extensions work on. Hmmm... they also work on the 9"hand grinder
I got since it's 5/8"-11 threaded too. I only used an extension with
those "plug and cone type" grind stones.
The pictures of the FE exhaust pipe Y is where I opened it up so it
looks like a header's collector inside.
Before it was a short pipe welded to the long pipe that continued
back to the muffler.
The factory torch cut a ragged hole in the long pipe and welded on
the short pipe over it. The torch cut hole was -way- too small to be
anything other than a bad joke! :/
I cut the long pipe off right after the Y junction and opened the side
wall of the long pipe with what ever I could reach in there with but
did a bunch of it (including the finishing work) using a plug type grind
stone and later added the extension to reach farther into the joint.
At that point it could flow like it was supposed to have been able to
do from the start.


...the weld along the bottom is just where I shrank the size of the
hole to match the 2+1/2" pipe. Was fixin' to weld on a short piece of
3" pipe but changed my mind. :)
Used a Walker "Thrush" straight thru muffler 45" long so it's not real
loud but flows like it's straight piped since the Walker Thrush doesn't
shrink down inside like -every- Cherry Bomb I ever looked thru. ;)
Alvin in AZ
#284
01-15-2013, 03:18 PM
OK, now it makes sense to me. I thought the y pipe was the extension you were talking about (???) Thanks for clearing up my confusion. Many years ago a friend of mine worked as a welder building headers at a fire truck conversion co. This was in the days of stick welders, before MIG and TIG. To make a Y pipe he would weld the two pipes together without an opening, then crank up the amps on the welder and stick a rod inside the pipe and use it to burn a hole thru.
#285
01-27-2013, 01:46 AM
