
1986 FSB Restoration Project (56K Warning)
#1
 11-28-2006, 03:34 PM

1986 FSB Restoration Project (56K Warning)
Hey guys/gals. This project has been along time (4 years) coming, but is finally here! Bear with me as I will be updating this site as the project comes along.
If you have any questions, please feel free to PM me.
The Project:
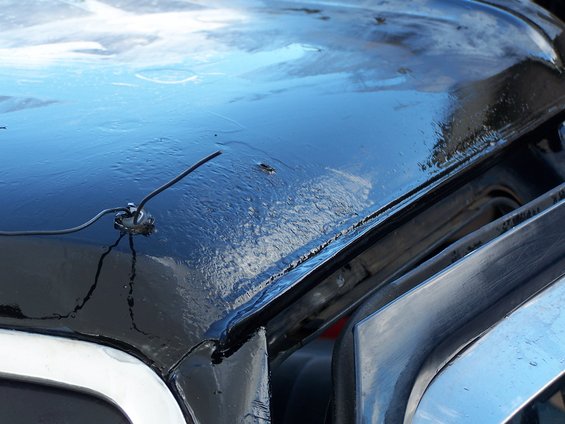
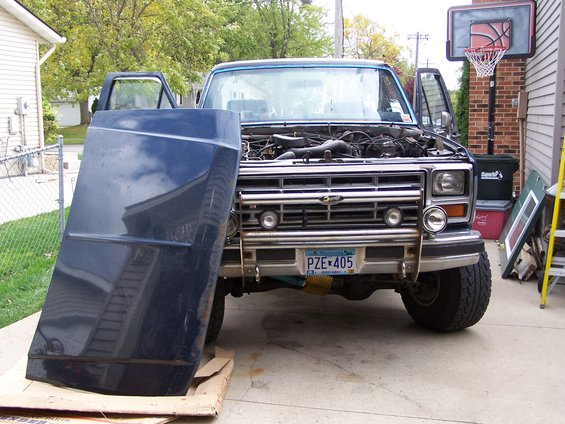
1986 Full Size XLT - I purchased this truck from a guy in Detriot Lakes Minnesota. It is orginally from Alaska.
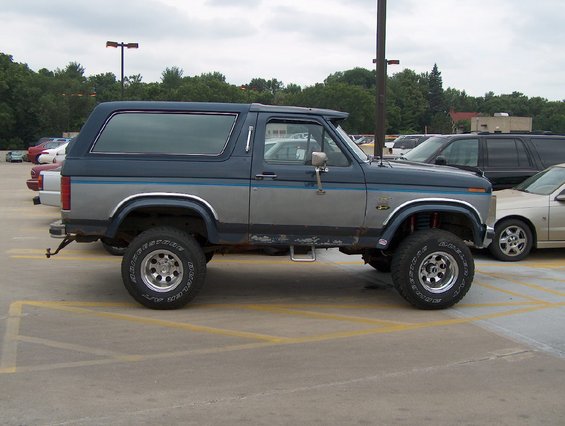
Notice the beautiful stainless steel body armor?
The Plan:
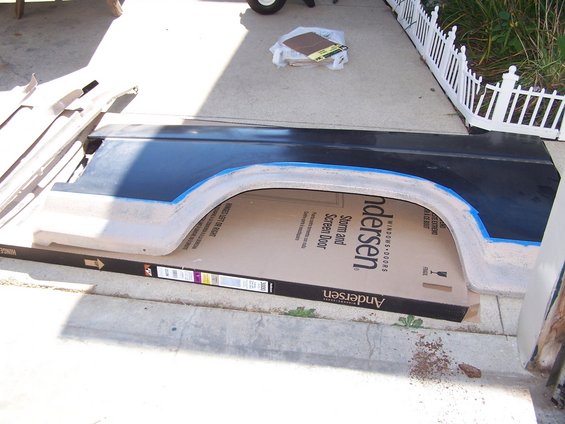
I have purchased a majority of the replacement body parts through Wheelers Autobody Supply. Everything I have purchased so far I have been VERY satisfied with. As Sixlitre did, I plan on "gluing" the rear quarters on (more to follow later, when I get to this step). Locally you can give Ray a call at 507-281-3450. In fact I just recieved my tailgate last week and could not be more happy!

Since I do not have access to a fancy paint shop (and becausee I like to save money) I have opted to coat the Bronco in all Durabak. Durabak� is a specially formulated polyurethane slip-resistant concrete floor coating, truck bed liners, marine deck and safety coating which comes in many colors. Many have done this but mine will be slightly different. A rough coat will be applied to all of the inner paneling (ie. doors, fenders, tailgate etc). The color I choose was sandstone. The rough will also be applied to follow the lower bodylines (approx. 6" up from the bottom lip) of the truck as well as th fender flares. All door jambs and the top will be sandstone (rough coat). The remainder will be done in Durabak Smooth. For more inforamtion on Durabak products follow this link www.durabakcompany.com or give Jake a call at 303-690-7190.
Prior to the Durabak application I will coat all of the "rust-prone" areas with POR-15 (ie. door jambs, tailgate area, cab and fenders). POR15 is a rust-preventive paint like coating, designed for application directly on rusted or seasoned metal surfaces. It dries to an rock-hard, non-porous finish that won't chip, crack, or peel, and it prevents rust from recurring by protecting metal from further exposure to moisture. I ordered 2 of their starter kits for this project ($16.50/ set) http://www.stoprust.net://
You will need the following supplies for applying the Durabak. Note: Jake will send you blue rollers to apply the rough Durabak, but he suggested buying a smooth applicating roller to apply the smooth. The other option for both types is of course to spray the Durabak. Xylene (Xylol) is used to thin Durabak if you choose to spray. A gun with 1/4" spray nozzle is recommended. Xylene is also used to prep the surface, clean up spills and prevent your rollers from drying out.
If you have any questions, please feel free to PM me.
The Project:
1986 Full Size XLT - I purchased this truck from a guy in Detriot Lakes Minnesota. It is orginally from Alaska.
Notice the beautiful stainless steel body armor?
The Plan:
I have purchased a majority of the replacement body parts through Wheelers Autobody Supply. Everything I have purchased so far I have been VERY satisfied with. As Sixlitre did, I plan on "gluing" the rear quarters on (more to follow later, when I get to this step). Locally you can give Ray a call at 507-281-3450. In fact I just recieved my tailgate last week and could not be more happy!
Since I do not have access to a fancy paint shop (and becausee I like to save money) I have opted to coat the Bronco in all Durabak. Durabak� is a specially formulated polyurethane slip-resistant concrete floor coating, truck bed liners, marine deck and safety coating which comes in many colors. Many have done this but mine will be slightly different. A rough coat will be applied to all of the inner paneling (ie. doors, fenders, tailgate etc). The color I choose was sandstone. The rough will also be applied to follow the lower bodylines (approx. 6" up from the bottom lip) of the truck as well as th fender flares. All door jambs and the top will be sandstone (rough coat). The remainder will be done in Durabak Smooth. For more inforamtion on Durabak products follow this link www.durabakcompany.com or give Jake a call at 303-690-7190.
Prior to the Durabak application I will coat all of the "rust-prone" areas with POR-15 (ie. door jambs, tailgate area, cab and fenders). POR15 is a rust-preventive paint like coating, designed for application directly on rusted or seasoned metal surfaces. It dries to an rock-hard, non-porous finish that won't chip, crack, or peel, and it prevents rust from recurring by protecting metal from further exposure to moisture. I ordered 2 of their starter kits for this project ($16.50/ set) http://www.stoprust.net://
You will need the following supplies for applying the Durabak. Note: Jake will send you blue rollers to apply the rough Durabak, but he suggested buying a smooth applicating roller to apply the smooth. The other option for both types is of course to spray the Durabak. Xylene (Xylol) is used to thin Durabak if you choose to spray. A gun with 1/4" spray nozzle is recommended. Xylene is also used to prep the surface, clean up spills and prevent your rollers from drying out.
#2
11-28-2006, 03:35 PM
Cont...
I will try to take you on a step by step as it occured. My first step will be to remove and rough coat the top and POR15 and under coat the inner panels (sandstone). After the rough coating I will coat the outer panels (smooth black), hood and cab. As Sixlitre suggested I will tackle the removal of the Rear fenders. Please stay tuned as this project progresses! I will supply photos and how to's as it goes.
09/25/2006
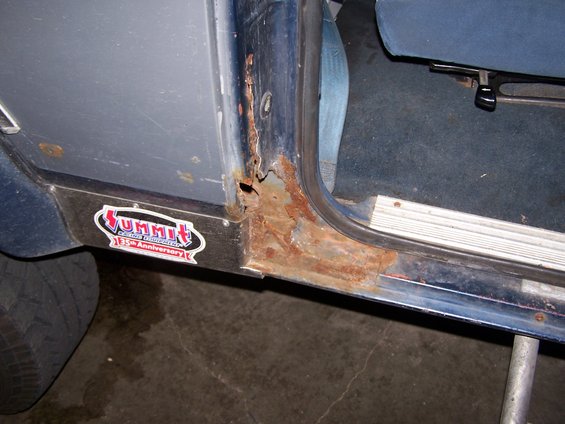
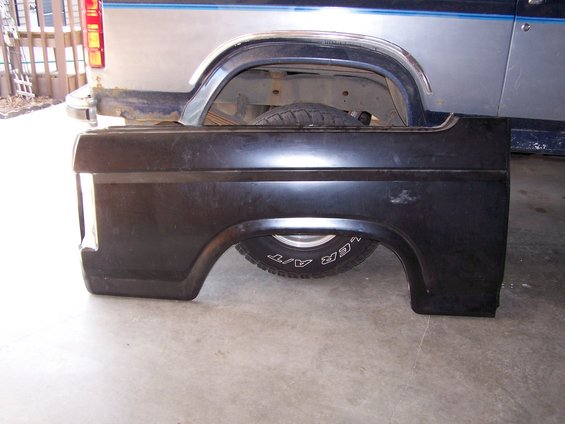
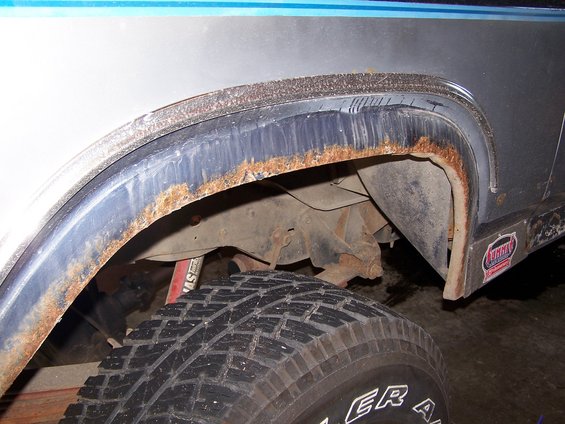
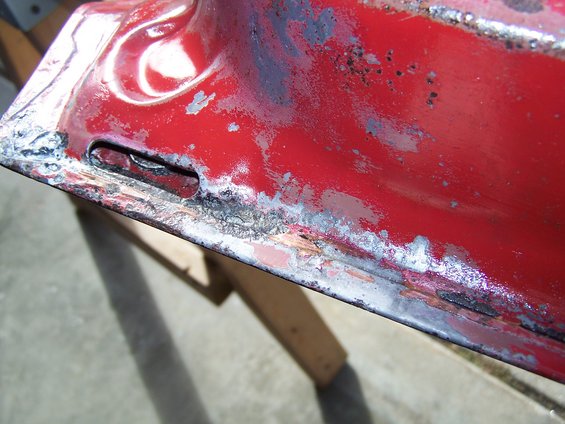
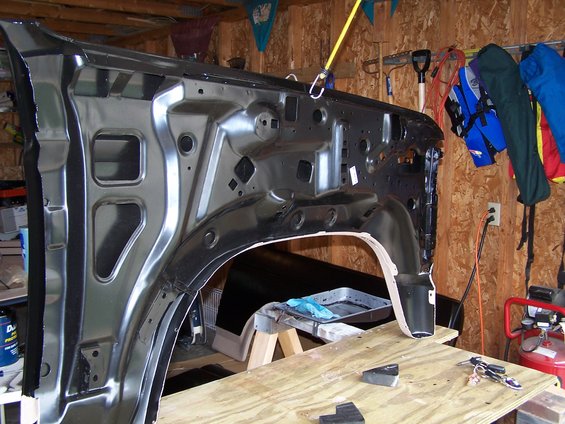
The first thing I did today was to remove the steps and fender flares. I discovered alot of rust so it was a good thing to get started on this project sooner rather than later.
This fender is in good shape compared to the Driver-side rear...looks like I will be fabbing a wheel well!
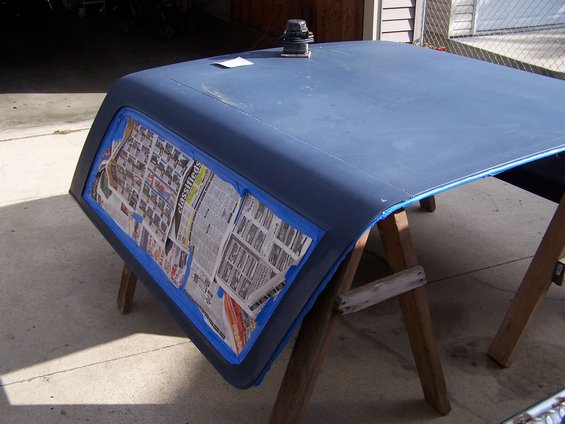
I decided it was a good day to begin the Durabak process (almost 70 degrees and sunny today with a slight breeze...low humidity) beginning with the top, under coating the rear fenders, new rocker panels, tailgate and front rock guard. With all parts I followed the following process (make sure to wear mask and gloves for application and make sure there is proper ventilation):
1) I started off by taping those areas where I did not want the durabak to cure to. This is the time-consuming part! In case you accidently get some in an area you did not intend, use zylol to clean it up.
2) Even though Durabak sticks well to painted surfaces, sanding or scuffing the surface will give the liner a little "tooth". I used a palm sander and 150 grit paper.

3) As with any surface during the painting process, the surface where the Durabak will be applied needs to be cleaned. Zylol will be used to clean the surface.
4) Mixing Durabak solution thoroughly will ensure that the rubber granules are evenly suspended (DO NOT SHAKE). Use a paint stick or drill and paint mixer. I mixed the stuff everytime I needed to pour more in the paint pan.
5) Durabak (rough coating) requires a special stipple roller for application. Jake will send you these with your order. The roller suspends the granules during application so they are evenly applied throughout. Zylol can be used to clean the brush/roller between applications. IN those hard to reach areas a regular paint brush can be used...I used the dabbing method.
1st coat

2nd coat
09/25/2006
The first thing I did today was to remove the steps and fender flares. I discovered alot of rust so it was a good thing to get started on this project sooner rather than later.
This fender is in good shape compared to the Driver-side rear...looks like I will be fabbing a wheel well!
I decided it was a good day to begin the Durabak process (almost 70 degrees and sunny today with a slight breeze...low humidity) beginning with the top, under coating the rear fenders, new rocker panels, tailgate and front rock guard. With all parts I followed the following process (make sure to wear mask and gloves for application and make sure there is proper ventilation):
1) I started off by taping those areas where I did not want the durabak to cure to. This is the time-consuming part! In case you accidently get some in an area you did not intend, use zylol to clean it up.
2) Even though Durabak sticks well to painted surfaces, sanding or scuffing the surface will give the liner a little "tooth". I used a palm sander and 150 grit paper.
3) As with any surface during the painting process, the surface where the Durabak will be applied needs to be cleaned. Zylol will be used to clean the surface.
4) Mixing Durabak solution thoroughly will ensure that the rubber granules are evenly suspended (DO NOT SHAKE). Use a paint stick or drill and paint mixer. I mixed the stuff everytime I needed to pour more in the paint pan.
5) Durabak (rough coating) requires a special stipple roller for application. Jake will send you these with your order. The roller suspends the granules during application so they are evenly applied throughout. Zylol can be used to clean the brush/roller between applications. IN those hard to reach areas a regular paint brush can be used...I used the dabbing method.
1st coat
2nd coat
#3
11-28-2006, 03:35 PM
Cont...
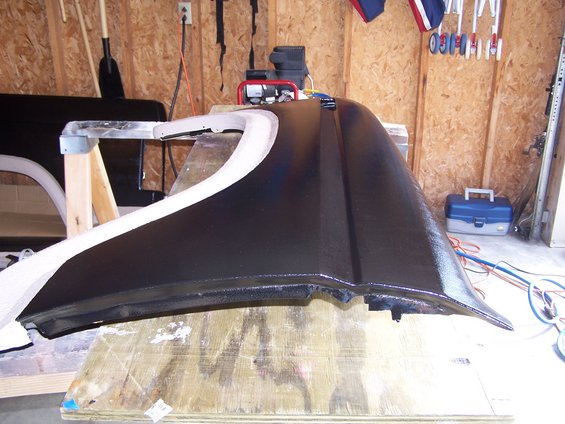
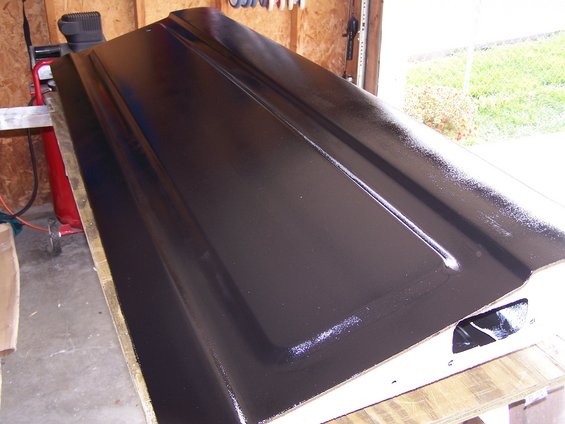
Fender 1st Coat - (undercoating only)
My objective was to get all of the undercoating completed prior to rolling on the Black Smooth Durabak.
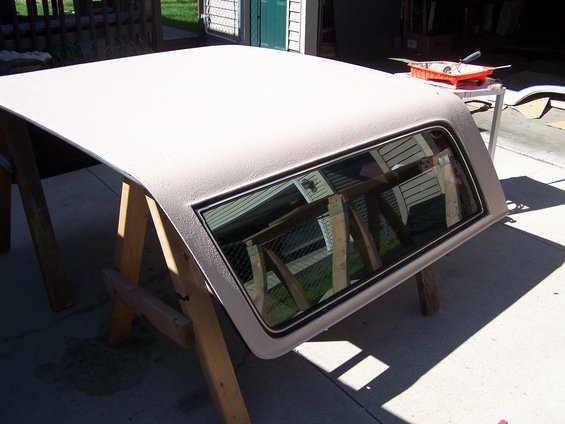
Fender complete - (Undercoating only)

Tailgate 1st coat - (Undercoating only)

6) Curing time varies depending on humidity and temperature (usually an hour). As soon as the first coat is no longer tacky, the second coat can be applied. The masking tape should be removed before it cures to the surface. Full cure is achieved in 2-4 days. I went out this morning to see how everything had set up over night. VERY impressed with the rock hard results!!!
09/26/2006 & 09/27/2006
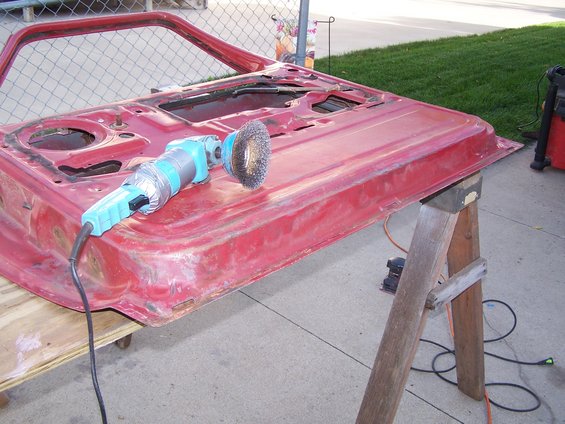
Tuesday I got a chance to rough coat the inner rear fenders and completed the tailgate (rough-coated). I also completed the rough coat on the front fenders. Regarding the rear fenders and rough coating: you want to make sure that you DO NOT rough-coat the GLUE POINTS. The glue will have a tough time adhering to the metal if you do. If you accidently do, use a wire brush to take it off. I preplanned and taped accordingly but found one point that I accidently painted.

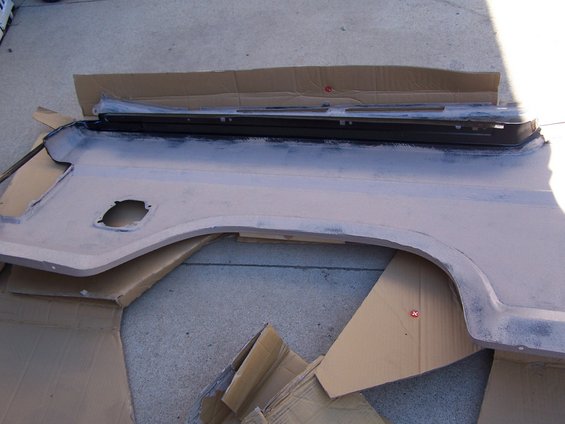

One lesson learned I should have done the Smooth coat first to avoid the time consuming process of staying between the lines:
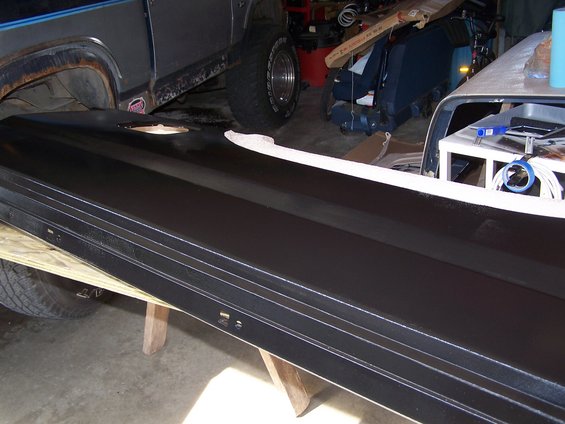
My objective was to get all of the undercoating completed prior to rolling on the Black Smooth Durabak.
Fender complete - (Undercoating only)
Tailgate 1st coat - (Undercoating only)
6) Curing time varies depending on humidity and temperature (usually an hour). As soon as the first coat is no longer tacky, the second coat can be applied. The masking tape should be removed before it cures to the surface. Full cure is achieved in 2-4 days. I went out this morning to see how everything had set up over night. VERY impressed with the rock hard results!!!
09/26/2006 & 09/27/2006
Tuesday I got a chance to rough coat the inner rear fenders and completed the tailgate (rough-coated). I also completed the rough coat on the front fenders. Regarding the rear fenders and rough coating: you want to make sure that you DO NOT rough-coat the GLUE POINTS. The glue will have a tough time adhering to the metal if you do. If you accidently do, use a wire brush to take it off. I preplanned and taped accordingly but found one point that I accidently painted.
One lesson learned I should have done the Smooth coat first to avoid the time consuming process of staying between the lines:
#4
11-28-2006, 03:36 PM
Cont...
Between drying times I was also able to POR 15 the Cab, prep the rockers and POR 15 the doors. The starter package comes with all of the directions you will need. I will summerize (make sure to wear gloves and mask when using any of these products and have proper ventilation):

1) Sand/wire brush the area you wish to apply POR 15 to...get the rust scale off! I used a power sprayer to blow all the crud off prior to the next step.
2) Marine Clean is included with the package. Marine clean should be diluted with water 1:1. Spray Marine Clean on the area and wipe off.

3) Next apply Metal Ready. The area should be soaked for a period of 15 minutes.
4) Wipe off excess Metal Ready. and make sure areas is dry for the POR 15 paint application. Metal Ready will leave a zinc like residue.
5) Apply POR 15 paint. The paint is nice and thick and will fill in those cracks in your rain gutters. Prior to Durabaking this area I'll put a little calk in the cracks.
6) If you plan to overcoat your POR 15 job an important step is to sand the POR15 with 400-600 grit paper and give it a light primer spray prior to applying overcoat.

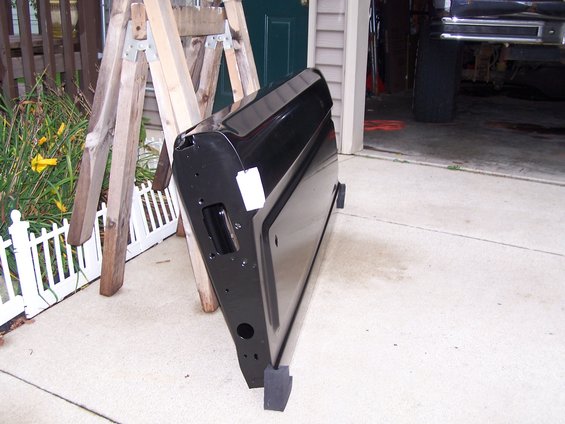
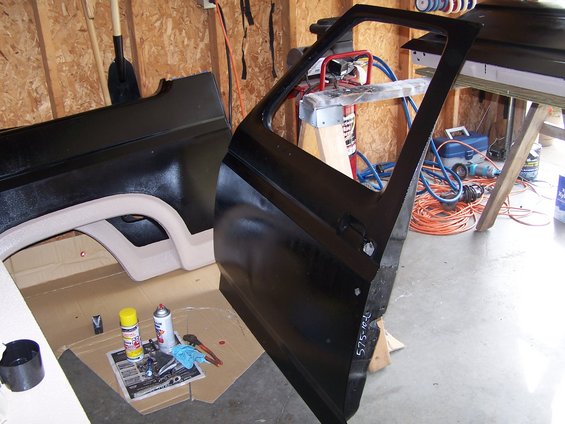
Door POR 15 Prep
The red door was in pretty good shape and did not require a full POR 15 coat. The black door had very minor surface rust and so I decided to POR 15 the entire door. I was VERY surprised as to the coverage I got with such a little can (2 doors and the cab).

1) Sand/wire brush the area you wish to apply POR 15 to...get the rust scale off! I used a power sprayer to blow all the crud off prior to the next step.
2) Marine Clean is included with the package. Marine clean should be diluted with water 1:1. Spray Marine Clean on the area and wipe off.
3) Next apply Metal Ready. The area should be soaked for a period of 15 minutes.
4) Wipe off excess Metal Ready. and make sure areas is dry for the POR 15 paint application. Metal Ready will leave a zinc like residue.
5) Apply POR 15 paint. The paint is nice and thick and will fill in those cracks in your rain gutters. Prior to Durabaking this area I'll put a little calk in the cracks.
6) If you plan to overcoat your POR 15 job an important step is to sand the POR15 with 400-600 grit paper and give it a light primer spray prior to applying overcoat.
Door POR 15 Prep
The red door was in pretty good shape and did not require a full POR 15 coat. The black door had very minor surface rust and so I decided to POR 15 the entire door. I was VERY surprised as to the coverage I got with such a little can (2 doors and the cab).
#5
11-28-2006, 03:37 PM
Cont...
Rocker Prep - I did not get any further in this step since it will be better to first pull the carpet and then complete. Notice my arm...the power sprayer sometimes not your friend!

09/28/2006
Here are the rockers:

I was able to coat the inner rear front fender and outer front fender. One front fender left to complete:
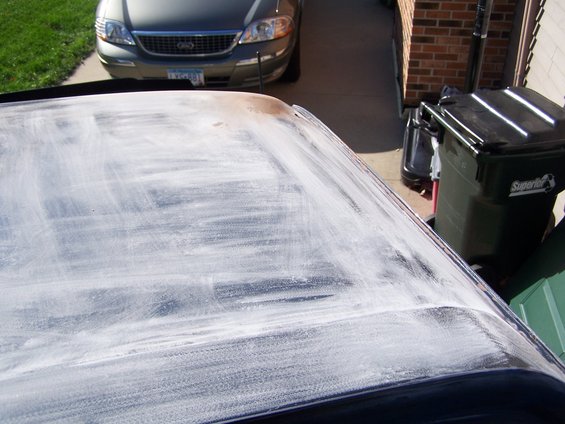
I was also able to smooth coat the cab of the truck...I did not take pictures of this. Will probably give it one more coat in the end.
I pulled the hood off and cowel...now just need to sand and their ready for paint.
I started pulling the bolts for the front fender in anticipation of installing the new one on Friday. Hopefully that will happen! There are a number of places to pull bolts from before the fender will come out.
09/28/2006
Here are the rockers:
I was able to coat the inner rear front fender and outer front fender. One front fender left to complete:
I was also able to smooth coat the cab of the truck...I did not take pictures of this. Will probably give it one more coat in the end.
I pulled the hood off and cowel...now just need to sand and their ready for paint.
I started pulling the bolts for the front fender in anticipation of installing the new one on Friday. Hopefully that will happen! There are a number of places to pull bolts from before the fender will come out.
#6
11-28-2006, 03:40 PM
Cont...
09/29/2006
Many interuptions again today. I mainly did alot of prep work for the upcoming days. However, I did manage to finish the tailgate off and progressed to a 1st and 2nd coat on the driverside door. While the door and tailgate were drying I was able to sand/grind on the hood and the passenger side door. Next I plan to sand the cowl so that I can paint all parts in one session. If possible I will try to undercoat the lower half (rough sand) and inner doors
Lessons learned:
1) If you plan to overcoat your POR 15 job an important step is to sand the POR15 with 400-600 grit paper and give it a light primer spray. I made sure to read the instructions AGAIN prior to slapping on a coat of liner on the doors.
2) Again...if you plan to coat any painted surface (non-rusted) with POR 15 you must sand (thoroughly) and use the metal ready...otherwise the POR 15 will peal off. I identified one area in the door pillar area that I did not sand well enough. I will wire brush that area and start over.
3) It will be very important to get all of the painting done before cooler weather sets in. Although I can always do the tear down and assembly in cold weather (I tore the transmission out last winter in -8 degree weather...no heat in the garage) I will not be able to do painting or gluing.
Later for now! Updates to come!
#7
11-28-2006, 03:41 PM
More...
10/12/2006
It has been a few weeks since I have been able to do any work on the truck due to my wife's illness. It gave me time to think as well as reflect on the progress that I have made. And even though the ultra-smooth rollers laid down a good 2-3 coats of paint (Smooth Black Durabak), I was not thrilled with streaks the rollers left after the panels had dried. On Sunday I decided it was a worhty investment to purchase a spray gun capable of spraying heavy materials such as Durabak. At $45 it was the best investment you could ever make when doing a project like this. Upon purchase...I dreamed of MANY ways to use this gun and make it an even better investment. If you plan on a Durabak finish like this HIGHLY recomend this purchase...it will save you so much time in the end!
The Gun:
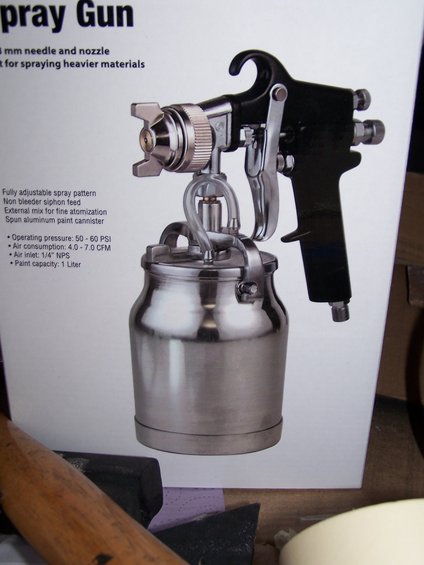
Review the specifications on the packaging in this picture (PSI, CFM, Etc.)
It is recommended by the Durabak Company that you use a gun capable of spraying heavy materials. Should be sprayed at between 45-65 psi. In specific regard to the smooth Durabak they recommend you also THIN the material 10%. My particular gun came with a 1 Liter capacity cup. On first use, I decided to use only 500 mLs of Durabak. To thin 10% that means adding 50 mLs of Zylene (Zylol) to Durabak to get a total volume of 550 mLs. This left me plenty of room to thin/thicken as needed inside the cup. Many have recommended thinning by the gallon, unfortunatly I had already taken out an unknwon amount out of a fresh gallon. It is helpful to get a measuering cup for the zylene and a measuering cup for the Durabak along with paint sticks.
The Process:
1) Tape off/mask any materials you do not want painted.
2) Be sure to sweep out your painting area thoroughly (I used my compressor air adapter and a broom to clean the garage floor).
3) Hang your plastic and setup your work bench/area.
4) Wet down the area in which you will be painting. I used a mist attachment on the garden hose and sprayed the work bench (very slightly) and the garage floor. This will significantly trap any dust particles kicked up in the spraying process and will do a great job of eliminating them from getting on the materials being painted.
5) Thin your paint material is indicated above.
6) Clean all materials that you plan to paint. I used zylene on a clean shop rag to clean all of the panels (doors, fenders, tailgate, etc).
7) I highly suggest practicing on a piece of cardboard or anything else that you don't care about prior to applying your first coat.
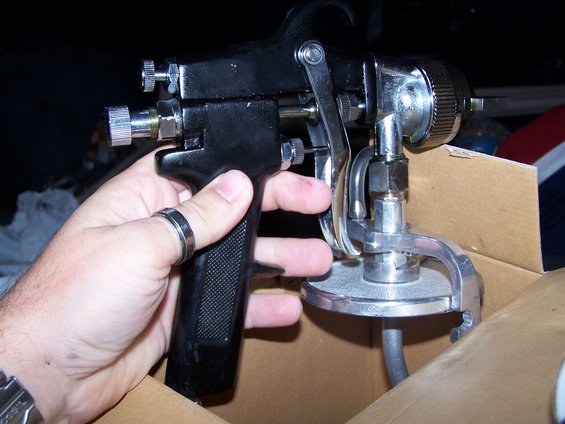
8) Make adjustments to FLOW and PATTERN:
a) Overspray - this is when you have too much pressure (high flow) going through the gun. Decrease flow by making changes at the regulator (on the compressor) or turning the bottom **** on the gun counterclockwise (see below)
b) "Chunky Spray" is casued when there is'nt enough pressure. Again make changes at the regulator or turn the bottom **** clockwise.
c) Test your pattern - this controlled 2 ways: by chaning the "bat wing" you can get a vertical spray or horizontal spray. By adjusting the top **** you change the width of the sporay pattern. Play with these two setting to find what will work best for you and your application.
9) When applying the paint you want the gun to remain 6-9" from the work surface at all times, working back and forth on the material. DO NOT USE AN ARCH MOTION. After an hour of dry time you should be able to apply your second coat.
10) Let everything dry. With 550 mLs of material I was able to apply 2 coats to 4 fenders, 2 doors, 1 hood, 1 visor and 1 tailgate. It goes along way!
Finished Front Fender :
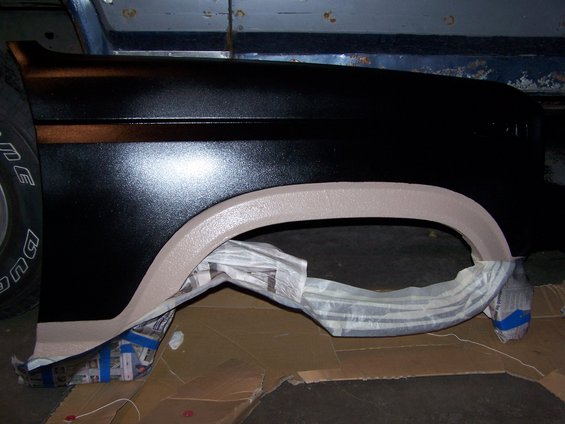
CLEANING:
1) Put a 1/4 cup of zylene in the cup and wipe with a clean shop rag. You may alos choose to turn the cup upside down for an hour to empty the cup out as much as possible prior to cleaning it with zylene.
2) Repeat this process.
3) Please a new round of clean zylene in the gun and spray through the gun onto some cardboard.
4) Use the supplied cleaning brush (at least with mine) and clean the rubber syphon hose.
My next goal is to finish the insides of the doors in the coming week (weather permitting). Then assembly begins.
Keep drooling...unitl next time!
10/12/2006
It has been a few weeks since I have been able to do any work on the truck due to my wife's illness. It gave me time to think as well as reflect on the progress that I have made. And even though the ultra-smooth rollers laid down a good 2-3 coats of paint (Smooth Black Durabak), I was not thrilled with streaks the rollers left after the panels had dried. On Sunday I decided it was a worhty investment to purchase a spray gun capable of spraying heavy materials such as Durabak. At $45 it was the best investment you could ever make when doing a project like this. Upon purchase...I dreamed of MANY ways to use this gun and make it an even better investment. If you plan on a Durabak finish like this HIGHLY recomend this purchase...it will save you so much time in the end!
The Gun:
Review the specifications on the packaging in this picture (PSI, CFM, Etc.)
It is recommended by the Durabak Company that you use a gun capable of spraying heavy materials. Should be sprayed at between 45-65 psi. In specific regard to the smooth Durabak they recommend you also THIN the material 10%. My particular gun came with a 1 Liter capacity cup. On first use, I decided to use only 500 mLs of Durabak. To thin 10% that means adding 50 mLs of Zylene (Zylol) to Durabak to get a total volume of 550 mLs. This left me plenty of room to thin/thicken as needed inside the cup. Many have recommended thinning by the gallon, unfortunatly I had already taken out an unknwon amount out of a fresh gallon. It is helpful to get a measuering cup for the zylene and a measuering cup for the Durabak along with paint sticks.
The Process:
1) Tape off/mask any materials you do not want painted.
2) Be sure to sweep out your painting area thoroughly (I used my compressor air adapter and a broom to clean the garage floor).
3) Hang your plastic and setup your work bench/area.
4) Wet down the area in which you will be painting. I used a mist attachment on the garden hose and sprayed the work bench (very slightly) and the garage floor. This will significantly trap any dust particles kicked up in the spraying process and will do a great job of eliminating them from getting on the materials being painted.
5) Thin your paint material is indicated above.
6) Clean all materials that you plan to paint. I used zylene on a clean shop rag to clean all of the panels (doors, fenders, tailgate, etc).
7) I highly suggest practicing on a piece of cardboard or anything else that you don't care about prior to applying your first coat.
8) Make adjustments to FLOW and PATTERN:
a) Overspray - this is when you have too much pressure (high flow) going through the gun. Decrease flow by making changes at the regulator (on the compressor) or turning the bottom **** on the gun counterclockwise (see below)
b) "Chunky Spray" is casued when there is'nt enough pressure. Again make changes at the regulator or turn the bottom **** clockwise.
c) Test your pattern - this controlled 2 ways: by chaning the "bat wing" you can get a vertical spray or horizontal spray. By adjusting the top **** you change the width of the sporay pattern. Play with these two setting to find what will work best for you and your application.
9) When applying the paint you want the gun to remain 6-9" from the work surface at all times, working back and forth on the material. DO NOT USE AN ARCH MOTION. After an hour of dry time you should be able to apply your second coat.
10) Let everything dry. With 550 mLs of material I was able to apply 2 coats to 4 fenders, 2 doors, 1 hood, 1 visor and 1 tailgate. It goes along way!
Finished Front Fender :
CLEANING:
1) Put a 1/4 cup of zylene in the cup and wipe with a clean shop rag. You may alos choose to turn the cup upside down for an hour to empty the cup out as much as possible prior to cleaning it with zylene.
2) Repeat this process.
3) Please a new round of clean zylene in the gun and spray through the gun onto some cardboard.
4) Use the supplied cleaning brush (at least with mine) and clean the rubber syphon hose.
My next goal is to finish the insides of the doors in the coming week (weather permitting). Then assembly begins.
Keep drooling...unitl next time!
10/12/2006
It has been a few weeks since I have been able to do any work on the truck due to my wife's illness. It gave me time to think as well as reflect on the progress that I have made. And even though the ultra-smooth rollers laid down a good 2-3 coats of paint (Smooth Black Durabak), I was not thrilled with streaks the rollers left after the panels had dried. On Sunday I decided it was a worhty investment to purchase a spray gun capable of spraying heavy materials such as Durabak. At $45 it was the best investment you could ever make when doing a project like this. Upon purchase...I dreamed of MANY ways to use this gun and make it an even better investment. If you plan on a Durabak finish like this HIGHLY recomend this purchase...it will save you so much time in the end!
The Gun:
Review the specifications on the packaging in this picture (PSI, CFM, Etc.)
It is recommended by the Durabak Company that you use a gun capable of spraying heavy materials. Should be sprayed at between 45-65 psi. In specific regard to the smooth Durabak they recommend you also THIN the material 10%. My particular gun came with a 1 Liter capacity cup. On first use, I decided to use only 500 mLs of Durabak. To thin 10% that means adding 50 mLs of Zylene (Zylol) to Durabak to get a total volume of 550 mLs. This left me plenty of room to thin/thicken as needed inside the cup. Many have recommended thinning by the gallon, unfortunatly I had already taken out an unknwon amount out of a fresh gallon. It is helpful to get a measuering cup for the zylene and a measuering cup for the Durabak along with paint sticks.
The Process:
1) Tape off/mask any materials you do not want painted.
2) Be sure to sweep out your painting area thoroughly (I used my compressor air adapter and a broom to clean the garage floor).
3) Hang your plastic and setup your work bench/area.
4) Wet down the area in which you will be painting. I used a mist attachment on the garden hose and sprayed the work bench (very slightly) and the garage floor. This will significantly trap any dust particles kicked up in the spraying process and will do a great job of eliminating them from getting on the materials being painted.
5) Thin your paint material is indicated above.
6) Clean all materials that you plan to paint. I used zylene on a clean shop rag to clean all of the panels (doors, fenders, tailgate, etc).
7) I highly suggest practicing on a piece of cardboard or anything else that you don't care about prior to applying your first coat.
8) Make adjustments to FLOW and PATTERN:
a) Overspray - this is when you have too much pressure (high flow) going through the gun. Decrease flow by making changes at the regulator (on the compressor) or turning the bottom **** on the gun counterclockwise (see below)
b) "Chunky Spray" is casued when there is'nt enough pressure. Again make changes at the regulator or turn the bottom **** clockwise.
c) Test your pattern - this controlled 2 ways: by chaning the "bat wing" you can get a vertical spray or horizontal spray. By adjusting the top **** you change the width of the sporay pattern. Play with these two setting to find what will work best for you and your application.
9) When applying the paint you want the gun to remain 6-9" from the work surface at all times, working back and forth on the material. DO NOT USE AN ARCH MOTION. After an hour of dry time you should be able to apply your second coat.
10) Let everything dry. With 550 mLs of material I was able to apply 2 coats to 4 fenders, 2 doors, 1 hood, 1 visor and 1 tailgate. It goes along way!
Finished Front Fender :
CLEANING:
1) Put a 1/4 cup of zylene in the cup and wipe with a clean shop rag. You may alos choose to turn the cup upside down for an hour to empty the cup out as much as possible prior to cleaning it with zylene.
2) Repeat this process.
3) Please a new round of clean zylene in the gun and spray through the gun onto some cardboard.
4) Use the supplied cleaning brush (at least with mine) and clean the rubber syphon hose.
My next goal is to finish the insides of the doors in the coming week (weather permitting). Then assembly begins.
Keep drooling...unitl next time!
Trending Topics

#10
11-28-2006, 10:22 PM

Posting Guru
Join Date: Jan 2003
Location: SE Texas
Posts: 1,388
Likes: 0
Received 0 Likes
on
0 Posts

#11
11-29-2006, 06:51 AM
Restoration
I have been posting this information on another forum, but have been wainting to place it here. I think many people will find it useful. This is a job that, I think, anyone can handle. If you can turn a wrench, sand, lift a paint gun or roller you can do this. My progress has halted due to weather. I do not have a heated garage so it makes things a little cold...although I did do some transmission work last winter in -8 degree weather. For you non-Minnesotans...that's cold enough to make your nipples scratch glass!
Anyway...there is MUCH information forthcoming, including installation of fenders, doors and tailgate to a how-to in utilizing the 3M adhesive to glue the rear fenders on. This is TOUGH stuff...10x stronger than a spot weld and really seals the seams so there is no chance for oxidation in the seam. I will start at the front of the truck and work my way back...there is a possibility (if it warms up) of getting the hood, cowl and front fenders on, stay tuned.
Please let me know if anyone has questions... later for now!
OOOPPPS! I just looked at the original thread and it looks like I have some repeat information...please ignore it...please ignore it...dang I did it again!
Last edited by cje07; 11-29-2006 at 06:58 AM.
#12
12-03-2006, 07:03 PM

Posting Guru

#13
12-04-2006, 06:29 AM
Both finishes have a UV protectant built in. We'll see! If it starts to fade...I can always shoot another color coat later on! Yep...don't have to worry about wax!
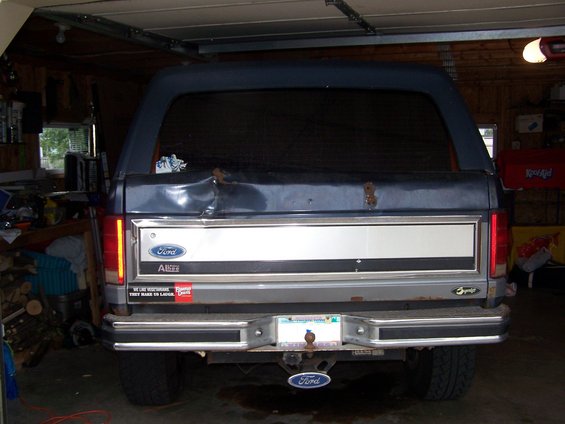
Everyday I open the garage door I get excited for this project to be done. It is going to look 100x better then it does right now! I have all the new parts stuffed in the back of the truck and the rear fenders hanging from the rafters.
Everyday I open the garage door I get excited for this project to be done. It is going to look 100x better then it does right now! I have all the new parts stuffed in the back of the truck and the rear fenders hanging from the rafters.
#14
01-30-2007, 07:15 AM
Update
Not much done on the truck as of late except alot of dreaming. It's hard to do anything when the temp is +1 degree above 0.
I did just purchase a Saginaw Power Steering pump from the junk yard. As many of you know the stock pump in these truck is garbage (e.g. lack power to turn big wheels and lots of whiiiiiinnnnnninnnnggg). The Saginaw came out of a 1984 Ford Econoline van. They are by far a much more bullet-proof unit. The swap will require some modification (PS Bracket)...along with a good paint job. I will link from this thread to a "Saginaw Swap" thread once it is complete and I have more pictures...man I have alot of work to do!!!
Let me know if you have any questions about this swap! I'll try to answer!
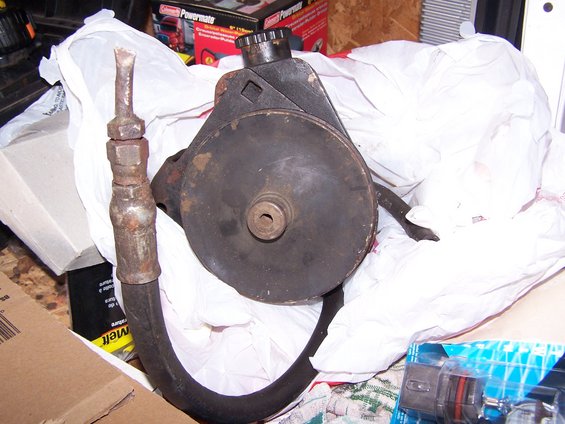
#15
01-30-2007, 08:27 AM
Hotshot