
Which rear axle do I have?
#1
 02-25-2006, 01:04 PM


Join Date: Jul 2004
Location: va
Posts: 1,552
Likes: 0
Received 0 Likes
on
0 Posts
Which rear axle do I have?
I have a 1993 F-150xlt with a Dana 44 front axle with drain plug. Which rear axle do I have, there are 5 listed below from Haynes? It looks real close to #4. It has 10 bolts the id tag is in the same place, but its hard to read. My rear diff. truck code is 19 which is a 3.55 Non Limited Slip. There's no drain plug, like the front.
Ford 8.8 and 9.0
Ford 10.25
Dana 60,60-5,61-1,61.2 and 62
Dana 70
Dana 70HD
Ford Axle Identification
<A onclick=\"\"NewWindow(this.href,'name','750', '600','yes');return\" href="http://www.badshoeproductions.com/pop8.html" false;\?>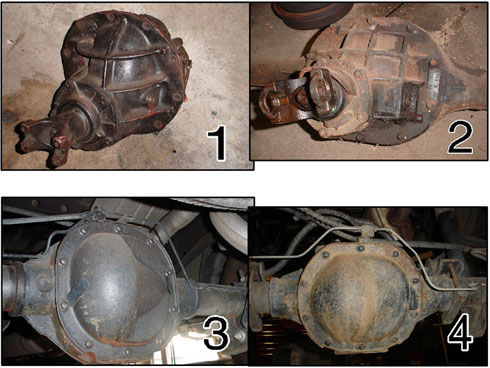
Photo 1 - The 9� rear ends have a removable �hog-head� center carrier and is about 10� from the bottom to the top stud. The 9� was introduced in 1957 and ran to mid 80's.
Photo 2 - The 8" rear was use from the 60's to the late 70's, top to bottom stud is about 9".
Photo 3 - 8.8� rear�s have a ten bolt inspection plate on the back that�s about 10� from the center of the top bolt to the bottom bolt center. The 8.8� first saw service in the 79 Crown Vic. and in 1980 for the F100/150.
Photo 4 - The 7.5� rear was first put in the 78 Fairmont. It also has a ten bolt cover but measures about 9� from top to bottom bolt.
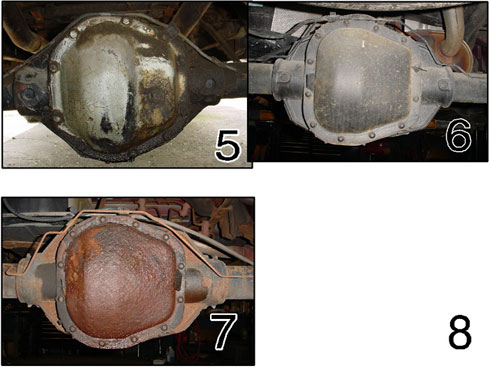
Photo 5 - Dana 44 use as front axle on 4x4's also as rear axles on some late 70 F100's. Has 10 bolts, normally has a fill plug on the cover and top to bottom bolt head centers are about 9 1/4".
Photo 6 - The 9.75" used from 97 to present F150
Ford 8.8 and 9.0
Ford 10.25
Dana 60,60-5,61-1,61.2 and 62
Dana 70
Dana 70HD
Ford Axle Identification
Photo 1 - The 9� rear ends have a removable �hog-head� center carrier and is about 10� from the bottom to the top stud. The 9� was introduced in 1957 and ran to mid 80's.
Photo 2 - The 8" rear was use from the 60's to the late 70's, top to bottom stud is about 9".
Photo 3 - 8.8� rear�s have a ten bolt inspection plate on the back that�s about 10� from the center of the top bolt to the bottom bolt center. The 8.8� first saw service in the 79 Crown Vic. and in 1980 for the F100/150.
Photo 4 - The 7.5� rear was first put in the 78 Fairmont. It also has a ten bolt cover but measures about 9� from top to bottom bolt.
Photo 5 - Dana 44 use as front axle on 4x4's also as rear axles on some late 70 F100's. Has 10 bolts, normally has a fill plug on the cover and top to bottom bolt head centers are about 9 1/4".
Photo 6 - The 9.75" used from 97 to present F150
Last edited by mike L; 02-25-2006 at 01:29 PM.

#3
02-25-2006, 01:59 PM
Tuned
Join Date: Jul 2002
Location: Louisiana
Posts: 476
Likes: 0
Received 0 Likes
on
0 Posts
I changed my rear end fluid myself.
I have a 1993 2W drive with a Ford 8.8 non limited slip.
Have rags, a pan that holds 3 qts., regular screwdriver or flat bar, rachet set 3/8, 1 tube silicone sealer ,high temp black (so it does not show. I used the copper 700 deg. it shows.) 3 qts of 75W-90 or 140W? check with the manual.
I bought 2 Mobil 1 75W-140W and 1 75W-90W I did not notice dumped it all in and I don't think it will hurt (was to lazy to return the 90W for another 140)
You do have to remove the cover, 9 bolts, leave one in loose. Put a pan under and gently push a large regular screwdriver or flat bar to break the seal and let the cover hang. When most of the fluid has drained remove the last bolt and remove the cover. I found to completely drain the bottom of the rear end you will have to sop up the remaining fluid under the gears. Now clean the surfaces of the cover and rear end to remove the old silicone sealent. The hayes manual shows how to lay out the silicone around the bolt holes. Use a 1/8" bead, it will spread and squeeze out. Tighten down firm but not with all your might. Let dry over night.
Next day use the end of the 3/8 inch rachet to remove the fill plug with an extention if needed, it fits inside the hole. Fill the rearend and you will see the fluid start to drain out the hole. You may want to put a hose onto the end of the bottle to make it easier. Install plug, drive and check for leaks.
Hope this helps.
#4
02-25-2006, 05:31 PM
Post Fiend
#5
02-25-2006, 05:48 PM
Tuned
Join Date: Jul 2002
Location: Louisiana
Posts: 476
Likes: 0
Received 0 Likes
on
0 Posts
Originally Posted by quicklook2
you forgot two things, use additive if you have limited slip, and the most important thing, have a six pack (at least) of beer after to celebrate finishing job.
very nice write up!
very nice write up!

quicklook2
Let's see, he said "My rear diff. truck code is 19 which is a 3.55 Non Limited Slip" in other words a regular rear end. No additive needed.
mike L : If you spin one rear wheel and the other turns opposite way it's a regular , I don't know the right term, but if the other wheel turns the same direction it is a limited slip and needs the additive.
The official ford-truck axle guide:
https://www.ford-trucks.com/article/...de_Chart_.html
#6
02-25-2006, 06:10 PM
Post Fiend
#7
02-25-2006, 07:42 PM

Originally Posted by byronbgs
I try
quicklook2
Let's see, he said "My rear diff. truck code is 19 which is a 3.55 Non Limited Slip" in other words a regular rear end. No additive needed.
mike L : If you spin one rear wheel and the other turns opposite way it's a regular , I don't know the right term, but if the other wheel turns the same direction it is a limited slip and needs the additive.
The official ford-truck axle guide:
https://www.ford-trucks.com/article/...de_Chart_.html
Trending Topics
#9
02-25-2006, 09:09 PM
Join Date: Jul 2004
Location: va
Posts: 1,552
Likes: 0
Received 0 Likes
on
0 Posts
Diff. Tag #
Originally Posted by jhnhardee
should be the 8.8, I belive they stoped using the 7.5 in the early 80's.
Thanks guys
Last edited by mike L; 02-25-2006 at 09:15 PM.
#11
06-28-2006, 08:42 PM
Join Date: Jul 2004
Location: va
Posts: 1,552
Likes: 0
Received 0 Likes
on
0 Posts
#12
06-28-2006, 09:52 PM

You know what guys if the tag says 3L55 that is a good indication that the axle has l/s...has the rear-end ever been changed out of that truck? You might want to put the truck up on stands with both tires off the ground, take the parking brake off, and put the tranny in neutral. Try to spin one wheel and check to see if other spins in the same direction or the opposite...if it spins the same, u do have L/s if not, then it is open. Its been my experience that codes don't match up on cars or trucks and you just have to go to the basics to figure things out. Hope that helps...gl
Mike
Mike
#13
06-28-2006, 11:59 PM
Join Date: Jul 2004
Location: va
Posts: 1,552
Likes: 0
Received 0 Likes
on
0 Posts
I did jack up the back and spun one wheel and the other wheel spun in the opposite way, so its open then? When I did this it was in park, i was still able to turn the wheels half a turn.
My local Ford dealer said that's not a good way to tell if it has l/s because its has 100,000 miles on it, and may be worn out. I would need to look inside, what would i look for inside. Does someone have a picture of a l/s.
Anyways I might just add 4 oz. of the l/s additive to just be safe.
My local Ford dealer said that's not a good way to tell if it has l/s because its has 100,000 miles on it, and may be worn out. I would need to look inside, what would i look for inside. Does someone have a picture of a l/s.
Anyways I might just add 4 oz. of the l/s additive to just be safe.
#14
06-29-2006, 12:47 PM
Here's what an 8.8 limited slip looks like.
http://cgi.ebay.com/ebaymotors/Ford-Mustang-Stock-Diff-8-8-NO-Gears-GT_W0QQcmdZViewItemQQcategoryZ6763QQihZ014QQitemZ3 30001434505QQrdZ1QQsspagenameZWDVW#ebayphotohostin g
Notice the S shaped spring in the center, the open diff doesn't have that. There are clutch plates behind the 2 side gears, and these do wear out. The factory install method is also heavily biased towards slip, as opposed to grip, and there is an easy way to make these perform nearly as good as a locker. From the factory the clutch packs are stacked as follows..
FP = friction plate(friction material on both sides)
PP = Pressure plate(no friction material, all steel with small dimples on surface)
Factory stack.. FP|PP|PP|FP|PP|PP|FP
Better stack .. FP|PP|FP|PP|FP|PP|FP|PP
Notice there is also an extra plate in the Better stack. This makes the spring harder to put back in, but the diff is way tighter. Even without the extra disk the performance is improved.. meaning traction is better. You can buy the LS rebuild kits new, or you can strip the parts from a scrap yard diff like I did.
#15
07-12-2006, 10:06 PM
Join Date: Jul 2004
Location: va
Posts: 1,552
Likes: 0
Received 0 Likes
on
0 Posts