
Power Door Locks FIXED!!!!
#76
 09-22-2006, 08:22 PM


On a side note, I see alot of people stating the didn't pop the metal rivets, etc., etc. When I split my cases, of course I drilled out the plastic posts, and instead of leaving the rivets or drilling them out, I literally removed them altogether, and never put rivets back. I drilled the plastic posts right through, then when I put the cases back together, I used some quality screws for plastic, and let me tell you, using 6 of those (I think that's how many there were if I can remember correclty) screws held the cases together, no problem whatsoever. To date, I am not witnessing ANY case splittling whatsoever. Cause let me tell you, by being able to take the cases apart completely and off the truck, it makes the job a whole lot easier. Not to mention, should you ever have to service these units again, screws make r and r a snap. When I had mine apart, I also put in some new grease for all the gears as well.
Anyway, I am super glad that so many people have benefited from this post, I know I sure did hence why I figured many others could use this info. I still for the life of me can't remember where I originally saw this info. Regardless, maybe this fix should be documented and stuck in one of the tech sections or something.
Cheers!

#78
09-26-2006, 02:34 PM

Freshman User
Join Date: Oct 2002
Location: Crete USA
Posts: 29
Likes: 0
Received 0 Likes
on
0 Posts
#80
09-26-2006, 10:05 PM
OK, since this is a popular thread and I had to redo my locks since I put the caps on backward, I thought I would take a few more pics to help out. This really is a easy fix for anyone with some mechanical skills so don't be afraid to try.
This is the way I do it, others may approach it different but it has worked for me.
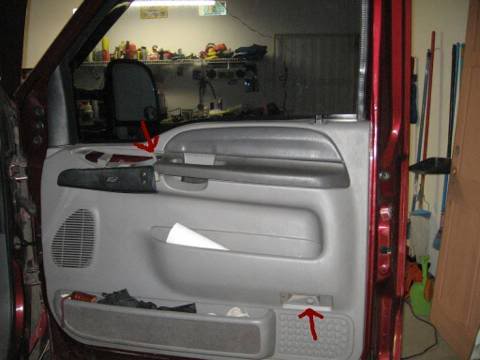
Start off by taking the (fake) door light cover off with a small flat screwdriver, it pops right off. Then with your hand pull the plastic piece with the window/door lock control up from the front. Now pull out the wiring plugs from the switches.
There will be two screws behind these two parts, using a 9/32 on a 1/4 inch socket wrench with extension remove these two screws. Now lift the entire door panel up about an inch and then out.
Next remove the plastic plug (1) from the door. The nut for the door handle is in here. Then remove the three screws (2) with a T-25 torx bit or driver. This is the door latch that holds the actuator. Next I removed the bolt (3) that hold the bottom half of the window track in place, it is a 10mm. Removing this makes the latch much easier to get out of the door.
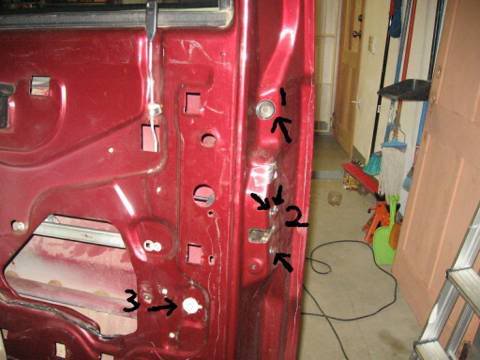
Now I remove the door latch, some say they did not but it is easy to do and makes the rods more accessible. You will need a 1/4 inch ratchet with extension and a 7/16 socket. The first nut is straight in from the plastic plug you removed. The other nut is on the opposite corner of the handle and is better accessed with a 7/16 wrench.
Once you have the handle out I release the door handle rod at the bottom toward the latch (2). There is a push clip that holds it in place, just pull on it to release. The door lock (where key goes) rod has a plastic clip also but is a different style (1). It is bent into a U-shape at the end and since I broke one the first time, I now slid it off the "U" by turning the entire (now free from door except this rod) handle around the "U" until it is free.
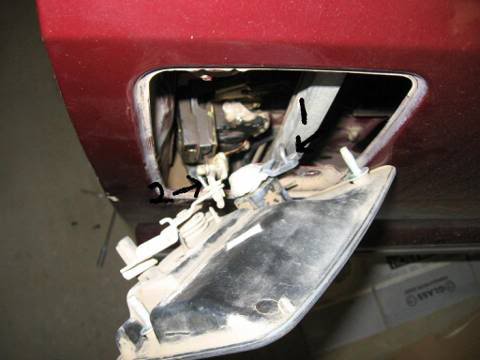
This pic better shows where to release the rods. 1 is the U-shaped rod for the door lock (key) and 2 is the plastic clip that held the door handle rod in place.
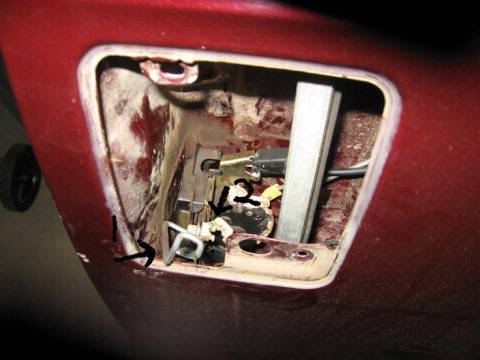
Remove the plastic clip at the latch assembly for the manual door lock rod. I do not have a photo of this but you pull the plastic clip from around the rod and pull the rod out of it's hole, very simple once you see it. Next remove the plastic clips that hold the inside door hand rod in place and the wiring harness for the latch. Just trace these and you will find them, they can be seen easy with the door panel off.
You will need to work the latch Assembly down, this is where removing the 10mm nut from the window track helps as you have more room to work. Once you have it out the hole in the lower part of the door you need to remove the rod holding the inside handle in place. At this point I popped out the rod plastic housing from the latch and used a small pair of pliers to grab the ball at the end of the rod (more like cable) to work the cable free.

Last part is just to remove the two electrical connectors from the latch assembly. Now the latch is free from the door and can be taken apart on your work bench.

Once again this is how I did it, others have done it different so there is no one right or wrong way. I tried to show this for the first timer, as many people posting here have never done this before.
Legal stuff:
Void where prohibited, not legal in all 50 states, CA residents must first pay sales tax on a new actuator and then still can not use this. Always wear safety goggles, never throw actuator into open flame, small parts are not to be taken internally.
This is the way I do it, others may approach it different but it has worked for me.
Start off by taking the (fake) door light cover off with a small flat screwdriver, it pops right off. Then with your hand pull the plastic piece with the window/door lock control up from the front. Now pull out the wiring plugs from the switches.
There will be two screws behind these two parts, using a 9/32 on a 1/4 inch socket wrench with extension remove these two screws. Now lift the entire door panel up about an inch and then out.
Next remove the plastic plug (1) from the door. The nut for the door handle is in here. Then remove the three screws (2) with a T-25 torx bit or driver. This is the door latch that holds the actuator. Next I removed the bolt (3) that hold the bottom half of the window track in place, it is a 10mm. Removing this makes the latch much easier to get out of the door.
Now I remove the door latch, some say they did not but it is easy to do and makes the rods more accessible. You will need a 1/4 inch ratchet with extension and a 7/16 socket. The first nut is straight in from the plastic plug you removed. The other nut is on the opposite corner of the handle and is better accessed with a 7/16 wrench.
Once you have the handle out I release the door handle rod at the bottom toward the latch (2). There is a push clip that holds it in place, just pull on it to release. The door lock (where key goes) rod has a plastic clip also but is a different style (1). It is bent into a U-shape at the end and since I broke one the first time, I now slid it off the "U" by turning the entire (now free from door except this rod) handle around the "U" until it is free.
This pic better shows where to release the rods. 1 is the U-shaped rod for the door lock (key) and 2 is the plastic clip that held the door handle rod in place.
Remove the plastic clip at the latch assembly for the manual door lock rod. I do not have a photo of this but you pull the plastic clip from around the rod and pull the rod out of it's hole, very simple once you see it. Next remove the plastic clips that hold the inside door hand rod in place and the wiring harness for the latch. Just trace these and you will find them, they can be seen easy with the door panel off.
You will need to work the latch Assembly down, this is where removing the 10mm nut from the window track helps as you have more room to work. Once you have it out the hole in the lower part of the door you need to remove the rod holding the inside handle in place. At this point I popped out the rod plastic housing from the latch and used a small pair of pliers to grab the ball at the end of the rod (more like cable) to work the cable free.
Last part is just to remove the two electrical connectors from the latch assembly. Now the latch is free from the door and can be taken apart on your work bench.
Once again this is how I did it, others have done it different so there is no one right or wrong way. I tried to show this for the first timer, as many people posting here have never done this before.
Legal stuff:
Void where prohibited, not legal in all 50 states, CA residents must first pay sales tax on a new actuator and then still can not use this. Always wear safety goggles, never throw actuator into open flame, small parts are not to be taken internally.
Last edited by ssjrsw; 09-26-2006 at 10:14 PM.
#81
09-29-2006, 08:18 PM

Hi
Found this thread on another ford truck site. Glad I did. I just stuck so foil in my passanger side motor and now its stronger then new.
Wish I had seen the photo's of the (2) tabs being bent back before I attempted mine. The case is a little worse for the wear, but it works.
Now I am a member here too so I'll have to look around and see what else I need to get up to speed on.
Thanks
Jim
#82
10-13-2006, 10:32 AM

Any pics of this process?
Did anyone who successfully performed this fix take any pictures during the procedure? I can follow written directions well enough but it helps alot to know what the expect to see by way of visuals. A descriptoin of the part is one thing but a picture speaks a thousand words!
Please post or email to me if you do have pics.
<remove_this>trobinson017@yahoo.com<remote_this>
Please post or email to me if you do have pics.
<remove_this>trobinson017@yahoo.com<remote_this>
#83
10-13-2006, 10:33 AM
#84
12-18-2006, 11:45 PM

#86
12-19-2006, 08:03 AM
Originally Posted by RidinHigh90
I have a 00 Excursion and have owned it for a year...bought it and none of hte door locks even ATTEMPT at moving...should i even tryyy this or shuld i jsut buy new actuators? seems that jsut u guys with slow and "attempting" locks use THE FIX thanks!
When I bought my 00 Ex.. the only one that worked was the driver door. I repaired all of them to include the rear lift gate. Jim
#87
12-19-2006, 09:02 AM
Can't get my assembly out of door
I have a 2000 Ranger SC. The exterior door handle does not look like the pictures posted here. It's not an insert into the door, it's much like the tailgate handle. It just goes thru the door and hooks onto stationary pins. I can't remove it to get at the metal rod that runs from there to the latch assembly. Since both ends of this rod are bent in such a way that I can't work them out of their "holes" I'm stuck. If I can learn a way or figure out a way to get that rod disconnected from one end I can proceed.
Any help would be much appreciated.
Tim
Any help would be much appreciated.
Tim
#88
12-20-2006, 04:08 PM
Originally Posted by TimRob
I have a 2000 Ranger SC.
Originally Posted by RidinHigh90
I have a 00 Excursion and have owned it for a year...bought it and none of hte door locks even ATTEMPT at moving...should i even tryyy this or shuld i jsut buy new actuators? seems that jsut u guys with slow and "attempting" locks use THE FIX thanks!
#89
12-21-2006, 08:40 AM
#90
12-24-2006, 08:52 PM

Freshman User
Join Date: Nov 2006
Location: Glendale Az
Posts: 46
Likes: 0
Received 0 Likes
on
0 Posts