Now it's my turn
#1
 10-03-2005, 09:51 PM

Now it's my turn
There have been quite a few posts of different people's progress on their project and other posts asking how metal is formed for patches and what tools to use. Well, here are pictures of the latest progress on the 48/51 F-4 I am working on. The cab from the '48 was in a little rougher shape than I thought, like that's a real suprise! I had to rebuilt all four corners, I replaced a lot of metal this last weekend. I figured I spent about twenty hours cutting and welding. I did a lot cutting and welding

I still have to apply filler and smooth everything out. I plan to apply POR 15 both on the top and bottom of the floor. The main part of the floor inside the cab is in very good condition but has a lot of surface rust. I don't want to send it out to be blasted because money and time restraints, I want to get the cab mounted on the frame before the end of the week. This is suppose to be a low budget mild restoration, yeah right.
Here are a few pictrures of the rear corners, I took pictures of the front corners but they are kind of hard to make out what exactly I had to do:
Inside driver rear corner
Outside driver rear corner-before
Outside driver rear corner-now
Inside passenger rear corner
Outside passenger rear corner-before
Outside passenger rear corner-now
#2
10-03-2005, 10:04 PM

#3
10-03-2005, 10:28 PM
Senior User
Join Date: Jun 2005
Location: Canton,Oh
Posts: 284
Likes: 0
Received 0 Likes
on
0 Posts
#4
10-03-2005, 10:48 PM
Post Fiend
Join Date: Sep 2004
Location: Near Fresno, California
Posts: 5,231
Likes: 0
Received 0 Likes
on
0 Posts
#5
10-04-2005, 12:06 AM
I traced the contour of the panel onto the sheet metal. I measured the "steps" and added those dimensions to the main tracing. I then cut slits in the sheet and bent what I could on my brake, the rest I hammered on the edge of my rail road track anvil, first one way then I flipped it over and bent the second edge to form a "Z" ledge.
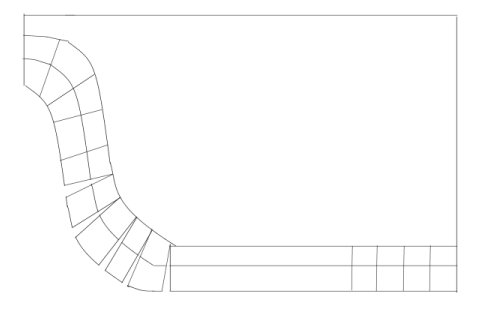
The slits on the left side formed the "S" and the slits on the right allowed the metal to follow the contour of the corner of the cab. I try to trim the "fingers" of the slitted parts so they don't overlap. You can do this when you test fit the piece. Mark the areas that overlap and trim off the excess. You want the "fingers" to butt up against each other so you don't have a gap to fill with weld but if they overlap you have a bulge that's hard to grind level.
I layed the piece over the rusted area and traced the edge of the patch panel on the body. I did this so I knew where my new piece was going to be and then I cut out the rusted metal. I then lined up the patch panel to the line I drew and tack welded it in a few places to hold it in position. I then started to clamp the edges down in the position I wanted them in and tacked the slits together. After I had everything tacked into place I started to stich weld everything together, doing a small stitch weld here and there until they became one solid weld. I welded one slit and then moved to another part of the patch so I wouldn't heat up one area too much a one time.
#7
10-04-2005, 01:07 AM
Trending Topics

#9
10-04-2005, 07:26 AM
Posting Guru
Join Date: Feb 2002
Location: Michigan
Posts: 1,392
Likes: 0
Received 0 Likes
on
0 Posts
#10
10-04-2005, 09:11 AM
#11
10-04-2005, 09:27 AM
Bob -
Very nice design solution. I have worked designing sheet metal stuff for years and, usually, that kind of part requires a die (in production) or a shrinker/stretcher (for a one-off part). Your solution of pie-cutting the flanges is a very good one. Sequencing the bends thru the brake operation is the tricky part. Labor intensive, to be sure, but very nicely done. Congratulations!
Very nice design solution. I have worked designing sheet metal stuff for years and, usually, that kind of part requires a die (in production) or a shrinker/stretcher (for a one-off part). Your solution of pie-cutting the flanges is a very good one. Sequencing the bends thru the brake operation is the tricky part. Labor intensive, to be sure, but very nicely done. Congratulations!
#12
10-04-2005, 11:36 AM
Another trick I some times use is to make a template out of card stock or thin cardboard. It's easy to cut and it's cheap. You can make all of you patches out of card board, test fit the parts together to see how they fit together and when you're satified, trace their shapes on the sheet metal and cut.
I don't do this often because it's a little more time consuming and I am always in a hurry to get the project done but if you're new to doing patch work it's the way to go.
I don't do this often because it's a little more time consuming and I am always in a hurry to get the project done but if you're new to doing patch work it's the way to go.
#15
10-04-2005, 05:07 PM
Post Fiend
