1948 - 1956 F1, F100 & Larger F-Series Trucks Discuss the Fat Fendered and Classic Ford Trucks

1950 F-2 Restoration

Thread Tools
 
Search this Thread
 
  #16  
Old 03-25-2017, 11:34 PM
seanb50's Avatar
seanb50
seanb50 is offline
Junior User
Thread Starter
Join Date: Mar 2017
Location: Grants Pass, OR
Posts: 66
Likes: 0
Received 9 Likes on 5 Posts
Here are a few more pictures of the other body panels. I remember the running boards having quite a bit of rust, so they must have been repaired well. Unless I'm remembering the running boards on my 45, its been so long things tend to run together.

Name:  A2DFE6BF-3DA2-45BC-AAA5-45B04861CAC0_zps44jvvkbf.jpg
Views: 955
Size:  164.0 KB

Name:  B68F0602-86F9-4A28-8785-3874F4A8371A_zpsphab2e01.jpg
Views: 942
Size:  130.5 KB

Name:  8ABCE8E0-C491-4127-99FA-A858614CA7B5_zpsjie7zshc.jpg
Views: 962
Size:  126.0 KB

Name:  1242B5BA-84B3-41D4-8DF5-085D70794234_zpsblnrwxqp.jpg
Views: 961
Size:  139.5 KB

Name:  CE9D6F6F-87E2-4D04-82C2-4BE1140C505E_zpsyanuaojq.jpg
Views: 944
Size:  152.5 KB

Name:  6E42C043-34E2-4159-AB2B-96AFBFBBE10F_zps128dj9xc.jpg
Views: 921
Size:  174.4 KB

Name:  F07D7B1F-6066-4F86-AABE-C95AD25D2C40_zps63f7unfl.jpg
Views: 944
Size:  191.1 KB
 
  #17  
Old 03-25-2017, 11:38 PM
seanb50's Avatar
seanb50
seanb50 is offline
Junior User
Thread Starter
Join Date: Mar 2017
Location: Grants Pass, OR
Posts: 66
Likes: 0
Received 9 Likes on 5 Posts
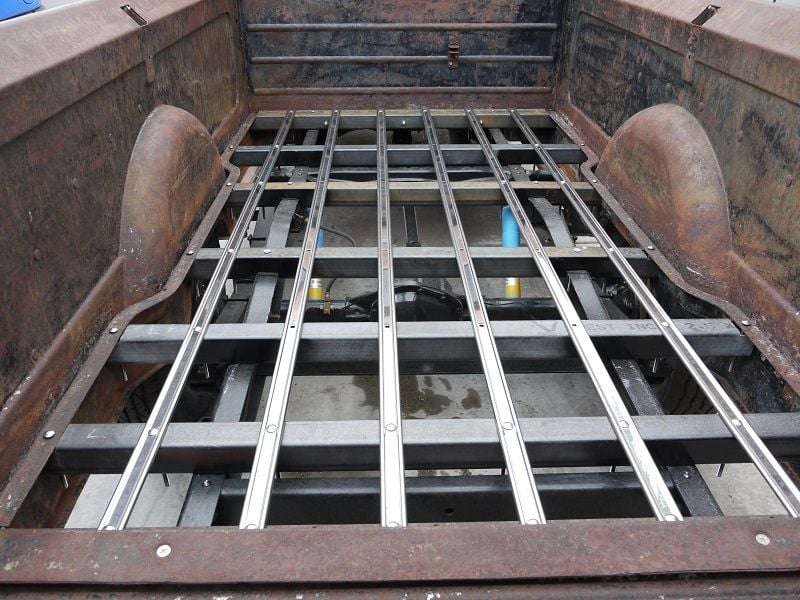
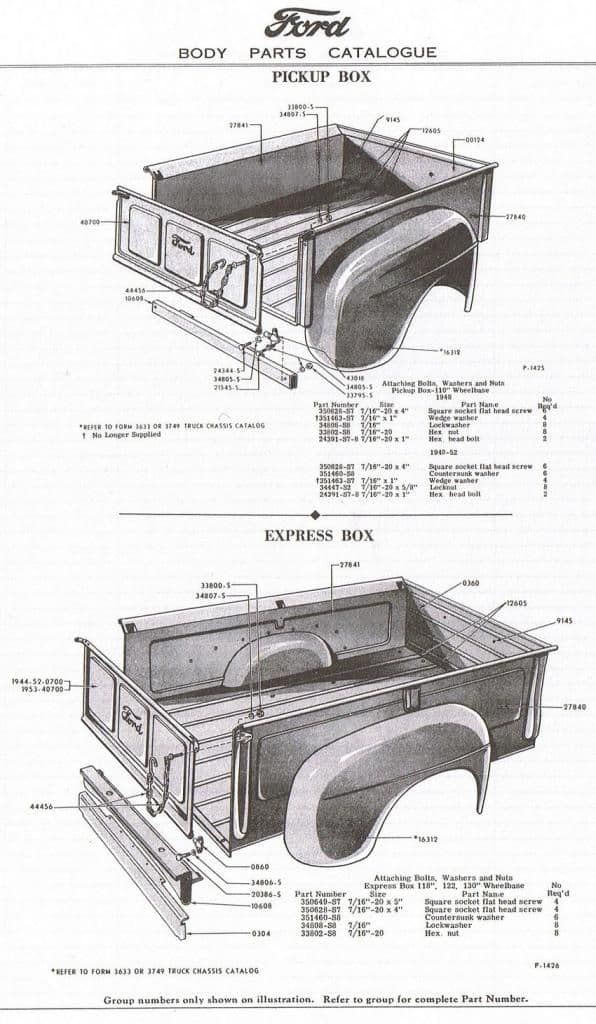
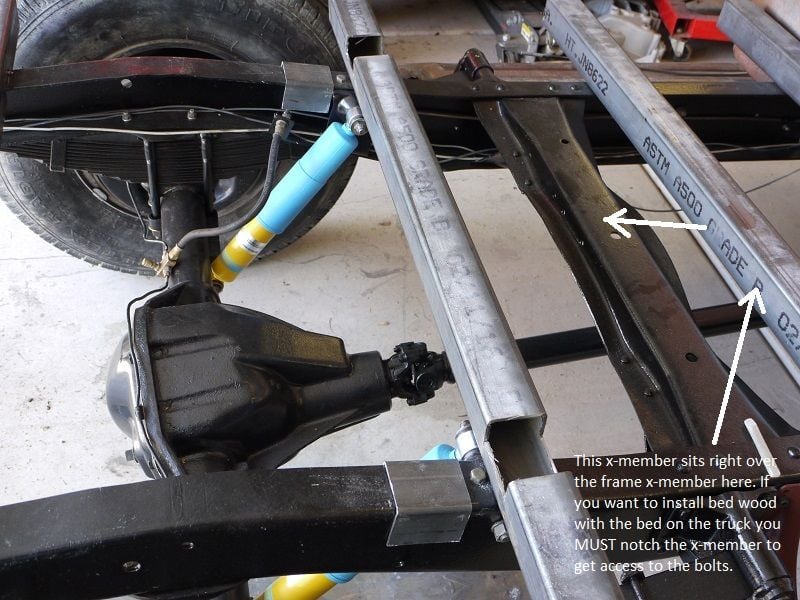
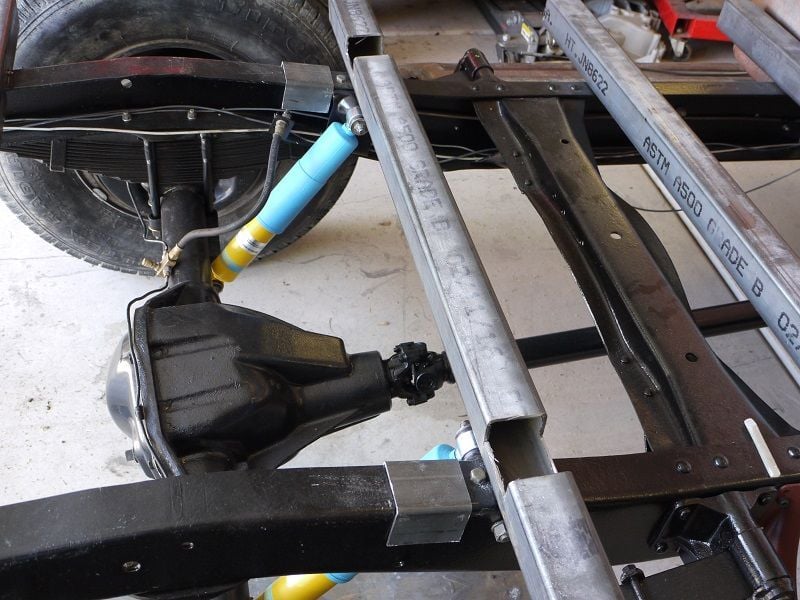
I'm missing the cross braces for the bed. They must have been taken out by the shop it was at for a while since they are the ones that did the sand blasting on that part. If anybody has pictures of what they look like, or at least some kind of measurement for how it sits in relation to the frame of the truck I can make something that will work.
 
  #18  
Old 03-25-2017, 11:42 PM
Scotty's 52 F3's Avatar
Scotty's 52 F3
Scotty's 52 F3 is offline
Fleet Mechanic
Join Date: Aug 2015
Location: Marana, Arizona
Posts: 1,992
Received 56 Likes on 49 Posts
The cross braces were originally wood. Bruce Horkey's has replacements. Maybe has dimensions?
 
  #19  
Old 03-25-2017, 11:52 PM
ALBUQ F-1's Avatar
ALBUQ F-1
ALBUQ F-1 is online now
Fleet Owner
Join Date: Jul 2004
Location: NM
Posts: 26,799
Received 607 Likes on 377 Posts
Looks like a very solid truck! Please read up on the very necessary breathing apparatus needed for spraying BC/CC, it can do permanent damage to your lungs!
 
  #20  
Old 03-25-2017, 11:56 PM
seanb50's Avatar
seanb50
seanb50 is offline
Junior User
Thread Starter
Join Date: Mar 2017
Location: Grants Pass, OR
Posts: 66
Likes: 0
Received 9 Likes on 5 Posts
Originally Posted by Scotty's 52 F3
The cross braces were originally wood. Bruce Horkey's has replacements. Maybe has dimensions?
I should've known that... I have a bed floor kit from LMC floating around here someplace. Not sure, but I doubt it would have come with the cross braces? If somebody could just tell me where it sits in relation to the frame at various points, I could put in metal bracing and then just put a thin rubber isolator between the bed and the frame.
 
  #21  
Old 03-26-2017, 12:01 AM
seanb50's Avatar
seanb50
seanb50 is offline
Junior User
Thread Starter
Join Date: Mar 2017
Location: Grants Pass, OR
Posts: 66
Likes: 0
Received 9 Likes on 5 Posts
Originally Posted by ALBUQ F-1
Looks like a very solid truck! Please read up on the very necessary breathing apparatus needed for spraying BC/CC, it can do permanent damage to your lungs!
I have a few respirators floating around here somewhere. I always wear a dust mask when sanding paint or filler. I remember I used to have one that has a couple different filters, I always used one filter set for sand blasting, and swapped to another filter set for painting. I'll have to see if I can find that one.

Unless you are talking about something more than a regular cartridge style respirator? Can you point me in the right direction to do a little more research on the topic in order to get up to speed with what is current now a days?
 
  #22  
Old 03-26-2017, 12:08 AM
Scotty's 52 F3's Avatar
Scotty's 52 F3
Scotty's 52 F3 is offline
Fleet Mechanic
Join Date: Aug 2015
Location: Marana, Arizona
Posts: 1,992
Received 56 Likes on 49 Posts
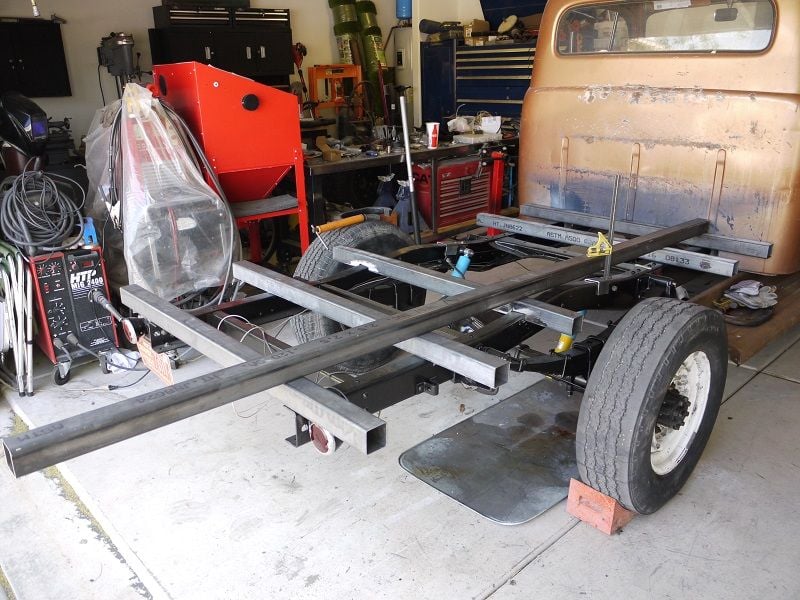
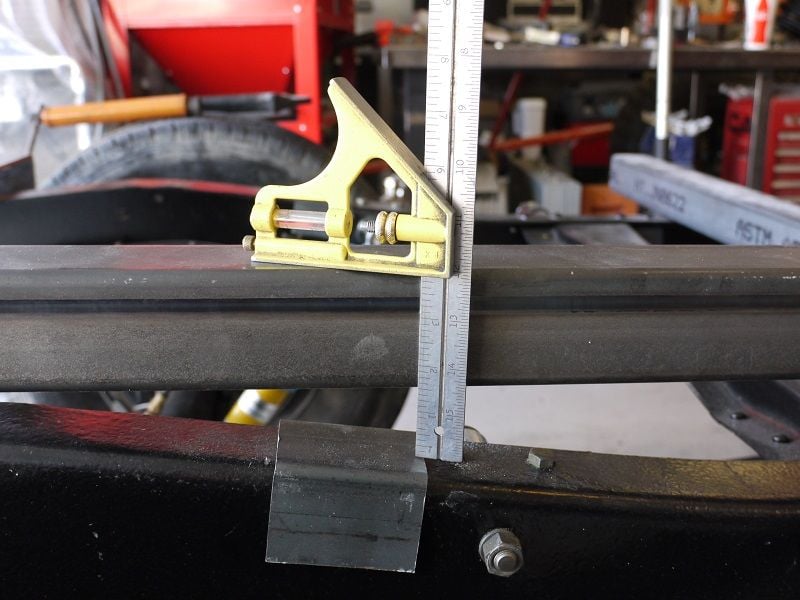
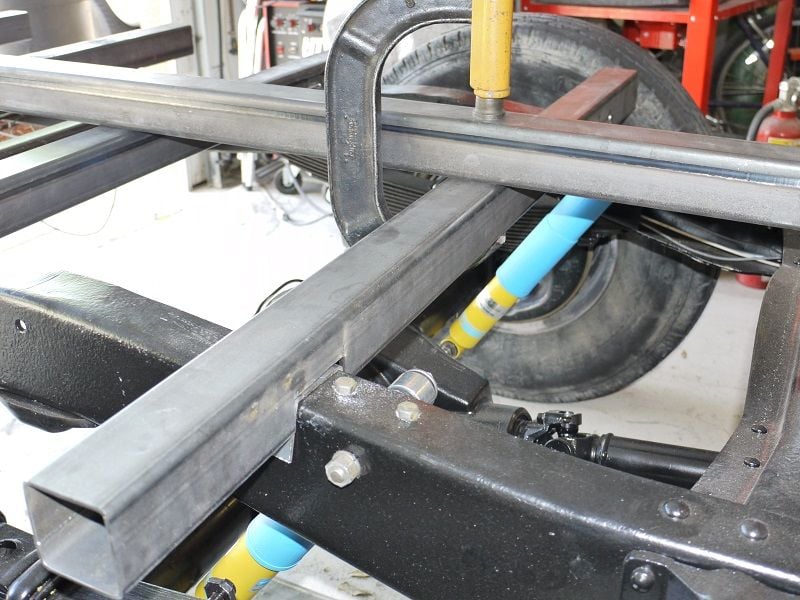
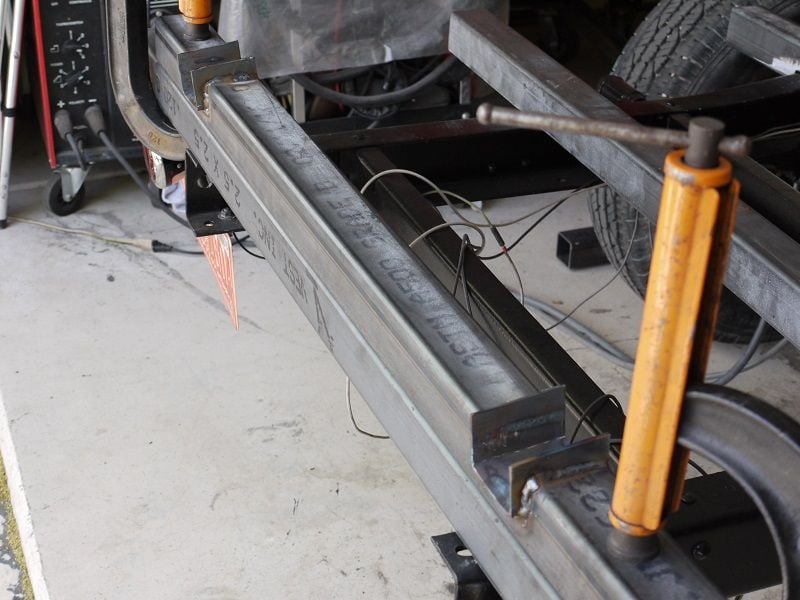
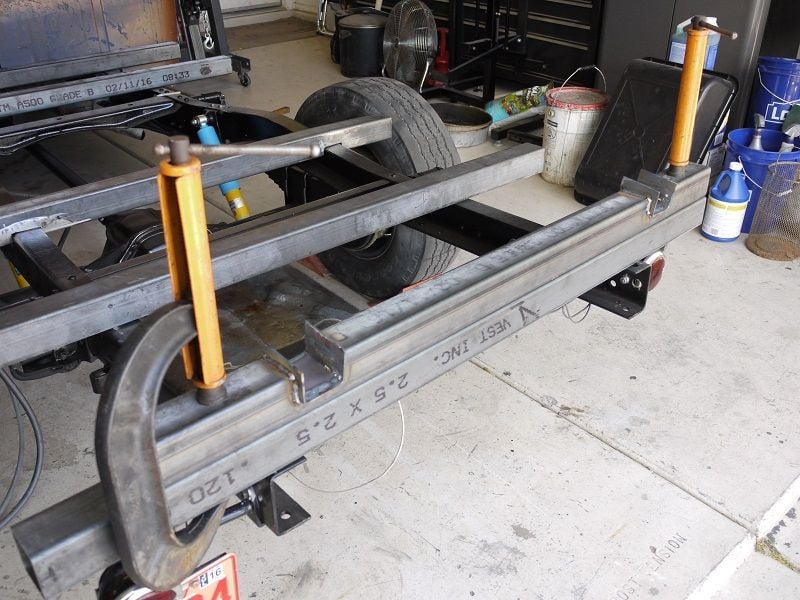
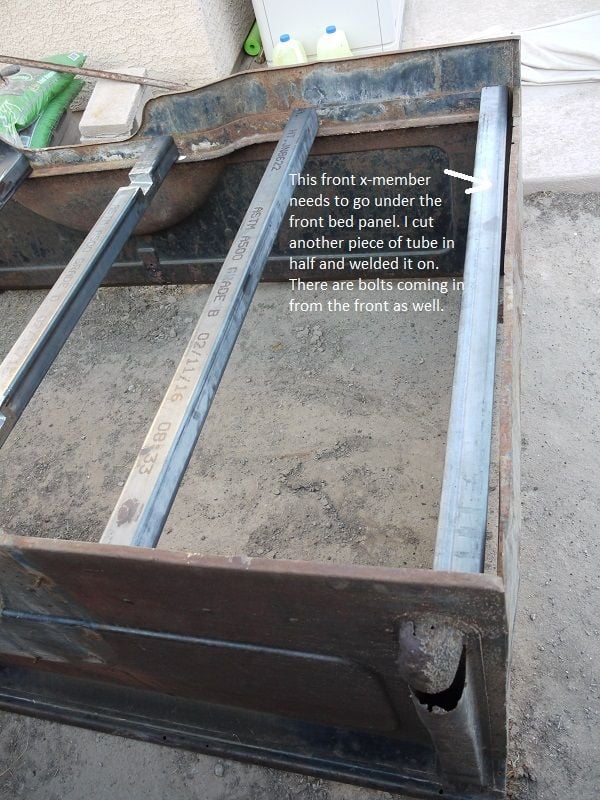
I used 2 1/2" sq tube. I think original wood was 2 1/2" tall by 1 1/2" wide. Front one is bigger to go under front of bed.

 
  #23  
Old 03-26-2017, 12:11 AM
Scotty's 52 F3's Avatar
Scotty's 52 F3
Scotty's 52 F3 is offline
Fleet Mechanic
Join Date: Aug 2015
Location: Marana, Arizona
Posts: 1,992
Received 56 Likes on 49 Posts
  #24  
Old 03-26-2017, 12:29 AM
seanb50's Avatar
seanb50
seanb50 is offline
Junior User
Thread Starter
Join Date: Mar 2017
Location: Grants Pass, OR
Posts: 66
Likes: 0
Received 9 Likes on 5 Posts
Originally Posted by Scotty's 52 F3
I used 2 1/2" sq tube. I think original wood was 2 1/2" tall by 1 1/2" wide. Front one is bigger to go under front of bed.

Thanks Scotty! I like what you did, I'll probably go that route. It looks like you notched the two in order to clear the hump in the frame?
 
  #25  
Old 03-26-2017, 12:45 AM
Scotty's 52 F3's Avatar
Scotty's 52 F3
Scotty's 52 F3 is offline
Fleet Mechanic
Join Date: Aug 2015
Location: Marana, Arizona
Posts: 1,992
Received 56 Likes on 49 Posts
  #26  
Old 03-26-2017, 12:47 AM
Scotty's 52 F3's Avatar
Scotty's 52 F3
Scotty's 52 F3 is offline
Fleet Mechanic
Join Date: Aug 2015
Location: Marana, Arizona
Posts: 1,992
Received 56 Likes on 49 Posts
The tubing I used is over kill but all I could find at 2 1/2" locally. Later I found a place that had 2 1/2" x 1" which might be better?
 
  #27  
Old 03-26-2017, 12:54 AM
seanb50's Avatar
seanb50
seanb50 is offline
Junior User
Thread Starter
Join Date: Mar 2017
Location: Grants Pass, OR
Posts: 66
Likes: 0
Received 9 Likes on 5 Posts
Originally Posted by Scotty's 52 F3
The tubing I used is over kill but all I could find at 2 1/2" locally. Later I found a place that had 2 1/2" x 1" which might be better?
Thanks for posting the details! Looks like you did a really good job. I like the overkill factor. But with the cost of buying tubing, I'll have to think about it a bit. I'm not opposed to using a smaller diameter tubing, and still using a wood spacer/isolator between the bed and the frame. Wood is fine for that, I just don't like it being structural for bed integrity like the original ones must have been.

There is talk of using this truck as a truck once it is done. My mom wants to drive it regularly, and we have talked of putting logos on and using it on the farm for certain things such as going to market.
 
  #28  
Old 03-26-2017, 01:33 AM
120mm's Avatar
120mm
120mm is offline
Freshman User
Join Date: Mar 2017
Location: Afghanistan or Iowa
Posts: 26
Likes: 0
Received 0 Likes on 0 Posts
Now, there is significant cancer on some of the parts, bad enough that large portions will likely disappear when I try and sandblast them. Probably why dad hadn't sandblasted and painted them yet. What are my options here? I could probably blast them anyway, and hope the general shape is retained enough then fiberglass them. How do all these parts install on the truck? I can figure out the inside of the cab stuff easy enough, but the other stuff I don't know about...
I would never sand blast small, thin parts. I'd use electrolysis, instead.

Rust removal by electrolysis


I'd do just about anything to avoid media blasting parts. If I had a big enough tub, I'd even do body panels this way.
 
  #29  
Old 03-26-2017, 02:04 AM
seanb50's Avatar
seanb50
seanb50 is offline
Junior User
Thread Starter
Join Date: Mar 2017
Location: Grants Pass, OR
Posts: 66
Likes: 0
Received 9 Likes on 5 Posts
Originally Posted by 120mm
I would never sand blast small, thin parts. I'd use electrolysis, instead.

Rust removal by electrolysis

https://www.youtube.com/watch?v=qi8qIxK4IlA

I'd do just about anything to avoid media blasting parts. If I had a big enough tub, I'd even do body panels this way.
That's cool, I like the idea. However what tells you when it has been long enough and the part is ready? Is too long going to hurt? Too little time and allows rust to come back from underneath whatever you coated it with to resurface years later?

Big problem... how do you dispose of the solution once you are done?
 
  #30  
Old 03-26-2017, 02:46 AM
120mm's Avatar
120mm
120mm is offline
Freshman User
Join Date: Mar 2017
Location: Afghanistan or Iowa
Posts: 26
Likes: 0
Received 0 Likes on 0 Posts
Originally Posted by seanb50
That's cool, I like the idea. However what tells you when it has been long enough and the part is ready? Is too long going to hurt? Too little time and allows rust to come back from underneath whatever you coated it with to resurface years later?

Big problem... how do you dispose of the solution once you are done?
Basically, you pull the part out and wash the goop off. If you're happy with the result, it's done. If not, put it back in. I can't believe it can be left in too long, but the most I've heard of someone doing it is overnight. The more powerful the electrical feed, the faster it works, within limits.

The best thing about this process is that the rust doesn't just go away; the part's surface molecules are also changed electrically to repel oxygen molecules, which are what foster rust formation due to the ionic bias.

The solution after you're done is utterly inert. It's literally water, bicarbonate soda and iron oxide. All that stuff occurs naturally and can go down the drain or even thrown on the ground. If you are worried about it's alkyd properties, put some vinegar in it until it quits foaming.

Note: you ARE going to produce some hydrogen gas during the process, so maybe next to your water heater or near other open flames might not be the best place to do this.


Quick Reply: 1950 F-2 Restoration


All times are GMT -5. The time now is 10:25 AM.