When you click on links to various merchants on this site and make a purchase, this can result in this site earning a commission. Affiliate programs and affiliations include, but are not limited to, the eBay Partner Network.
Well its time I start my build. I've been reading everyone else's and gathering inspiration. Now it's time. Just ordered some sheet metal from DC. Shipping cost and everyone's help I decided Dennis Carpenter had some decent stuff.
Darn it Here goes the picture first then text. GRR.
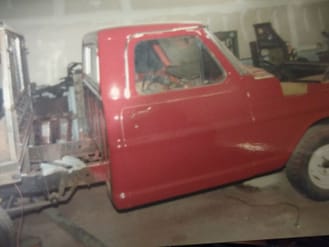
So anyway I've been finishing the tear down on my 1971 f100 short bed 2wd Ranger. Current motor is mid 80's 302, 2v and a 3 speed manual shift on the floor. I bought the truck in 1987 as a parts truck only to discover it was too nice to part up. So I turned my '71 4x4 360 into a parts truck.
Any how, The truck has been done over once by me in about 1990. Unfortunately I removed the bed and built a flat bed, change out the 302 original motor for a 351M/400 and a NP435 trans. Those are three things I regret. The trans had shift fork problem and wouldn't stay in gear. Ended up putting the 3 speed back in and that problem was solved. The next problem I suffered was the defective oil pan. Ended up with a connecting rod poking a hole in the oil pan and a piston going up through the cam. I don't think that motor didn't like 5000 rpm too much. So off to the PNP to find the motor that is currently in the truck. A mid 80's 302. (Which will be replaced again by the 94 5.0 engine that my bronco is going to supply.) Now on to the bed. I built a nice flat bed that I still have but I want to bring my truck back to something more stock looking and Flair side beds are a bit rare around the Northeast where I am. So I will compile some photos of what I have and start working towards my end goal to have a decent 1971 F100 toy to help learn my Grandson the right way to get into trouble
Thanks smoky diesel. I spent a lot of time finding someone with quality parts. My budget is not big but I'm not afraid to get my hands dirty. I have no set time frame. I just want something that will be around after I'm gone.
So here is where the resent project starts. Feb 28,2016. Yes there is a truck under that 20 year old pile of stuff.
It took a while to find a place for all that crap.😷
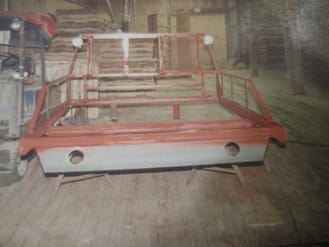
Once I had it unearthed I decided to test fit a newer style side bed
The bed fits good and I like the style fiberglass fenders but I'm not sure if I'll use it as the metal is really rusted and I'm thinking a period correct bed and fenders might be better.
Looks like a nice project. Personally I would find a period correct bed, the one you have doesn't look bad I just feel period correct helps it to maintain the original style.
3X on the period correct bed. IMHO, the older fenders look a lot better. I personally was never a fan of the 80/ fenders.
Nice to see a build thread from you Brian. I'm kickin' back to watch and enjoy. We all got your back.
So last night I spent some time looking through some old photos of my truck. I could not find any of it glory days, but I did find some of my previous build. Please excuse the quality I used my cell phone to take pictures of my pictures.
The bed was off an 82 f150. I came by it for free. I had never put it on the truck, it was dismantled for storage. So when I was ready I test fit it.
I must correct myself, In my first post I sail it was a flair side, but in reality it was a style side. Just wanted to clear that up. If I had my way with an unlimited budget I would find a Style side bed again, but I doubt that will happen. I will be able to use some of the flair side bed parts like the tailgate and bed front as they are in great shape. The rest of the bed will come from an aftermarket kit.
I spent some time last winter practicing my welding skills and sheet metal bending and fitting on the bedside. Here is some of what I did.
Good idea to practice. Looks like you're ready to get started. After I run a 80 Amp, 220V line to my garage, I'll be ready to practice too. Spring is coming!
Good idea to practice. Looks like you're ready to get started. After I run a 80 Amp, 220V line to my garage, I'll be ready to practice too. Spring is coming!
80 amp is some serious power. Are you planning on tig welding thick aluminum? The welder that I used in the practice round is a Lincoln 220v. Its running on a 30 amp circuit. This is at my work. At home I have a Hobart 115v 20 amp that will be just fine for sheet metal. I use .024 for sheet metal. If I need to do structural welding I have the Lincoln mig at work or stick welders that I would use depending on the job.
So I done get a ton of time to do the things I want, but I figured while I was waiting for new metal to arrive I would do a few things on my truck.
First I tuned up my little Hobart Handler 120. Change the wire to .024 and install the appropriate tip. Well as my luck would have they change the thread size for the Tweco gun on my welder and nobody has it. No problem I just removed the tip holder and figured out what size thread ( 6mm 1.0 thread) will need to re-tap the holder. So That only ate up half of of my Saturday.
Now lets weld up the floor around the rear cab mount bolt hole.
Well turns out the under structure has some problems and that will be another post. I had to remove this to be able to fit a socket into the hole then use the body mount and bolt to hold the under structure so I could jack the cab up and bend the under structure so I could get the fit right.
My Hobart requires a 50 amp service and I have a 220V air compressor that needs a 20Amp breaker. and the extra 10 amps will just insure that the house lights don't flicker when I use the welder and the compressor at the same time.
Gary your welder must be fairly large. I have a Miller TIG at work that requires 50A breaker. I haven't had much luck TIG welding yet. MIG welding is so much easier.
Well its like Christmas again today. Brown truck clause just dropped a box down my chimney. Yeah Now I have no excuse except the 50 and 60 hrs a week I already work.
Just missing the floor supports. I already knew they were out of stock when I purchased all this stuff. I am surprised they didn't hold up shipping until they had everything. Time to get to work
 01-18-2017, 04:26 PM


 So off to the PNP to find the motor that is currently in the truck. A mid 80's 302. (Which will be replaced again by the 94 5.0 engine that my bronco is going to supply.) Now on to the bed. I built a nice flat bed that I still have but I want to bring my truck back to something more stock looking and Flair side beds are a bit rare around the Northeast where I am. So I will compile some photos of what I have and start working towards my end goal to have a decent 1971 F100 toy to help learn my Grandson the right way to get into trouble


 MIG welding is so much easier.


 Time to get to work


