NashvegasMatt's build journey 72'
#1
 08-25-2016, 09:23 AM

Join Date: Aug 2016
Posts: 504
Likes: 0
Received 0 Likes
on
0 Posts
NashvegasMatt's 72’ F100 build journey (Pics galore)
This will be my project update and build thread. Here’s what we’ve done so far:
- 1972 F100 Ranger
- 302 5.0
- C4 transmission
Installed Upgrades/Updates
- PerTronix Ignitor
- PerTronix 40k 1.5 Coil
- Edelbrock valve covers/Felpro gaskets
- FoMoCo shorty headers, 2.5” exhaust, thrush welded mufflers
- Grant steering wheel and adapter
- Replacement turn signal switch, wiring, and chrome lever
- All 4 drums totally rebuilt, mostly Wagner parts
- Wiring for turn signals/brake lights fixed
TO BE DONE:
New Radiator
Radio install
WaterPump
Steering coupler research, possibly solid unit elbow swap out
Carpet
Window Channel seals
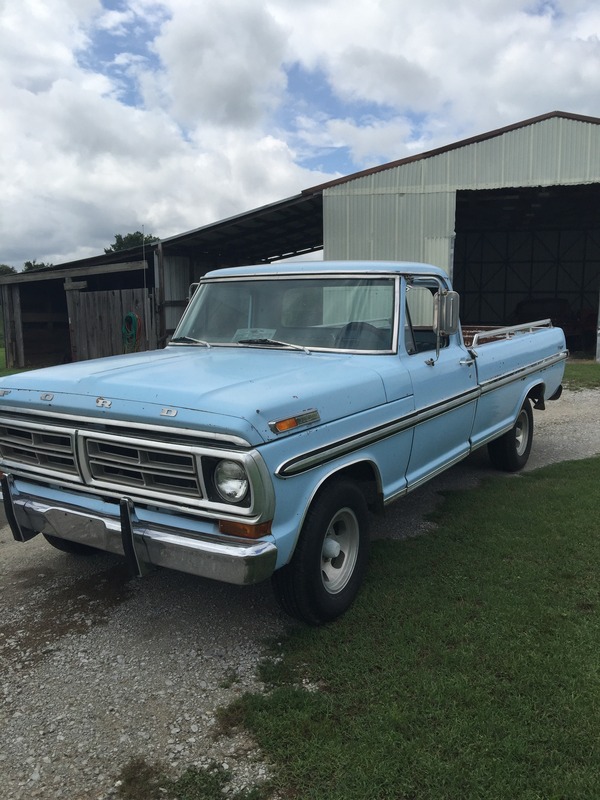
Picked her up from a guy in the middle of nowhere TN. This is how she looked when I bought her.
- 1972 F100 Ranger
- 302 5.0
- C4 transmission
Installed Upgrades/Updates
- PerTronix Ignitor
- PerTronix 40k 1.5 Coil
- Edelbrock valve covers/Felpro gaskets
- FoMoCo shorty headers, 2.5” exhaust, thrush welded mufflers
- Grant steering wheel and adapter
- Replacement turn signal switch, wiring, and chrome lever
- All 4 drums totally rebuilt, mostly Wagner parts
- Wiring for turn signals/brake lights fixed
TO BE DONE:
New Radiator
Radio install
WaterPump
Steering coupler research, possibly solid unit elbow swap out
Carpet
Window Channel seals
Picked her up from a guy in the middle of nowhere TN. This is how she looked when I bought her.

Last edited by NashvegasMatt; 02-04-2018 at 08:21 AM. Reason: Updating mods
#2
08-25-2016, 09:27 AM
Join Date: Aug 2016
Posts: 504
Likes: 0
Received 0 Likes
on
0 Posts


#3
08-25-2016, 09:32 AM
Join Date: Aug 2016
Posts: 504
Likes: 0
Received 0 Likes
on
0 Posts


#4
08-25-2016, 09:44 AM
Posting Guru
#5
08-25-2016, 09:54 AM

Posting Guru
#6
08-25-2016, 10:10 AM
Great looking truck! It looks like it hasn't been overly molested lol The negative battery terminal is looking pretty rough like John said, but as long as the block is grounded to the frame or body it should be good...given that the circuit is closed and roughly all wires are the same gauge. Not sure what's going on with the left side vacuum ports? Other wise good job on the doors very nice!
#7
08-25-2016, 10:12 AM
Join Date: Aug 2016
Posts: 504
Likes: 0
Received 0 Likes
on
0 Posts
Tune up is kind of vague. I can do most work myself. Care to share suggestions?
Trending Topics
#8
08-25-2016, 10:18 AM
Posting Guru
Oily bits, plugs, wires, filters, grease everything. Check tranny fluid and rear end oil, points and condenser. You know an old skool tune up. Also give the front end a good inspection, always good to make sure its safe. Then enjoy it or mod it what ever you like. You have a great starter platform there.
How's the interior and how many miles are on the clock?
#9
08-25-2016, 11:14 AM
Join Date: Aug 2016
Posts: 504
Likes: 0
Received 0 Likes
on
0 Posts
#10
08-25-2016, 01:48 PM
Posting Guru
Come on back in if you need help in finding the ground point.
#11
08-25-2016, 02:09 PM
Join Date: Aug 2016
Posts: 504
Likes: 0
Received 0 Likes
on
0 Posts
Also, assuming that's a pcv on the left valve cover..? What should be hooked up there? Looks new like it hasn't always been there or was replaced but without vacuum lines?
#12
08-25-2016, 05:17 PM
Posting Guru
6 gauge will work just fine for your application. Black, as short as you can get to make it reach to the ground point below the alternator. Scuff up the block and clean the grounding bolt. It you have the ability, chasing out the block with a tap would not hurt.
The starter passes a lot of current through this point. Do what I said properly and you may notice better starting.
Semper Fi
The starter passes a lot of current through this point. Do what I said properly and you may notice better starting.
Semper Fi
#13
08-25-2016, 06:48 PM
Post Fiend
The grounding point on the engine for the negative battery cable is a threaded hole behind the alternator .
It's either on the block face or sidewards next to cylinder #1... I can't remember exactly because I see FE engines all the time and have but one Windsor running... and my spare 289 is facing driver side out against the garage wall.
It's either on the block face or sidewards next to cylinder #1... I can't remember exactly because I see FE engines all the time and have but one Windsor running... and my spare 289 is facing driver side out against the garage wall.
#15
08-25-2016, 07:41 PM
Lead Driver