
Sending unit repair = Success!
#1
 06-03-2016, 01:41 AM

Sending unit repair = Success!
Hey everyone!
First off I want to state I do apologize for the sub-par quality AND quantity of pictures. I am not the best when it comes to taking pictures when I work, and when I remember they are typically quick and not checked to ensure they are in focus. Subsequently, included in this post are ones off of my phone's camera. I believe it is enough to get the points across.
Wanted to start out by saying I figured I would make this thread a how-to for replacing just the float/rheostat in our sending units. I decided to do this write-up as I found lots of threads stating that it could be done, but none of them had a definite answer (I.E. the OP either did it and never posted results, or decided to just eat $400 and get the whole pickup assembly). I figured I would go ahead and bite the bullet and try it for myself, as $130 for the sender is a lot easier to swallow than $350-$400 for the whole assembly.
Anyway, for those looking in the future about the issue of your sending unit having gone bad or (like mine) is intermittently reading something other than full, it can be repaired! The units for the 6.8L V10 tanks will work on our units (at least the 29 gallon one does).
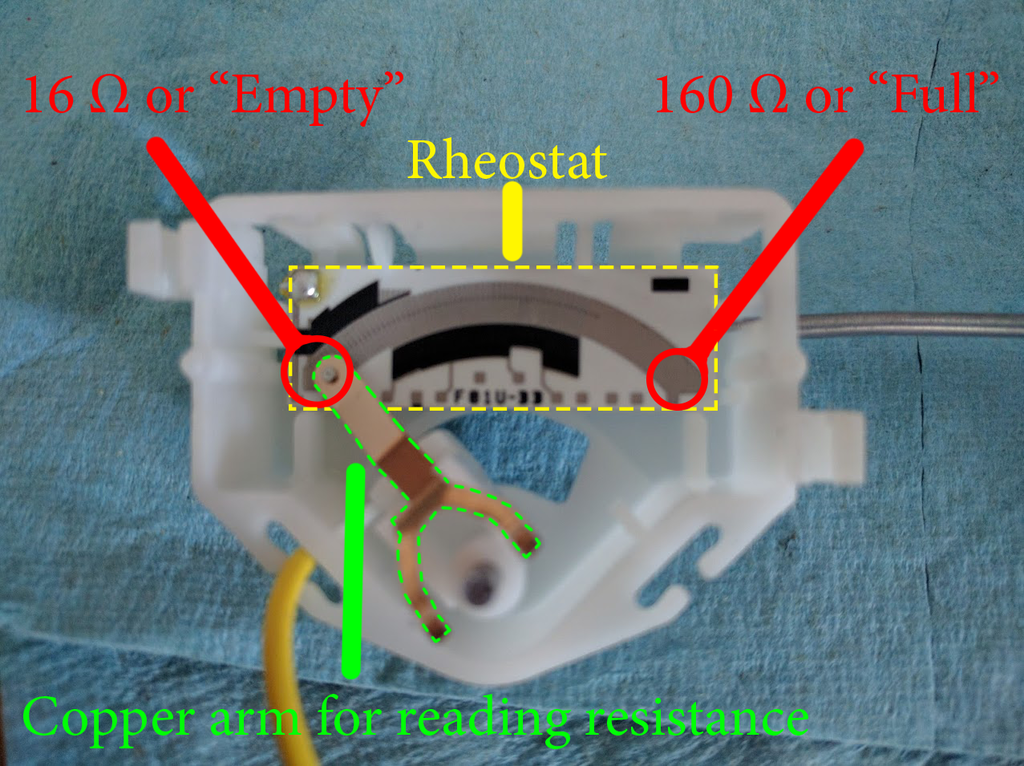
Before diving into how to fix the sending unit itself, a brief description of how it works is in order (I prefer to know how things work before I 'operate' on them. Guess it just gives me peace of mind while dissecting new, shiny parts ). Basically what makes these units work is they read a resistance between the sending unit's mounting plate and the yellow wire on the unit. The yellow wire is attached to a rheostat, which is a resistor that is able to change how much resistance it has, depending on what position it is read from. A copper clip that is attached to the float arm rides along the plate and the rheostat, allowing for a resistance reading to be sent to the gauge.
I originally thought that my pickup foot broke off as awhile back I ran out of fuel at a 1/4 tank. Well, when pulling my tank and pulling the unit out for inspection, I was greeted with a nice little surprise:
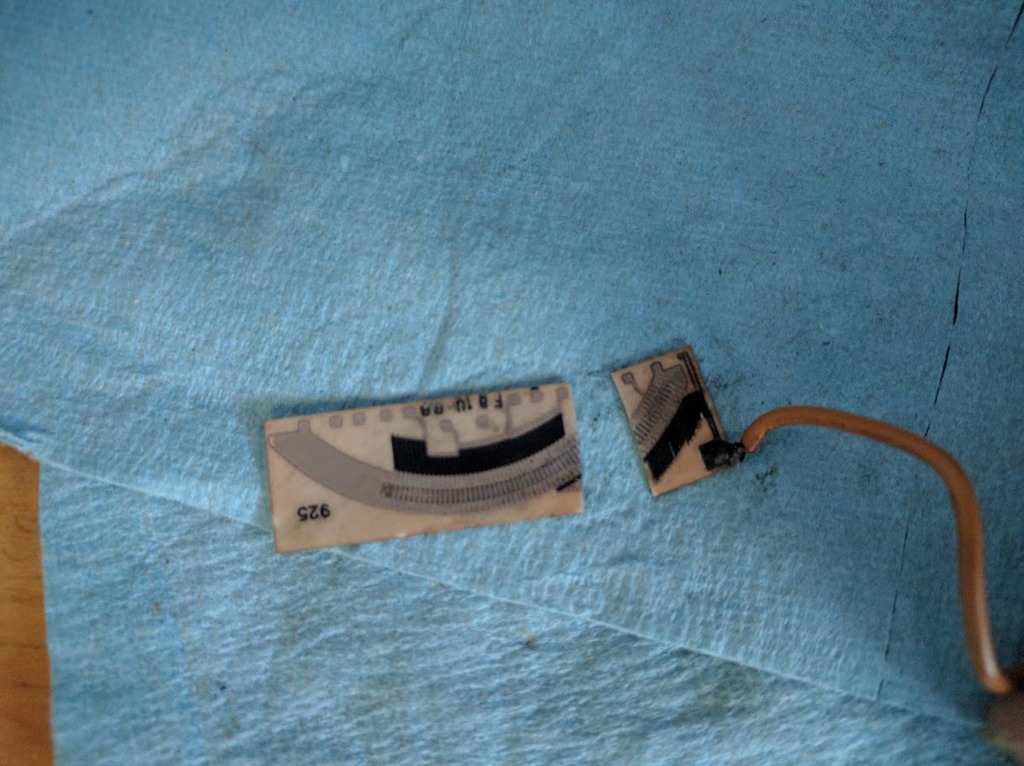
Yep, that explains why my gauge was always reading full. After I had the tank dropped it was a fairly easy swap. First things first, and that would be to get the correct part. This is what I needed for my tank (29 gallon):
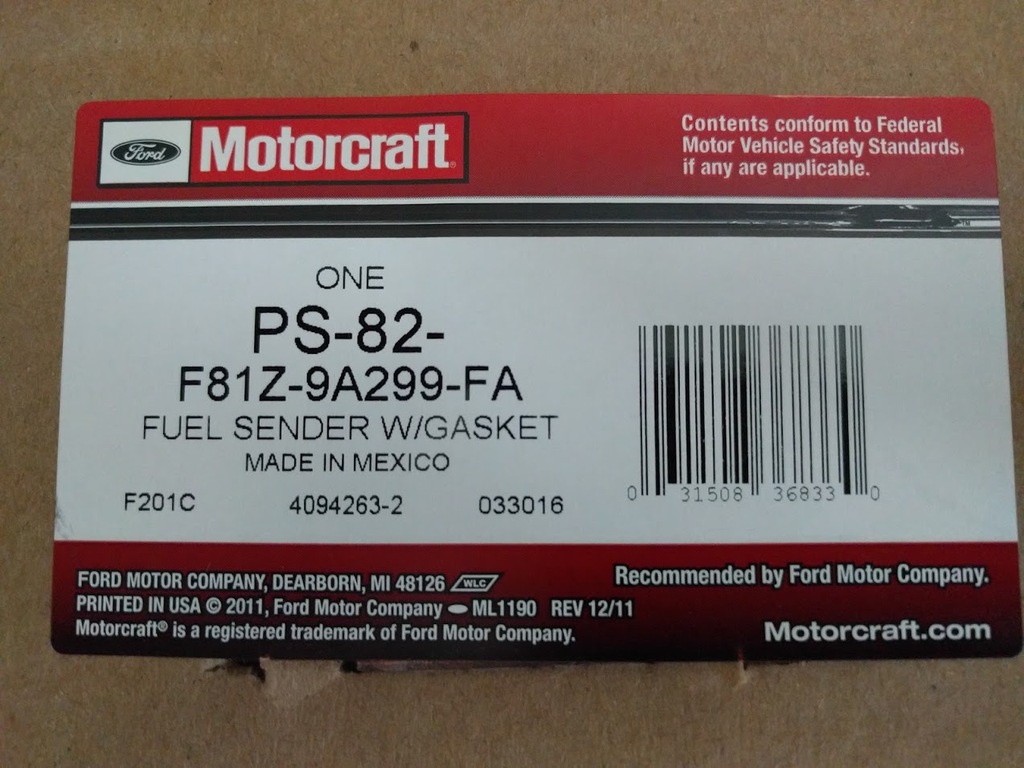
All arrived well, and before I cracked open the new one I wanted to ensure it was at least physically close to the stock one. Well, looked pretty close to me:
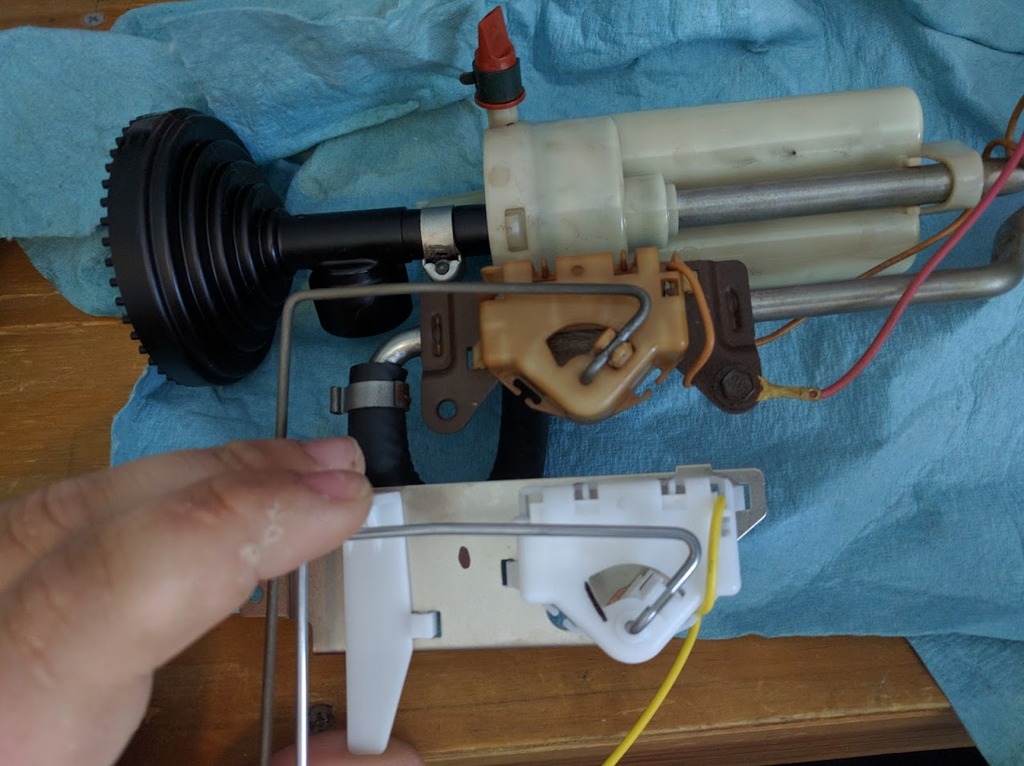
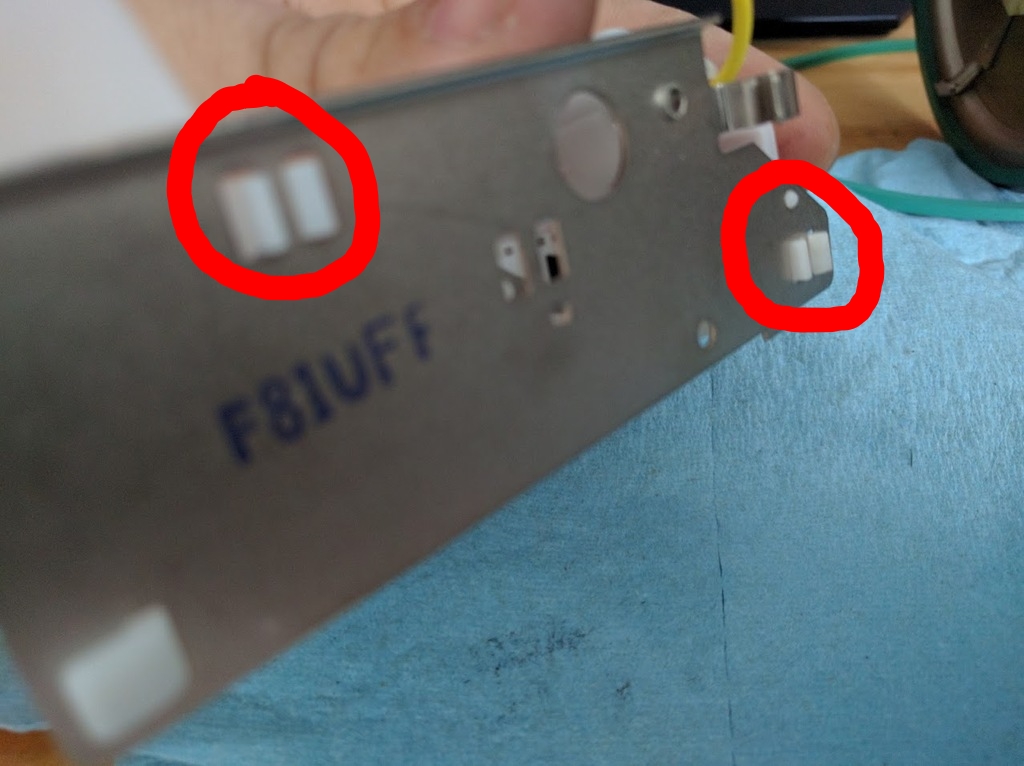
Next step is to release the units and float assemblies themselves. This is an easy task, and just requires undoing the two circled clips on both the new unit and your old unit. I found it was easiest to use a screwdriver that was just slightly larger than the clips themselves (was on my leatherman) and partially twist it to get them to widen a bit. While holding one of the clips open, I rotated my screwdriver around to push one side of the clip out of the plate. This allowed for the other side of the clip to come out easily, and I was then able to pop the clip on the other side of the housing without a hitch. NOTE: When popping the unit out be careful to not bend it much, if at all. The rheostat itself is housed in the plastic cap and can become damaged if twisted and turned during removal/installation!
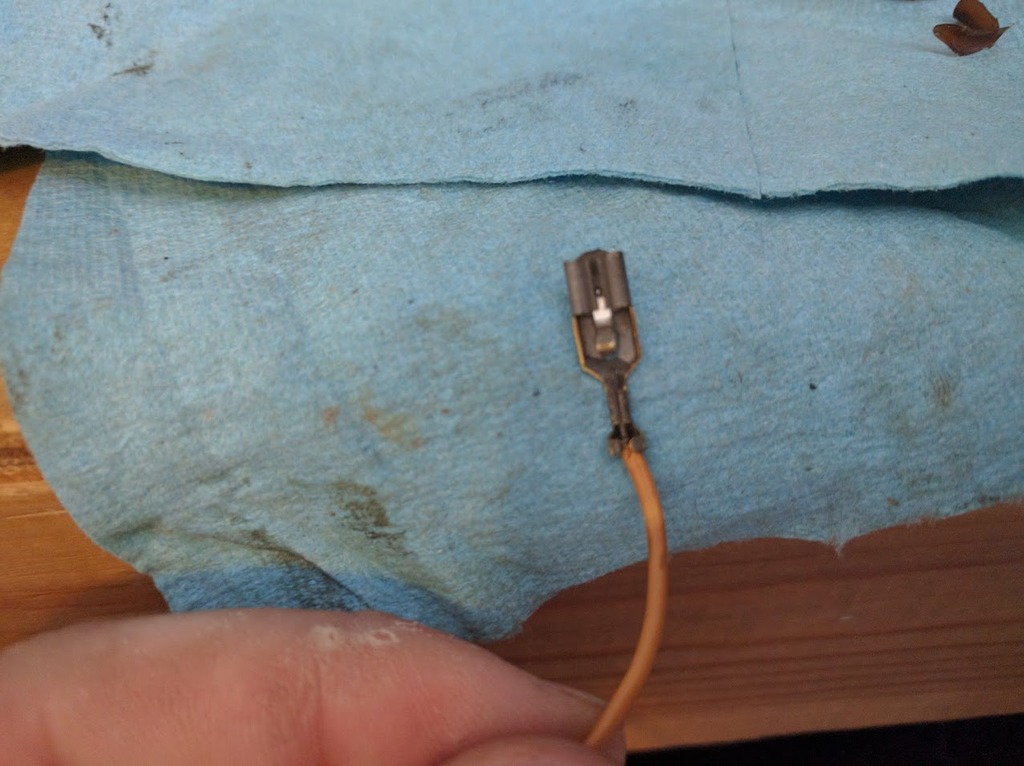
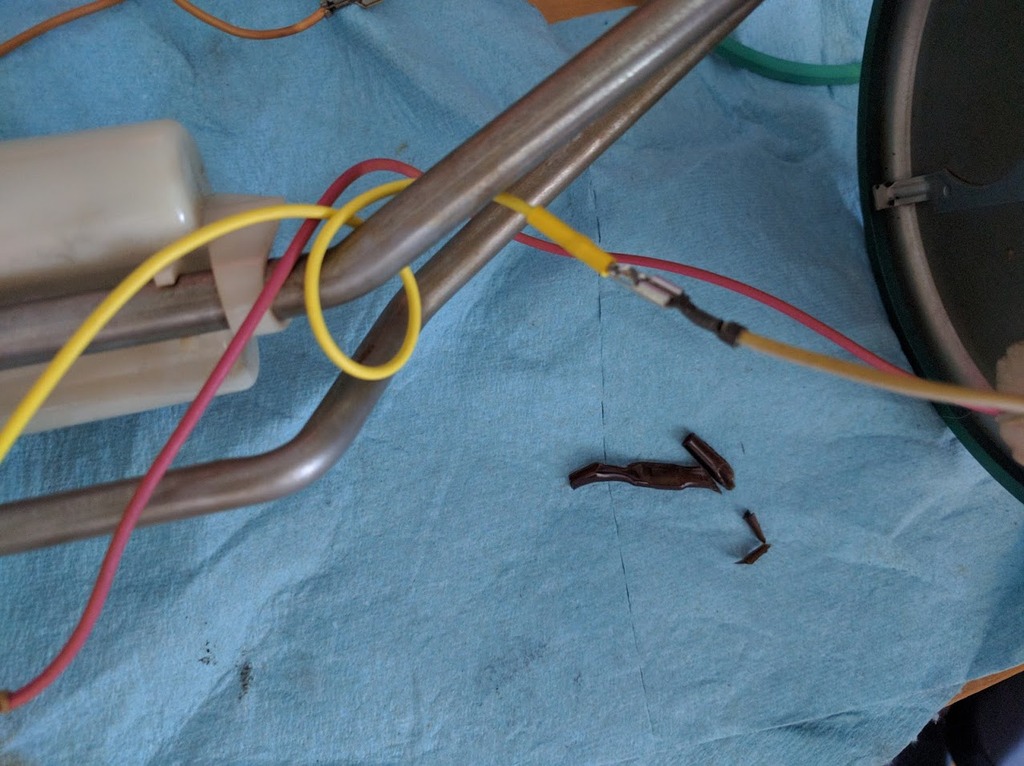
After removing the old unit, you will need to remove the connection located just before the plug going out of the top of the sending unit. I had to remove some heatshrink that was placed on it, and push in a locking tab located on the terminal. Said tab can be seen here:
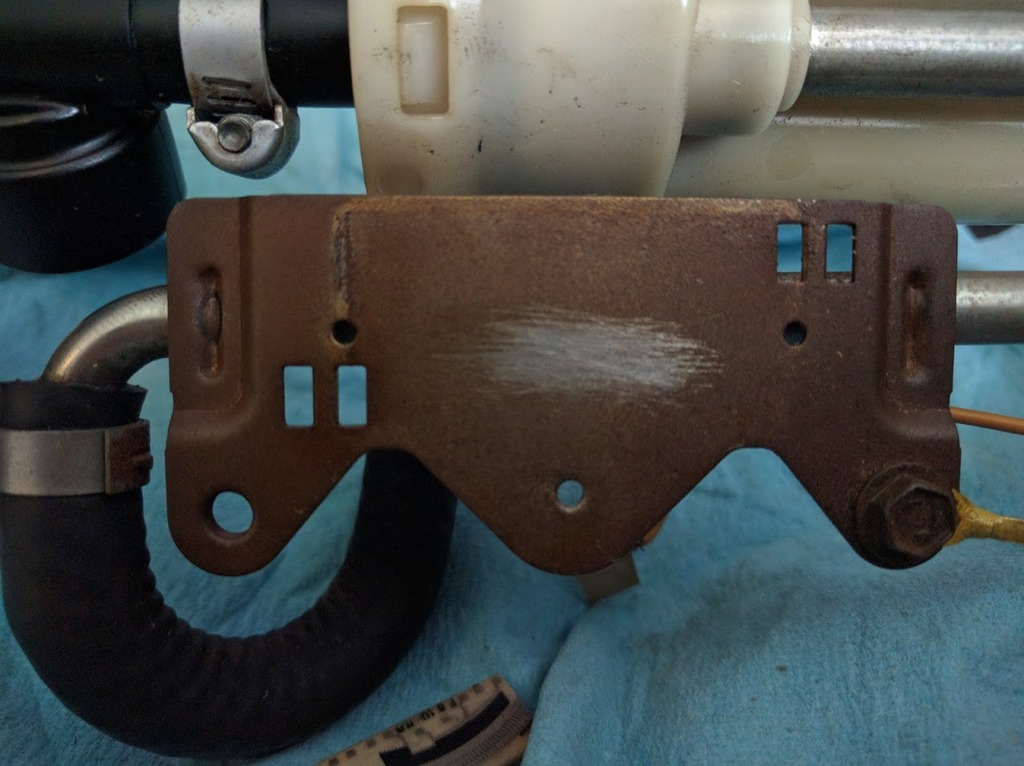
I went ahead and scratched some of the rust off my sending unit plate to ensure a good connection was achieved. It isn't very pretty, but the only tool I had on hand at time of fixing this was my leatherman, so I used what I had on it to do the job:
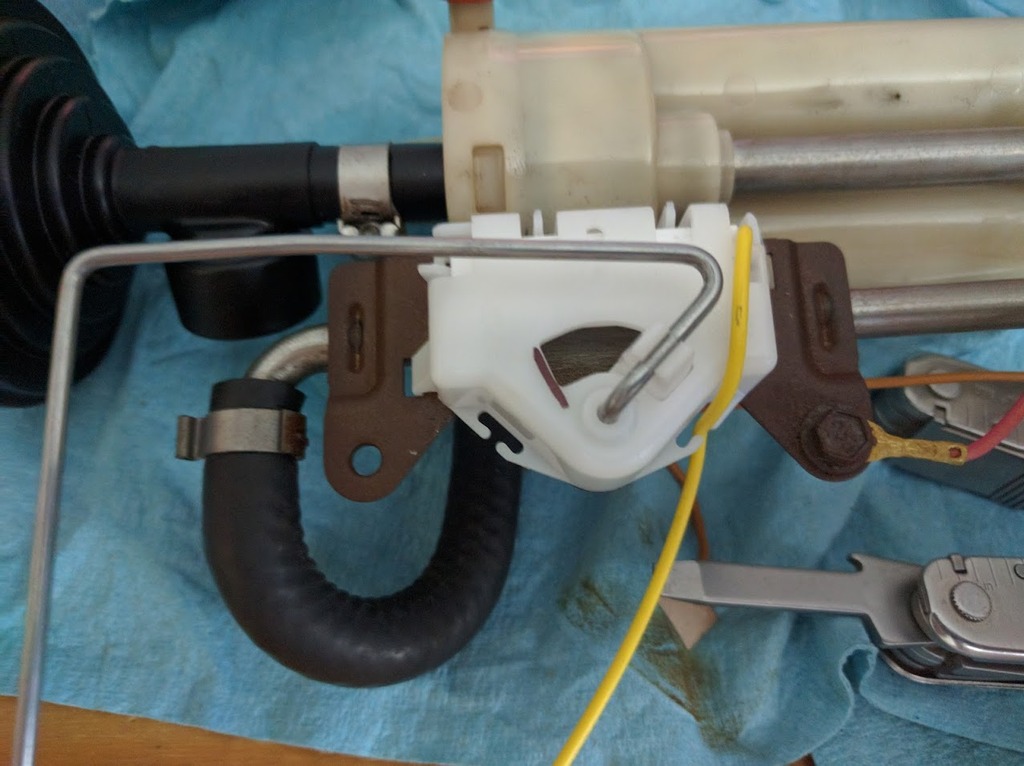
Next is to line the pin on the rheostat's casing and float arm up on your old sending unit's plate. Once the pin and arm are lined up in their respective holes, apply even pressure to the cover of the unit directly above the tabs. They should go in after a second of pushing with a satisfying click. You will then have something looking like this:
After doing this you will need to hook up the sending unit wire. I recommend protecting the connection with heatshrink rated for diesel as an added security measure. Ensure that it is clipped correctly and routed in such a way that the float will not catch on it when in the "Full" position before proceeding!
I then moved the float itself up and down to ensure it would freely travel the entire range it needed to, and to verify it was seated correctly before going any further with the process. After ensuring it could freely travel, it was time to check the resistance. First, with the float in the "Empty" postition:
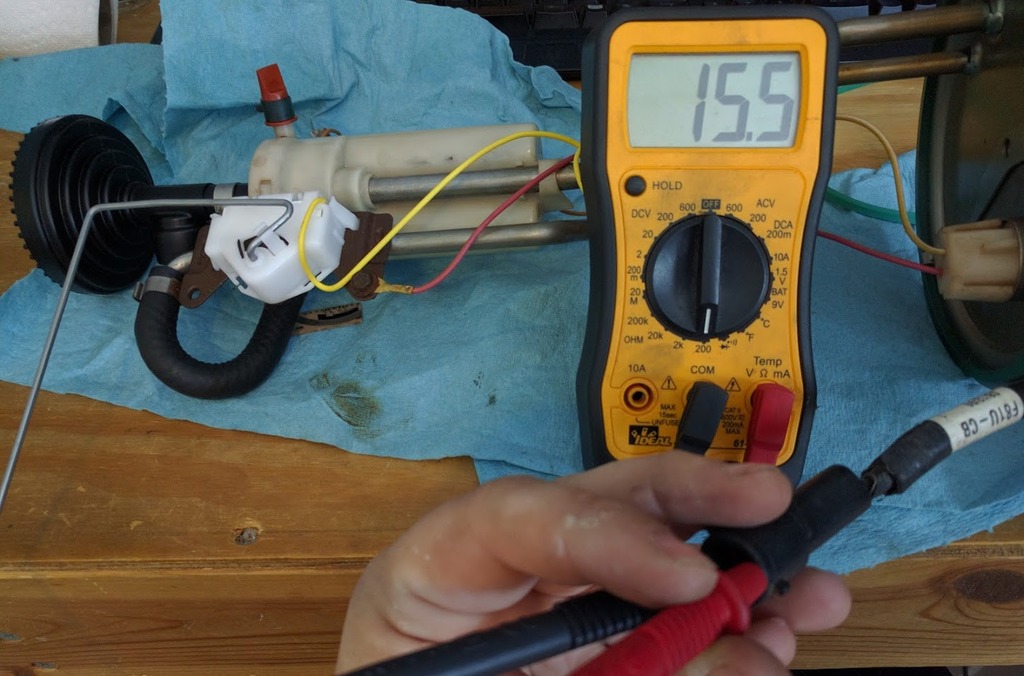
That checks out. What about with it at the "Full" postition?
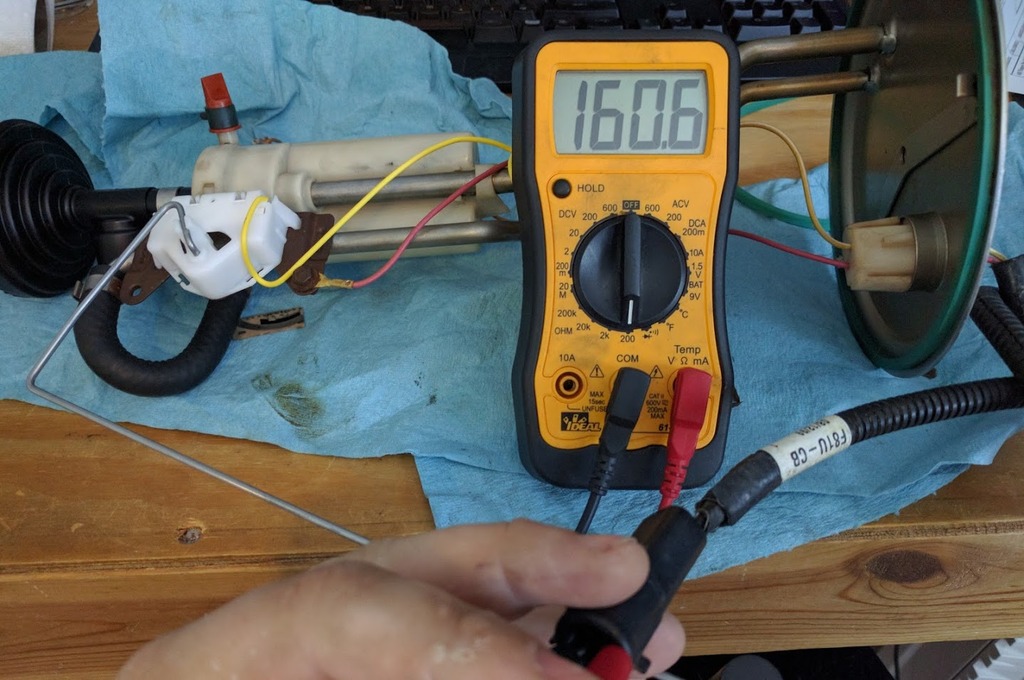
That checks out as well! Now all that is needed to do is to reinstall the unit in the tank and get it all hooked up and check the gauge's reading:
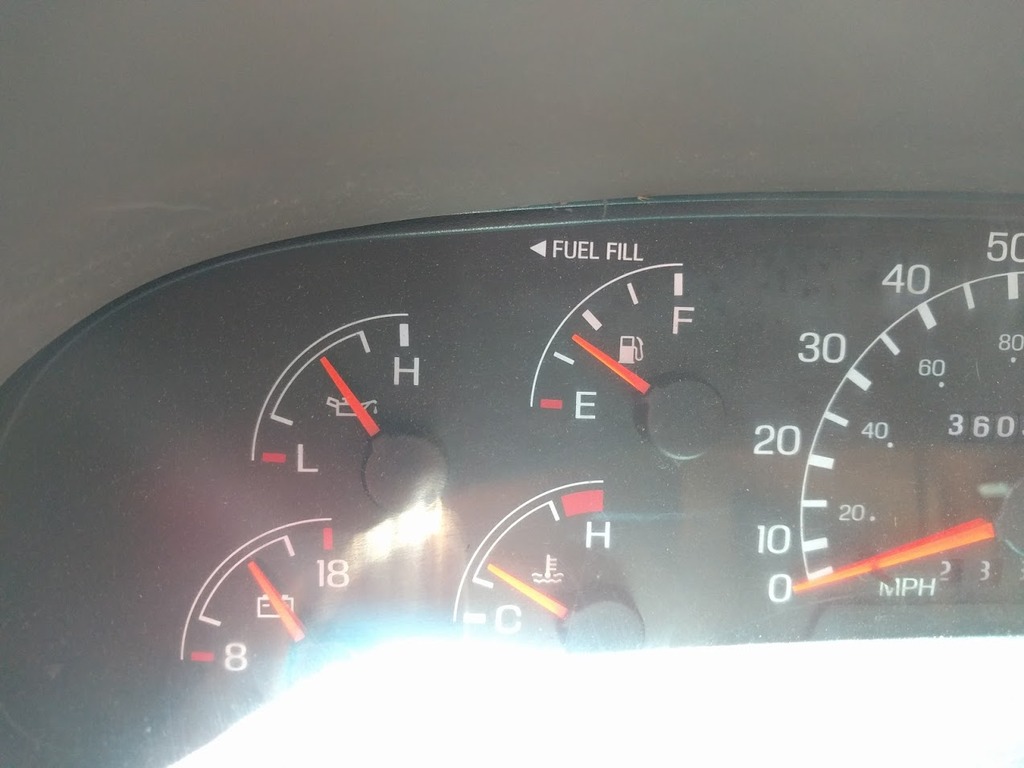
That is a lot better than the "Full" reading I was getting the other day before I dropped the tank!
Honestly the job of replacing it wasn't as hard as I thought it would be. Hopefully if anybody has the same issue in the future will stumble across this thread and not be near as intimidated as I was at first about cracking open a $130-$150 part to fix your truck. If anybody has any questions feel free to either put them here in this thread or shoot me a PM!
First off I want to state I do apologize for the sub-par quality AND quantity of pictures. I am not the best when it comes to taking pictures when I work, and when I remember they are typically quick and not checked to ensure they are in focus. Subsequently, included in this post are ones off of my phone's camera. I believe it is enough to get the points across.
Wanted to start out by saying I figured I would make this thread a how-to for replacing just the float/rheostat in our sending units. I decided to do this write-up as I found lots of threads stating that it could be done, but none of them had a definite answer (I.E. the OP either did it and never posted results, or decided to just eat $400 and get the whole pickup assembly). I figured I would go ahead and bite the bullet and try it for myself, as $130 for the sender is a lot easier to swallow than $350-$400 for the whole assembly.
Anyway, for those looking in the future about the issue of your sending unit having gone bad or (like mine) is intermittently reading something other than full, it can be repaired! The units for the 6.8L V10 tanks will work on our units (at least the 29 gallon one does).
Before diving into how to fix the sending unit itself, a brief description of how it works is in order (I prefer to know how things work before I 'operate' on them. Guess it just gives me peace of mind while dissecting new, shiny parts
). Basically what makes these units work is they read a resistance between the sending unit's mounting plate and the yellow wire on the unit. The yellow wire is attached to a rheostat, which is a resistor that is able to change how much resistance it has, depending on what position it is read from. A copper clip that is attached to the float arm rides along the plate and the rheostat, allowing for a resistance reading to be sent to the gauge.
I originally thought that my pickup foot broke off as awhile back I ran out of fuel at a 1/4 tank. Well, when pulling my tank and pulling the unit out for inspection, I was greeted with a nice little surprise:

Yep, that explains why my gauge was always reading full. After I had the tank dropped it was a fairly easy swap. First things first, and that would be to get the correct part. This is what I needed for my tank (29 gallon):

All arrived well, and before I cracked open the new one I wanted to ensure it was at least physically close to the stock one. Well, looked pretty close to me:

Next step is to release the units and float assemblies themselves. This is an easy task, and just requires undoing the two circled clips on both the new unit and your old unit. I found it was easiest to use a screwdriver that was just slightly larger than the clips themselves (was on my leatherman) and partially twist it to get them to widen a bit. While holding one of the clips open, I rotated my screwdriver around to push one side of the clip out of the plate. This allowed for the other side of the clip to come out easily, and I was then able to pop the clip on the other side of the housing without a hitch. NOTE: When popping the unit out be careful to not bend it much, if at all. The rheostat itself is housed in the plastic cap and can become damaged if twisted and turned during removal/installation!

After removing the old unit, you will need to remove the connection located just before the plug going out of the top of the sending unit. I had to remove some heatshrink that was placed on it, and push in a locking tab located on the terminal. Said tab can be seen here:

I went ahead and scratched some of the rust off my sending unit plate to ensure a good connection was achieved. It isn't very pretty, but the only tool I had on hand at time of fixing this was my leatherman, so I used what I had on it to do the job:

Next is to line the pin on the rheostat's casing and float arm up on your old sending unit's plate. Once the pin and arm are lined up in their respective holes, apply even pressure to the cover of the unit directly above the tabs. They should go in after a second of pushing with a satisfying click. You will then have something looking like this:

After doing this you will need to hook up the sending unit wire. I recommend protecting the connection with heatshrink rated for diesel as an added security measure. Ensure that it is clipped correctly and routed in such a way that the float will not catch on it when in the "Full" position before proceeding!

I then moved the float itself up and down to ensure it would freely travel the entire range it needed to, and to verify it was seated correctly before going any further with the process. After ensuring it could freely travel, it was time to check the resistance. First, with the float in the "Empty" postition:

That checks out. What about with it at the "Full" postition?

That checks out as well! Now all that is needed to do is to reinstall the unit in the tank and get it all hooked up and check the gauge's reading:

That is a lot better than the "Full" reading I was getting the other day before I dropped the tank!
Honestly the job of replacing it wasn't as hard as I thought it would be. Hopefully if anybody has the same issue in the future will stumble across this thread and not be near as intimidated as I was at first about cracking open a $130-$150 part to fix your truck. If anybody has any questions feel free to either put them here in this thread or shoot me a PM!

#4
06-03-2016, 07:35 AM

Fleet Owner
#5
06-03-2016, 07:38 AM
Fleet Mechanic


#7
06-03-2016, 09:59 AM
Trending Topics
#9
07-15-2016, 08:19 AM
Such an excellent write-up. I did some PDF magic and have attached the PDF file so it can live long, even if the pictures get lost from the original post.
Obviously, the original pictures were high resolution, so I had to de-res them a little and reduce their size so that the PDF file size would be acceptable to the FTE host site. I think they are still just as useful in their new size, though, especially in a printed document.
Obviously, the original pictures were high resolution, so I had to de-res them a little and reduce their size so that the PDF file size would be acceptable to the FTE host site. I think they are still just as useful in their new size, though, especially in a printed document.
#11
03-02-2019, 08:46 AM
#12
03-02-2019, 10:51 AM
Hotshot
#13
03-31-2019, 10:55 PM

I may have a lead on an even cheaper method of doing this. Does anyone know if it is possible to change the float arm on one of these sending units?
For reference, I'm considering using
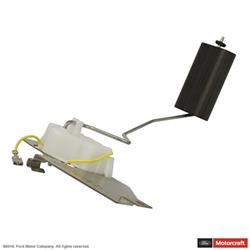
It's Motorcraft part 2L1Z9A299AA
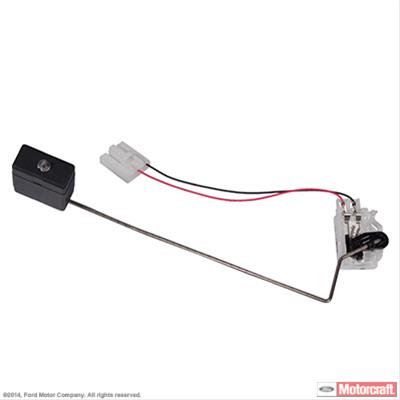
Also, I have seen a couple of Motorcraft senders for less than $15 with the same shape and appear as though they would mount easily in place but, there are two wires instead of one. I'm assuming one is the ground and that the ground is run through the body of the sending unit on our one wire versions. Would it be possible to just attach the ground wire to our sending unit body?
For reference here 2 wire version similar to the ones I've been seeing
For reference, I'm considering using


It's Motorcraft part 2L1Z9A299AA
Also, I have seen a couple of Motorcraft senders for less than $15 with the same shape and appear as though they would mount easily in place but, there are two wires instead of one. I'm assuming one is the ground and that the ground is run through the body of the sending unit on our one wire versions. Would it be possible to just attach the ground wire to our sending unit body?
For reference here 2 wire version similar to the ones I've been seeing
#14
04-02-2019, 08:04 AM
I may have a lead on an even cheaper method of doing this. Does anyone know if it is possible to change the float arm on one of these sending units?
For reference, I'm considering using Motorcraft part 2L1Z9A299AA, $41.99
Also, I have seen a couple of Motorcraft senders for less than $15 with the same shape and appear as though they would mount easily in place but, there are two wires instead of one. I'm assuming one is the ground and that the ground is run through the body of the sending unit on our one wire versions. Would it be possible to just attach the ground wire to our sending unit body?
For reference here 2 wire version similar to the ones I've been seeing
What is the ohm range for the E-F readings on those senders? Same as the 15-160 ohm range for our trucks?
