Hackster's F100 CV Swap, Coyote, 6 speed 3 link build thread
#286
 01-22-2016, 10:49 AM

I totally see what you are saying. I need to raise the shifter up anyways and the seating position in the truck is a lot higher vs the console height. Should not be a problem but the cup holders in front also could break up that dead area a little bit......definately something to think about though.
Quick question for you....did you have the coyote tick on your car? It is not there at all on a cold start and the more I read, it is very very common on these motors. almost sounds like an exhaust leak.
Working on that this weekend.
Sean
Quick question for you....did you have the coyote tick on your car? It is not there at all on a cold start and the more I read, it is very very common on these motors. almost sounds like an exhaust leak.
Working on that this weekend.
Sean
Hey Sean, check your in box or email. I sent you a message.
#287
01-22-2016, 12:47 PM
Senior User
Join Date: Feb 2015
Location: Washington
Posts: 185
Likes: 0
Received 0 Likes
on
0 Posts
"Second trip out of the garage netted a big burnout in front of the house =) truck is going to be damn fun. The manual is where its at for sure."
-Sean
^^^Oh man, no video footage, lol. Truck is really coming together, all the small details really make the difference! I look forward to seeing the interior unfold, the center console is looking great so far!
-Sean
^^^Oh man, no video footage, lol. Truck is really coming together, all the small details really make the difference! I look forward to seeing the interior unfold, the center console is looking great so far!
#288
01-22-2016, 02:05 PM
I really like the new 5.0; it will surely be a blast in this beast you've built.
#289
01-22-2016, 05:15 PM

Hotshot
On the conjsole maybe.
Compare

Band-It Cherry Veneer 24" x 96" Paper-Backed
Your Price$46.90Buy 4-up$43.55
(9 Reviews)
Part #260-050QtyQty is required.
Compare

Band-It Mahogany Veneer 24" x 96" Paper-Backed
Your Price$46.90Buy 4-up$43.55
(5 Reviews)
Part #260-044QtyQty is required.
Compare

Band-It Red Oak Veneer 24" x 96" Paper-Backed
Your Price$46.90Buy 4-up$43.55
(2 Reviews)
Part #260-046QtyQty is required.
Compare

Band-It Black Melamine 24" x 96" Iron-On
Your Price$29.89Buy 4-up$28.50
(7 Reviews)
Part #260-031QtyQty is required.
Compare

Band-It Walnut Veneer 24" x 96" Paper-Backed
Your Price$46.90Buy 4-up$43.55
Part #260-048QtyQty is required.
Compare

Band-It Maple Veneer 24" x 96" Paper-Backed
Your Price$46.90Buy 4-up$43.55
(5 Reviews)
Part #260-042QtyQty is required.
Compare

Band-It White Melamine 24" x 96" Iron-On
Your Price$29.89Buy 4-up$28.50
(5 Reviews)
Part #260-034QtyQty is required.
Compare

Band-It White Ash Veneer 24" x 96" Paper-Backed
Your Price$46.90Buy 4-up$43.55
(1 Reviews)
Part #260-040QtyQty is required.
Compare

Band-It Gray Melamine 24" x 96" Iron-On
Your Price$29.89Buy 4-up$28.50
Band-It Cherry Veneer 24" x 96" Paper-Backed
Your Price$46.90Buy 4-up$43.55
(9 Reviews)
Part #260-050QtyQty is required.
Compare
Band-It Mahogany Veneer 24" x 96" Paper-Backed
Your Price$46.90Buy 4-up$43.55
(5 Reviews)
Part #260-044QtyQty is required.
Compare
Band-It Red Oak Veneer 24" x 96" Paper-Backed
Your Price$46.90Buy 4-up$43.55
(2 Reviews)
Part #260-046QtyQty is required.
Compare
Band-It Black Melamine 24" x 96" Iron-On
Your Price$29.89Buy 4-up$28.50
(7 Reviews)
Part #260-031QtyQty is required.
Compare
Band-It Walnut Veneer 24" x 96" Paper-Backed
Your Price$46.90Buy 4-up$43.55
Part #260-048QtyQty is required.
Compare
Band-It Maple Veneer 24" x 96" Paper-Backed
Your Price$46.90Buy 4-up$43.55
(5 Reviews)
Part #260-042QtyQty is required.
Compare
Band-It White Melamine 24" x 96" Iron-On
Your Price$29.89Buy 4-up$28.50
(5 Reviews)
Part #260-034QtyQty is required.
Compare
Band-It White Ash Veneer 24" x 96" Paper-Backed
Your Price$46.90Buy 4-up$43.55
(1 Reviews)
Part #260-040QtyQty is required.
Compare
Band-It Gray Melamine 24" x 96" Iron-On
Your Price$29.89Buy 4-up$28.50
#290
01-23-2016, 12:17 AM

Thanks for the replies fellas.. I am pretty set on the material for the center console being leather or leatherette material and some stitching down the middle. I am going for a certain european look. Those Germans can nail an interior. I want the inside of the truck to be almost luxurious feeling when you get in it. And I want it to look like a total departure from the outside, just like under the hood and underneath 
Only a little time tonight to work on the truck, had to go to a WInterhawks game with the wife.
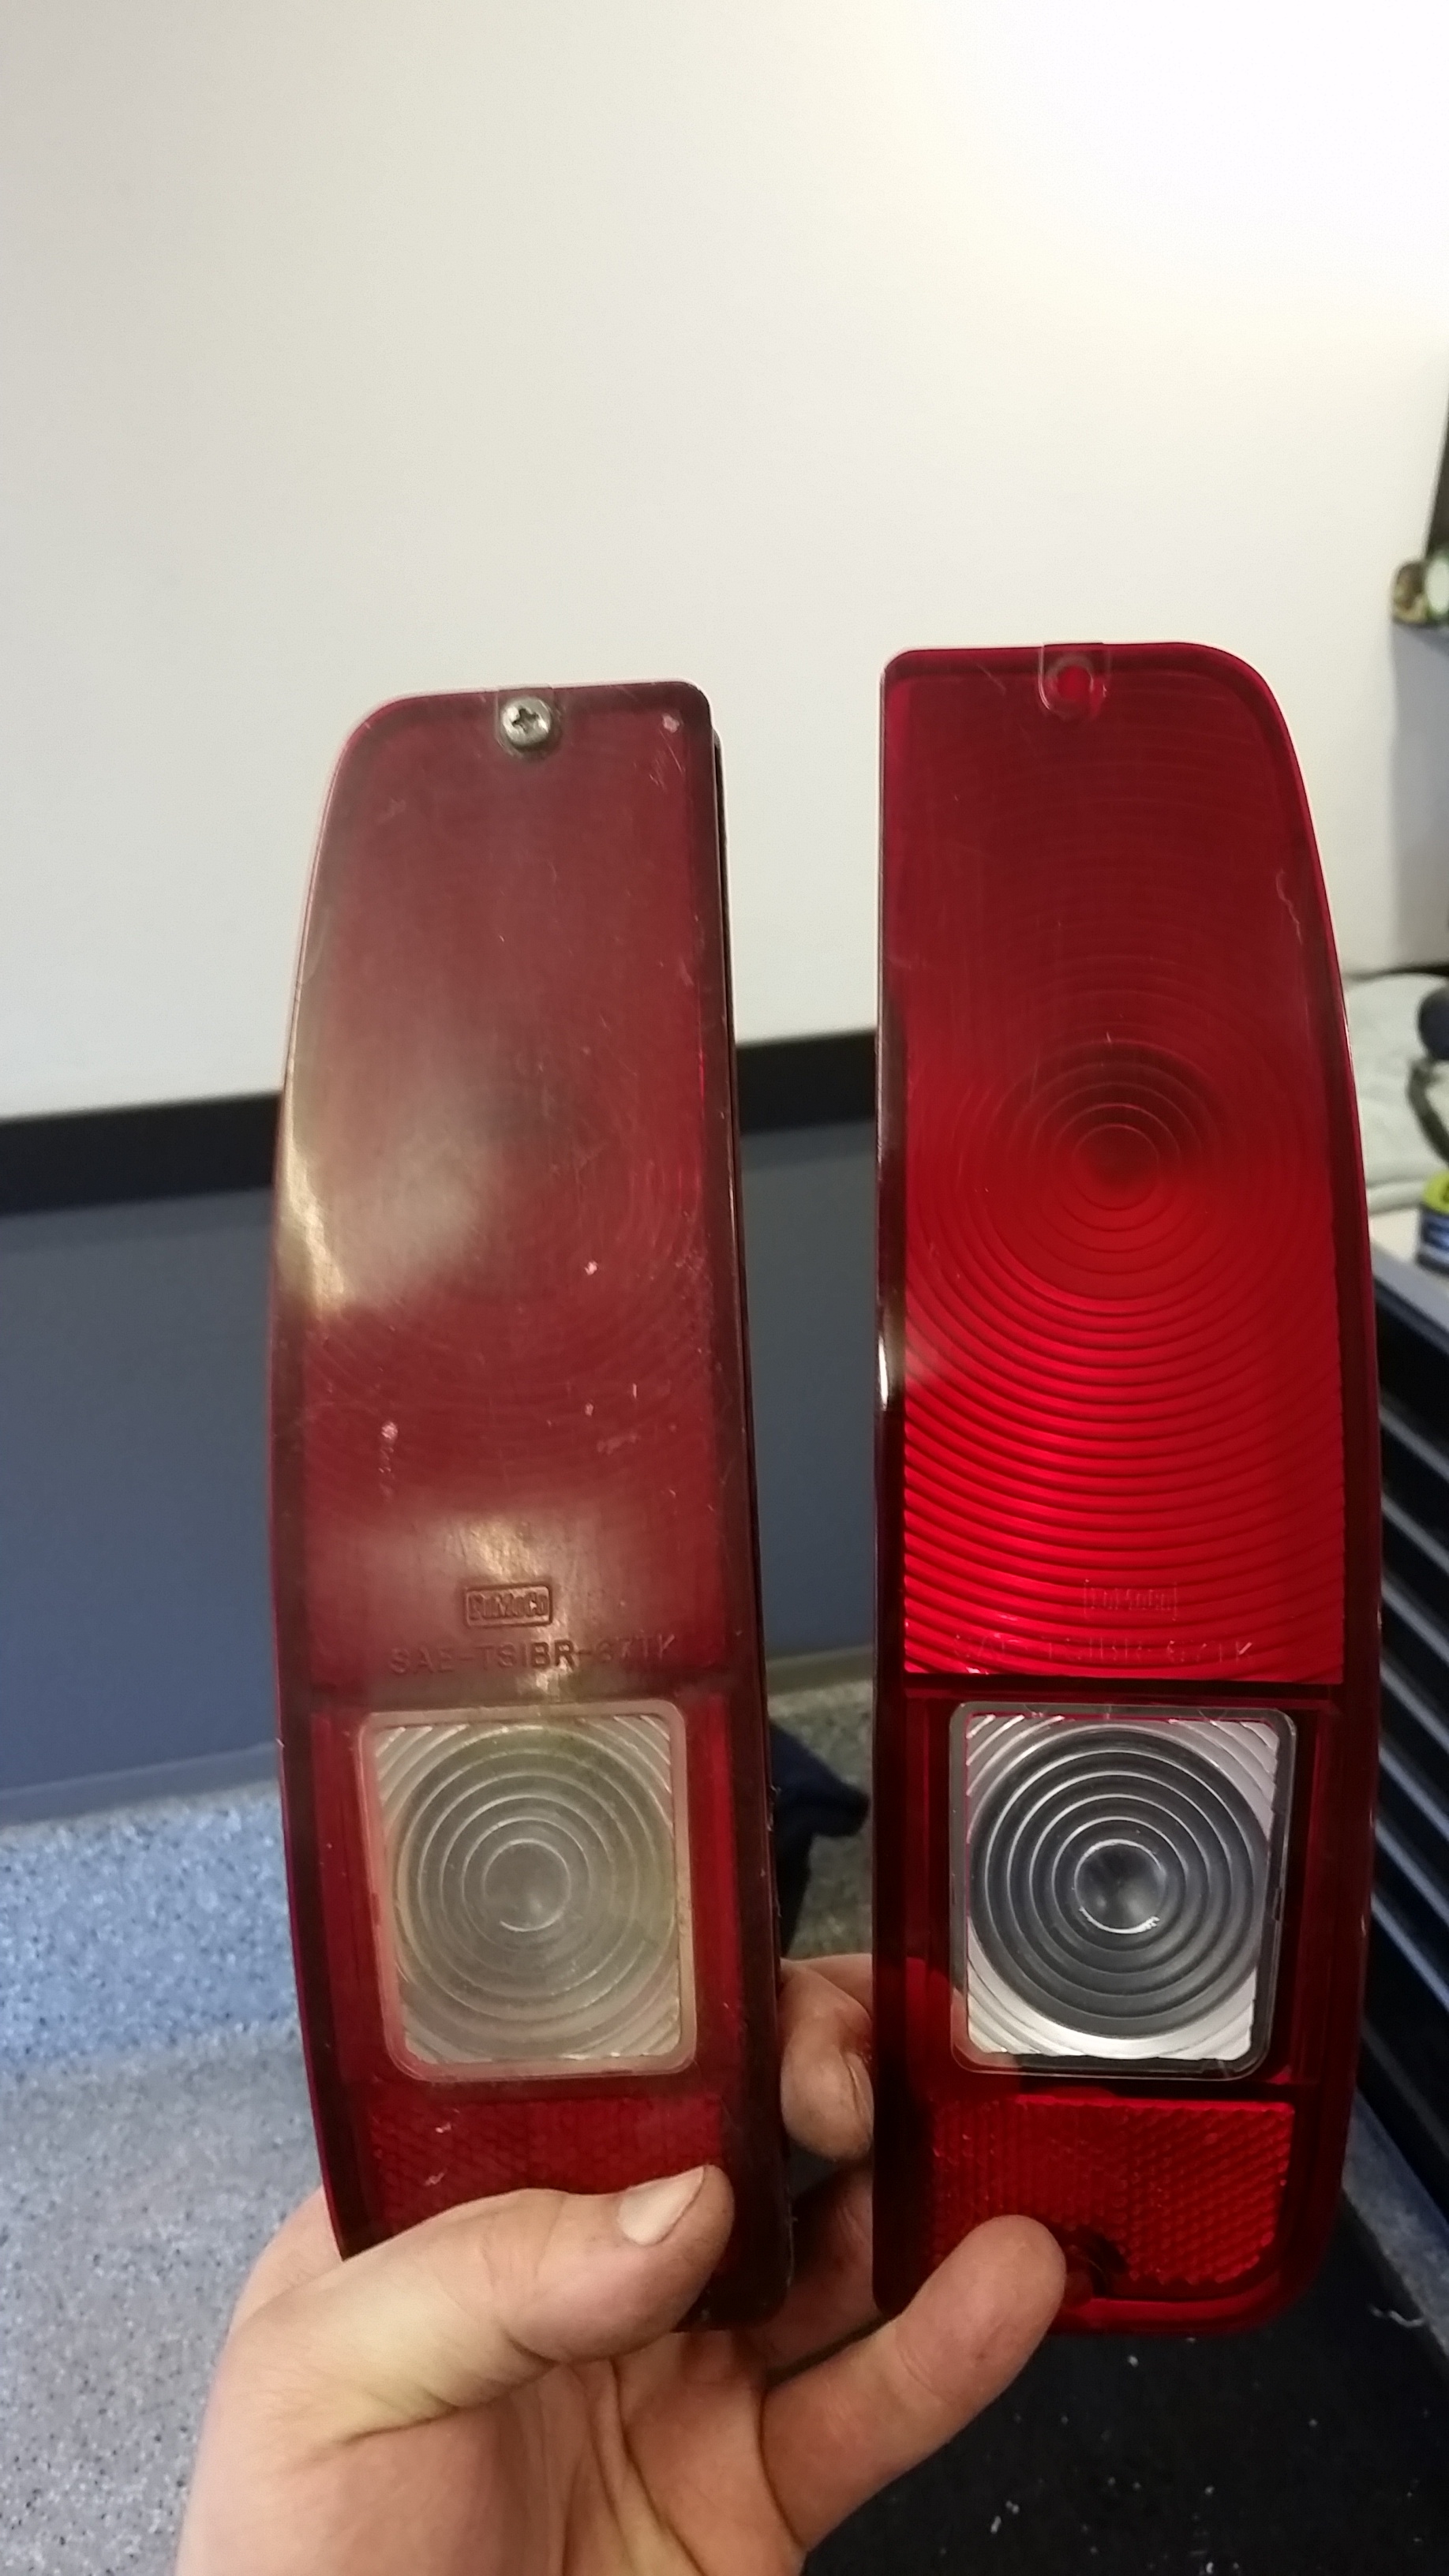
Managed to pull these out of the bin and get some polish out and see if they would clean up. They polished out like new. I was pretty suprised.
Old on the left, polished up on the right.
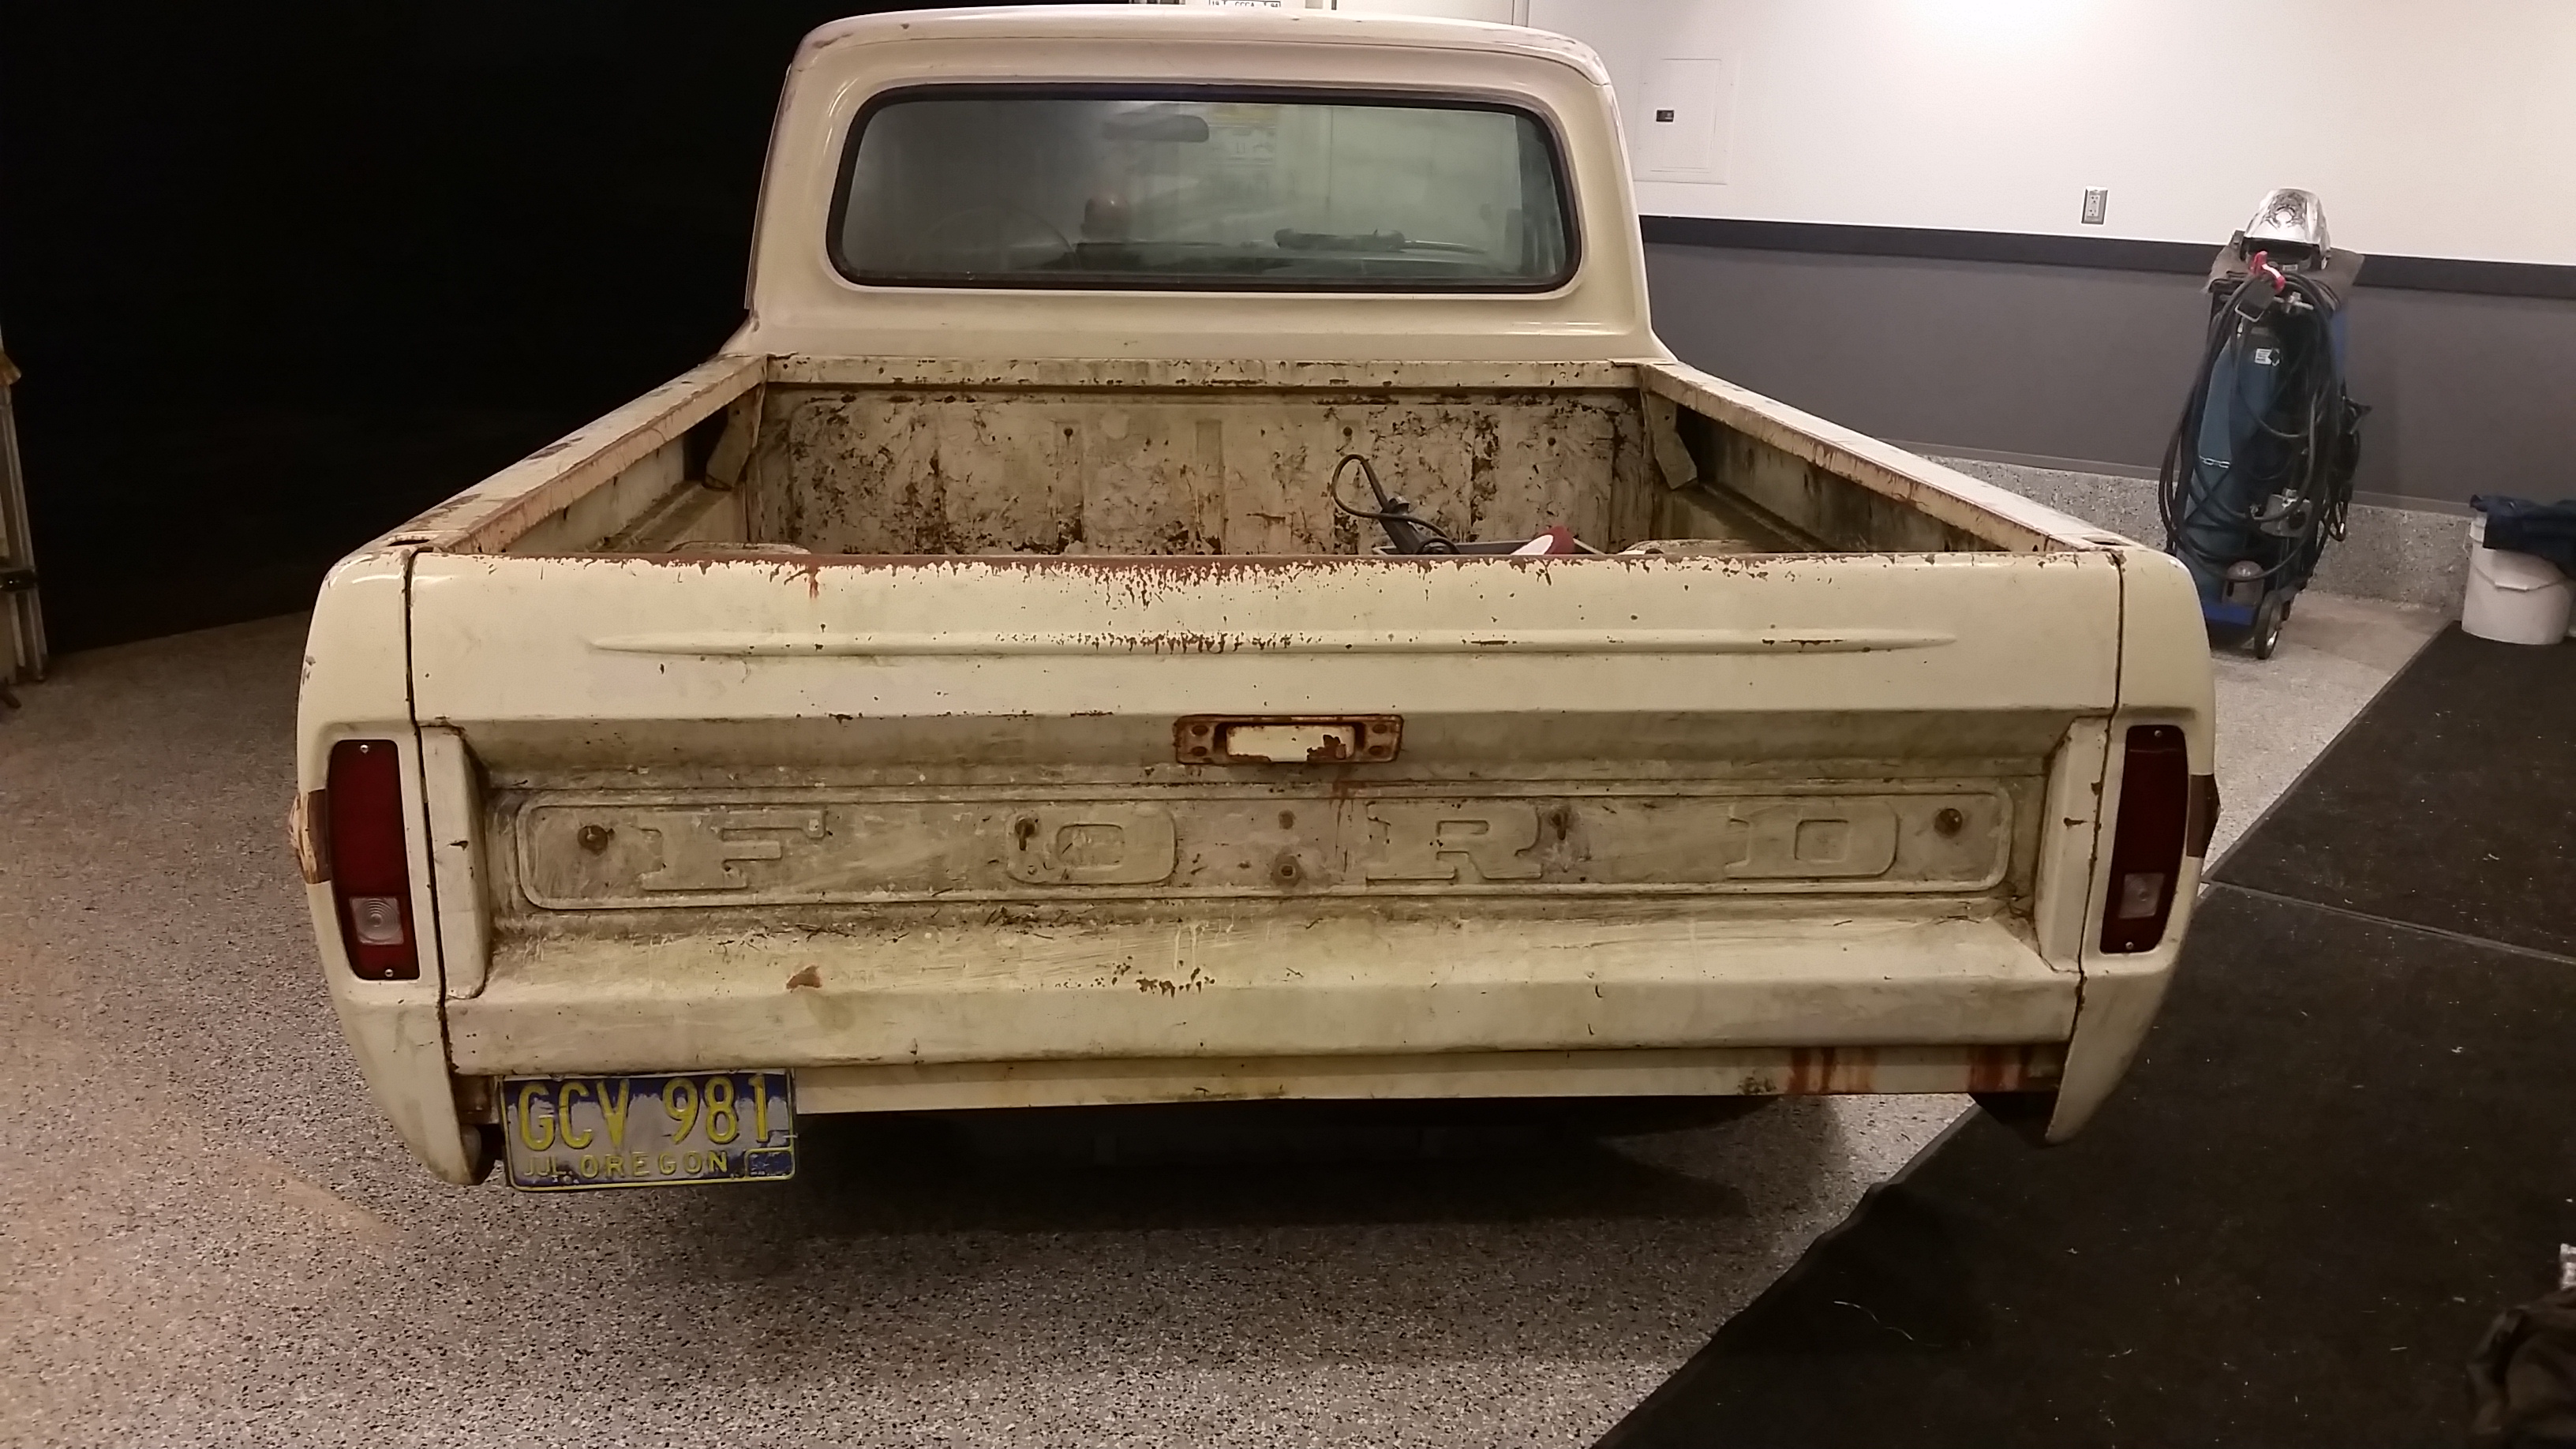
Also spent a little more time cleaning up the license plate from the 68 I parted out. I hope that the DMV will let me keep them on the truck.
Little hammer and dolly work on the license plate and cleaned it up really good and shot it with a coat of clear. Also got it on.
Rear of the truck looks cool...At this point, I have no plans to run a rear bumper.
Also go the shifter adapter and lift kit built, welded up and bolted on. It has a little angle back and to the driver, forgot to snap a pic.
I was able to find some diagrams for the seat bracket and plotted them out at work actual size and printed out and picked up some steel.
1 of the seat foams showed up today, next week should be a barrage of parts. Seat foams, carpet and inner door handles, seat sliders, bolts and hardware, second seat foam and shorter front shocks....its go time fellas.
Damn near ready to take it for a trip to get some fuel for reals.
Sean
Only a little time tonight to work on the truck, had to go to a WInterhawks game with the wife.
Managed to pull these out of the bin and get some polish out and see if they would clean up. They polished out like new. I was pretty suprised.
Old on the left, polished up on the right.

Also spent a little more time cleaning up the license plate from the 68 I parted out. I hope that the DMV will let me keep them on the truck.
Little hammer and dolly work on the license plate and cleaned it up really good and shot it with a coat of clear. Also got it on.
Rear of the truck looks cool...At this point, I have no plans to run a rear bumper.

Also go the shifter adapter and lift kit built, welded up and bolted on. It has a little angle back and to the driver, forgot to snap a pic.
I was able to find some diagrams for the seat bracket and plotted them out at work actual size and printed out and picked up some steel.
1 of the seat foams showed up today, next week should be a barrage of parts. Seat foams, carpet and inner door handles, seat sliders, bolts and hardware, second seat foam and shorter front shocks....its go time fellas.
Damn near ready to take it for a trip to get some fuel for reals.
Sean
#291
01-23-2016, 08:29 AM
#292
01-23-2016, 08:34 AM
"Thanks for the replies fellas.. I am pretty set on the material for the center console being leather or leatherette material and some stitching down the middle. I am going for a certain european look. Those Germans can nail an interior. I want the inside of the truck to be almost luxurious feeling when you get in it. And I want it to look like a total departure from the outside, just like under the hood and underneath."
I understand your desire to make your console your way and that's how it should be. My input is merely thoughts on a console that looks very similar to mine. With double stitching and cup holders.
Here's a couple of pictures showing a finished console, kind of what your doing.
This is in my 64 with bucket seats.
#294
01-23-2016, 11:23 PM
"Thanks for the replies fellas.. I am pretty set on the material for the center console being leather or leatherette material and some stitching down the middle. I am going for a certain european look. Those Germans can nail an interior. I want the inside of the truck to be almost luxurious feeling when you get in it. And I want it to look like a total departure from the outside, just like under the hood and underneath."
I understand your desire to make your console your way and that's how it should be. My input is merely thoughts on a console that looks very similar to mine. With double stitching and cup holders.
Here's a couple of pictures showing a finished console, kind of what your doing.
This is in my 64 with bucket seats.
I understand your desire to make your console your way and that's how it should be. My input is merely thoughts on a console that looks very similar to mine. With double stitching and cup holders.
Here's a couple of pictures showing a finished console, kind of what your doing.
This is in my 64 with bucket seats.
Your console looks great and you are right its really close to what I have going on. One question for you, well maybe a couple. What is the little square cutout on the console?
Also what did you do for the little vents on the side, they look pretty good. I need one on the drivers side to vent the console.
Thanks for the info. Interior looks great in there.
Well, today was interesting. Hands down the longest I have ever worked on a set of seat mounts in my life.
Not too sure everyone knows that they once made factory bucket seat mounts for these trucks but they were very, very rare and even more rare some 50 years later. I stumbled across someone that had taken the time to draw up the seat mounts in CAD and share them on one of the ford forums. I downloaded them at work and had one of our CAD guys print them out in actual size so I could use them as a template. (Thanks Eddie) Its one of the benefits of working in the HVAC Field =)
And here we go.
Started out with some 3/16" hot rolled plate. I sincerely believe these could be made with 1/8" and be plenty sturdy.

Laid out the template on the plate....I should mention here that I made a couple adjustments. As I am not running a fuel tank and am not necessarily a small person, in height and diameter I extended the brackets to the rear of the truck by about 3" and marked another set of holes in the brackets.

Got to work with the plasma, grinder and a flap disc and the drill press. I did a pilot hole, around 3/8 then the final 1/2" hole x 24 holes 8)
Cut out and marked for holes. I also use a punch to mark the center of the holes before drilling.

All drilled up and ready to mark them up and bend them the poor mans way :roll:

So.....I have no brake so I have to get a little more creative and its a lot more work this way but I get to the end and its a very strong good looking part. OEM, not exactly.
I marked out the lines to bend on.

Then I use the plasma to cut the lines. I leave about 3/8" of uncut material at the end and about every three or four inches I skip a 1/4" section to keep the piece together allowing me to bend it but keep the part in one piece.

This is how I do my bends. This is a digital angle guage from Harbor Freight. It allows me to get dead on angles on my bends. I think this one was 26 degrees. I bent it to 26.2 degrees and can duplicate that over and over this way.

I wont bore you with the other bends.....and I did not take any photos of them either.
Here are the 4 brackets bent up and ready to weld. I know bending is the preferred way but this is doable at home and should be no issue with strength for seat brackets.

I went to work with the welder, turned the heat up a little bit and had 2 good setbacks. I forgot I had put Stainless wire, so I had to swap back to normal wire, then grabbed the hood and found it with dead batteries. So a quick trip for a rockstar, and some batteries for the hood. New lenses and batteries are good for the vision.
Now onto the weld.
You can see that there is some compound angles going on here.


And there we have it, bucket seat brackets for your bumpside in about a half a day's work.

I am super happy with how they came out, they were a lot of work and I am very, very glad to have found the drawings.
My neighbor also found a weak link in my brake heim joint (These were not final tight yet) but I was not happy with this setup so I rebuilt it with WAAAAY more better stuff.
3/8-24 stud cut down and lick tighted into a female heim joint then into the coupler with a jam nut on both sides and burried together. There is no chance of a failure now.

Much better now.
Also got my cupholders.
#295
01-23-2016, 11:31 PM
Your console looks great and you are right its really close to what I have going on. One question for you, well maybe a couple. What is the little square cutout on the console?
The square cut out is for my iphone, like a docking station. My radio which looks like the stock one has the connection for iphone with both types of plugs.
Also what did you do for the little vents on the side, they look pretty good. I need one on the drivers side to vent the console.
The vents on the side are actually speakers designed to look like vents. Bass is under seat. I do have air going to the back of system to keep it cool.
Thank you for the compliments. Hope I gave you some ideas.
#296
01-24-2016, 08:59 AM


#297
01-26-2016, 11:39 AM
Elder User
#298
01-27-2016, 09:21 AM
 Thanks appreciate the kind words and you following along.
Photobucket is acting up so please bare with me on the update.....some of my photos will not upload and others just upload three or four times and drop in the wrong place.
Took a little bit of time to work on the beat to #*(& hood that I got off the parts truck. It is very much not straight but its not all rusted out either. Not too sure I can live with all of the dents and stuff on it but it will have to work till I can find a straight one.
Scrubbed it up first of all, hit it with some 800 then 1500 and several passes with the buffer and it doesnt look terrible. Kind of funny seeing how different years or different models of truck have different paints on them. This one appears to just have a black primer over the metal and then color over that. Appears to be original paint as well.

It is just sitting on there, no hinges to bolt on yet.
Yesterday was like Christmas at my office.

Shorter front shocks from Mike Naake (Guy is awesome to work with if you ever need coilovers for a crown vic setup he is the guy to call.)

Inner door handles....will be wrapped in same material as seats.

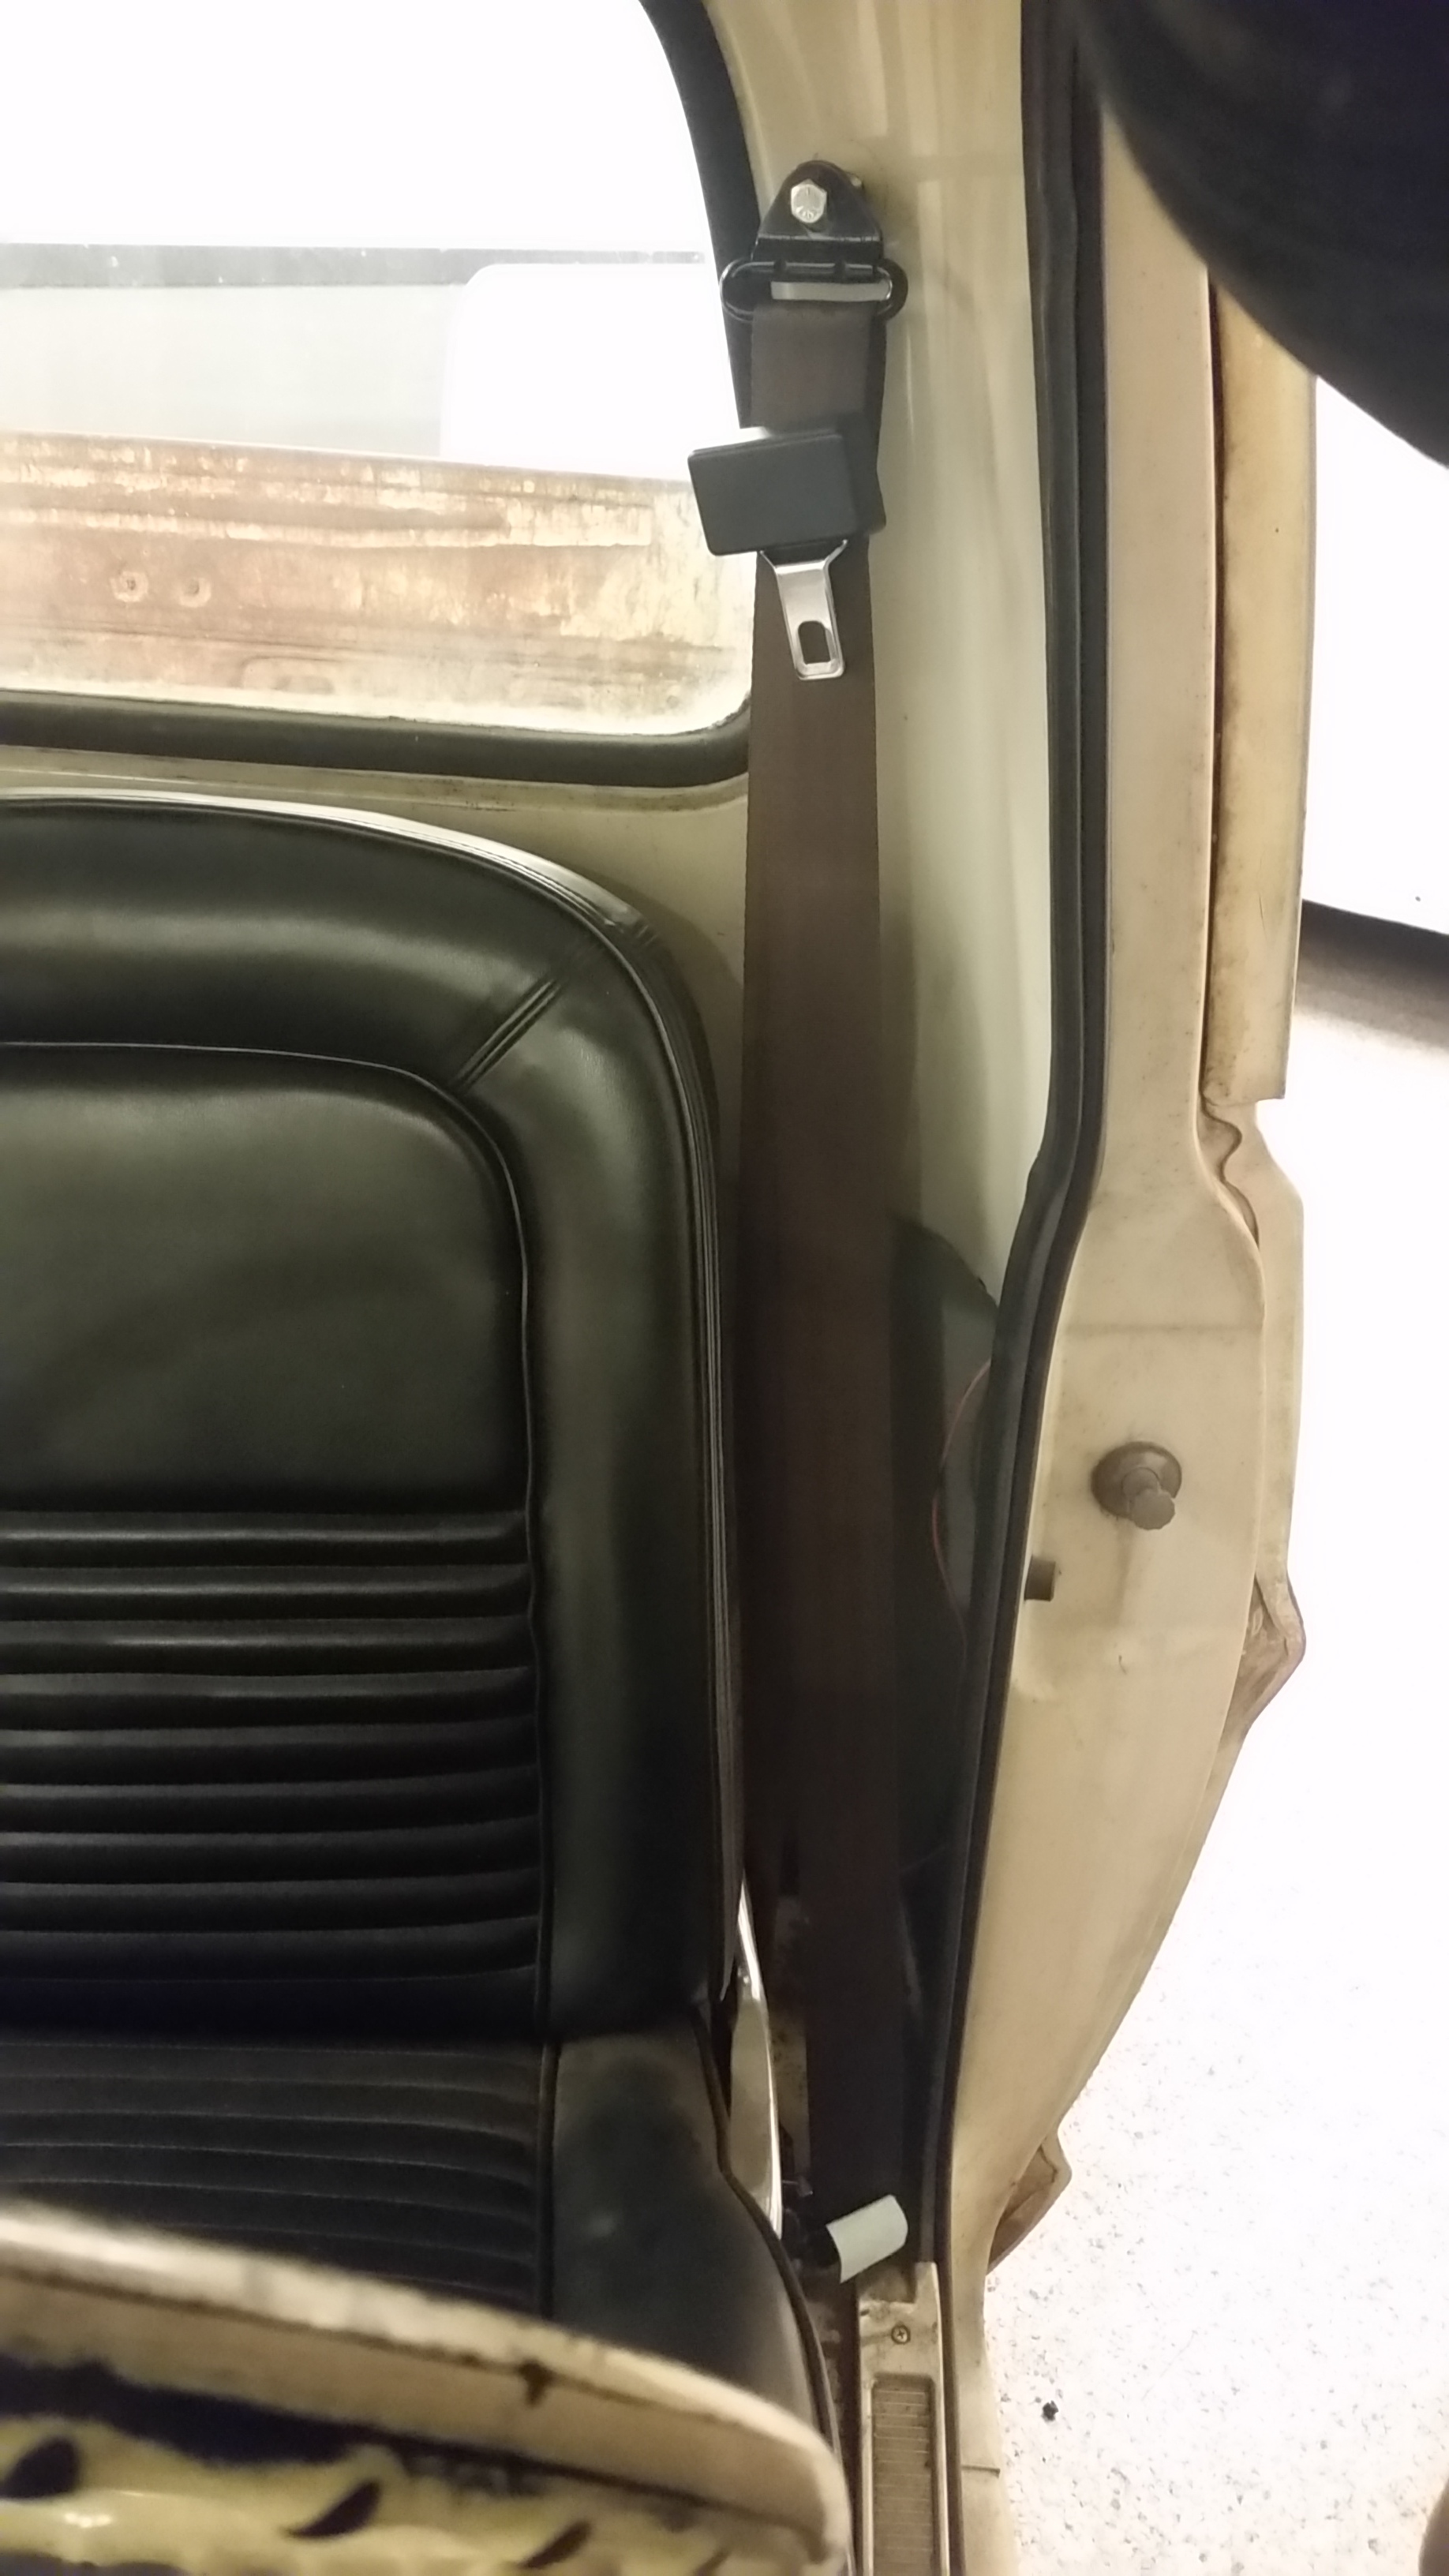
Seatbelts from Seatbeltplanet showed up yesterday. They look great so far and should go well with the interior theme I am working on.


Carpet from LMC showed up as well. Its not as dark as I had hoped but I think it will look good in there. I might see if the upholstery guy can order up some Brown BMW or Mercedes tight weave carpet and sew up a carpet kit in the future. Their carpet is amazing, if you have never felt it you should.


My buddy Jeff took my hinges and ran them through his blaster and got them all good and clean for me (I have got to get one of those) I shot them with some etch primer and then some cast aluminum paint. Pretty happy with how they came out.....I took pics of the whole process but cannot get those to upload either....

Got the second TMI foam for the seats. They look amazing until you sit in them. The foam is waaaayyyy too thick. It raises you up a good 2" from the stock seat and pushes you forward even more. I would not order them again if I had it to do over again. I would just build the foams from scratch. For $335.00 for the two foams I could have spent money somewhere else.

Met with an upholstery guy locally last night who can do the work in the time frame that I need it in. We are doing a high end leather looking vinyl. Dark Brown with light tan colored stitching. It should look awesome when its all done.....going to be pushing to get the truck done by the Optima Event though =(
#299
01-28-2016, 09:38 AM
Looooong day at work today only got a little bit of time in on the truck. Managed to get the truck up in the air and swap out the coilovers for the shorter ones. For those of you that are running a crown vic setup, how low is the front of your truck? Tire/ wheel size and crossmember to ground clearance.
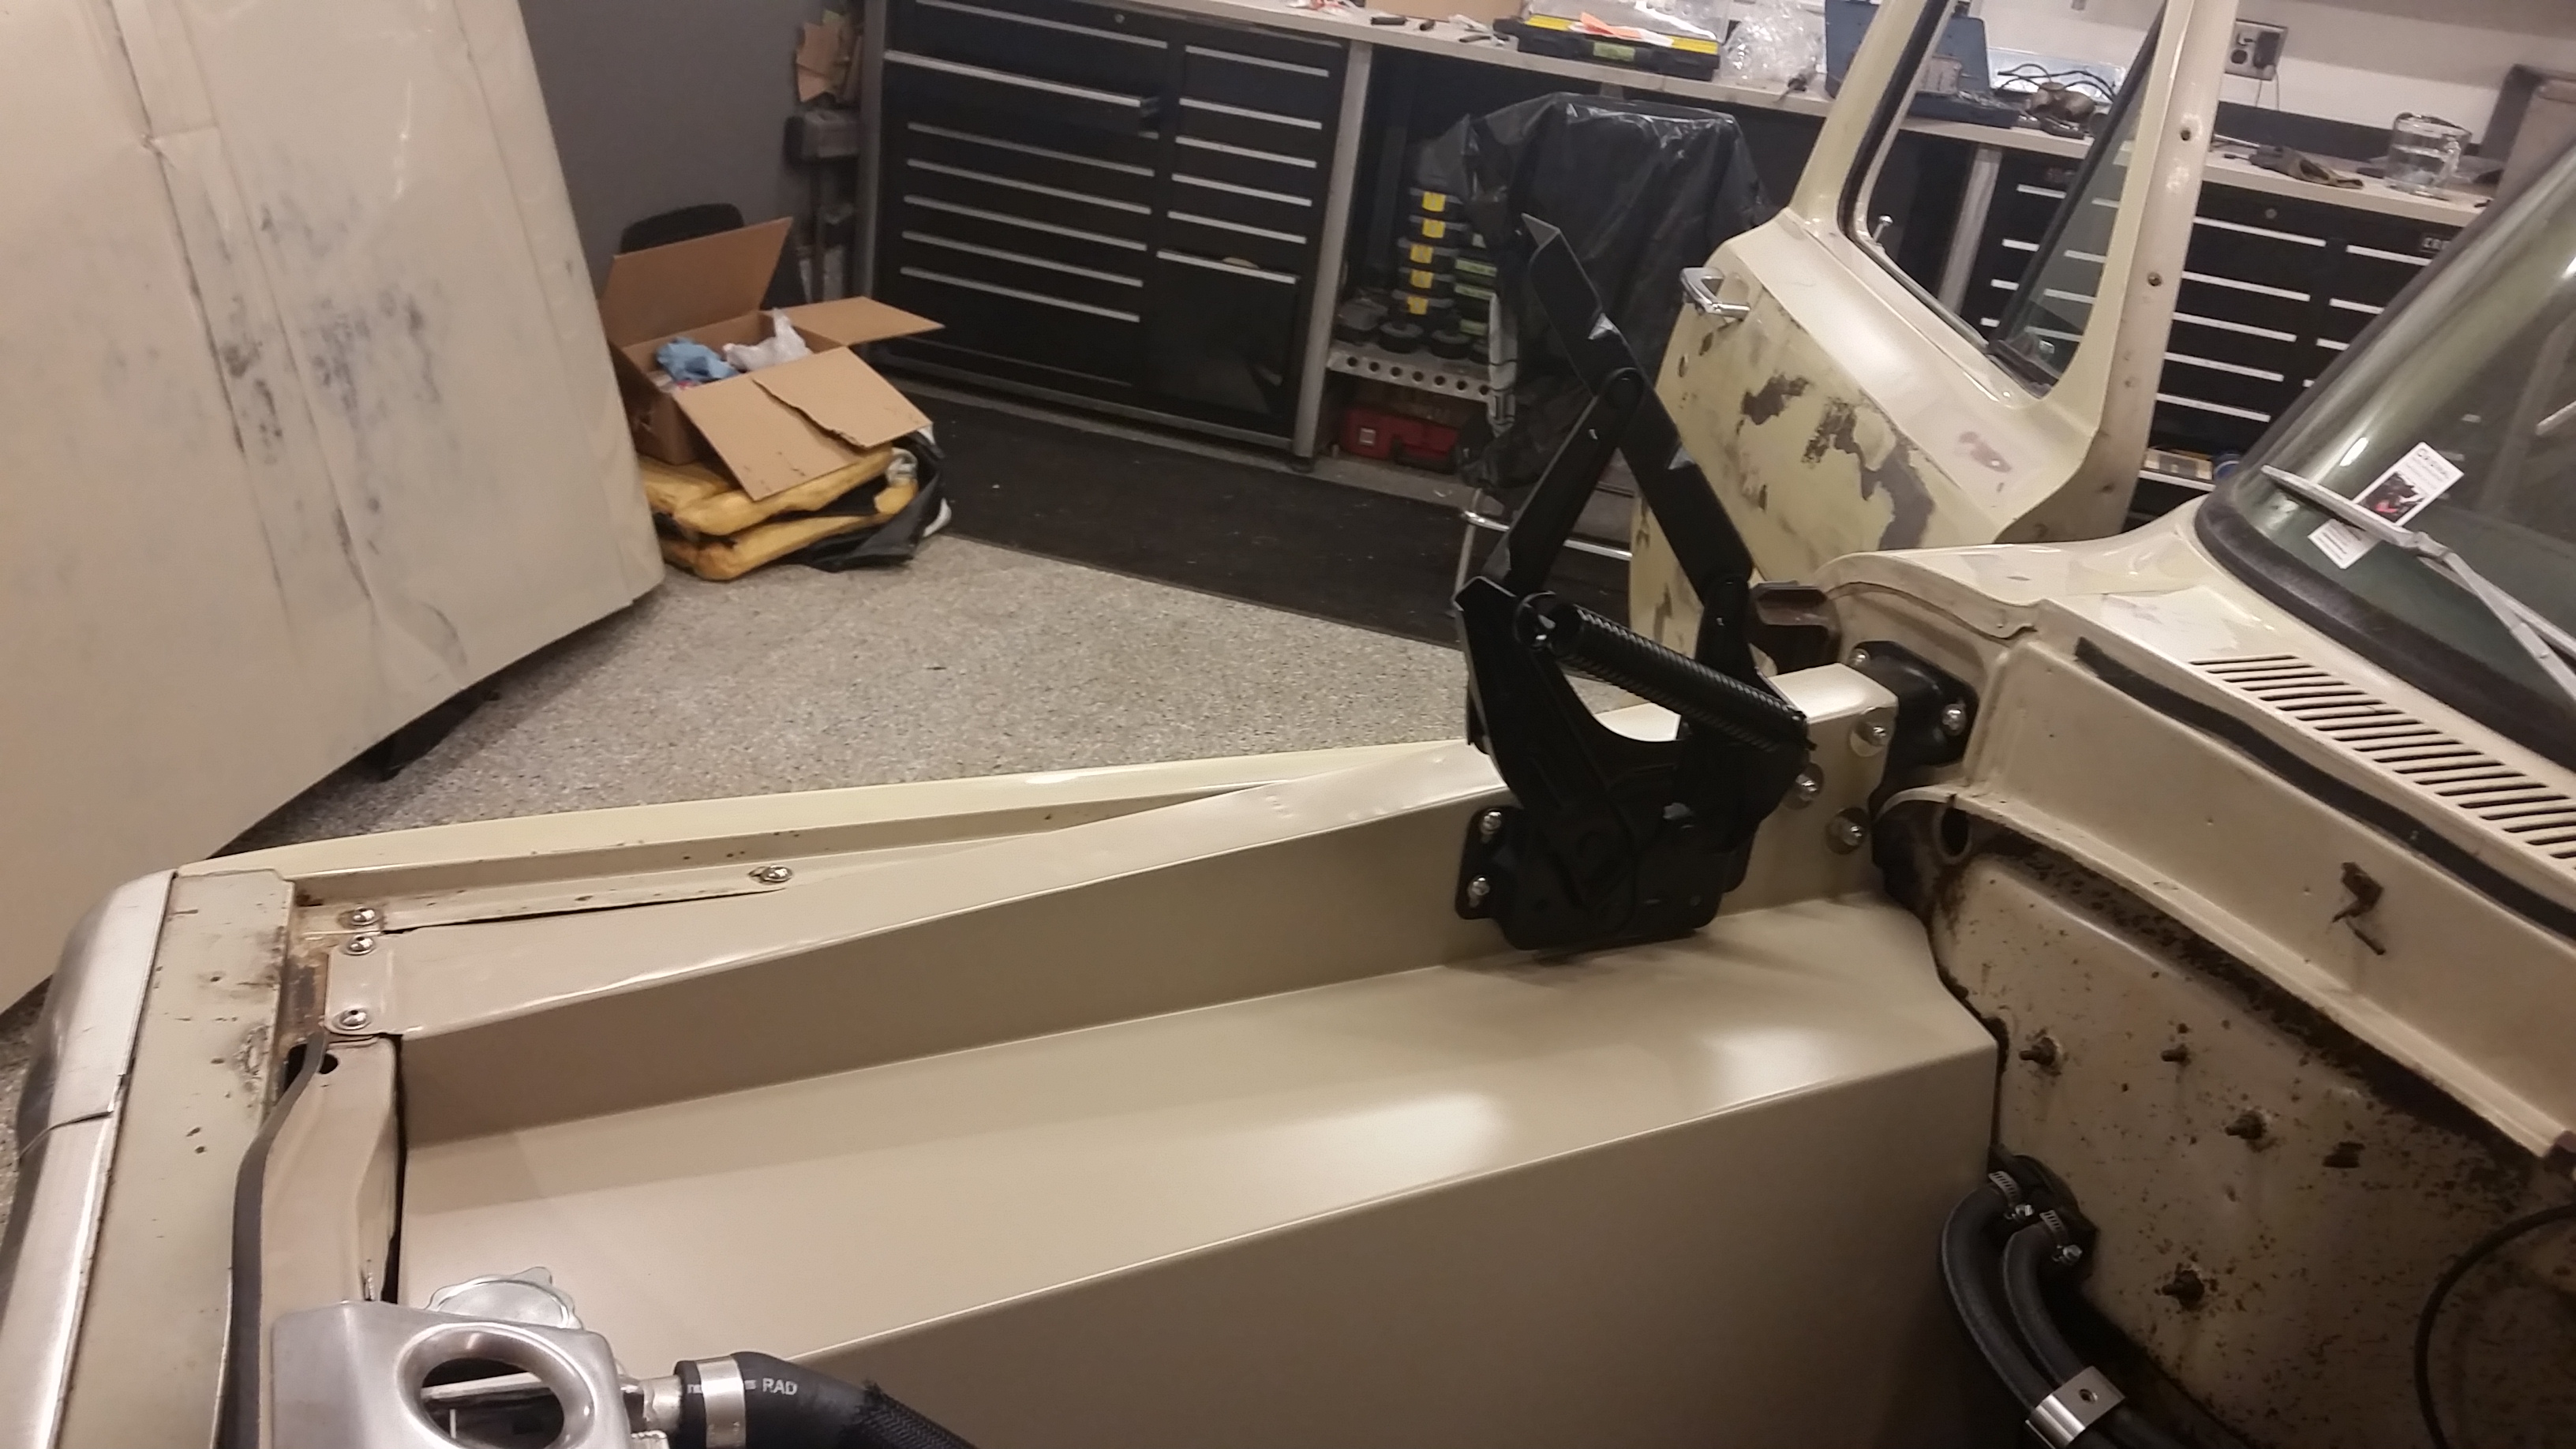
Hood hinges, while they look cool on the bench, the silver in the engine bay looks terrible. Looks like I am going to reshoot them black tomorrow.
Thanks for keeping up with the build thread.
Sean
Hood hinges, while they look cool on the bench, the silver in the engine bay looks terrible. Looks like I am going to reshoot them black tomorrow.
Thanks for keeping up with the build thread.
Sean
#300
01-28-2016, 11:04 PM
Seat Tracks from mustangs unlimited showed up today along with the hardware to bolt the seats to the tracks and the tracks to the brackets. Its a lot of crap to order all this stuff from scratch.
Got the seats out, bolted the rails to the seats and figured out the latching mechanism. Amazingly enough my hacked together seat brackets from a set of downloaded drawings on the internet bolted right to the truck and the seats bolted right to the brackets.
I had to get these bolted in and see how they fit in the truck.
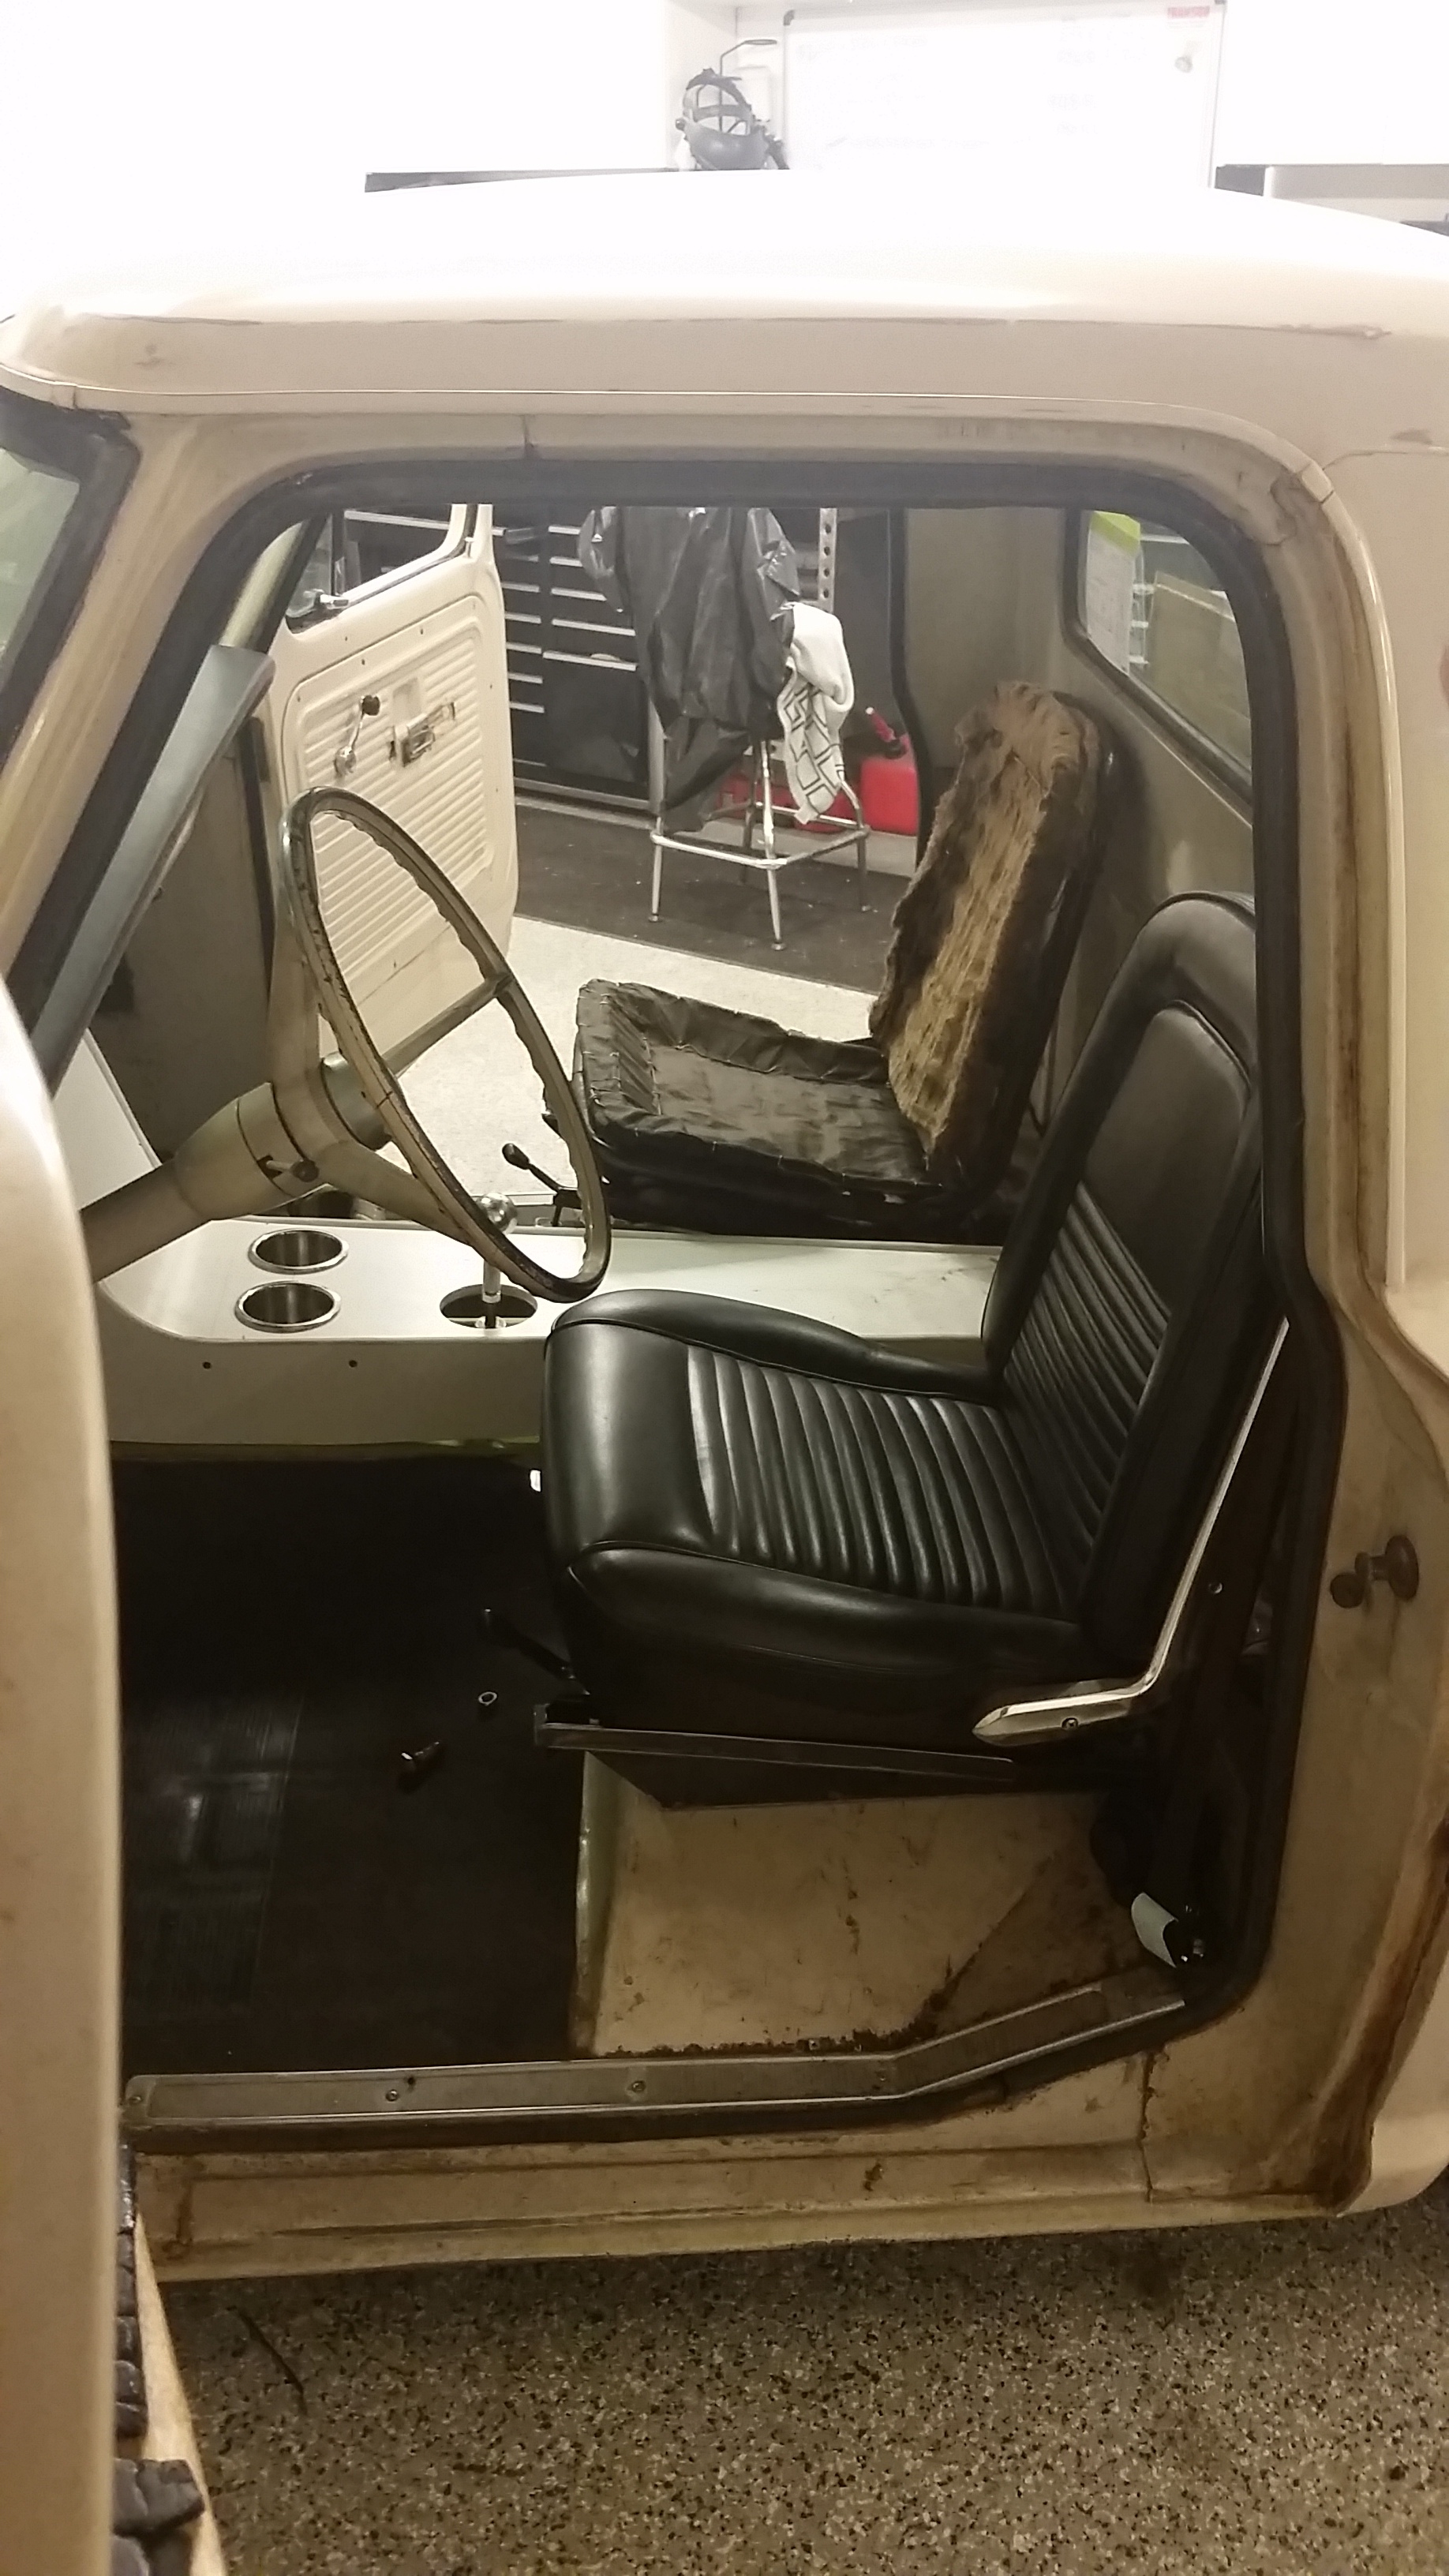
Look great in there, sit at the right height, arm to window is great as well.
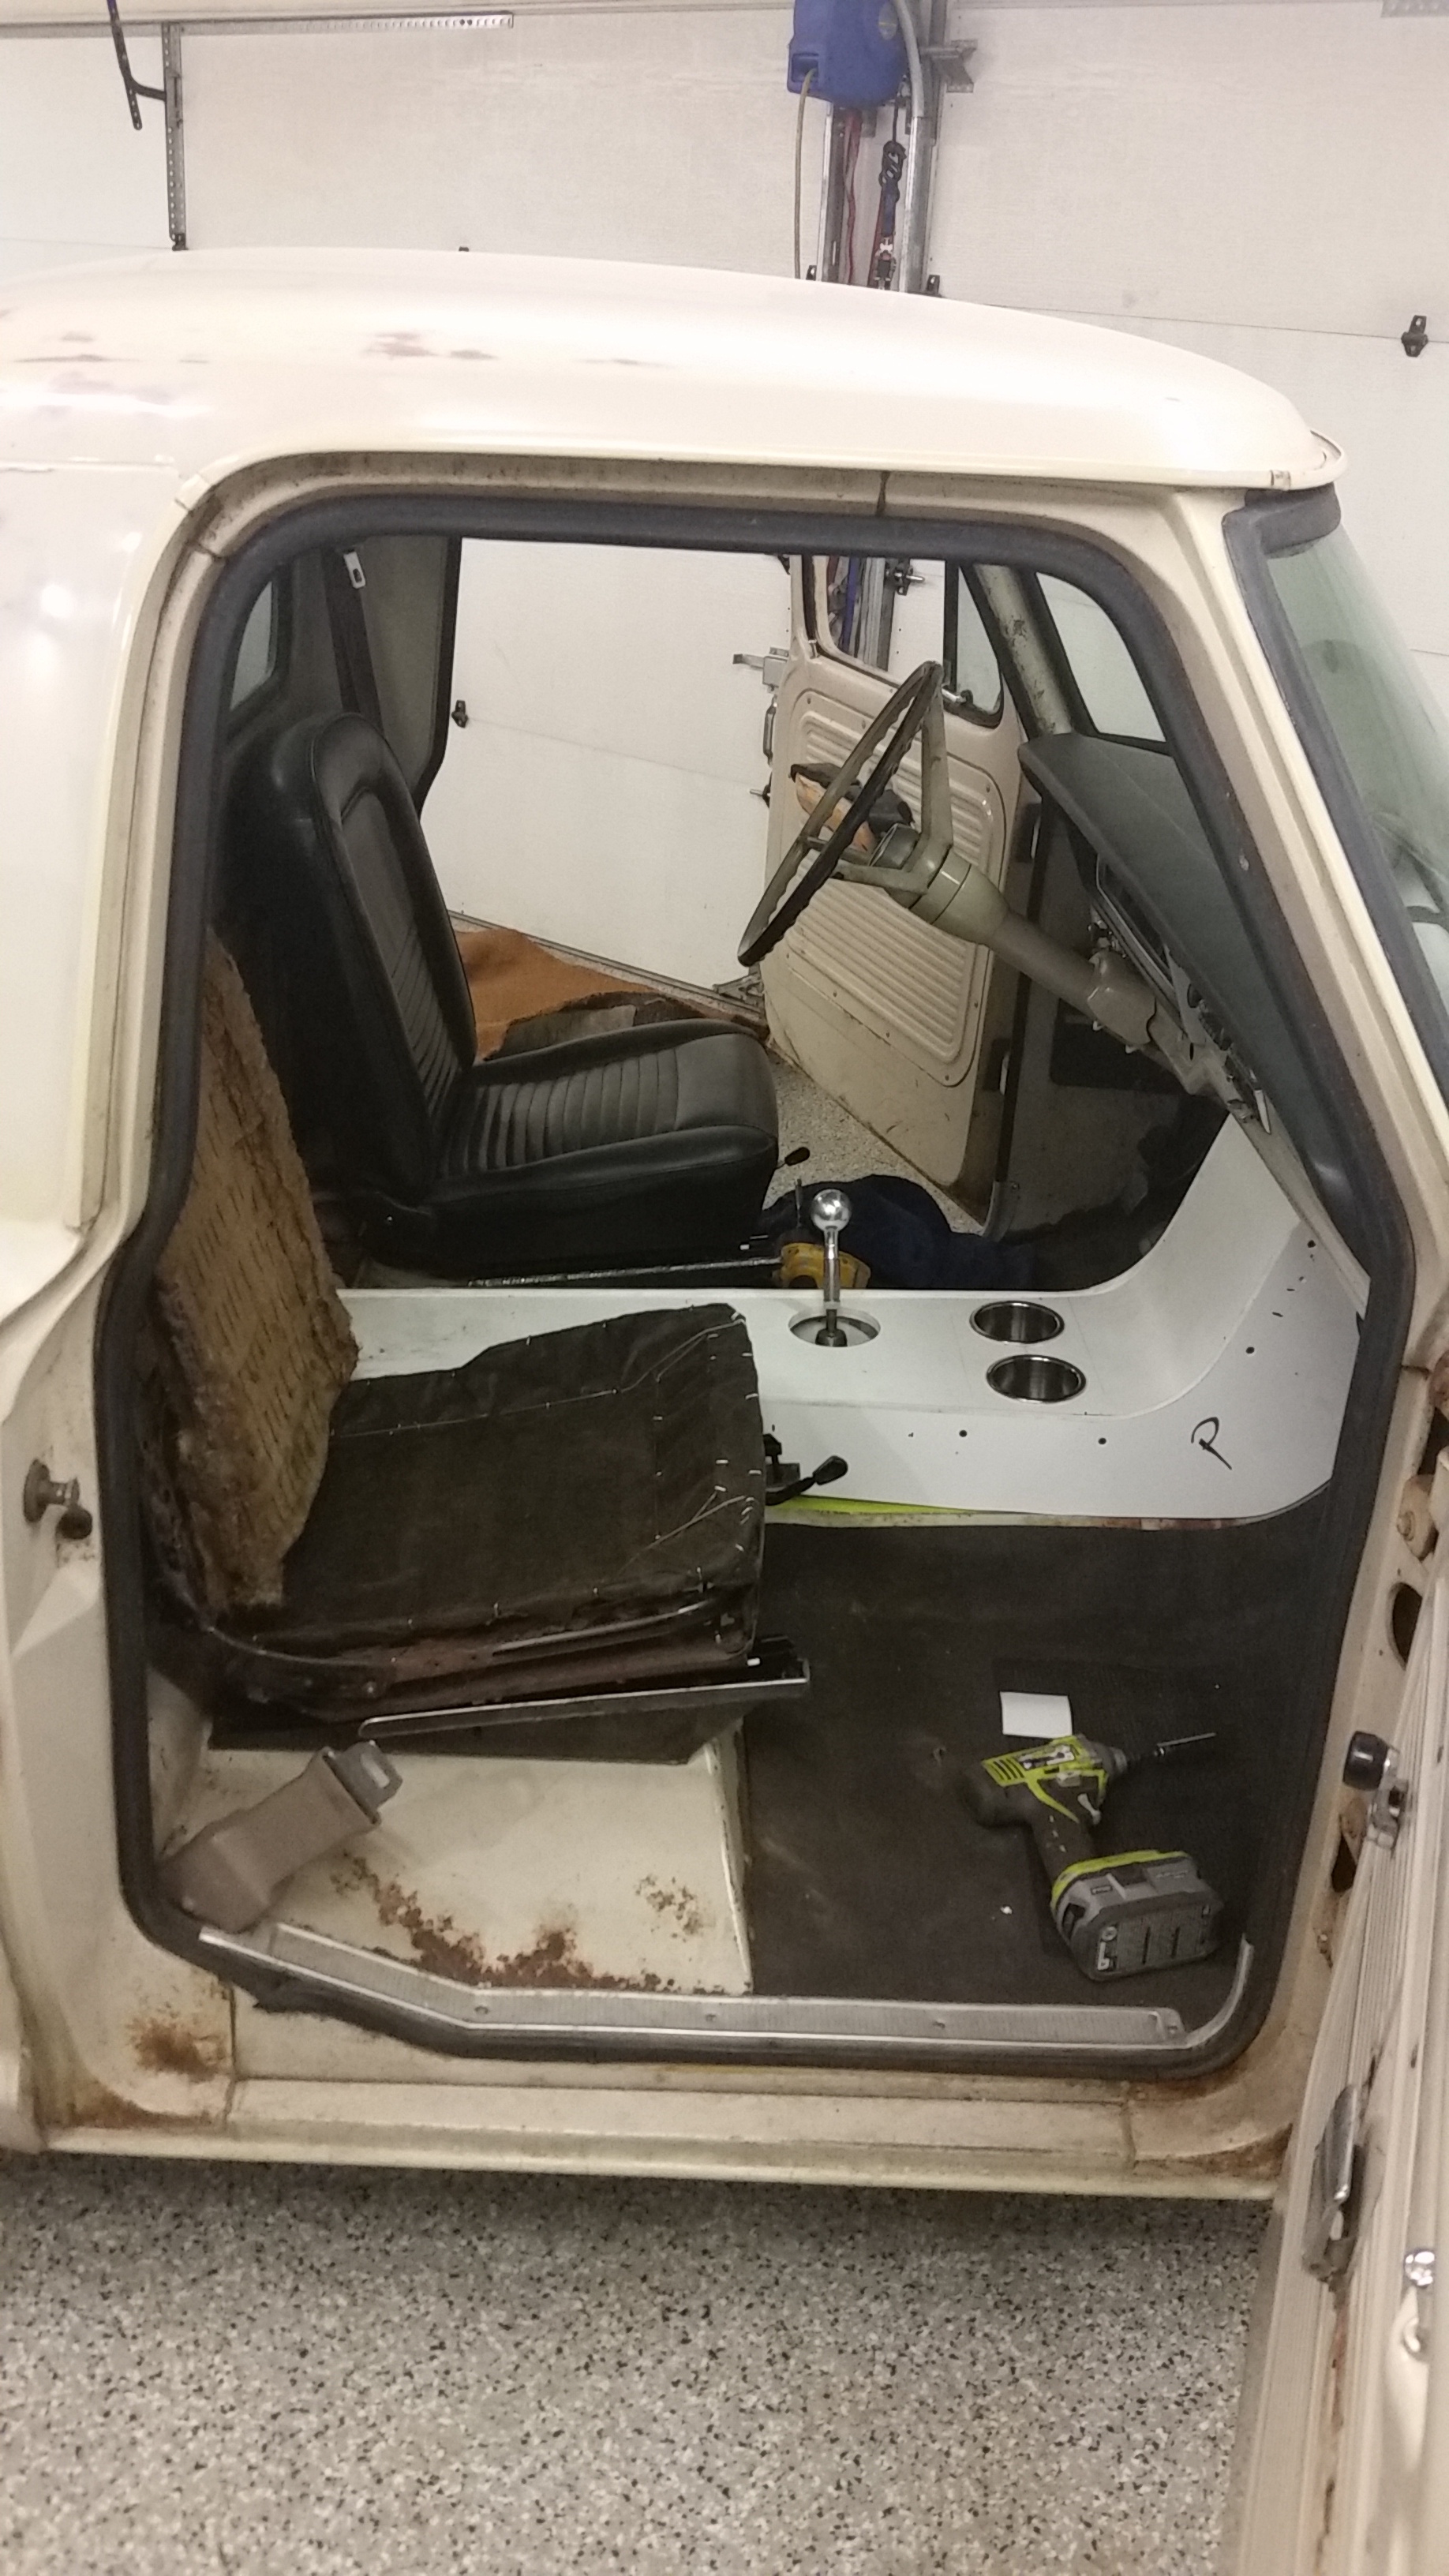
Also managed to spend a few minutes on the seatbelts and got them mocked up in there. They fit great....the cable end near the console might need to be a touch longer but they look great.
The silver looked terrible on these so I painted them black. I am not really sold on the black but it looks a hell of a lot better than the silver did. They go great with the stuff on the firewall. Need to pickup some washers for the hood bolts and I can get the hood bolted down.
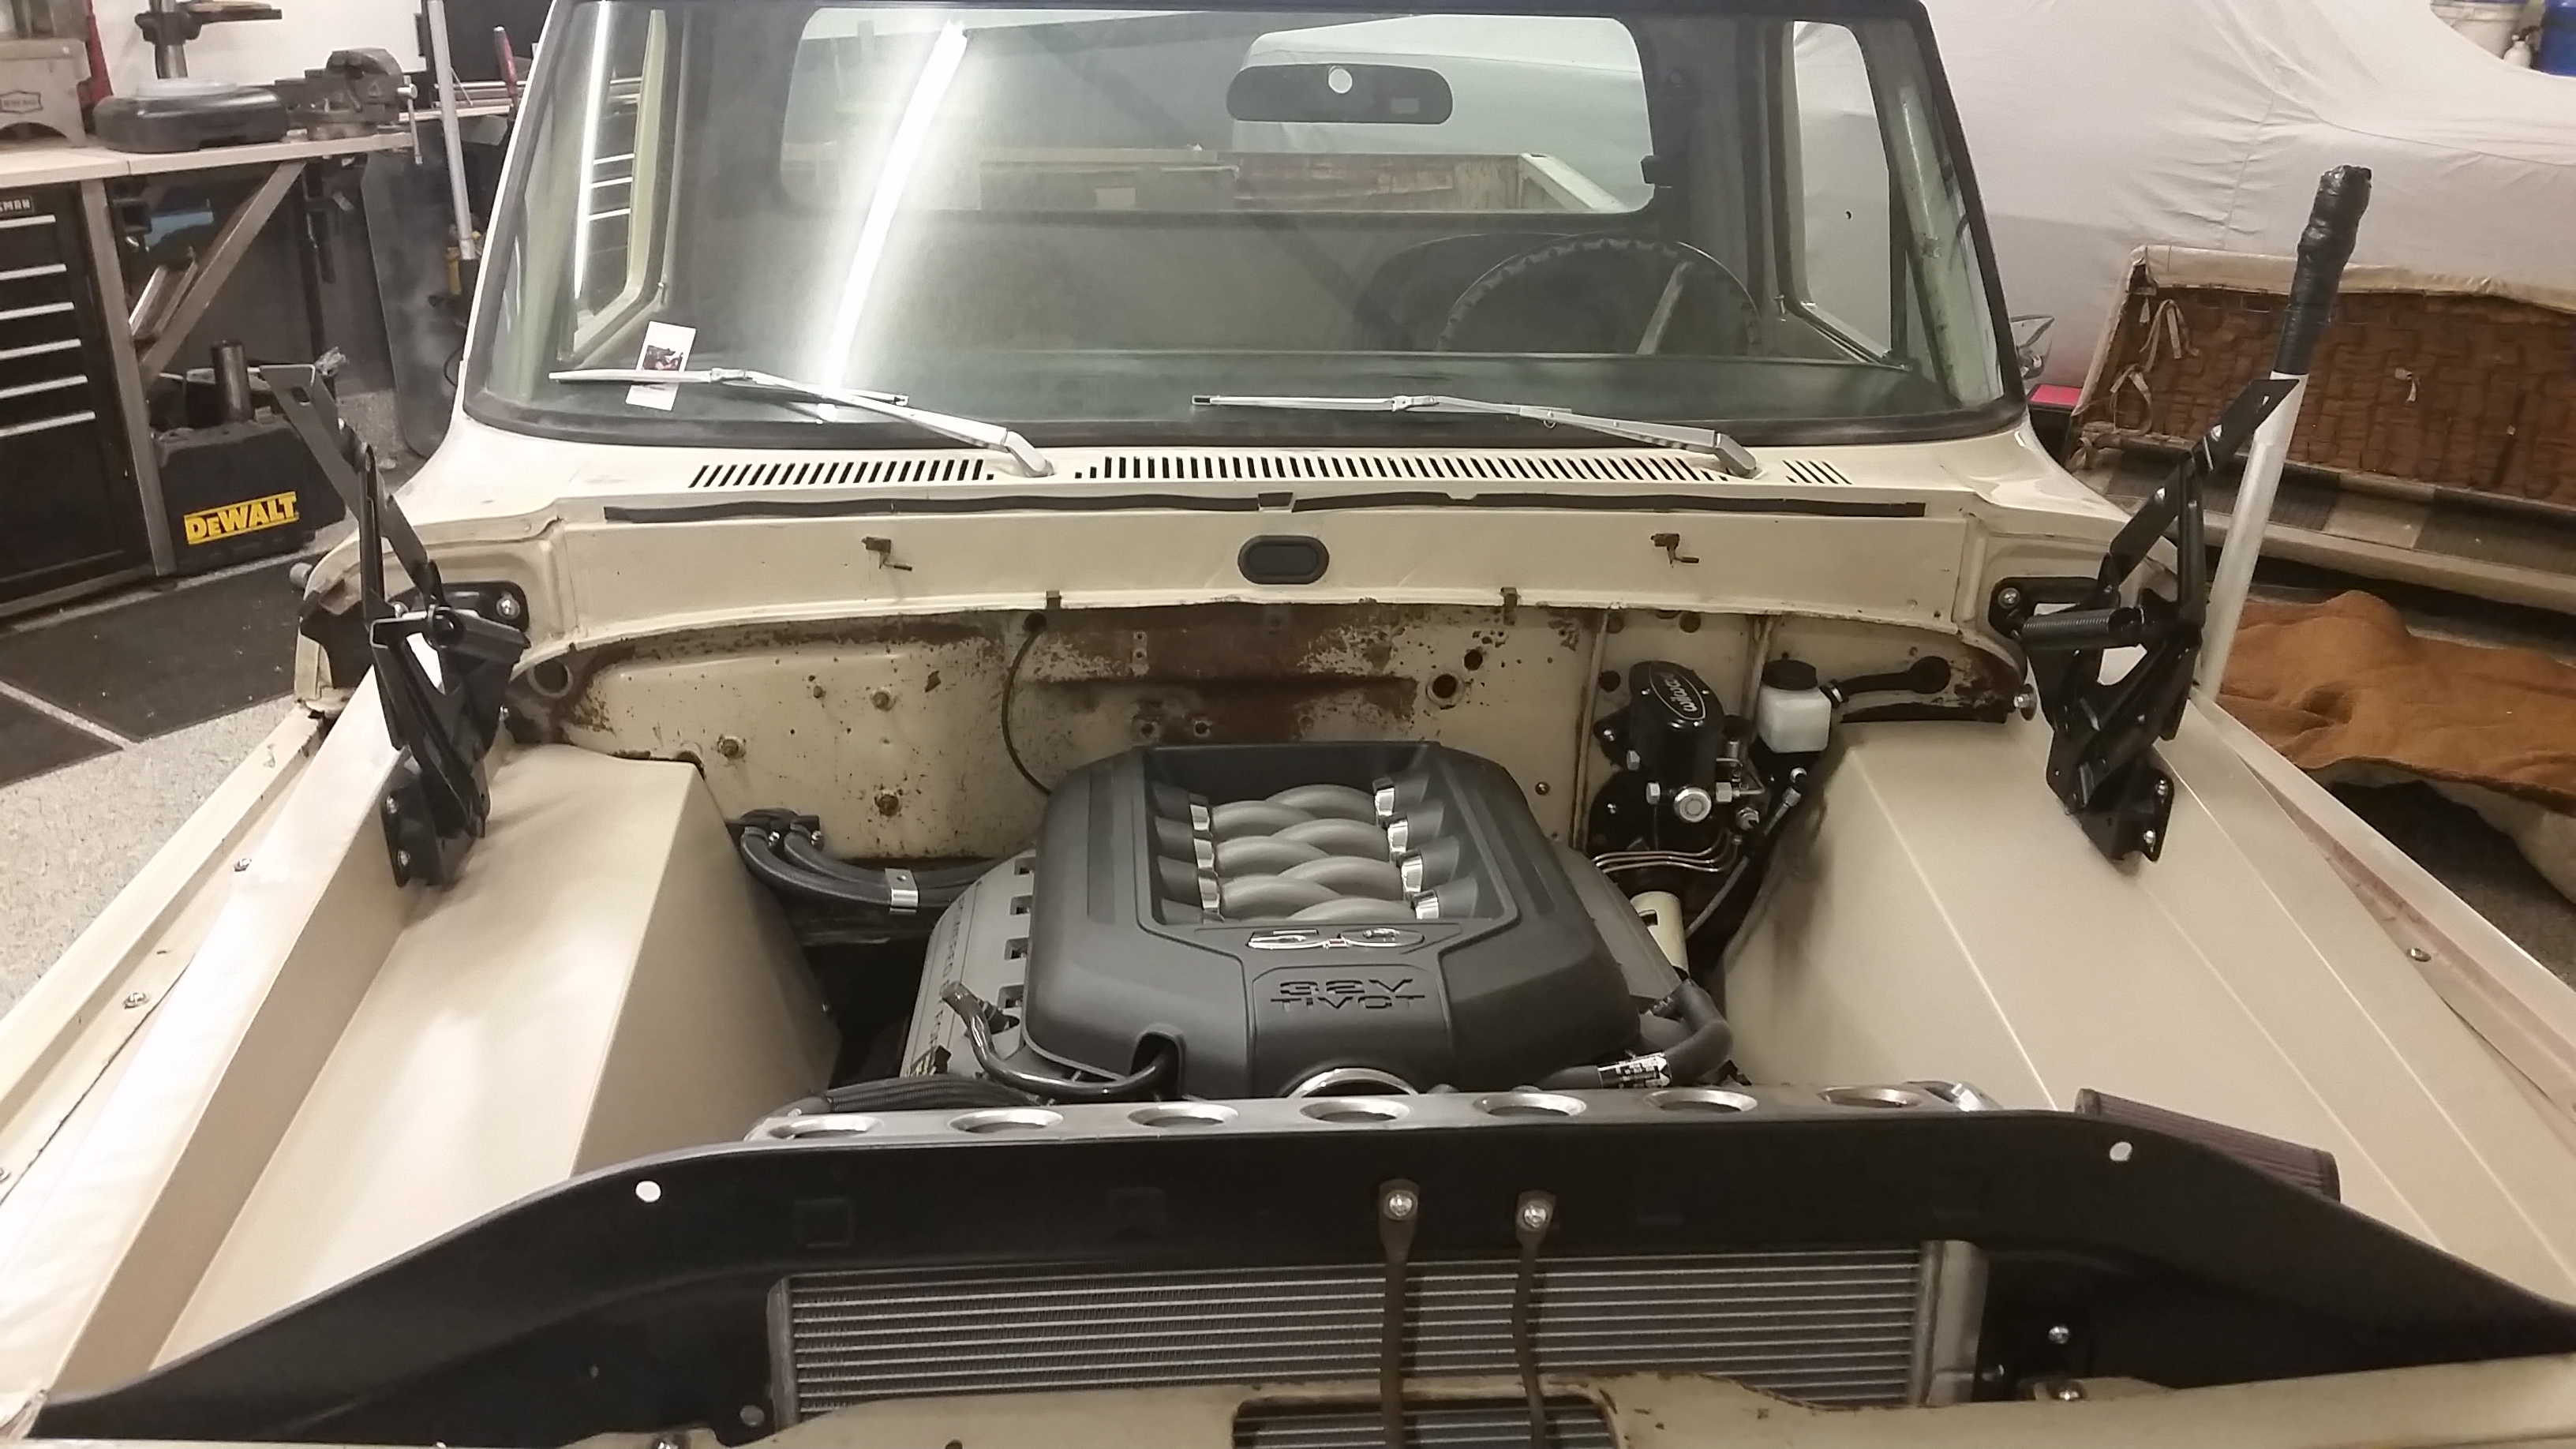
I really hope that the weather stays dry and I can get a few road miles on it this weekend.
Sean
Got the seats out, bolted the rails to the seats and figured out the latching mechanism. Amazingly enough my hacked together seat brackets from a set of downloaded drawings on the internet bolted right to the truck and the seats bolted right to the brackets.
I had to get these bolted in and see how they fit in the truck.

Look great in there, sit at the right height, arm to window is great as well.

Also managed to spend a few minutes on the seatbelts and got them mocked up in there. They fit great....the cable end near the console might need to be a touch longer but they look great.

The silver looked terrible on these so I painted them black. I am not really sold on the black but it looks a hell of a lot better than the silver did. They go great with the stuff on the firewall. Need to pickup some washers for the hood bolts and I can get the hood bolted down.


I really hope that the weather stays dry and I can get a few road miles on it this weekend.
Sean