When you click on links to various merchants on this site and make a purchase, this can result in this site earning a commission. Affiliate programs and affiliations include, but are not limited to, the eBay Partner Network.
Changing JUST shocks (but not springs) on a 2007+ (3rd Gen) Expedition
So, time to do my part to give back. Once every year or two I try to do a detailed write up on hard-to-find job details where there wasn't a lot of info floating around out there... It's that time again!
I have a 2007 Expedition EL Eddie Bauer, 110k miles and have noticed for a while now that light inputs to the shocks (gentle bumps, stops at red light, etc) seem to continue bouncing 5 or 6 (or more) times. Very subtle bouncing, but driving me crazy, and no dampening evident. Medium to Heavy inputs (big bumps or hard stops) are dampened just fine - one bounce then done - but the subtle inputs seem to continue oscillating forever.
So I set about planning to replace my shocks. Given the coilover shock setup of these trucks, replacing the entire strut assembly (spring and shock) is easiest; no need to compress spring and disassemble strut assembly. But my springs were nearly pristine, and I had a real hard time forking over the extra $400-600 necessary to replace the springs as well when they were just fine.
There’s a TON of great info out there on replacing entire strut assemblies. Most of it is for F150 suspension design; while similar, I found some differences for the 3rd gen Expedition. There is very, very little detail out there however on replacing ONLY shocks (i.e., compressing spring properly, removing shock etc). One or two generic vids on compressing a spring but nothing Expy specific, and not much detail or step-by-step. There is (rightly) appropriate caution required with using spring compressors as a DIY job; it’s not for everyone, but when done safely/carefully and using your head (other than as a backstop for a flying projectile ) it’s not anything to be unreasonably afraid of. You just have to be smart about it and use common sense.
As I found almost nothing out there specific to the 2007+ 3rd gen Expy, I thought I’d document what I went thru as I went thru the process of replacing mine.
First I set about researching spring compressors for home use. Unless you intend to spend hundreds on near-commercial grade compressor, external compressors (threaded rods with hooks that attach to the spring from the outside, where a nut gets screwed down to compress the spring) are really the only option for home use for this application. There are *many* McPherson spring compressors out there; they are NOT appropriate for this application. The Expy coilover shock configuration is just that - a shock absorber inside a spring. It is NOT a McPherson strut. I also found that most of my local auto parts stores (AutoZone, OReillys, etc) had compressor kits for rent but none had big enough hooks - and the ones in my local area provided kits that said right on the box 'for McPherson struts'. Sheesh...
The diameter of the Expy coil spring wire itself requires a larger ‘hook’. The one I used looks like this:
I liked the fact it had three legs instead of the usual two, and had the bigger hooks for wider diameter coil wire. (And it was made in USA )
NOTE: After I conquered the first one (entire strut removed, replaced shock, reinstall strut), the remaining three took roughly 60-90 minutes each. Below instructions are how I spent an add'l couple of hours digging into the first one. Compressing/install shock/uncompressing spring carefully and slowly took about 20-25 minutes each, and another 40-60 minutes per wheel to remove/reinstall.
FRONTS
Removal
So the fronts carry the most weight, and I started with those. Before attempting removal, I’d soak all of the fasteners mentioned with some rust penetrant (PB Blaster, etc).
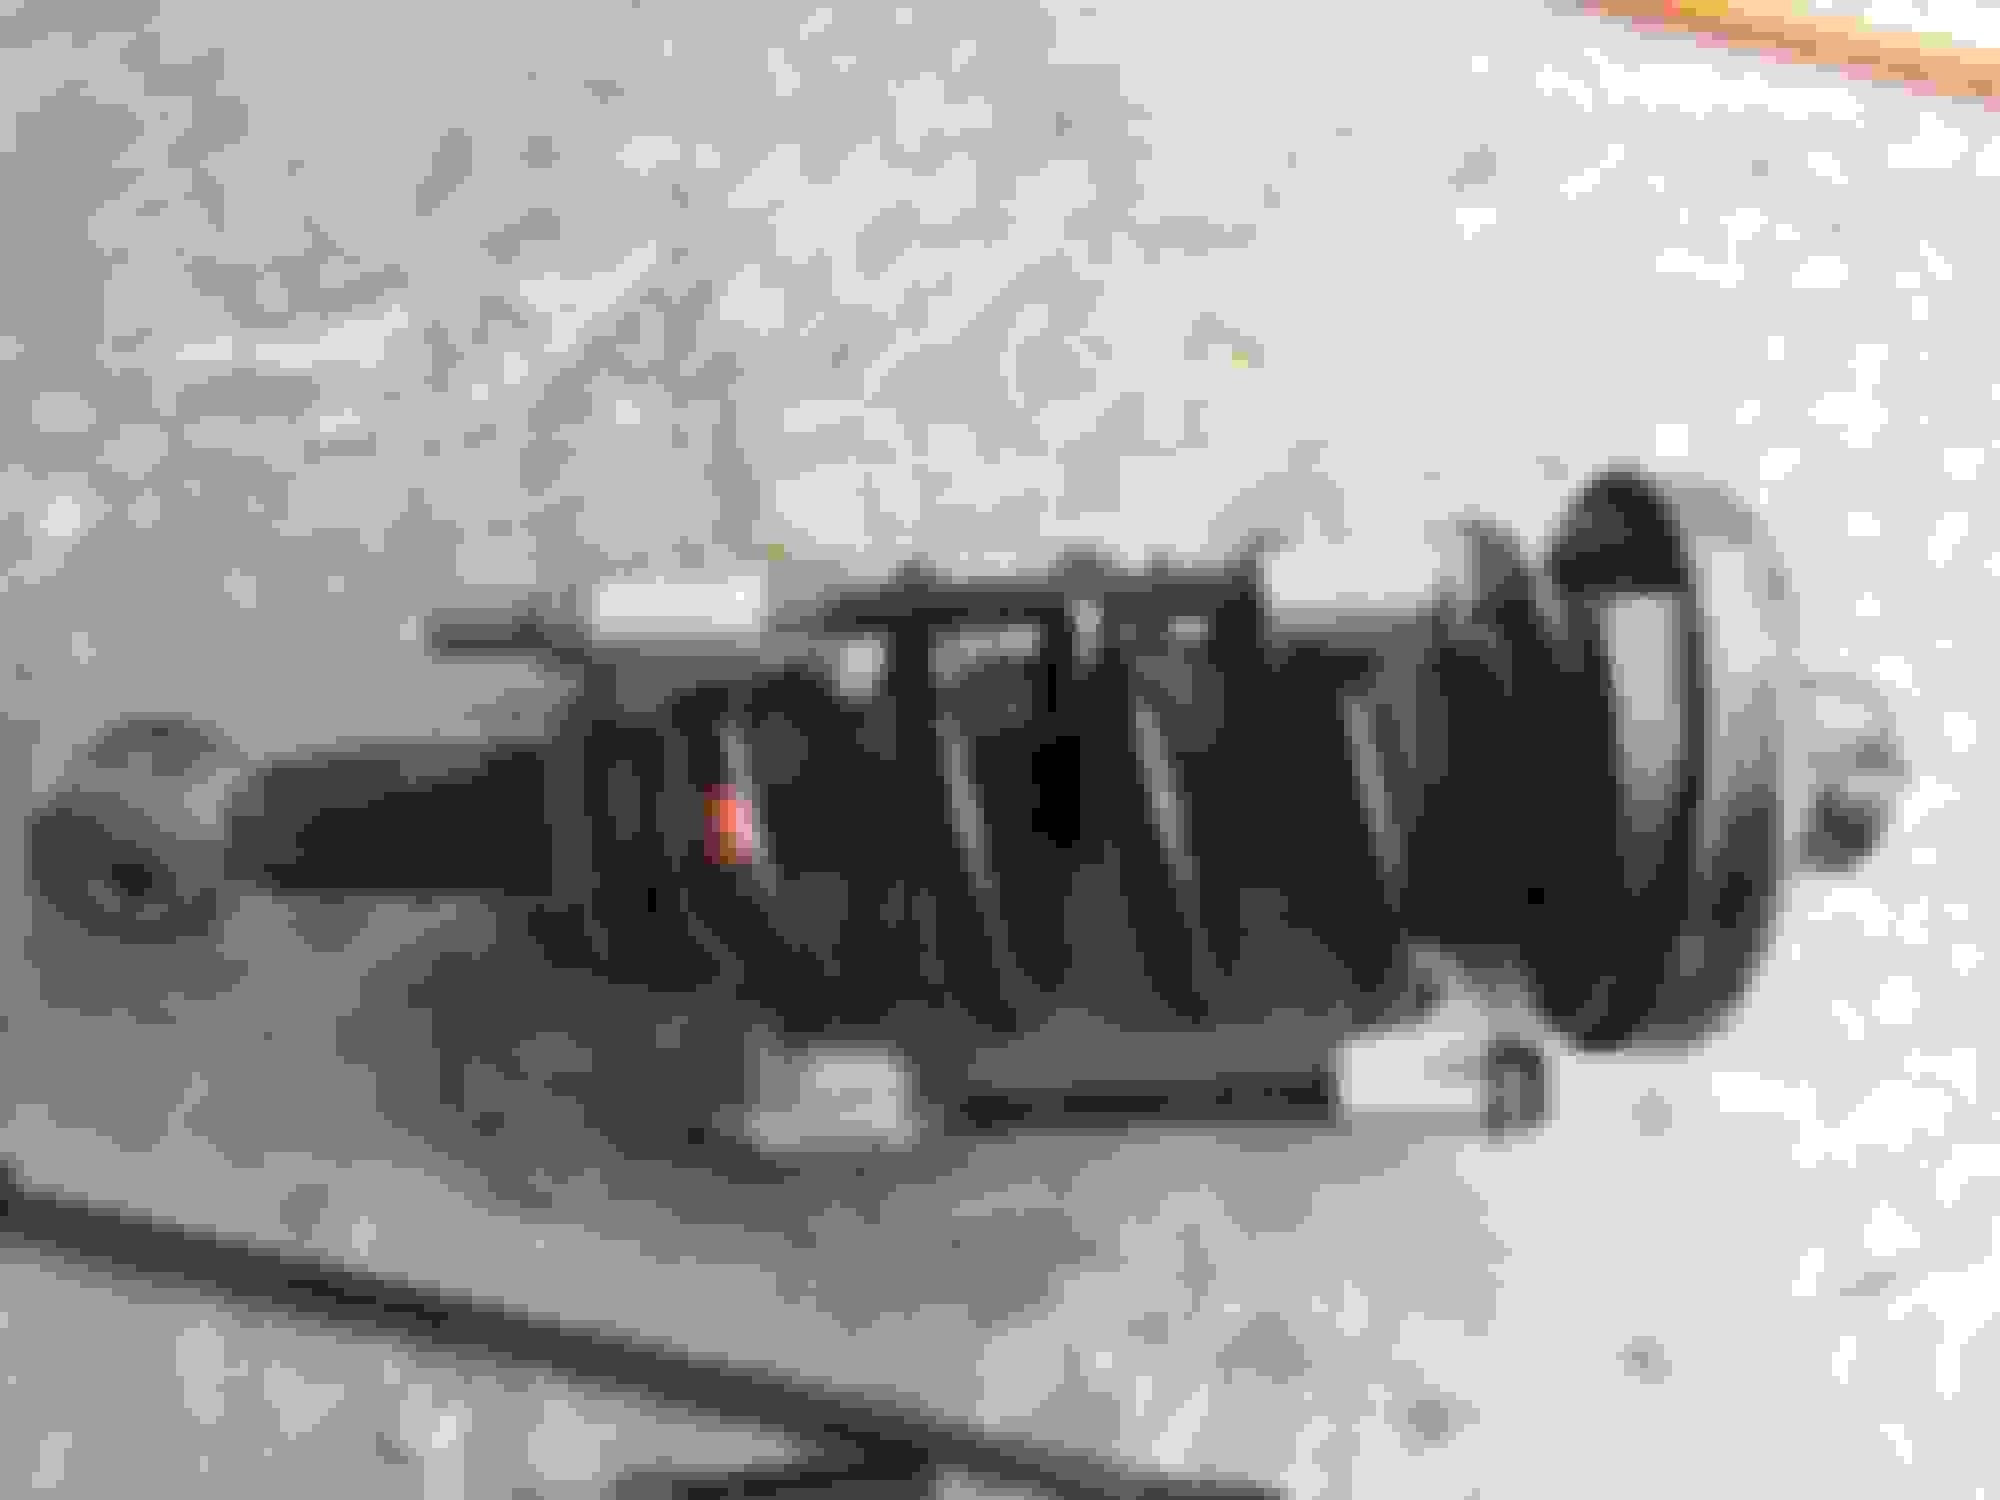
Here is a pic of the big pieces to deal with on the front struts (read on for description):
The biggest difference between F150 and Expy is that the lower shock mount is actually completely enclosed in an extruded metal area instead of just between two metal ears that you can slide it out of - see boxed area (A). If you’ve seen the F150 strut videos they show that strut bottom slipping out nicely. Not so for the 3rd gen Expy; this difference means you need to drop the lower arm substantially to get the strut assembly out.
Before you remove anything, use a metal marker (paint marker or other suitable marker) to mark the orientation of the strut mounting cap and spring, while still installed. This will help you align things when reassembling.
To drop front lower arm with enough clearance to get the strut out, you need to remove the upper ball joint, the stabilizer link, and the lower shock mounting bolt [see highlighted areas in above pic]. You really should also remove the attaching screws that fasten the brake line and the vacuum line to the steering knuckle - see circled area (B) in above pic - the screws are out of view, and in this pic I hadn't removed them yet. I found this allowed the arm to drop farther without straining those lines. I also opted to remove the tie rod end for easier access (the piece tied off with bungee cord, see above pic). This gave me a bit easier maneuvering room to get the strut assembly out.
You also need to remove the top three nuts above the strut tower (pictured). The back one can be accessed easily with a long extension down thru the engine compartment (15mm).
All of the fasteners are easy to get to. Note that lower shock mounting bolt is torqued to 350 ft lbs (unbelievable!!) so you’ll need a cheater bar to lengthen your breaker bar to get enough force.
Bolt sizes and torque specs for front strut removal (torque specs from 2007 Expy Ford service manual) - apply blue/medium threadlocker when re-torqueing:
Upper ball joint - 21mm nut - 85 ft lbs
Tie rod - 21mm nut - 85 ft lbs
Stabilizer link top nut - 18mm - 59 ft lbs
Upper strut tower nuts x3 - 15mm - 30 ft lbs (note gear wrench works great on these!)
Brake line attaching screw - 10mm - no torque spec
Vacuum line attaching screw - 8mm - no torque spec
Lower shock mounting bolt - 1-1/16th head; 30mm nut - 350 ft lbs!!!
Top shock nut - OEM original size 17mm - 41 ft lbs
It helped me to have someone push down a bit on the lower arm to get the strut out (to give sufficient clearance). It come out fairly easily, with someone helping to press down a bit on the lower arm.
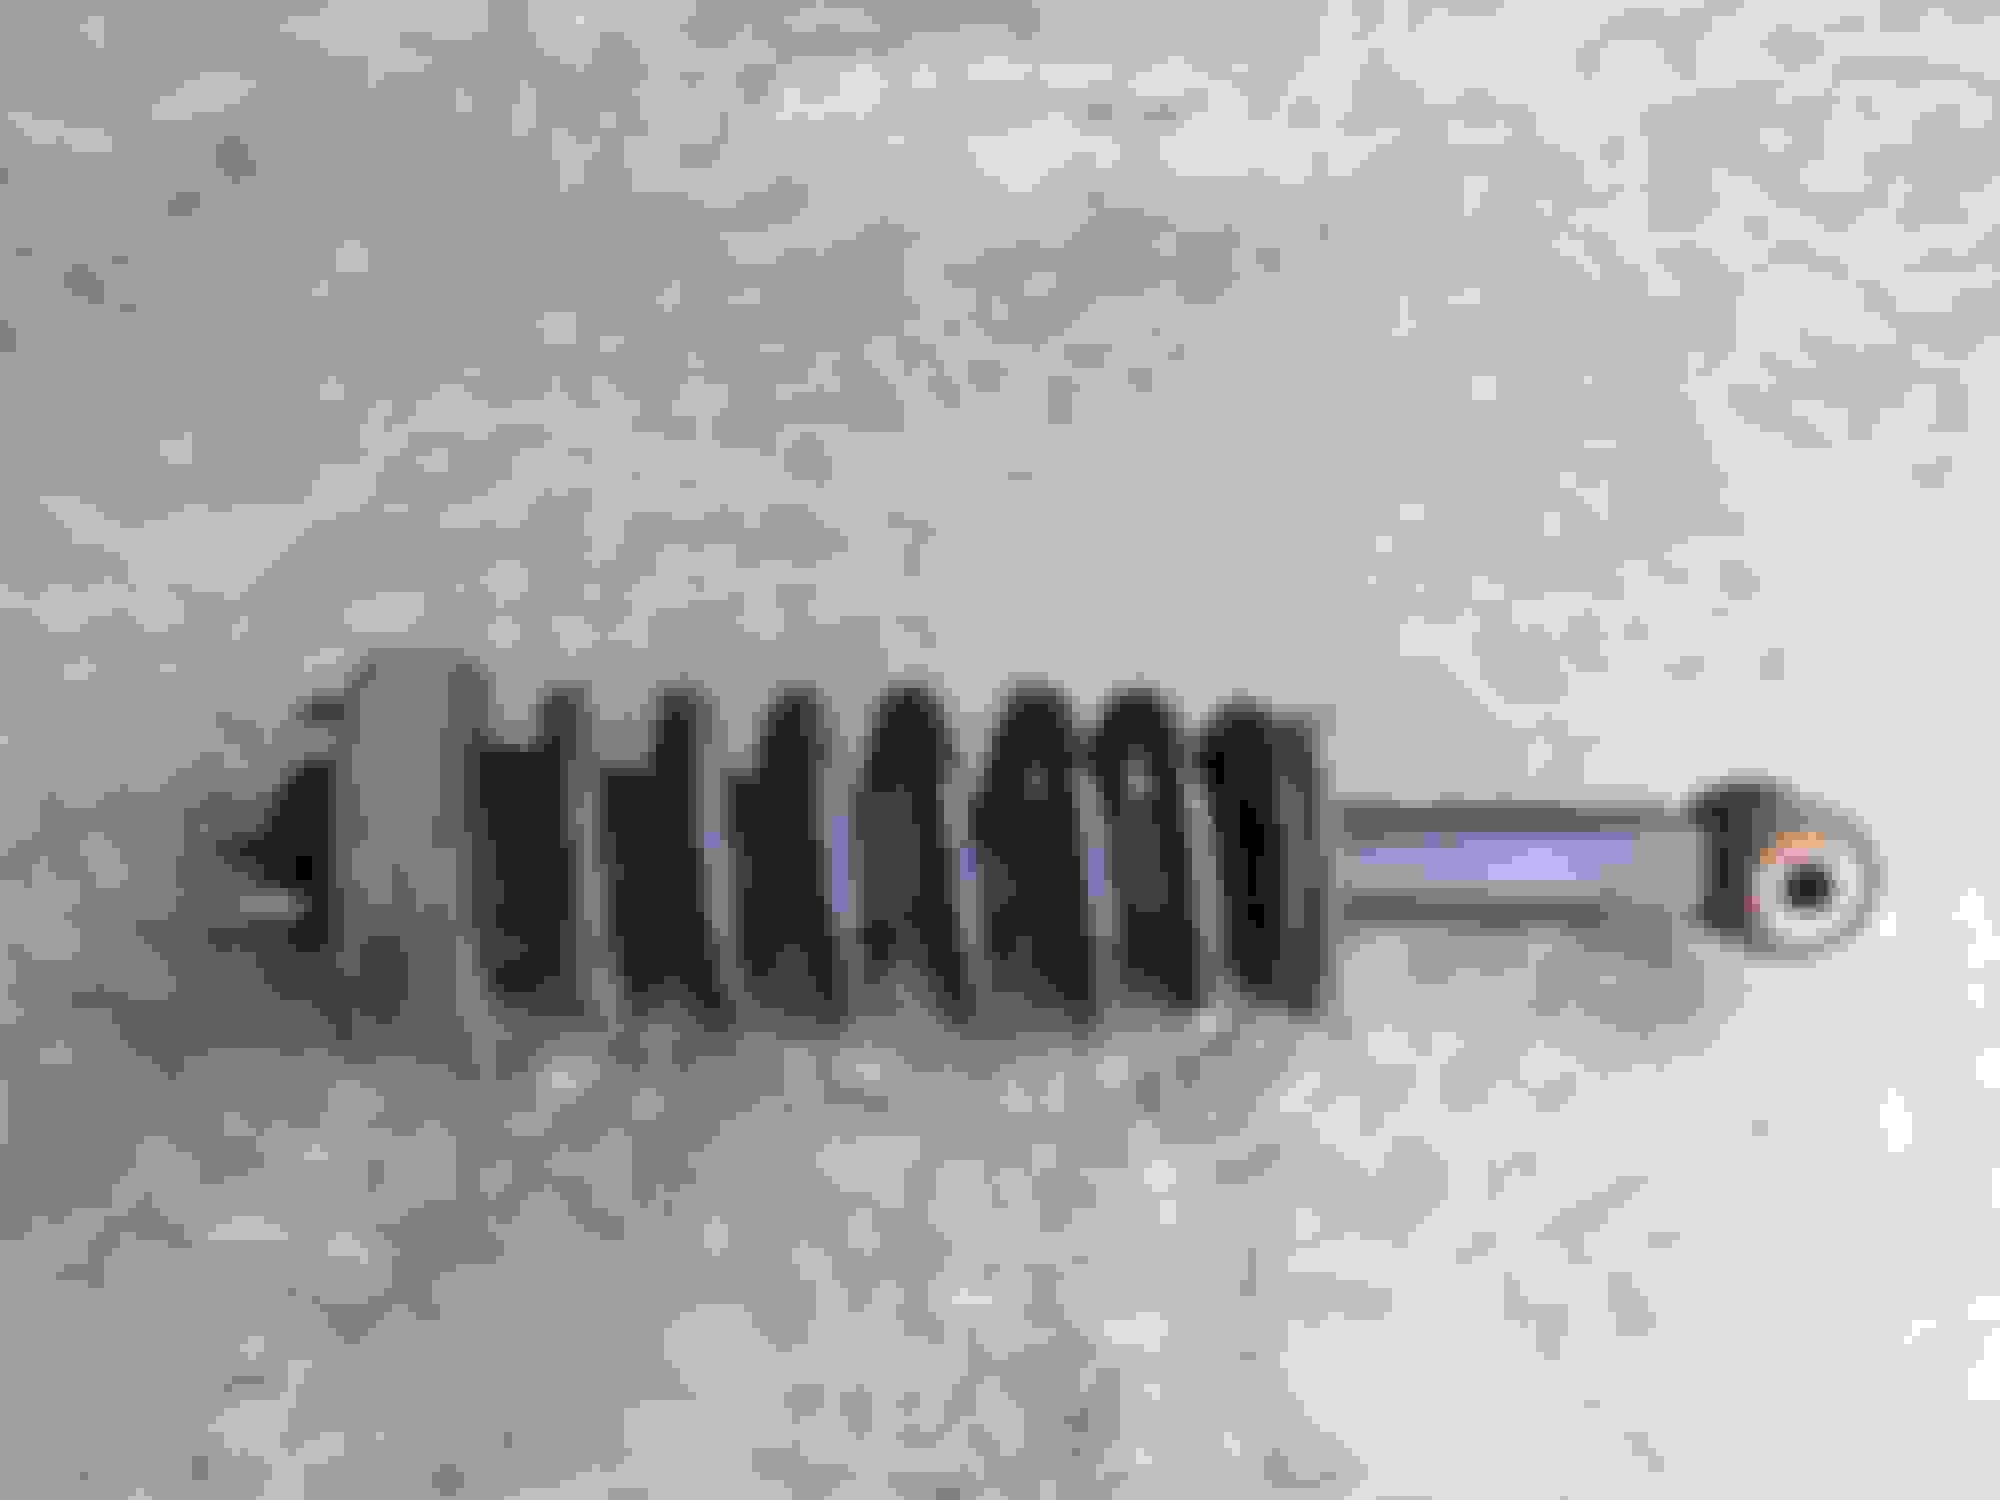
Here’s a shot of the freshly removed front coil/shock assembly (mine had 110k miles, not too bad considering!!)
Compression - the FUN part
Remember to keep the top and bottom of the springs pointed AWAY from anything important to be safe; also wear some safety glasses as a precaution. The compressing process isn’t difficult; just be safe (eye protection, be aware of where you are placing hands/fingers/etc) and use your head.
So once the assembly is out, you have to compress the spring to safely remove the top shock nut that allows removal of the shock. A shot of PB Blaster or other rust penetrant here helps to get things sinking into the rusty top nut while you’re setting up the compressor, and wire brushing away the corrosion so you can get a 17mm socket or wrench on there. I popped it initially with an impact wrench to barely crack it (DON’T remove it yet!!) and then set about applying the compressor tool.
For my tool, I greased the threads with bearing grease to help keep things smooth under high pressure and reduce chance of stripping threads, and made sure each leg was 120 degrees apart. Here’s a shot with the compressor legs installed before beginning:
I snugged them up, and then commenced about tightening each leg. I did four half-turns on each per ‘cycle’; four half turns, then go to next leg, then four half turns, next leg, etc. Using this approach I had sufficient spring compression to safely remove shock nut after six full cycles of half-turns. You can use a screwdriver or prybar to ‘test’ the spring to see if you can move it at all in the strut - once you can move the spring away from the lower plate a tiny bit with a small screwdriver prying, you know you’ve removed enough tension.
Note for both the front and rear springs, the threaded rods of the tool permitted the nut to turn smoothly; even on the firmer rear springs with the greater spring rate (force) the tool handled them well and showed little bowing of the rods under full force. Just a slow and careful turning motion, while keeping the top and bottom of the spring pointed away from anything important.
Once sufficient compression was achieved, I found a 17mm flared-end wrench helpful to get down into the shock top hole (you’ll see what I mean). I used that wrench to remove all four of my OEM shock nuts; I just used a vice grips to hold the center rod while removing the shock nut which in my case was badly rusted on there (on one shock I just gripped the shaft of the shock with the vice grips - pulled the dust boot aside and clamped to the actual shaft). After removing the shock top nut, just some gentle prying was able to remove the shock cap and insulator (rubber piece the spring sits in). At that point the shock is just removed from the bottom of the spring - a bit of gentle prying gets it right out of there. And re-stating the obvious, don’t be banging around your compressed spring at this point.
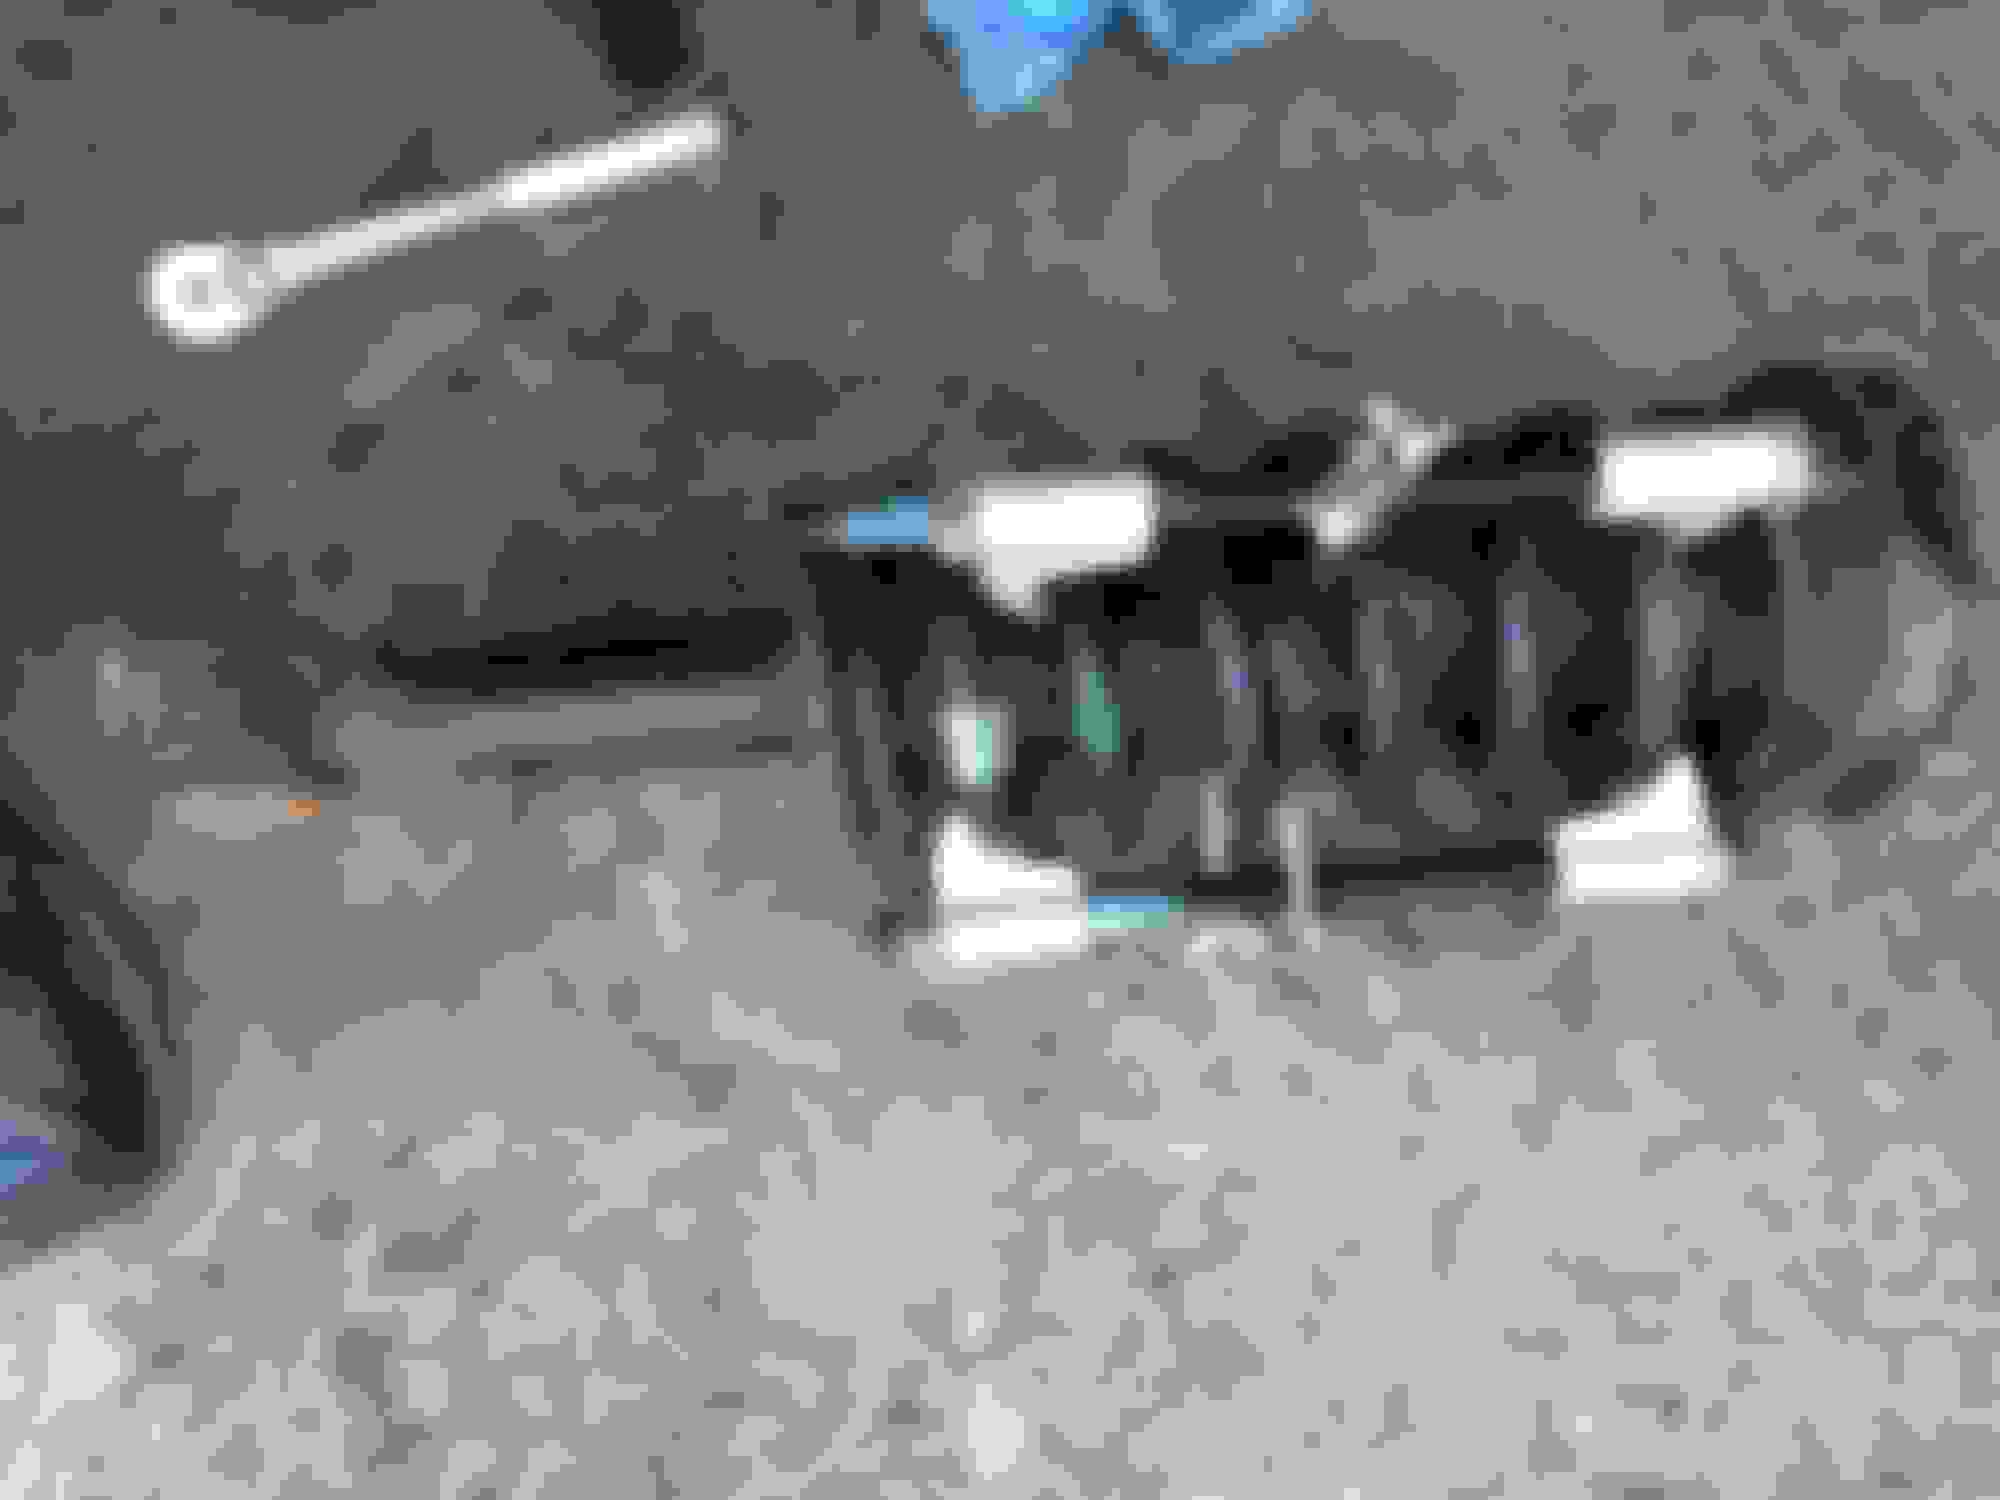
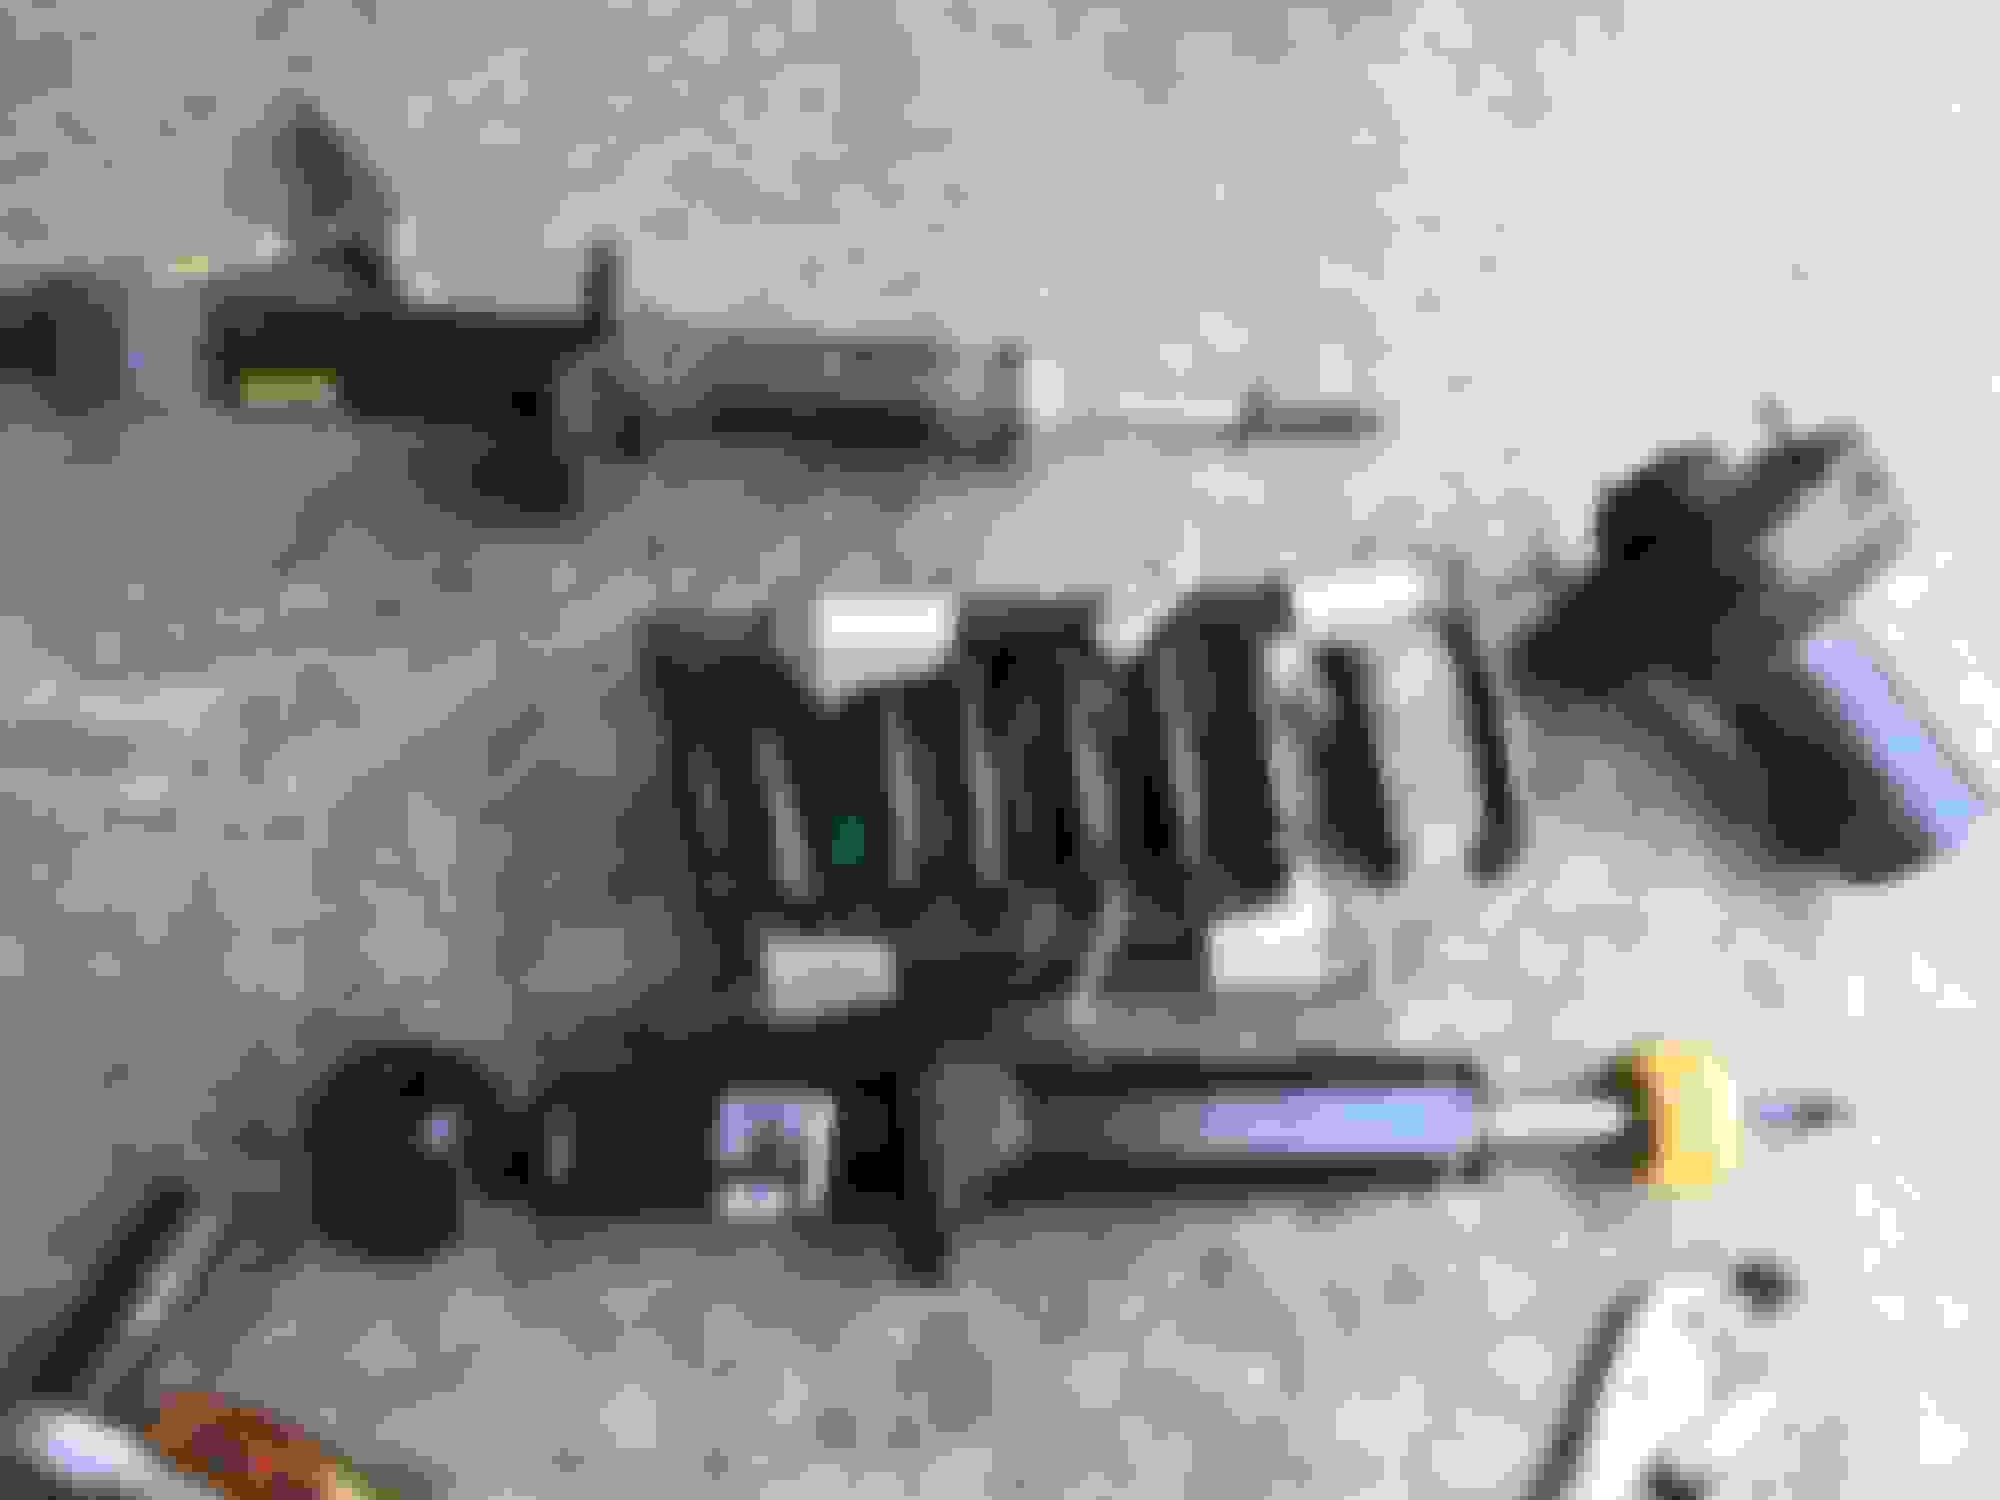
Here’s a shot of the fully compressed spring and all the parts having just pulled out the shock:
Unless your shock comes with a new one, you’ll need to remove the yellow ‘jounce’ bumper (attached you your OEM shock) to stick it onto your new shock; it slides right off. In the above pic on mine that’s the yellow rubber piece attached to the shaft.
Reassemble the new shock into the spring, and finger tighten the new shock nut on top. Now is the time to align (as closely as you can) the shock cap, spring and shock to the positioning markings you made before. This will make installation easier.
You will need to torque down the shock nut to specifications. I found this difficult with the flare wrench; I did use an airgun (easier), but used caution not to over torque. You have to be careful not to over torque the top shock nut.
Once that’s installed, you can begin to uncompress the tool. Same process in reverse; I did four half-turns, next leg, repeat. Be careful here too since it’s still dangerous until all compression is released. Once released, you can remove your tool and then reinstall the strut using reverse of removal!!
Reinstallation - noteworthy mentions
I found myself using my hydraulic jack to help with raising the lower arm to get everything re-fastened easily. Important - do not tighten down the lower shock mounting bolt until the full weight of the truck is on the lower arm - the bushing will get torn up if you tighten that honking 350 ft lb nut down before that arm is supporting the full weight of the truck. I just used a hydraulic jack under the lower arm to force it up until the full weight was being supported by the arm before I tightened things down.
REARS (noteworthy differences from the fronts)
Note that the rear springs on a 3rd gen Expy are much beefier than the front springs; less coils, but fatter coil wires. Even though I’d purchased a spring compressor with a wider ‘hook’ to accommodate the bigger spring wire diameter, they still didn’t neatly fit the rear ‘fatter’ spring diameter.
I had no issues, they compressed fine using cautious approach, but you should use your head when selecting a proper tool to compress. Make sure you can reasonably secure the spring coil without causing undue stress on the tool.
So the rears come out pretty much like the fronts, except they’re easier, because the lower arm is open underneath permitting the shock to drop down giving easy clearance for removal. This means you only need to remove a couple of things to get these struts out.
Other than the three strut top nuts and bottom shock bolt, here are the other two pieces to detach for the rears (different from front):
Here are two pics with the rear struts out and compressor installed - note the beefier / thicker spring wire on the first one - less coils, thicker spring wire - and note (on 2nd pic) how they were so thick they didn’t quite seat perfectly in my hooks… Use caution when choosing a tool for yourself.
Bolt sizes and torque specs for rear strut removal (torque specs from 2007 Expy Ford service manual) - apply blue/medium threadlocker when re-torqueing:
Upper trailing arm - 24mm - 184 ft lbs (note this one unfastens from the HEAD - the nut is NOT accessible and is attached to the suspension)
Upper tierod nut - 21mm - 76 ft lbs
Lower shock mounting bolt (same as fronts) - 1-1/16th head; 30 mm nut - 350 ft lbs
Upper strut tower nuts x3 (same as fronts) - 15mm - 30 ft lbs
Top shock nut (same as fronts) - OEM original size 17mm - 41 ft lbs
So that’s it. Everything reinstalled and no knocks, rattles or odd noises… No more bouncy-bouncy on the light inputs and no longer feels like I’m floating down the road on the Queen Mary.
Good luck and hope this helps some folks out!
Best,
Scott
PS - ...So the ONLY video clip I found that dealt with 3rd gen Expy unique suspension points and showed both front and rear removal key points… It is an advertisement for installing a strut product that replaces the OEM air suspension but it does briefly show the key fasteners to remove and is accurate for third gen Expy - at least my 2007 .
Awesome! Thanks. I really need to do this but have no where near the experience or tools to accomplish this. I have 168K and mine were shot at about 70K.
People don't realize stock shocks do not last very long at all.
I went with Monroe Reflex (71139 rear / 71138 front). Mainly because I've had decent performance out of them on prior rigs and price-to-performance (for me anyway) has been good. Retail on those at most auto parts stores is anywhere from $110-120/ea, but if you search online you can find them new for around $70-75/ea and free shipping.
I know folks have strong feelings about shock brands so I stayed clear of that in the write-up - I am just operating from my own personal experiences and YMMV
Thanks. I understand. It's like favorite oil or politician. That's a great price.
Nice write up on installing new shocks. Thank you for putting it all together.
I installed new Bilsteins on my 07 Navigator.
I too could not find spring compressors tools that would be heavy duty enough. I didn't see the 3 legged tool you have or I would have bought one for sure. Anyway, I took the shocks to a shop and they switched the springs over for $50.
I did the same work procedure as the write up in removing and replacing the shocks. Also, I reused all the old bolts & nuts. I wire buffed them and put locktite on the threads. I did use the new piston rod nuts that came with the new shocks.
I had Bilsteins on a 96 Ford E150 van and they were still very good after 80,000 miles. The 07 Navigator feels much safer on curvy mountain roads because they are firmer than the stock shocks. Around town on surface streets they are also firmer but not harsh.
I paid $82. each with free shipping for the shocks.
Great write up - thank you. I did the rears a few months back at 125k because one was blown and leaking. I went with Bilsteins (love them - firmer, but not harsh) and the ride improved so much, now I want to do the fronts. Thanks for sharing your experience and what you learned!
Awesome! Thanks. I really need to do this but have no where near the experience or tools to accomplish this. I have 168K and mine were shot at about 70K.
People don't realize stock shocks do not last very long at all.
How much did the shocks cost?
Berry,
I'm in the same situation as you my is at 168K as well.
Just a warning about the spring compressors. Don't get them at Harbor Freight or some super low price tool depot type store. Our employee had the tooth or finger(the gray part that grabs the spring) of the compressor break off and hit his shoulder which left a 10" diameter bruise and badly sore for 3 weeks. I can't imagine the damage if it hit him in the face.
The right rear shock inside the coil on my 2008 has just lost its seal and the oil has coated the lower arm. Obviously, I'm in need of new shocks and I thank you for this thread.
Very nice job.
On the fronts, when you re assemble is it mandatory to get an alignment and/or camber check? It's the one thing I'm not confident about for this job.
Btw, our 2008 has been a great vehicle but this year I found a trans fluid leak at the front heat exchanger, the radiator that shares duty with the A/C and now the shocks. Going to be. $500 job for the trans cooler. Only other repairs were plug coils/plugs and the coolant fitting above the right side valve cover.
On the fronts, when you re assemble is it mandatory to get an alignment and/or camber check?
So technically, while they look very similar a coilover shock like we have is not the same as a strut... A true strut is an integral part of the suspension and is an adjustment point for alignments. Coilover shocks are not. So technically, no you don't need it (with the one caveat below!), particularly if you keep the OEM springs meaning ride height not affected.
If you had a true strut then definitely yes, alignment needed since it's an adjustable component.
Now... Not trusting my own 'science' I did take it up to have it checked just to make 100% sure LOL but there was nothing out of whack, no alignment was needed and no charge for the peek.
Where I might be more concerned is if I'd replaced the entire deal including springs like those all-in-one spring/shock assemblies (resulting in likely subtle ride-height difference) - then I'd say good to get it checked for sure.
Hey, I just wanted to thank you for this write up you did. It's not a difficult job but it's not something we do very often and having this info made everything easy and kept me from doing any unnecessary work.
I purchased the same spring compression tool that you used. It's a very nice tool set and I hope anyone that reads this decides to buy it. Having 3 rods around the spring is so so much safer and easier on the tool. I got it from Amazon, I think it's the only one with 3 rods.
350ft-LB's! Good grief, now I have a new setting on my torque wrench - Purple face.
Scott - did you consider just removing the lower A-arm instead of disconnecting all the other bits? I tried your way on my Navigator 2wd and couldn't get the rears (OEM Load Leveling Suspension air springs) out without completely removing the lower control arm. I have the Monroe QuickStruts for the fronts, and am gearing up for the change. Ideas?
 09-08-2015, 04:31 PM


 Once every year or two I try to do a detailed write up on hard-to-find job details where there wasn't a lot of info floating around out there... It's that time again!
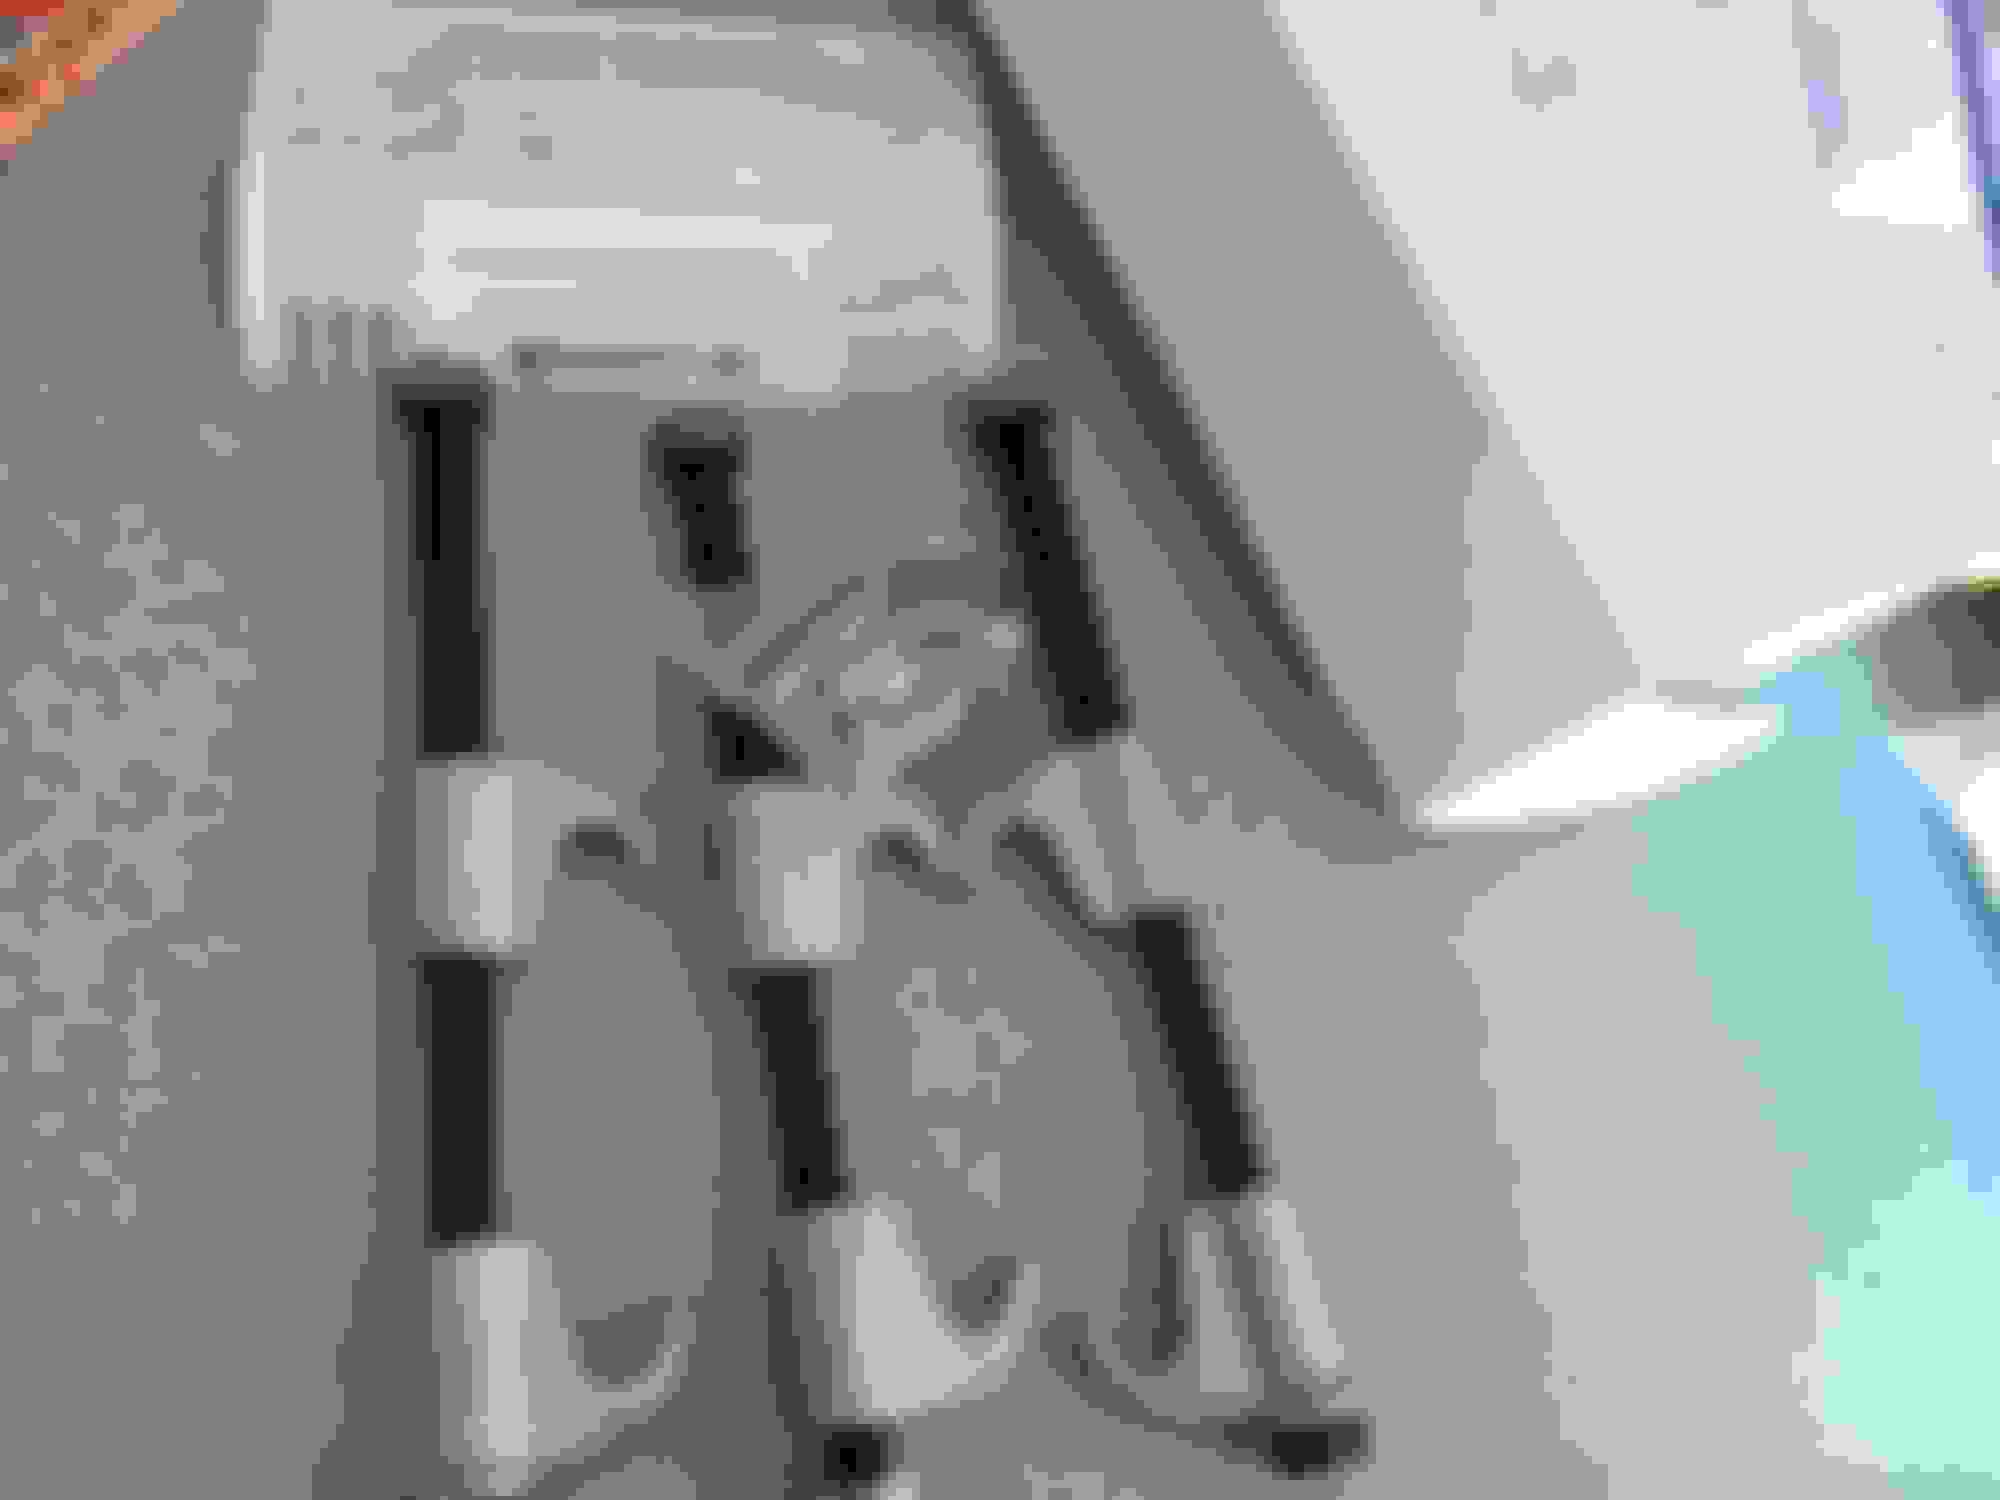


 !
!

