
Snowy's 79 Bronco Ranger XLT Build Thread
#1
 06-16-2015, 04:43 PM

Snowy's 79 Bronco Ranger XLT Build Thread
I have benefited greatly from these forums over the last 4 years. I constantly search the different sections for technical advice on not only my vehicles, but my friend's rigs as well. With this I mind I figure I should document my bronco build so that maybe I can contribute to the resource, and possibly save someone else some trouble.
The goal with this bronco is to have a very capable but reliable 4x4 for playing up in the mountains near my home. I'm hoping for 9-10mpg with a relatively mild mannered 460 and the factory drivetrain.
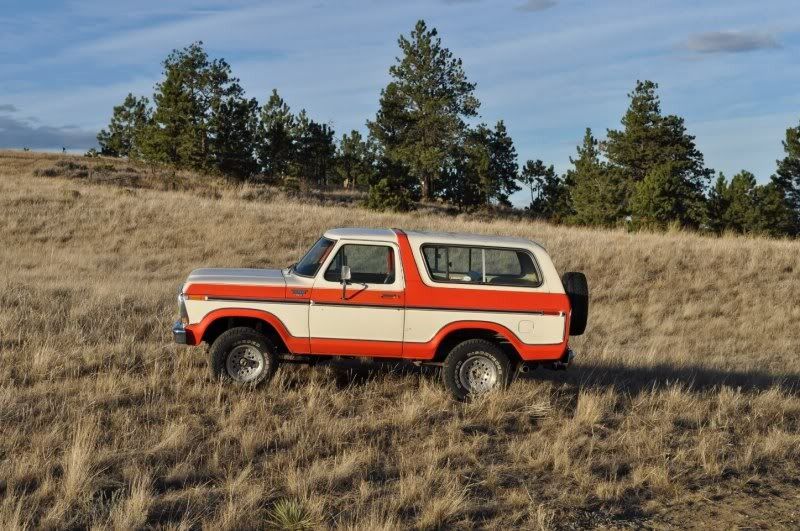
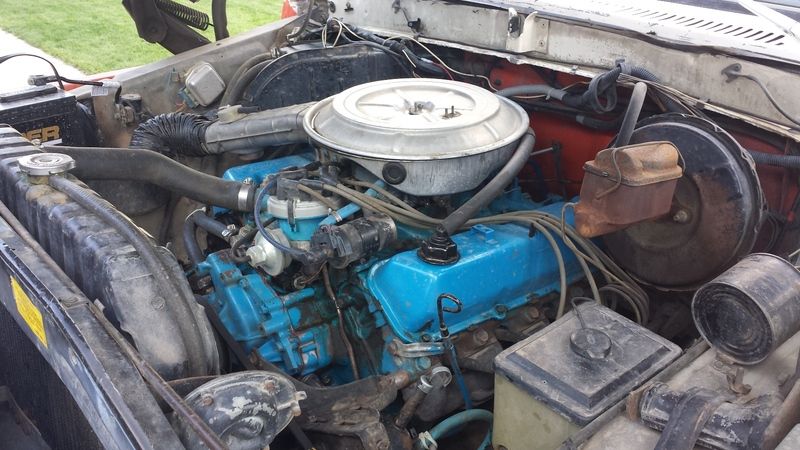
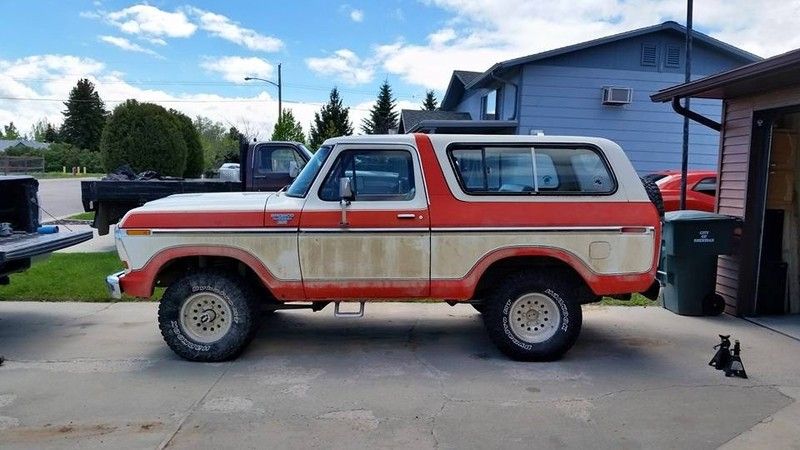
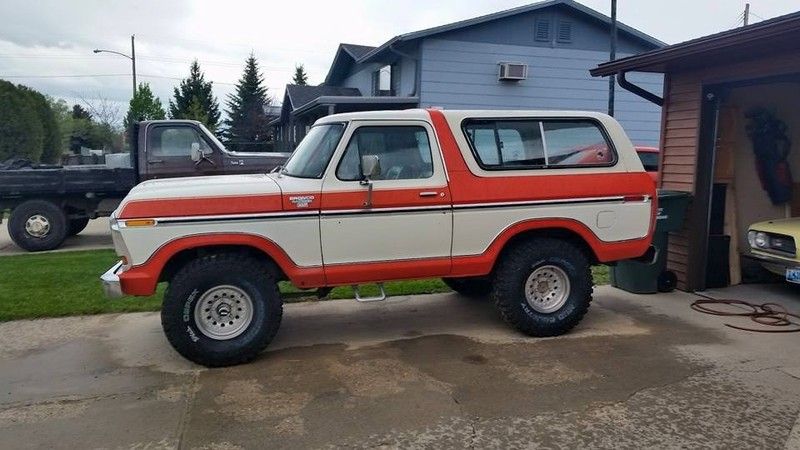
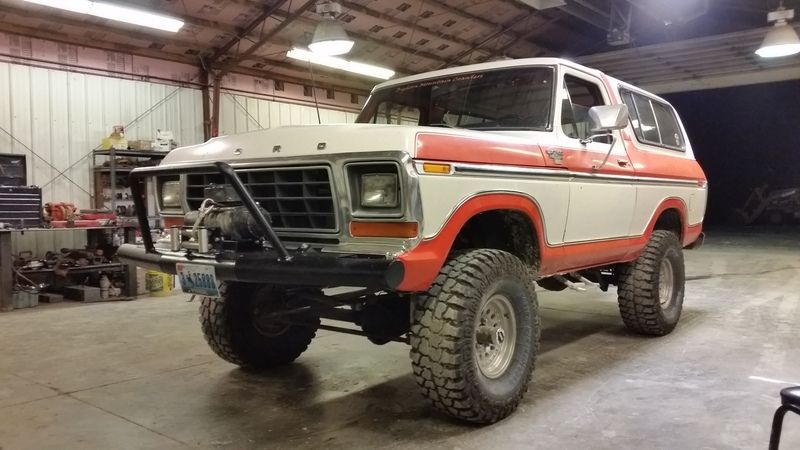
A little history on this is probably in order. I purchased this low mile bronco from a buddy of mine with 64,000 original miles on it. He had replaced the original 400 with a 73 (or newer) smog era 460 and a little higher stall converter. A hail storm damaged the hood area, and he lost interest so I was able to buy it at a decent price sometime in late 2009.
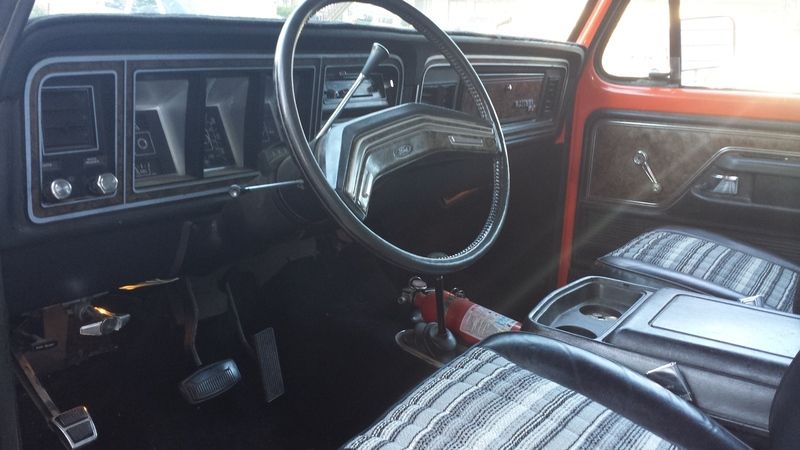
Originally equipped with a 400/C6/NP205/D44/9" drive train, tilt, cruise, air, and bucket seats. It's a very well optioned bronco.
Immediately after purchasing it I replaced the tires with 32x10.50x15 Hankook Dynapro M/T RT03's.
Not long after that the brake master cylinder was replaced, and then pretty much all upgrades on it stopped as it became my daily driver for the next 2 years. Then we moved from Montana to Wyoming, where work kept me very busy. The bronco sat for a long time, being used only occasionally for hunting or running around town. It was always reliable. Started every time no matter how long it sat or how cold it was.
As it sat before I began the upgrades in progress, the odometer read 68,500 or so. Here's the before pictures:
More to come.....
The goal with this bronco is to have a very capable but reliable 4x4 for playing up in the mountains near my home. I'm hoping for 9-10mpg with a relatively mild mannered 460 and the factory drivetrain.
A little history on this is probably in order. I purchased this low mile bronco from a buddy of mine with 64,000 original miles on it. He had replaced the original 400 with a 73 (or newer) smog era 460 and a little higher stall converter. A hail storm damaged the hood area, and he lost interest so I was able to buy it at a decent price sometime in late 2009.
Originally equipped with a 400/C6/NP205/D44/9" drive train, tilt, cruise, air, and bucket seats. It's a very well optioned bronco.
Immediately after purchasing it I replaced the tires with 32x10.50x15 Hankook Dynapro M/T RT03's.
Not long after that the brake master cylinder was replaced, and then pretty much all upgrades on it stopped as it became my daily driver for the next 2 years. Then we moved from Montana to Wyoming, where work kept me very busy. The bronco sat for a long time, being used only occasionally for hunting or running around town. It was always reliable. Started every time no matter how long it sat or how cold it was.
As it sat before I began the upgrades in progress, the odometer read 68,500 or so. Here's the before pictures:


More to come.....
#2
06-16-2015, 05:00 PM
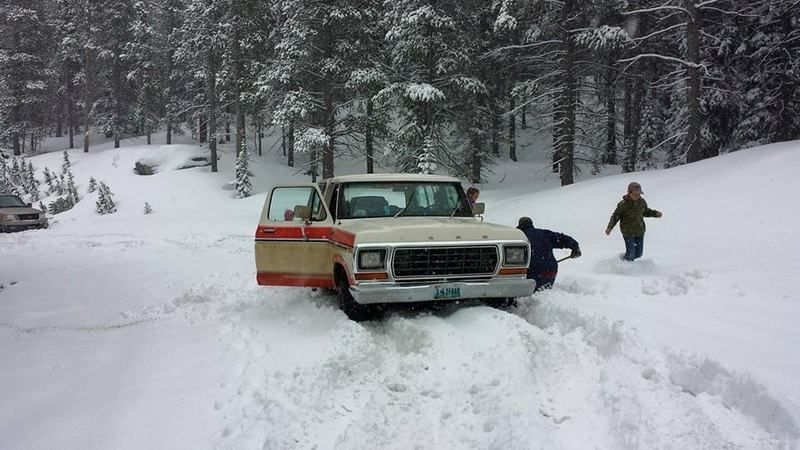
The urge to make these upgrades began because of the influence of some friends in a local 4x4/jeep club. We went out playing in the snow, they winched themselves around, and I chained up. I hauled the whole family around and blasted through drift after drift, having a ball. It was very obvious that I was quickly approaching the end of the bronco's clearance and capabilities. It was definitely upgrade time.
Playing in the snow....
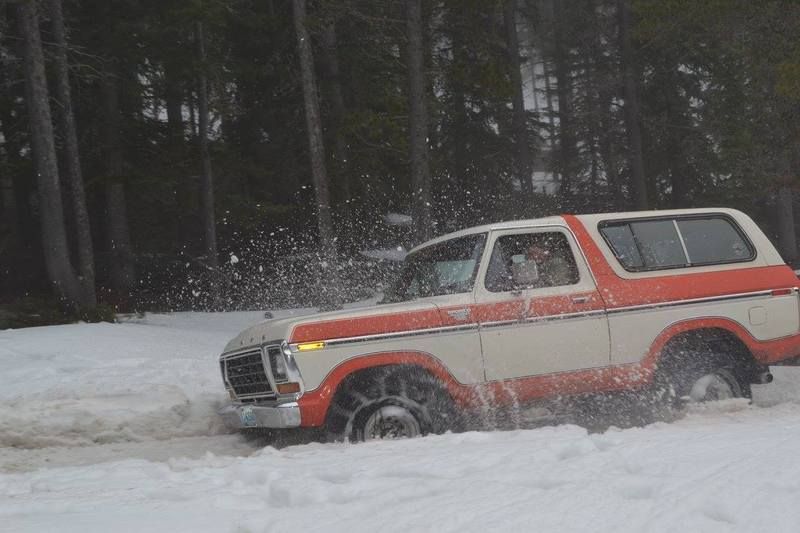
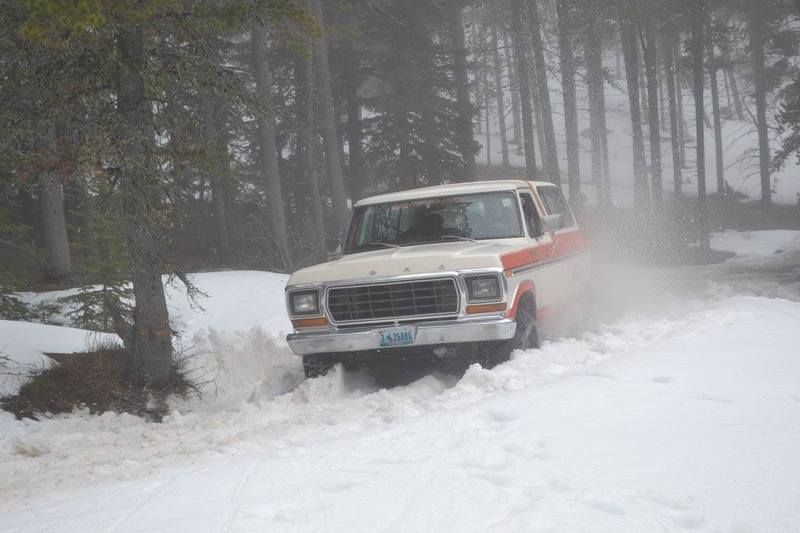
Stuck! This started happening a lot!
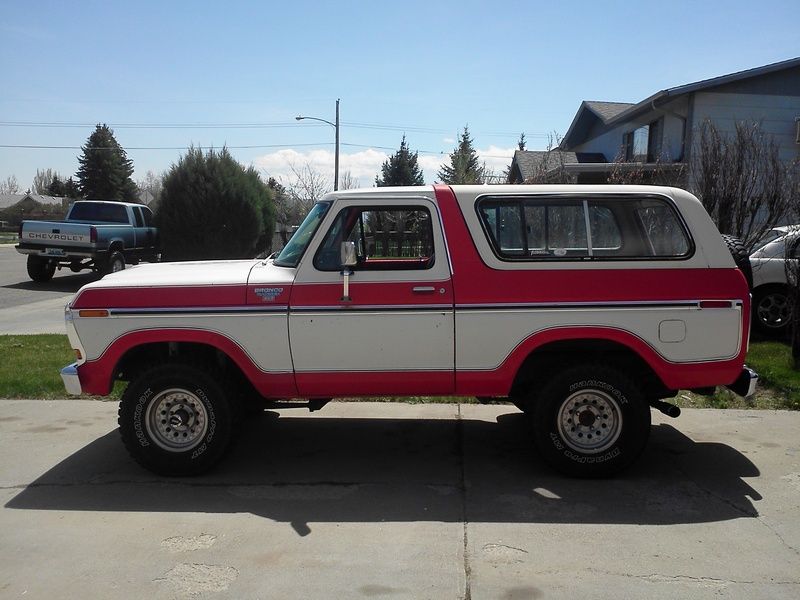
First step was a set of 35x12.50x15's Cepek Mud Country tires.

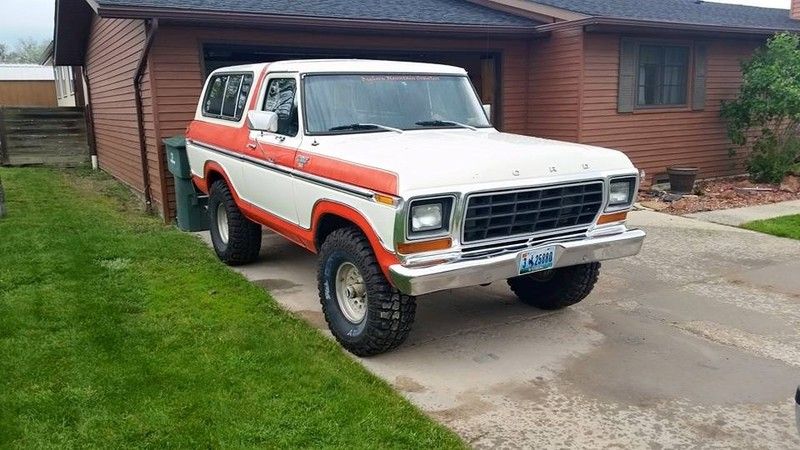
The tires barely fit. They rub the radius arms and the right front rubs the inner fender. Time for a lift kit.
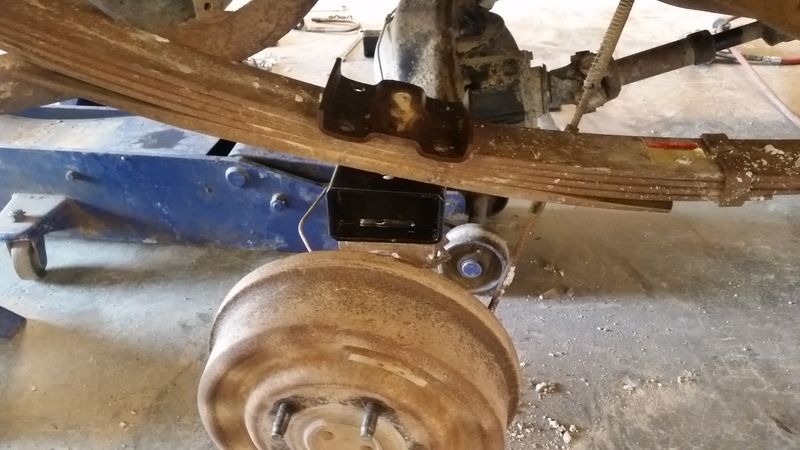
I was on a budget as we are saving up for a vacation, so I bought a lift kit that has blocks for the rear. I plan on doing the shackle flip to eliminate these things soon. The kit is Rough Country's 4" lift.


Here's the Bronco with the lift and tires installed:
I like it so far.
Playing in the snow....


Stuck! This started happening a lot!

First step was a set of 35x12.50x15's Cepek Mud Country tires.


The tires barely fit. They rub the radius arms and the right front rubs the inner fender. Time for a lift kit.
I was on a budget as we are saving up for a vacation, so I bought a lift kit that has blocks for the rear. I plan on doing the shackle flip to eliminate these things soon. The kit is Rough Country's 4" lift.


Here's the Bronco with the lift and tires installed:

I like it so far.
#3
06-16-2015, 05:24 PM
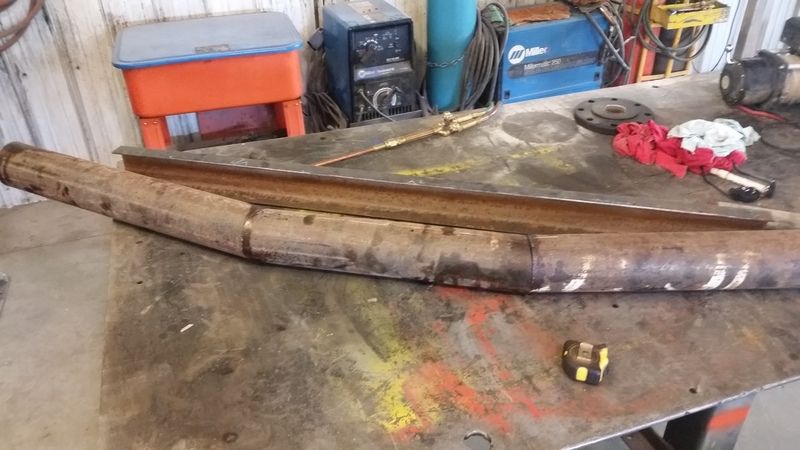
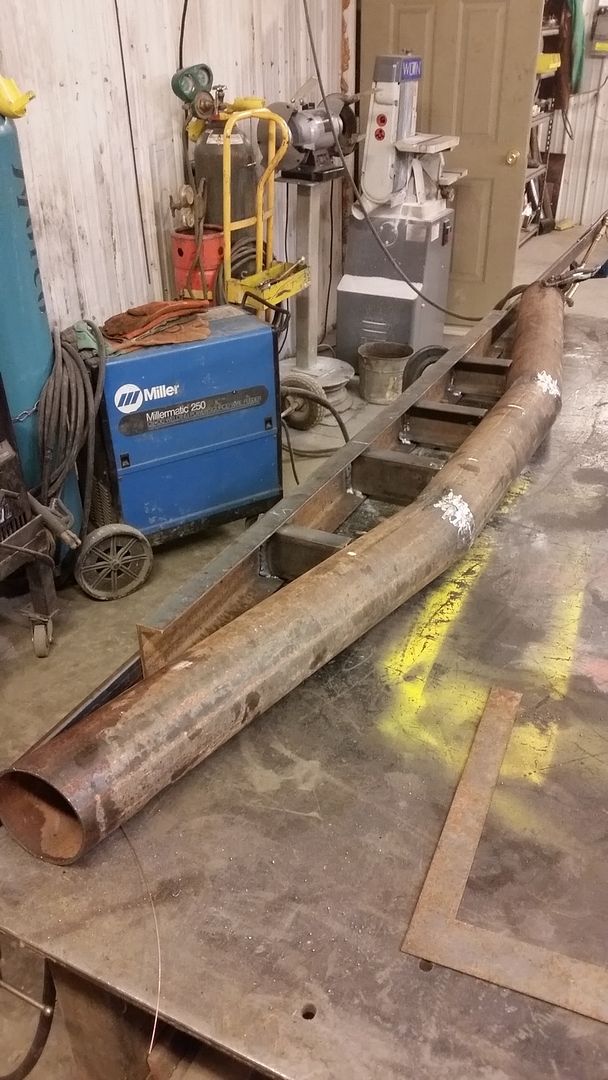
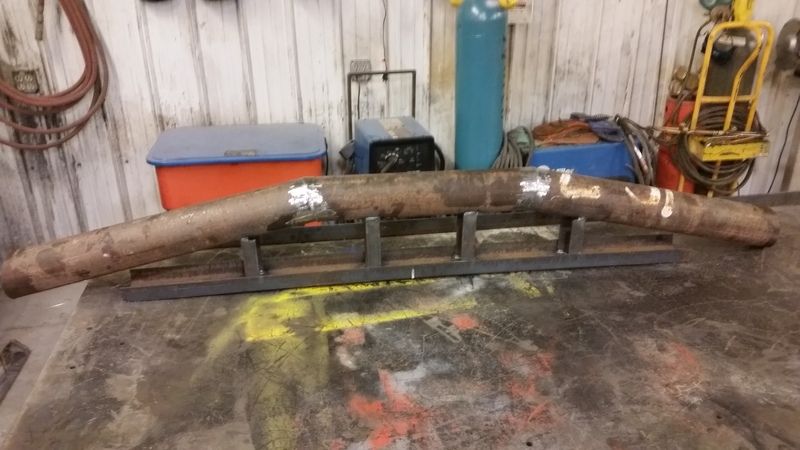
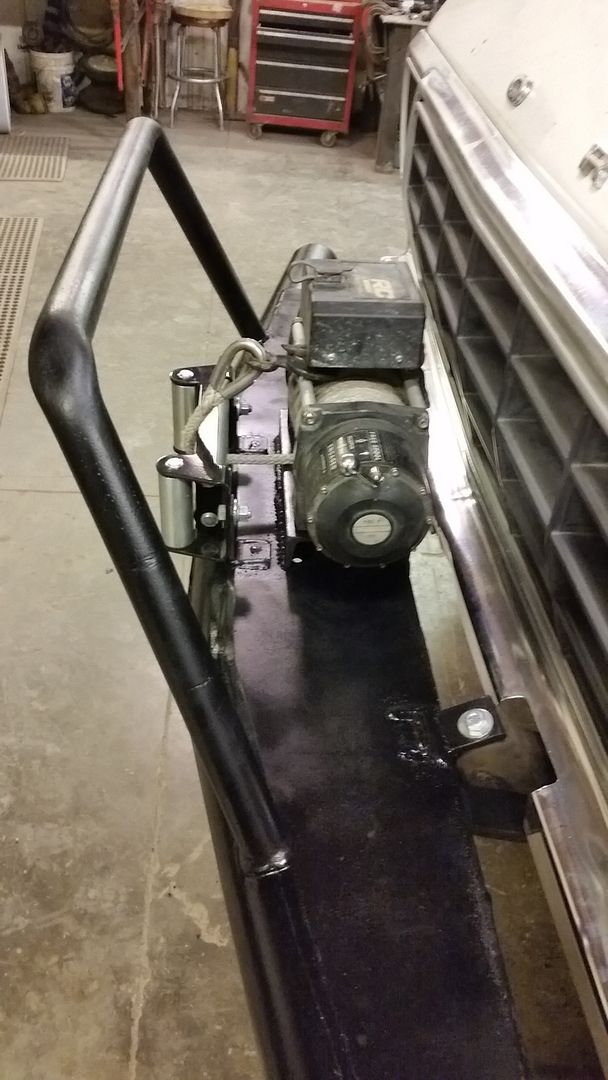
Along with the additional clearance, I was quickly shown the necessity of a decent winch. My friend had a good used winch, but I needed a bumper to mount it too. I looked at purchasing one, but was pretty busy looking at my wallet. I am fortunate enough to have time, tools, and materials, so I started fabricating a winch bumper for the Bronco. 4" pipe, some scrap channel, and 1/8" plate make up the frame. The upper tube is heavy wall 1.75" oil field pipe.
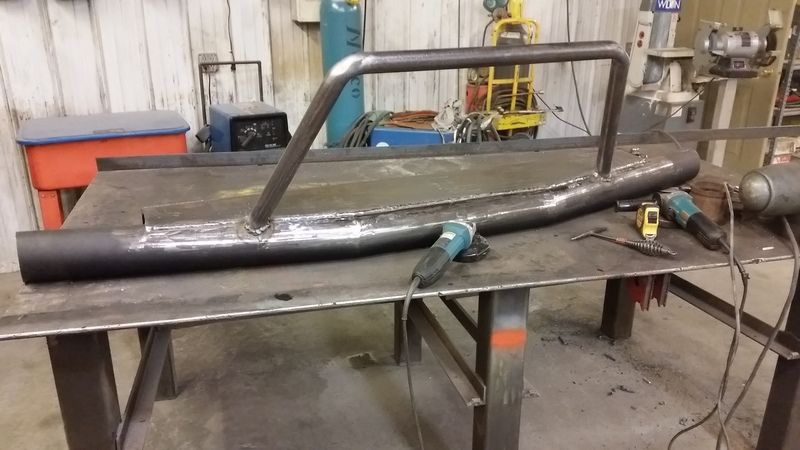

That last photo shows the way I had envisioned the winch being mounted. That was not to be though as the geometry for the fairleads would be wrong. It was time to install a winch plate and fairlead mounts. Off came the paint and the new channel plate was installed.
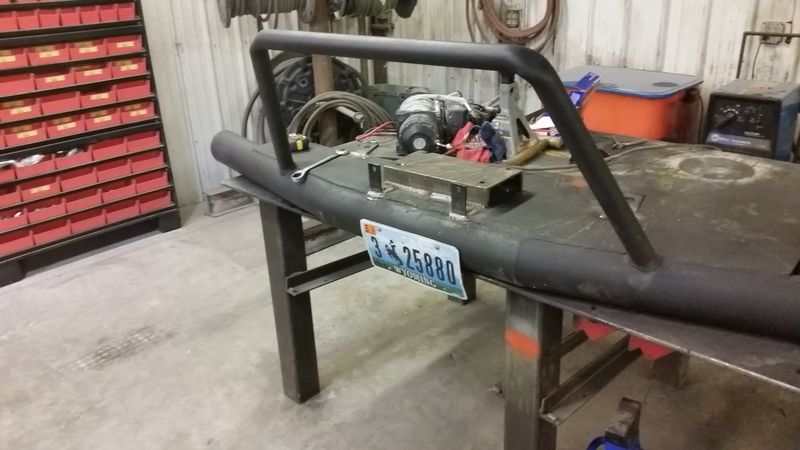
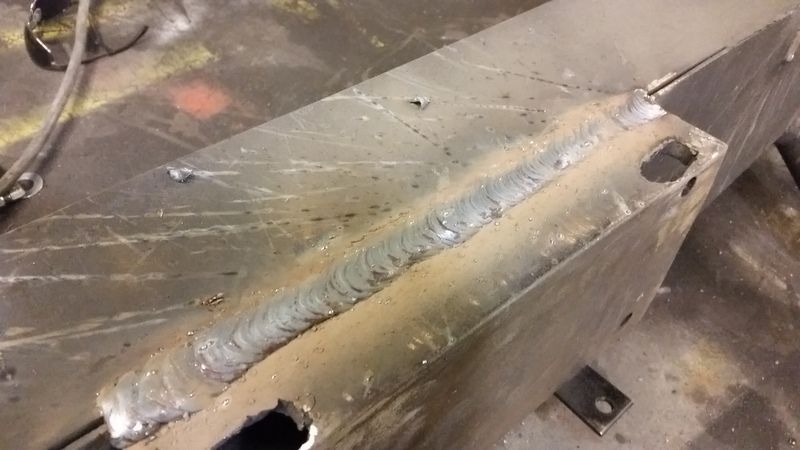
Turned out pretty good I think.
That's where I am today, other than the CB & Stereo install. I've just ordered all of the stuff needed to change out the retarded timing set, upgrade the ignition system (replace duraspark with HEI module, re-curve distributor, new plugs, wires, cap/rotor, and coil), and upgrade the cooling system. I'll get started on that Wednesday.


That last photo shows the way I had envisioned the winch being mounted. That was not to be though as the geometry for the fairleads would be wrong. It was time to install a winch plate and fairlead mounts. Off came the paint and the new channel plate was installed.


Turned out pretty good I think.


That's where I am today, other than the CB & Stereo install. I've just ordered all of the stuff needed to change out the retarded timing set, upgrade the ignition system (replace duraspark with HEI module, re-curve distributor, new plugs, wires, cap/rotor, and coil), and upgrade the cooling system. I'll get started on that Wednesday.
Last edited by Snowymountainman; 06-16-2015 at 09:02 PM. Reason: Spelling error
#4
06-16-2015, 08:07 PM
Laughing Gas
#6
06-17-2015, 09:39 AM
Yes, this is only a 4" suspension lift. It's from Rough Country. Here's a link to the kit I installed:
4in Suspension Lift Kit for 78-79 Ford 4wd Bronco [450.20] | Rough Country Suspension Systems�
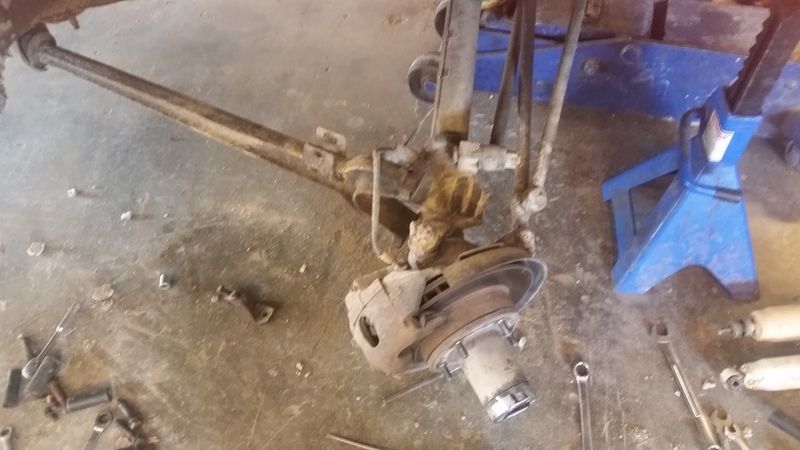
Installation is pretty easy. The hardest part is getting the front axle bushings in. And those new coil springs are large! They dwarf the old ones.
#7
06-17-2015, 10:43 AM

FTE Legend
Trending Topics
#8
06-17-2015, 10:54 AM
It's a little higher in the front right now. Not much but you can see it. This may be because I used the original rear springs, and they've sagged. Rough country makes a kit that has new rear springs instead of blocks for a little more money. If I don't do the shackle flip I'll be buying the springs.
4in Suspension Lift System for 78-79 Ford 4wd Bronco [535.20] | Rough Country Suspension Systems�
4in Suspension Lift System for 78-79 Ford 4wd Bronco [535.20] | Rough Country Suspension Systems�
#10
06-19-2015, 04:16 PM
New User
#11
06-21-2015, 04:11 PM
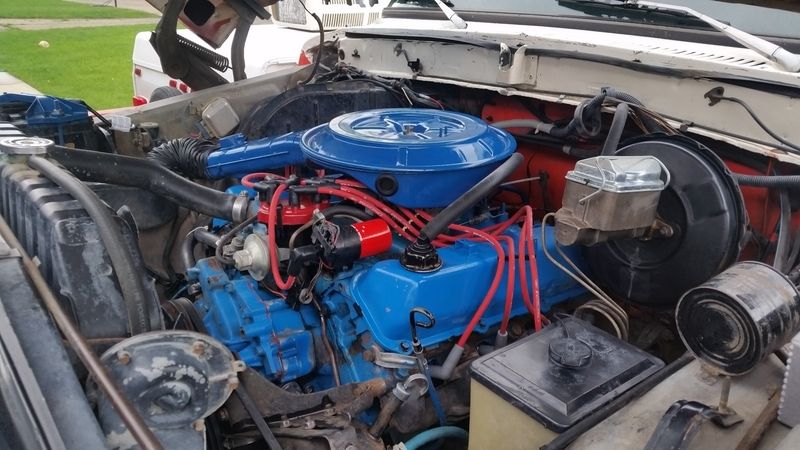
Part of my grand plan was goofed up this weekend since I had to help a friend with a jeep problem. With limited time I decided to tackle all of the ignition related issues without getting into the timing set & cooling system. Here's how the engine looked prior to starting this round of upgrades:
I started by checking my timing as it sat. I verified that the 0� mark was at least close and then made it easy to see with a lumber crayon. My initial timing was set at about 12�. With vacuum advance disconnected, my total was about 37� with the advance being all in very quickly. I didn't have a tach hooked up but I'd guess it was in by 2500rpm.
When the vacuum advance was hooked up I saw 55� total.
Then I removed the plugs, wires, distributor, & coil to begin the upgrades. The plugs were in so tight I had to get a breaker bar on them. I've never seen plugs that tight. They were Bosch platinum 4's and they looked like the motor was running about right, maybe a bit on the lean side.
I purchased a set of distributor springs to adjust the mechanical advance so that was the first project. Using this as a guide:
Duraspark_distributor_recurve_instructions_index
I replaced the light spring with one from my new set. Verified which slot it was in (13L=26�), Adjusted the tab to keep tension on the new spring, checked for play in the bushings, and re-assembled it.
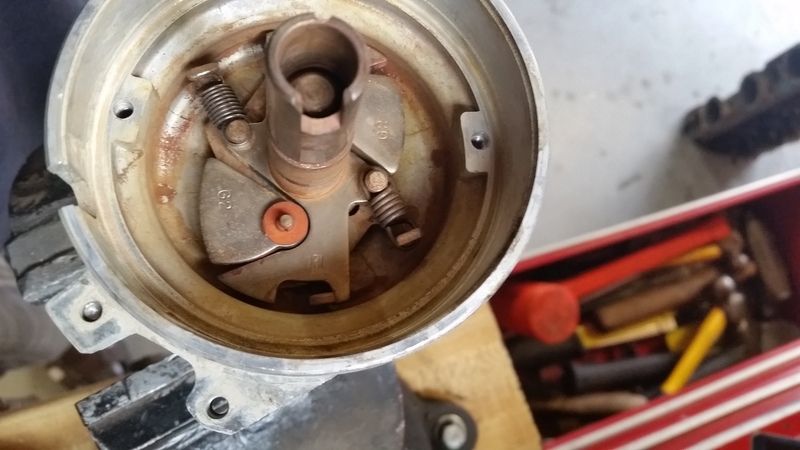
The spark plugs were replaced with some copper core Motorcraft plugs, with a plug gap of 0.40. The new 9mm wires are from Ford Racing and they look like good wires. A new cap/rotor/coil from Taylor rounded out the rest of the stuff I had to install.
It fired right up and within a minute or two I had the timing set to 14�, and my total mechanical was coming in later at 37�, which I expected to be more like 39�. The total with vacuum advance hooked up was lower as well, sitting at 50�, which still seems way high. When I drove it there was noticeable improvement. It was more responsive. Top end still feels pretty flat. Here's how it looked right after I finished up.
The second drive, which was an extended one up the mountain, gave me some difficulty. Hot starting was an issue. Beside the road I retarded it a couple degrees, but I don't think i went quite far enough. It was heating up, top end feeling pretty dead still. No pinging though, which I fully expected to be hearing as advanced as it is.
We messed around with it in camp and ended up retarding it even farther and actually had pretty good luck with hot starts and performance. It's not as responsive, but it's more reliable. We also discovered that my vacuum advance is not adjustable. A friend is lobbying pretty hard for me to ditch the factory ignition and go with an aftermarket electronic ignition that is easier to adjust. Apparently he's had great luck running them on his 429/460 based stroker motors in his mud truck. And it appears I like to play in the mud......
If I get time I'll install the new timing set, water pump, high flow thermostat, and have the radiator flushed. I should probably locate a fan shroud too.....
I started by checking my timing as it sat. I verified that the 0� mark was at least close and then made it easy to see with a lumber crayon. My initial timing was set at about 12�. With vacuum advance disconnected, my total was about 37� with the advance being all in very quickly. I didn't have a tach hooked up but I'd guess it was in by 2500rpm.
When the vacuum advance was hooked up I saw 55� total.
Then I removed the plugs, wires, distributor, & coil to begin the upgrades. The plugs were in so tight I had to get a breaker bar on them. I've never seen plugs that tight. They were Bosch platinum 4's and they looked like the motor was running about right, maybe a bit on the lean side.
I purchased a set of distributor springs to adjust the mechanical advance so that was the first project. Using this as a guide:
Duraspark_distributor_recurve_instructions_index
I replaced the light spring with one from my new set. Verified which slot it was in (13L=26�), Adjusted the tab to keep tension on the new spring, checked for play in the bushings, and re-assembled it.

The spark plugs were replaced with some copper core Motorcraft plugs, with a plug gap of 0.40. The new 9mm wires are from Ford Racing and they look like good wires. A new cap/rotor/coil from Taylor rounded out the rest of the stuff I had to install.
It fired right up and within a minute or two I had the timing set to 14�, and my total mechanical was coming in later at 37�, which I expected to be more like 39�. The total with vacuum advance hooked up was lower as well, sitting at 50�, which still seems way high. When I drove it there was noticeable improvement. It was more responsive. Top end still feels pretty flat. Here's how it looked right after I finished up.

The second drive, which was an extended one up the mountain, gave me some difficulty. Hot starting was an issue. Beside the road I retarded it a couple degrees, but I don't think i went quite far enough. It was heating up, top end feeling pretty dead still. No pinging though, which I fully expected to be hearing as advanced as it is.
We messed around with it in camp and ended up retarding it even farther and actually had pretty good luck with hot starts and performance. It's not as responsive, but it's more reliable. We also discovered that my vacuum advance is not adjustable. A friend is lobbying pretty hard for me to ditch the factory ignition and go with an aftermarket electronic ignition that is easier to adjust. Apparently he's had great luck running them on his 429/460 based stroker motors in his mud truck. And it appears I like to play in the mud......

If I get time I'll install the new timing set, water pump, high flow thermostat, and have the radiator flushed. I should probably locate a fan shroud too.....
#12
06-22-2015, 02:49 PM
Junior User
Join Date: Aug 2013
Location: Portland, OR
Posts: 86
Likes: 0
Received 0 Likes
on
0 Posts
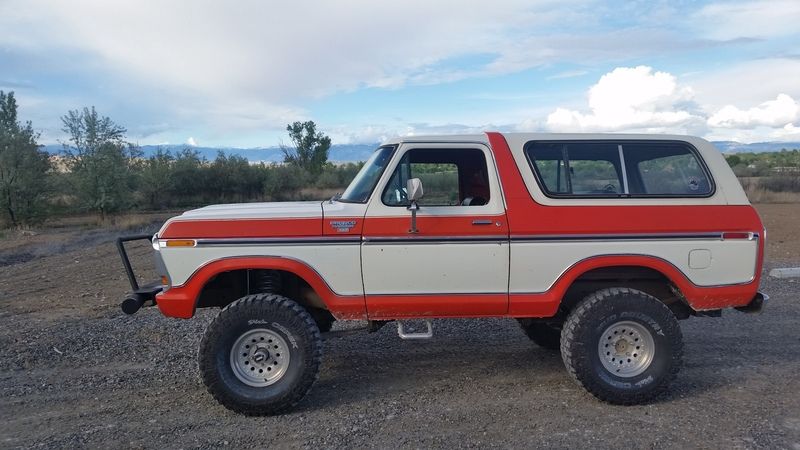
That's a beautiful Bronco. Always loved that color, it's called Coral on the '79 trucks, but it was previously Poppy Red on '65-66 Mustangs, Calypso Coral on '69-70 Mustangs and Torinos/Rancheros, and Home on the Orange on the Maverick sometime in the mid-70's.
I used to live in Montana as well, bought my Bronco in Missoula back in '95.
I used to live in Montana as well, bought my Bronco in Missoula back in '95.
#13
06-28-2015, 12:31 PM
Thanks SS. Montana was my playground for many many years.
I have some upgrades planned for this weekend. After going on a night ride up in the mountains, I realized my factory lights are not up to the task. Everyone else had LED lights (bars or spots) and the light those things put out is amazing.
Here's the lights I'll be installing:
I'm betting they make the after dark operations much more fun.
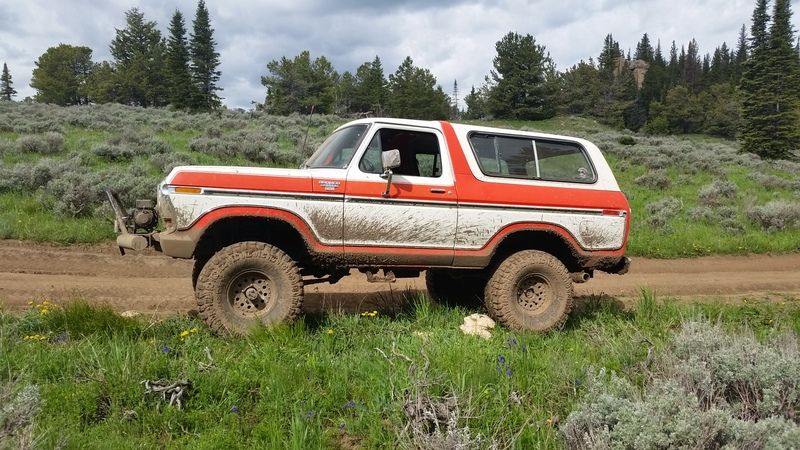
Aside from ordering lights, the only other thing I accomplished was washing all that mud off of it. $18 at the spray and pray car wash!! Damn!

I have some upgrades planned for this weekend. After going on a night ride up in the mountains, I realized my factory lights are not up to the task. Everyone else had LED lights (bars or spots) and the light those things put out is amazing.
Here's the lights I'll be installing:
I'm betting they make the after dark operations much more fun.
Aside from ordering lights, the only other thing I accomplished was washing all that mud off of it. $18 at the spray and pray car wash!! Damn!


#15
07-01-2015, 02:59 PM
Thanks Toyman!
So far I'd give the tires a 7 out of 10. They are loud on the road but seem to handle well. Off road they tend to grab large rocks and turn them into projectiles. Good grip on rocks, they clean out well in the mud. I'll let you know what I think of the snow traction once I get a chance to play with them this winter.
So far I'd give the tires a 7 out of 10. They are loud on the road but seem to handle well. Off road they tend to grab large rocks and turn them into projectiles. Good grip on rocks, they clean out well in the mud. I'll let you know what I think of the snow traction once I get a chance to play with them this winter.