When you click on links to various merchants on this site and make a purchase, this can result in this site earning a commission. Affiliate programs and affiliations include, but are not limited to, the eBay Partner Network.
A bit of the back story (I have posted a few pics here but the build I chronicled in a blog (jimmyvelvet.blogspot.com) for those that didn't follow the original build.
I bought a 69 F250 Camper Special from a used dealer/shyster in Idaho back in 2012. It had a poorly running 360 4spd in it that set it's self on fire as I was picking up the Cummins 6bt. The guy I was buying the Cummins from was lowering it into the bed of my truck with a hi-lo and pointed to my hood and said "you know there's smoke coming out of you truck". I brought the truck up into my shop (I'm on the 3rd floor but we have a big 12K lbs freight elevator) and took the entire front end apart.
Cleaned and stripped what I could then repainted etc.etc.
Made adaptors so I could use the stock Dodge engine mounts and clearanced the rear cross member to squeeze the Getrag (now NV4500)_ transmission in. Mounted clutch master cylinder
Mounted and aluminum radiator
Added power steering and shortened the steering column
Rewired almost everything from the dash board forward. and made a custom battery tray/holder.
Mounted the Intercooler.
Reassembled,
Did some body work,
Painted.
Made a custom gauge panel
Put new wheels and tires and drove it for about a year.
which brings me to this point: Time to do the suspension.
So as it turns out the 480lb/in spring rate of the original ford springs is whoa fully in adequate to handle the extra nearly 500lbs of the Cummins and heaver trans. Over large dips the suspension was bottoming out and that was causing the drag link to contact the bottom of the oil pan. Not something you want to have continually happen. Also, in order to improve the highway cruising ability I mounted much larger tires which combined with the saggy suspension had a habit of hitting the fender arch if I hit a bump while I had the wheel turned. Our frost heave filled parking lot was a big problem here. Heavy duty springs up front would have solved the bottoming problem but the highest spring rate out side of a custom spring was 520lb/in. and after calculating the needed spring rate that wasn't going to be good enough. I also need to lift the truck and decided 3" was enough so the wheel wouldn't the the fender anymore. I wanted to do a suspension lift not a body lift to also have extra clearance for the suspension bits and the oil pan. I spoke to John at AutoFab, which is the only company I found that makes I-beams with a 3" and 5" lift. Autofab has 3" extended springs but again the spring rate was too week. I could have gotten 5" over springs with a 580lb/in rate and adapted them but decided to go with airbags and heavy duty 3" longer shocks.
I bought airbag parts from Airbagit.com which included the bags valves, gauges, lines and a compressor. They make an adapter for the ford I-beam set up so the install should be fairly straight forward though the documentation sucks.
I brought the truck back up into the shop yesterday and took the front suspension apart.
I laid out the Autofab I-beams next to the stock beams and you can see how they are bent as to maintain the proper camber. the 3" lifted beams allow you to use the stock radius arms where as the 5" beams require a new set that Autofab also sells.
The autofab I-beams are on the bottom. OEM Ford on the top.
I'm going to layout the Airbag parts tomorrow and I'll post a few pics of that when I do.
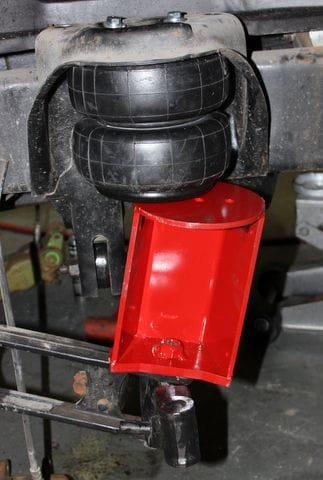
Here is the first I-beam installed. Also an air bag and the adapter that Airbagit sent me. It looks fairly straight forward but I'm too tired to continue messing with it tonight and I'm going home. Maybe tomorrow.
I was partners in a custom bike shop here in NY in the early 2000s. we used to have a saying/joke that when ever we heard some one say "bolt on" or "bolts right up" we knew that meant it would bolt right up only if you had a complete machine shop and hours to modify/fab to get it to work. Well here I am again:
I got the new I-beams in place with the radius arms and started to mount the air bags. that went fin on both sides. I screwed the mounting bolts into their holes on the top of the bags and put a dab of yellow paint on the center of the bolt heads.
The allowed me to mark where the mounting holes in the coil tower needed to be by just lifting the airbag into place. I drilled the 3/8' holes. By center punching where the paint dots where then drilling first with a 1/8" drill then final size. Quite easy.
The it was just a matter of mounting the bags.
Good progress so far. In the morning when I got in, I shot the perches with some rattle can red paint and now went to place them. Before that could happen I needed to make some precision spacers because there is a small recess milled into the top of the radius arm where the bolt goes through the I beam. This was need to take up that space to the airbag perch sat flush on top of the radius arm.
Now to place the lower airbag perch.....
And it's off by a mile. Bolts right up... I'm not going to waste too much time on this I'm just going to Fab new ones from scratch. Maybe friday.
^^^^ what he said. It's pitched to one side like a shock that's been put on the wrong side. Not trying to insult you, you're doing stuff is have to pay somebody else to do. Well, actually get a loan and mortgage the house, THEN pay somebody to do it lol.
They are sided and that was the first thing I thought but the other one makes the mismatch worse.
That angle of mismatch looks like it has something to do with a caster adjustment. Is there anything in the instructions about caster?
Or maybe in your pic below you have the left side mounted on the right and plus it's mounted inside-out.
Cool build! I'm thinking of a 6bt build in a 68,but hear stories about having to bob the crossmember for oil pan clearance,and bobing the rad support and/or the grille to mount an intercooler.Did you have these problems?
Cool build! I'm thinking of a 6bt build in a 68,but hear stories about having to bob the crossmember for oil pan clearance,and bobing the rad support and/or the grille to mount an intercooler.Did you have these problems?
Yes and no. I didn't have to do anything to the main cross member. My truck did have a rear cross brace the we did have to modify and I made a custom trans mount but all that was easy. I mounted my engine further forward than it need to go and as a price for that I had very little clearance between the flywheel and the rad. I was able to find very low profile electric fans that moved enough air and fit the space, but if I had to do it again I see now I could have moved the engine back at least 4 inches and maybe as much as 6. This would have allowed me to mount both the intercooler and the exchanger for the air conditioning with out serious problems. As it is now I did bob the front grill in order to mount the intercooler. Most people don't notice it, but it bugs the hell out of me.
One of the biggest challenges I had was with the pittman arm. The stock one doesn't have the offset large enough to allow the steering linkage to clear the oil pan (the 6bt is a much taller motor). Off road company's sell arms for lifted truck but they have too much offset. after looking at bronco arms and various years I finally made my own by taking two stock arms and welding the tapered spline (gotta have the right spline they are different for different years) to the bottom of another stock arm and welded a gusset to strengthen the whole thing.
I got a chance to work on the suspension parts today. I moved the I-beams to where I wanted them at full droop and measured the angle as well as the distance to the bottom of the air bag. Did a quick model in Solidworks:
then cut some 1/2 and 1/4 plate with the plasma cutter and milled the edges to fit together.
Then welded everything together after tacking and testing it all out on the truck. I had a bit of a clearance issue with the rubber suspension stops but milled another .2" off the back of the top round plate and now have almost a 1/4" clearance.
I was hoping to get them on the truck but just had time to shoot a couple of primer coats on the before I go home.
It's always after you paint something that you realize you have to modify it...I figured if I was going to all this trouble upgrading the suspension I should not be using the crap Koni stock replacement shocks but invest in something a little better suited for this application. I also needed longer shocks to work with the now lifted front end. I ordered a set of Rancho Rs series from SD truck springs and despite FedEx doing their damnedest to not deliver them*, They showed up last week. They are not only longer but the shock body is considerably wider than the ones they are replacing.
However they don't fit in the stock shock mounting location. the new shocks are too wide to fit next to the air bag, and the longer shock body now interferes with the shock/spring tower. Even the old stock shocks don'tt really fit next to the bag and I realized that Airbagit sells new weld on shock towers that solve this problem. However that would mean grinding off the rivets on the old ones to remove them. these are the same rivets that also hold the pivots for the I-beams, so that was not what I wanted to get into. Instead I just re-engineered the front shock mounting. I drew up the suspension members in CAD so I could make sure I had the movements and travels right. I got the damping rates from Rancho and tried to match that rate in the new position. I moved the shock in front of the I-beam and made 1/4" steel brackets and mounts that were welded to the Airbag spacer (no idea what else to call it). when I had all the pieces made I tacked them all in place and then re assembled the spindles. I used a floor jack to run the suspension through it's motion to make sure it all worked as expected. I just finished repainting and hopefully Friday will get to start reassembling everything, after which all I have left to do is to plumb the air lines, mount the air tank and valves, mount the compressor and then start on the rear. What could go wrong?
The passenger side with all the parts tacked into place:
 06-08-2015, 08:10 PM