Carb vacuum help
#1
 03-31-2015, 04:15 PM


Join Date: Mar 2015
Posts: 23
Likes: 0
Received 0 Likes
on
0 Posts
Carb vacuum help
I know it's bad form to make a first post request for help, but here I go. 
So in an attempt to fix my rough running 82 Bronco, I spent last night tracking down vacuum leaks...little did I know what I'd come upon.
A quick background first, got the truck a few months ago, been getting constant 11-12 MPG with 50/50 driving. This is with 4 speed NP435 and not sure of my rear end gearing, but I can say that I'm turning about 2700 at 65mph in 4th. I've also had a fluctuating idle and overall just not a happy motor. BTW, it has a rebuilt motor with 25k miles. I pulled the valve cover to do the gasket and the rockers looked brand new, none of that old burnt looking film from years of old oil.
First I checked my timing, during that process I found my vacuum advance wasn't holding vacuum. So ordered up that part and got it working great.
Starting having stalling issues yesterday, on my lunch break I noticed I had a broken vacuum line. Easy, I stuffed a stick in there until I could get home and rectify correctly. Last night I notice almost all of my lines are brittle and ready to snap, so I tore it all apart and began replacing them. Figured while I was in there I should test all of the end points. EGR valve = doesn't hold vacuum... A/CL DV = doesn't hold vacuum... TVS = Not exactly sure how to test this one. So for the time being I removed all lines for the EGR and Thermactor system (due to TVS being questionable), the actual BPV holds vacuum thankfully (those aren't cheap!).
Now all of my vacuum leaks are gone and the idle is rock solid and MUCH smoother but now my part throttle is rather "surgy" with a lot less torque. I've attempted playing with my base timing, doesn't seem to make much of a difference. So I'm in the process of ordering some replacement parts to get it all put back together as it should, I don't expect the truck to run well with all of the emissions stuff removed (as some people do).
Finally to the questions part of the presentation...
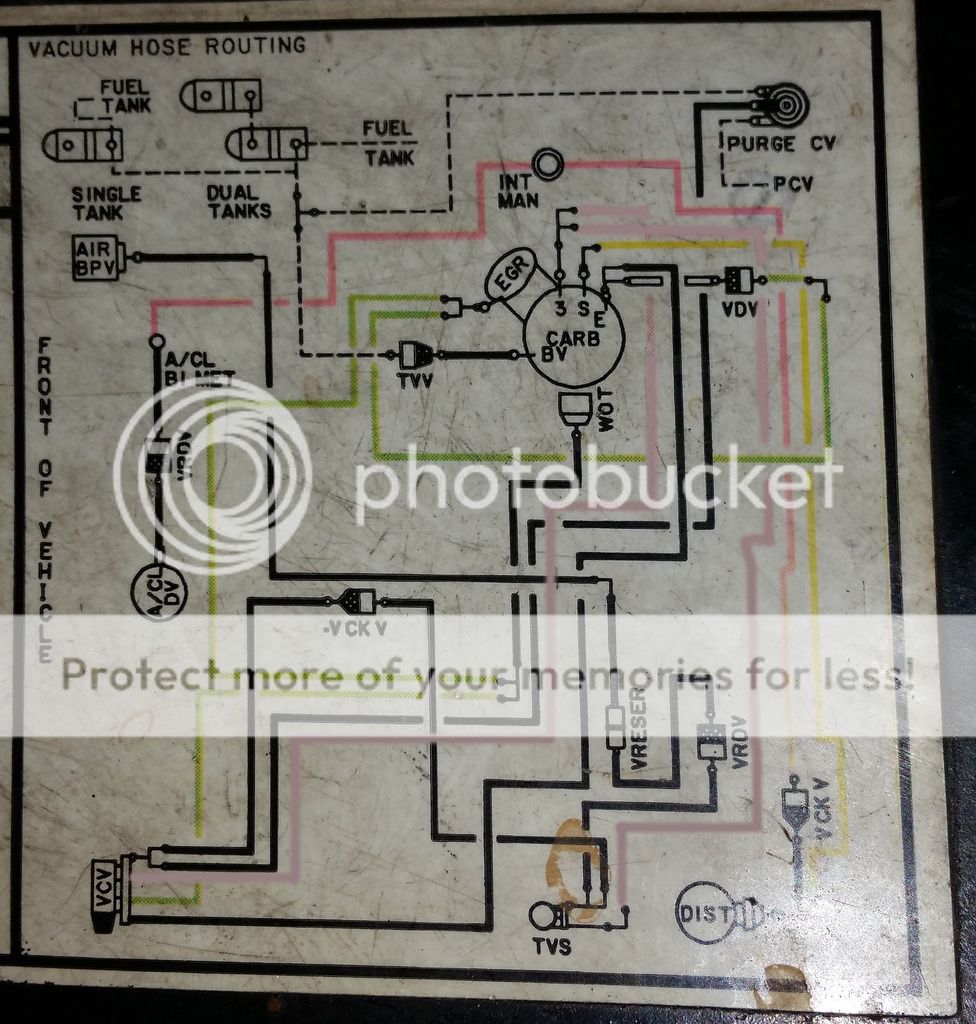
Here's my vacuum diagram.
Thank you in advance for your help. I joined up at Fullsizebronco also, but I've gained much more insight into my bronco from trolling this site for the last few months. I guess it's time I finally joined up and said hello (and asked for help).
Here's a pic of me and my son on our latest off road trip over the weekend. He held up to 3 hours on the trail really really well for a 2 1/2 year old.

So in an attempt to fix my rough running 82 Bronco, I spent last night tracking down vacuum leaks...little did I know what I'd come upon.
A quick background first, got the truck a few months ago, been getting constant 11-12 MPG with 50/50 driving. This is with 4 speed NP435 and not sure of my rear end gearing, but I can say that I'm turning about 2700 at 65mph in 4th. I've also had a fluctuating idle and overall just not a happy motor. BTW, it has a rebuilt motor with 25k miles. I pulled the valve cover to do the gasket and the rockers looked brand new, none of that old burnt looking film from years of old oil.
First I checked my timing, during that process I found my vacuum advance wasn't holding vacuum. So ordered up that part and got it working great.
Starting having stalling issues yesterday, on my lunch break I noticed I had a broken vacuum line. Easy, I stuffed a stick in there until I could get home and rectify correctly. Last night I notice almost all of my lines are brittle and ready to snap, so I tore it all apart and began replacing them. Figured while I was in there I should test all of the end points. EGR valve = doesn't hold vacuum... A/CL DV = doesn't hold vacuum... TVS = Not exactly sure how to test this one. So for the time being I removed all lines for the EGR and Thermactor system (due to TVS being questionable), the actual BPV holds vacuum thankfully (those aren't cheap!).
Now all of my vacuum leaks are gone and the idle is rock solid and MUCH smoother but now my part throttle is rather "surgy" with a lot less torque. I've attempted playing with my base timing, doesn't seem to make much of a difference. So I'm in the process of ordering some replacement parts to get it all put back together as it should, I don't expect the truck to run well with all of the emissions stuff removed (as some people do).
Finally to the questions part of the presentation...
- On my vacuum diagram there are 3 different ported vacuum sources, they are labeled "3" "S" and "E". Can you explain to me if there are any differences in the vacuum signal and specifically which port is which on the carb itself. There is one at the throttle plate (under the fuel bowl), another towards the pass side rear and a third a bit higher.
- Looking at the vacuum diagram, I'm having a hard time determining which direction the VCKV (check valve) should allow/block air flow. The diagram has a black and pointy end, does that point the direction of allowed flow?
- For my complete understanding of what is happening, can anyone explain how the VCV (vacuum tree on the water outlet) works? I can see that on my model there are 4 ports. The bottom goes to ported vacuum, next up goes to the EGR, 3rd up goes to a separate ported vacuum source and the 4th goes to the thermactor bypass valve and the PCV purge. Does the bottom port serve as the vacuum signal and the other ports open up as the temperature increases? If so, why does the 3rd port go to vacuum also?
- Anyone know how to test the function of the TVS? From what I can tell it's probably some sort of thermal switch, any idea the switch over temp?
Here's my vacuum diagram.
Thank you in advance for your help. I joined up at Fullsizebronco also, but I've gained much more insight into my bronco from trolling this site for the last few months. I guess it's time I finally joined up and said hello (and asked for help).
Here's a pic of me and my son on our latest off road trip over the weekend. He held up to 3 hours on the trail really really well for a 2 1/2 year old.
#2
03-31-2015, 06:35 PM

Heya Parsedout, welcome over from FSB. 
The info on the 300 can be really sparse over there, so when it comes to engine help, you can't beat this forum. That and Fordsix.com is also a very good one too. Also, this site has it's own dedicated Bronco forum, if you can't find what you need over there when it comes to the Bronco stuff.
What is your tire size?
Here's a quick formula for you:
Final Drive = (RPM * Tire Diameter) / (Speed * Transmission Gear Ratio * 336)
4th on the NP435 is 1:1, and it looks like you have about 30" tires?
FD = (2700 * 30) / (65 * 1 * 336)
FD = 3.7
I know they make a 3.73, but I don't think any Bronco ever came with them, so it's probably a 3.50 and your speedometer or RPMs are a little off, which is normal.
The step down is 3.00 and the step up is 4.11.
Nice work on tightening up all of your vacuum leaks. That made such an amazing difference on mine! I wish I had done it sooner, as it was a few years into owning it that I did (was pretty intimidated by engines at that time.) Those old, brittle lines get lots of fractures and cracks in them that seep in air all over the place. It really surprises me that someone rebuilt the engine and didn't even freshen up the vacuum lines.
EGR valve not holding vacuum probably means a ruptured diaphragm, making it completely non-op and causing vacuum issues.
It's probably been a good five years or more since I've had all that vacuum stuff on my engine, but from what I remember, a lot of those parts are just one way valves. They should immediately close from one direction, and I think some require x amount of vacuum when pulled from the other. However, finding out what those numbers are is probably impossible at this point unless you find some old manual.
My guess on the less torque thing is one of two things:
Either A) The fuel mixture is different because the EGR is disconnected.
Or B) It actually feels less torquey because it's smoother. You actually have a STRONGER engine but it doesn't feel like it because it isn't working as hard. I know I've had this where I change something and step on the gas and wonder where all my power went, only to look down and realize I'm suddenly doing 50mph instead of the 35 - 40 I'd normally be at. It's healthier, so it doesn't have to try as hard.
I know from my '81, and by the look of your vacuum sticker, in '82, the emissions components were actually extremely minimal. The EGR is about the only thing that affected the way the engine ran and even that isn't much. A lot of the other stuff is to either help it run better when the engine is cold, or to help return fuel vapors, etc. back into the combustion stream. It's not like today's engines where the computer is tuned for them and you screw it up by removing it.
At least, my thoughts.
For your questions:
1) One of them is full manifold vacuum, one is ported, and the other is emissions related. Since S goes to the distributor, I would think that is your ported. Full is going to be easy to tell because it's pulling vacuum at idle. I never really understood the 3rd one well enough to tell you.
2) If I remember right, the actual check valve itself will have a darker and a lighter end that's oriented like it is in the picture. As for the pointy end, some have a pointy end and some don't, so I don't think that indicates flow. If you can pull air through it both directions, it's probably bad either way.
3) How I understood it, the vacuum tree on the thermostat doesn't allow the vacuum circuit to complete until the engine warms up and opens up the passageway. It's to keep things like the EGR opening up when the engine's ice cold, and could stall the engine. This just shuts those circuits off until the engine is warmer. I don't recall which connect to which, but you could test it easy enough by warming the engine up and putting a vacuum pump on each port. Put your finger over the other ports one at a time and see which one makes the pump build vacuum.
4) Can't help you with that one.
Great looking scenery and Bronco. I grew up in country like that (just a bit further north) out in my Dad's jeep.
It's a good way to start out in life.
#3
03-31-2015, 09:17 PM
Join Date: Mar 2015
Posts: 23
Likes: 0
Received 0 Likes
on
0 Posts
Thanks for the final drive calc, tire size is 31". I think my speedo is off. I came up with around 3.82 based on what I saw on the way home today. Probably 3.50, could always scrape the 30 year old dirt off the tag on the diff but that would take away all of the mystique.
When I cleaned up the vacuum leaks I removed the additional full manifold vacuum line from the dist advance. It appears to run in parallel with the ported vacuum and has a check valve. Did a bit of reading and found a thread from a few years ago where another guy did the same thing an noticed a significant drop in power under light throttle, which is what I'm seeing also. I'm going to reattach it tonight and see if that helps.
I also found a thread about the EGR valves and how they cannot be tested as a static diaphragm and instead need to have some exhaust back pressure for them to hold vacuum and open up. Tonight I'm going to try to rev the engine a bit and see if I can get it to hold any vacuum with my pump.
Confirmed the black side of the check valve indicates the direction of flow, the air will move towards and out the black half. My wife walked out while I was sucking on the old crusty vacuum lines. I had to convince her it was some sort of elaborate crack pipe so she wouldn't think I'm a weirdo.
I'll report back on my advances.
Side note, I think I've decided to pass on the 2bbl/4bbl upgrade for the time being. I might actually source a rebuilt YFA and just focus on the non-engine critical things. Being a daily driver, can't really afford to have it down for any period of time while I screw around with little odds and ends. I'd rebuild my current carb but the PO said he "just rebuilt" it but I don't trust his mechanical ability one bit...sooooooo I would be surprised if there are missing check *****, etc.
#4
03-31-2015, 10:16 PM
Join Date: Mar 2015
Posts: 23
Likes: 0
Received 0 Likes
on
0 Posts
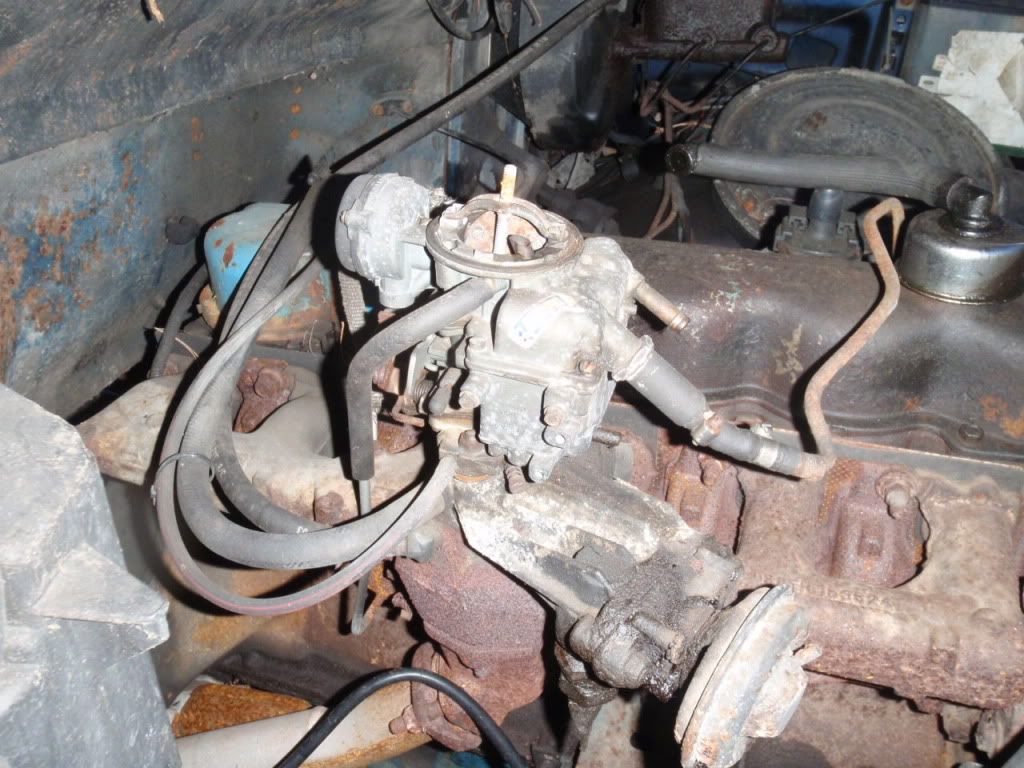
Update. EGR won't hold vacuum with exhaust back pressure either. Not surprised based on everything else that had blown vacuum diaphragms under the hood. Hooked up both lines to the vacuum advance and holy cow huge difference in part throttle response. Did however notice a metal tube that attaches on the bottom of the exhaust manifold and then connects to a port at the top of the carb inlet came apart. This isn't the tube that goes to the choke, but I'm going to assume this is another cold start "pump heat into the carb" type thing? I just capped the port on the carb and I don't hear an exhaust leak, so hopefully it'll be a non issue. Here in Phoenix we can get by without most of these cold weather contraptions.
#5
04-01-2015, 10:52 AM
Join Date: Mar 2015
Posts: 23
Likes: 0
Received 0 Likes
on
0 Posts
Drive to work today was an absolute dream. Hopefully the gas mileage will reflect this new found power/smoothness. It's so good, I'm thinking about just leaving all of the emissions stuff unhooked until I need to deal with inspection again. Although I could see a working EGR valve helping with fuel mileage, so that might be worth the $50 and added vacuum lines.
#6
04-01-2015, 10:55 AM

Lead Driver
That "port at the top of the carb inlet" supplies clean make-up air which is heated by the exhaust manifold before being drawn into the choke housing.
Usually, there is a red [high temp] vacuum hose connected.
Check this link:
https://www.ford-trucks.com/forums/1...ent-101-a.html
Usually, there is a red [high temp] vacuum hose connected.
Check this link:
https://www.ford-trucks.com/forums/1...ent-101-a.html
Last edited by 1986F150six; 04-01-2015 at 10:58 AM. Reason: Added link.
#7
04-01-2015, 10:59 AM
Join Date: Mar 2015
Posts: 23
Likes: 0
Received 0 Likes
on
0 Posts
EDIT: So I just read your link, good info. I'm still not entirely clear how the choke exhaust feed and the make up air feed are related. Also, does the wrapped choke exhaust feed actually send exhaust air into it or does it just heat up the tube which in effect heats the air inside it and then the choke spring gets filled with that ambient exhaust warmed air? Is that system fed with air from the make up line that just broke on mine? Since both of these end points are above the venturi, does it really affect the AF ratio if one or both are not connected?
Trending Topics
#8
04-01-2015, 11:04 AM
Lead Driver
Certainly place a rubber cap on the carburetor port, to prevent dirt, but it will be best to repair the system.
If the other end of the line is connected to the choke housing, dirty air [unfiltered] will be drawn into the carburetor via the choke. Some also plug the line going to the choke housing, but the carburetor was calibrated with this small vacuum leak in mind.
If the other end of the line is connected to the choke housing, dirty air [unfiltered] will be drawn into the carburetor via the choke. Some also plug the line going to the choke housing, but the carburetor was calibrated with this small vacuum leak in mind.
#9
04-01-2015, 11:04 AM
You have two lines to the vacuum advance? Interesting.
I've heard of that setup, but never seen it. From what I've heard, one of them only comes on when you fire up the truck and actually retards the timing (the lower the timing, the easier it is to start). This allows you to run more advance.
The speedometer is super easy to calibrate, especially if you have a GPS.
There's a gear on the end of the speedometer cable that goes into the tail shaft on the transmission/transfer case. One bolt, pull it out and pull off the C-Clip and swap the gear for another one. They're about $5 a pop and take about 5 minutes if you have the tools in hand. All you need is a 3/8" (if I remember right) and a pair of pliars. If someone put 31" tires on it, they probably never changed the gear.
Gear Size = (Tire Rotations Per Mile * Speedometer Worm Gear Teeth * Final Drive) / 1000
The hard part is knowing the speedometer worm gear teeth, since it's inside the transfer case and not easy to get to. They're usually 7, 8, or 9. You can usually figure it out by doing some reverse math by finding what the original tire size was by looking at the door jam and then using the teeth count on your current speedo gear. 31" tires are "technically" 650 rotations per mile, but they're probably actually closer to 30 - 30.5" diameter, which is more like 660 - 670.
However, if you have a GPS (if you have a smartphone, there's apps for them), go 60mph (according to your speedometer) and then look at the GPS and note how fast you're truly going. Pull your speedometer gear out and either count the teeth, or look it up on the internet (they're all color coded).
New speedometer gear = (GPS mph / 60mph) * current gear teeth.
Get whichever is closest and swap it in. It'll never be truly accurate, but you can get pretty close. If your speedometer is off, especially with larger tires (they didn't come with 31" tires stock), your mpg calculations are all going to be off (and lower than they really are).
If you decide to leave off the EGR and are planning on replacing the carb, get one from a mid - late 70s 300 since they won't be calibrated for an EGR, like your current one is. But, the EGR is definitely a good thing. They don't hurt engine performance and can help with gas mileage (if only by a tiny fraction).
I'm not sure about what the second metal pipe is. Do you have a picture of it?

#11
04-01-2015, 11:12 AM
Join Date: Mar 2015
Posts: 23
Likes: 0
Received 0 Likes
on
0 Posts
Certainly place a rubber cap on the carburetor port, to prevent dirt, but it will be best to repair the system.
If the other end of the line is connected to the choke housing, dirty air [unfiltered] will be drawn into the carburetor via the choke. Some also plug the line going to the choke housing, but the carburetor was calibrated with this small vacuum leak in mind.
If the other end of the line is connected to the choke housing, dirty air [unfiltered] will be drawn into the carburetor via the choke. Some also plug the line going to the choke housing, but the carburetor was calibrated with this small vacuum leak in mind.

#12
04-01-2015, 11:21 AM
Join Date: Mar 2015
Posts: 23
Likes: 0
Received 0 Likes
on
0 Posts
You have two lines to the vacuum advance? Interesting.
I've heard of that setup, but never seen it. From what I've heard, one of them only comes on when you fire up the truck and actually retards the timing (the lower the timing, the easier it is to start). This allows you to run more advance.
The speedometer is super easy to calibrate, especially if you have a GPS.
There's a gear on the end of the speedometer cable that goes into the tail shaft on the transmission/transfer case. One bolt, pull it out and pull off the C-Clip and swap the gear for another one. They're about $5 a pop and take about 5 minutes if you have the tools in hand. All you need is a 3/8" (if I remember right) and a pair of pliars. If someone put 31" tires on it, they probably never changed the gear.
Gear Size = (Tire Rotations Per Mile * Speedometer Worm Gear Teeth * Final Drive) / 1000
The hard part is knowing the speedometer worm gear teeth, since it's inside the transfer case and not easy to get to. They're usually 7, 8, or 9. You can usually figure it out by doing some reverse math by finding what the original tire size was by looking at the door jam and then using the teeth count on your current speedo gear. 31" tires are "technically" 650 rotations per mile, but they're probably actually closer to 30 - 30.5" diameter, which is more like 660 - 670.
However, if you have a GPS (if you have a smartphone, there's apps for them), go 60mph (according to your speedometer) and then look at the GPS and note how fast you're truly going. Pull your speedometer gear out and either count the teeth, or look it up on the internet (they're all color coded).
New speedometer gear = (GPS mph / 60mph) * current gear teeth.
Get whichever is closest and swap it in. It'll never be truly accurate, but you can get pretty close. If your speedometer is off, especially with larger tires (they didn't come with 31" tires stock), your mpg calculations are all going to be off (and lower than they really are).
If you decide to leave off the EGR and are planning on replacing the carb, get one from a mid - late 70s 300 since they won't be calibrated for an EGR, like your current one is. But, the EGR is definitely a good thing. They don't hurt engine performance and can help with gas mileage (if only by a tiny fraction).
I'm not sure about what the second metal pipe is. Do you have a picture of it?
I've heard of that setup, but never seen it. From what I've heard, one of them only comes on when you fire up the truck and actually retards the timing (the lower the timing, the easier it is to start). This allows you to run more advance.
The speedometer is super easy to calibrate, especially if you have a GPS.
There's a gear on the end of the speedometer cable that goes into the tail shaft on the transmission/transfer case. One bolt, pull it out and pull off the C-Clip and swap the gear for another one. They're about $5 a pop and take about 5 minutes if you have the tools in hand. All you need is a 3/8" (if I remember right) and a pair of pliars. If someone put 31" tires on it, they probably never changed the gear.
Gear Size = (Tire Rotations Per Mile * Speedometer Worm Gear Teeth * Final Drive) / 1000
The hard part is knowing the speedometer worm gear teeth, since it's inside the transfer case and not easy to get to. They're usually 7, 8, or 9. You can usually figure it out by doing some reverse math by finding what the original tire size was by looking at the door jam and then using the teeth count on your current speedo gear. 31" tires are "technically" 650 rotations per mile, but they're probably actually closer to 30 - 30.5" diameter, which is more like 660 - 670.
However, if you have a GPS (if you have a smartphone, there's apps for them), go 60mph (according to your speedometer) and then look at the GPS and note how fast you're truly going. Pull your speedometer gear out and either count the teeth, or look it up on the internet (they're all color coded).
New speedometer gear = (GPS mph / 60mph) * current gear teeth.
Get whichever is closest and swap it in. It'll never be truly accurate, but you can get pretty close. If your speedometer is off, especially with larger tires (they didn't come with 31" tires stock), your mpg calculations are all going to be off (and lower than they really are).
If you decide to leave off the EGR and are planning on replacing the carb, get one from a mid - late 70s 300 since they won't be calibrated for an EGR, like your current one is. But, the EGR is definitely a good thing. They don't hurt engine performance and can help with gas mileage (if only by a tiny fraction).
I'm not sure about what the second metal pipe is. Do you have a picture of it?
Here's a pic I found on google images that shows the tube. It's the line that connects at the top of the carb and then goes to a metal line and wraps around to the bottom of the manifold.
#13
04-01-2015, 11:23 AM
#14
04-01-2015, 12:12 PM
Lead Driver
The choke housing has a tiny port inside. It was designed to draw the heated air into the housing so the bimetallic spring will be heated as the engine warms up, thereby causing the choke to come off. Some chokes had electric assist to work with the heat from the manifold, but others depended solely on the heat [no electric heater]. The later would never work without the tubes being connected as the choke spring would not be heated. Does yours have a single wire connected to the choke housing?
An easy fix is to run a vacuum hose from the previously described port located at the top of the carburetor and connect it to the line going to the choke [sort of a loop]. For less than $15, purchase a manual choke conversion kit in the HELP section at any parts store. Then, the fuel mixture is as was designed and you have complete control of the choke for cold starts. Mine is like that and works quite well.
An easy fix is to run a vacuum hose from the previously described port located at the top of the carburetor and connect it to the line going to the choke [sort of a loop]. For less than $15, purchase a manual choke conversion kit in the HELP section at any parts store. Then, the fuel mixture is as was designed and you have complete control of the choke for cold starts. Mine is like that and works quite well.
#15
04-01-2015, 12:20 PM
Join Date: Mar 2015
Posts: 23
Likes: 0
Received 0 Likes
on
0 Posts
