Post mortem: on board air, Firestone air bags, in cab pneumatic controller, air horns, HIDs, solar
#1
 03-15-2015, 08:33 PM

On board air, Firestone air bags, in cab pneumatic controller, air horns, HIDs, solar
Long post ahead!
Major parts list for my 2011 F350 SRW with B&W factory gooseneck:
-Firestone 2535 Ride-Rite Air Bag
-Firestone WR17602145 Air-Rite Dual Cab Control Kit
-Firestone 1/4" air line, 100 ft
-VIAIR 200 PSI Ultra Duty Onboard Air System
-VIAIR 90150 0-200 PSI Air Pressure Regulator
-VIAIR 1/4" NPT 6 Port Billet Manifold
-VIAIR Air Compressor Mounting Bracket 95900
-HornBlasters Rocker Horn Kit
-HornBlasters 1/4" electric solenoid
-Battery Tender 021-1165 15W Solar Charger
-Black Flame Customs retrofit service using my OEM headlights
-Bulk pack of Firestone Union Connector for 1/4" Tubing
-Yellow pipe tape
What started as a weekend project ended up being nearly a month long. The original plan ws to install Firestone air bags and call it a day. After doing my research I decided to go with the Firestone air bags over Air Lift because of many reports of poor fitment and instructions. The Firestone bags went on without a hitch and required no cutting at all. I installed the two Schrader valves next to the fuel and DEF caps. A few trips with my trailer made me realize that I wanted to run an in-cab controller (more on this later). To do so, I'd need on board air. Beyond filling the air bags, I wanted the on board air so I could fill the tires on my trailer quickly and easily. I figured, with on board air I may as well add a set of air horns to use when I'm towing my 40' trailer.
I ordered a VIAIR 200 PSI kit and fabricated numerous brackets. I didn't want to drill anything into the frame and I wanted the compressor to be mounted upright. This took a few days in the metal shop and a few trips to the hardware store. The compressor is wired to upfitter #1 and the electric purge is wired to the "ON/OFF" compressor switch. The air line supplied by VIAIR is garbage, only after running everything did I realize how bad it was. The supplied VIAIR air line was extra stiff and would always have some kinks in it that I couldn't straight out. I ordered 100 ft of line from Firestone and reran everything.
The VIAIR air tank didn't have enough ports for all my fittings so looked into manifold options. There were some 10$ options online, but the consensus was to spend the extra few bucks and order the VIAIR manifold. I ordered one and mounted it on the passenger side. The manifold would all the quick disconnect couplers on both sides of the truck, the VIAIR regulator, and in cab air tank gauge.
Next up was in-cab control for the air bags. From my research, the wireless bag systems were both expensive and prone to failure. At this point I decided to go with a manual controller and run the extra air lines. Originally I bought a controller that would fill and drain the two bags in the rear, equally. Sounds good right? Well, what sounds good doesn't always work out. I found out that while cornering, now that the bags were joined together, one bag would deflate while the other would inflate. I was able to return the single controller and buy a two bag controller for the same price.
The horns and solenoid were all mounted on the driver side near the fuel filter. I can enable or disable the horn using upfitter #4. When the switch is off, only the OEM horn will sound. When the switch is on the horn solenoid will open. This wa done using a simple relay using the upfitter as the power source and tapping into the horn positive wire and using it as the trigger.
Finally, everything was hooked up! Leak down time. I had followed the instructions from VIAIR and did not over torque the fittings or use pipe tape or sealant. Huge mistake. Everything leaked. After pulling all the fittings I wrapped everything in yellow pipe tape. Problem solved.
Sometime during this extended project I pulled my OEM headlights and sent them to Black Flame Customs. They did a nice job with the retrofit and shipped them back to me. My car was aleady wired to use DDM ballasts so all I had to do was wire in a new connector for the bixenons. The light output and cutoff are great now.
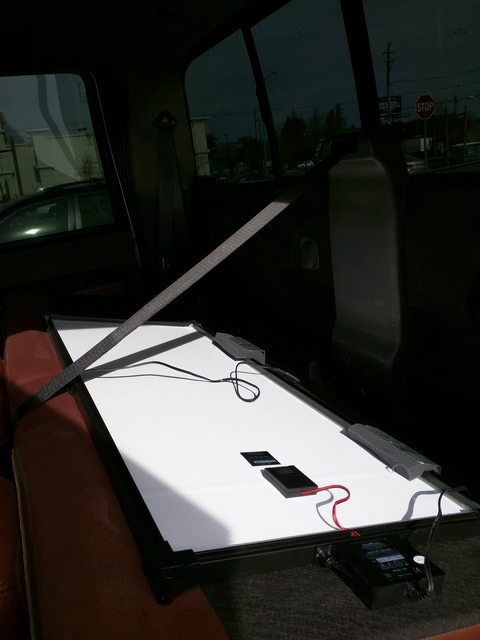
Last but not least I added some brackets to store my solar panel behind the back seats. I really only use the truck when I'm towing or working on projects. Because the truck sits for extended periods of time I wanted to ensure my new AGM Die Hard (Odyssey) batteries would always be topped off. I picked up a 15W panel that I place on the dash when the truck sits. When I do drive the truck, I need to store the panel. A few quick measurements and I realized I could fit the panel on the back seat.
Okay, photos time!
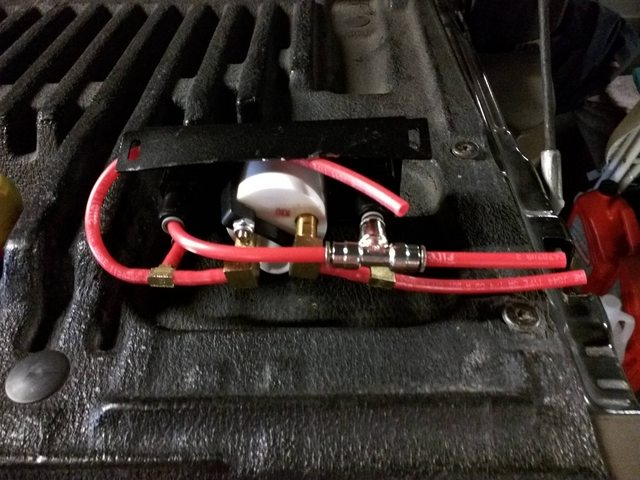
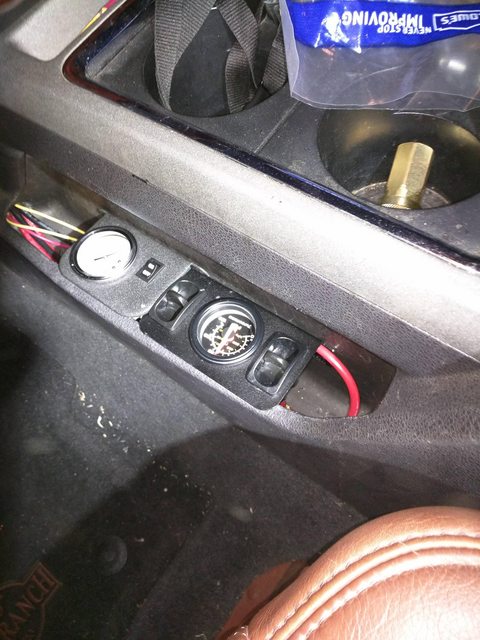
From the factory, the cab controller had the T fittings pointing straight down. This was a problem when I tried to mount everything in the little storage area by my leg. I solved the problem by replumbing everything so it sat flush wit the bottom of the container without and 90 degree bends.
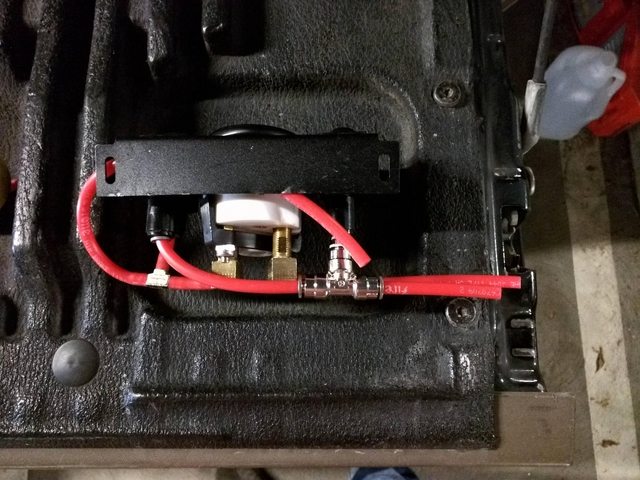
Another view so you can see how the air lines run parallel to floor.
The fittings for the air bags were only rated to 150psi. I added an inline regulator for the bags as well as any air tool that I might use.

I used over 40' of wire loom when everything was completed.
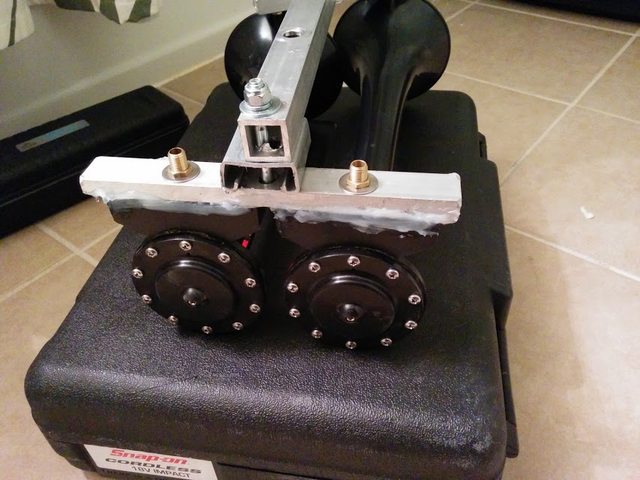
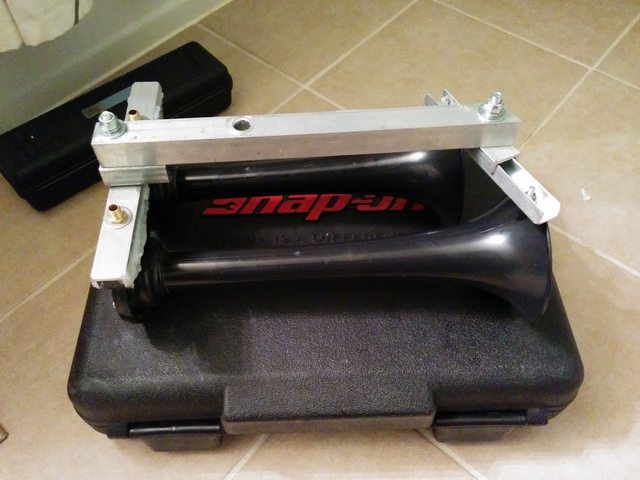
Mounting bracket for horns.
Silicone for good measure.
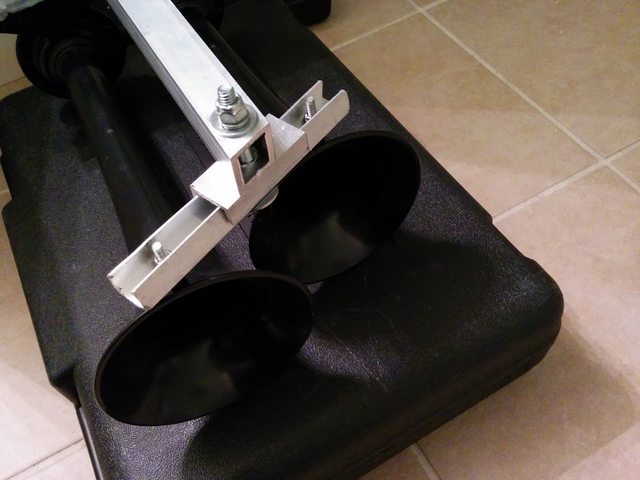
The front of the horns are mounted so they tilt downwards so water can drain.
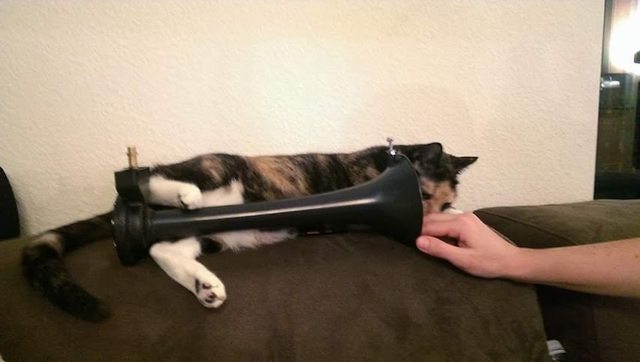
Cat for size.

Horns mounted on driver side near fuel filter. Nothing was drilled into the frame. Solenoid was mounted to the cross brace using rivets.
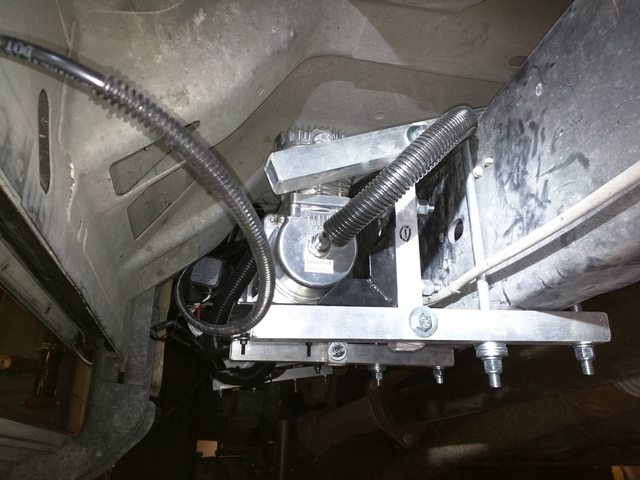
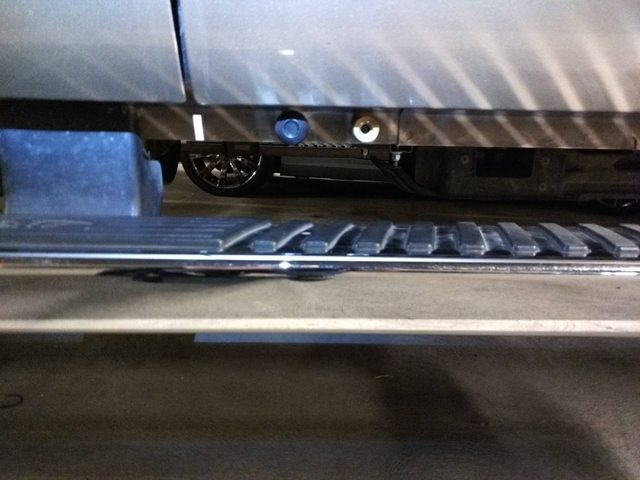
Air compressor mounted on passenger side rail. Again, nothing drilled to the frame. Note the brake line, don't pinch this!
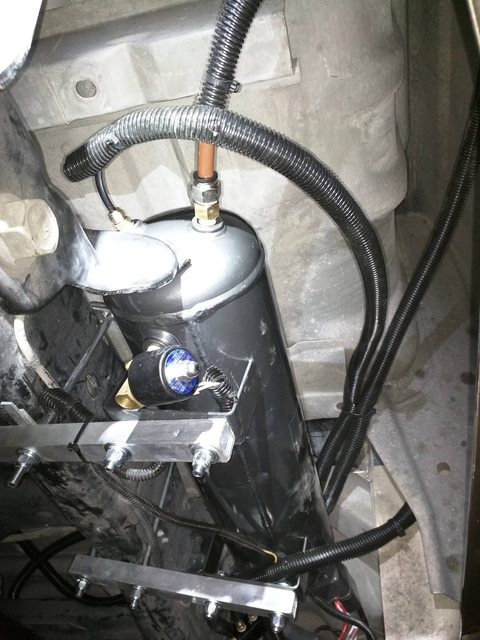
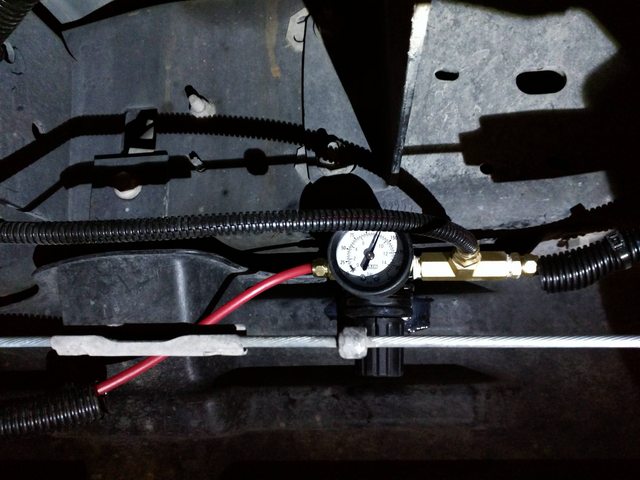
Air tank mounted on passenger side rail. I bought an extra set of solenoids and wired it up to the existing "ON/OFF" switch so I could drain the tank without crawling under the truck.
Air tank gauge, air tank purge, and individual bag control. I'll eventually cut some plastic to cover everything up. Good enough for government work!
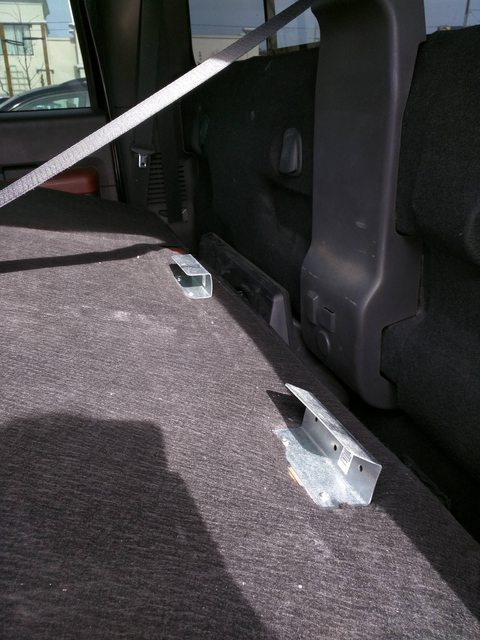
Brackets are riveted to the seat frame and are used to hold the solar panel.
Bent back in to shape with some foam glued on for protection.
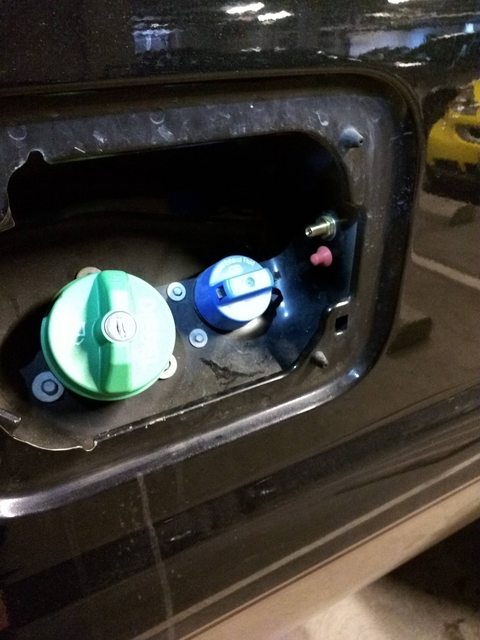
Manual inflation valve. The red cap is just to cover up the hole from when I removed the second inflation valve.
Each side of the truck has a pair of quick couplers. One is regulated, one is max PSI.
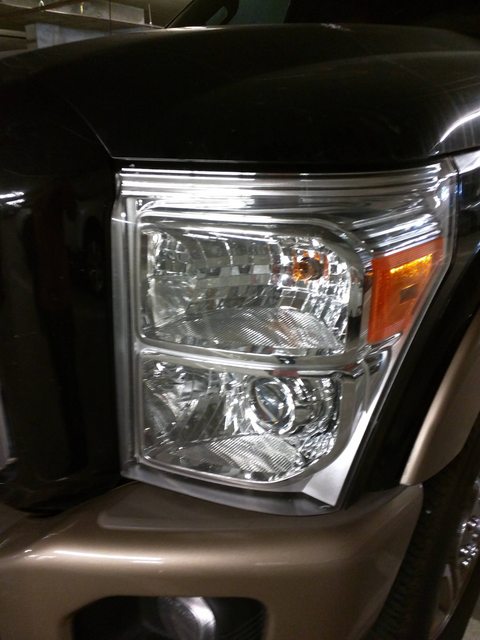
Black Flame Customs D2S projector retrofit. I'm using DDM ballasts with Osram bulbs.
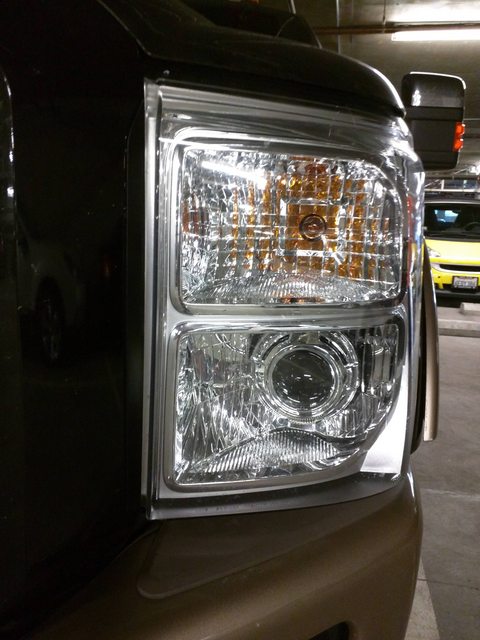
Everything looks OEM!
Major parts list for my 2011 F350 SRW with B&W factory gooseneck:
-Firestone 2535 Ride-Rite Air Bag
-Firestone WR17602145 Air-Rite Dual Cab Control Kit
-Firestone 1/4" air line, 100 ft
-VIAIR 200 PSI Ultra Duty Onboard Air System
-VIAIR 90150 0-200 PSI Air Pressure Regulator
-VIAIR 1/4" NPT 6 Port Billet Manifold
-VIAIR Air Compressor Mounting Bracket 95900
-HornBlasters Rocker Horn Kit
-HornBlasters 1/4" electric solenoid
-Battery Tender 021-1165 15W Solar Charger
-Black Flame Customs retrofit service using my OEM headlights
-Bulk pack of Firestone Union Connector for 1/4" Tubing
-Yellow pipe tape
What started as a weekend project ended up being nearly a month long. The original plan ws to install Firestone air bags and call it a day. After doing my research I decided to go with the Firestone air bags over Air Lift because of many reports of poor fitment and instructions. The Firestone bags went on without a hitch and required no cutting at all. I installed the two Schrader valves next to the fuel and DEF caps. A few trips with my trailer made me realize that I wanted to run an in-cab controller (more on this later). To do so, I'd need on board air. Beyond filling the air bags, I wanted the on board air so I could fill the tires on my trailer quickly and easily. I figured, with on board air I may as well add a set of air horns to use when I'm towing my 40' trailer.
I ordered a VIAIR 200 PSI kit and fabricated numerous brackets. I didn't want to drill anything into the frame and I wanted the compressor to be mounted upright. This took a few days in the metal shop and a few trips to the hardware store. The compressor is wired to upfitter #1 and the electric purge is wired to the "ON/OFF" compressor switch. The air line supplied by VIAIR is garbage, only after running everything did I realize how bad it was. The supplied VIAIR air line was extra stiff and would always have some kinks in it that I couldn't straight out. I ordered 100 ft of line from Firestone and reran everything.
The VIAIR air tank didn't have enough ports for all my fittings so looked into manifold options. There were some 10$ options online, but the consensus was to spend the extra few bucks and order the VIAIR manifold. I ordered one and mounted it on the passenger side. The manifold would all the quick disconnect couplers on both sides of the truck, the VIAIR regulator, and in cab air tank gauge.
Next up was in-cab control for the air bags. From my research, the wireless bag systems were both expensive and prone to failure. At this point I decided to go with a manual controller and run the extra air lines. Originally I bought a controller that would fill and drain the two bags in the rear, equally. Sounds good right? Well, what sounds good doesn't always work out. I found out that while cornering, now that the bags were joined together, one bag would deflate while the other would inflate. I was able to return the single controller and buy a two bag controller for the same price.
The horns and solenoid were all mounted on the driver side near the fuel filter. I can enable or disable the horn using upfitter #4. When the switch is off, only the OEM horn will sound. When the switch is on the horn solenoid will open. This wa done using a simple relay using the upfitter as the power source and tapping into the horn positive wire and using it as the trigger.
Finally, everything was hooked up! Leak down time. I had followed the instructions from VIAIR and did not over torque the fittings or use pipe tape or sealant. Huge mistake. Everything leaked. After pulling all the fittings I wrapped everything in yellow pipe tape. Problem solved.
Sometime during this extended project I pulled my OEM headlights and sent them to Black Flame Customs. They did a nice job with the retrofit and shipped them back to me. My car was aleady wired to use DDM ballasts so all I had to do was wire in a new connector for the bixenons. The light output and cutoff are great now.
Last but not least I added some brackets to store my solar panel behind the back seats. I really only use the truck when I'm towing or working on projects. Because the truck sits for extended periods of time I wanted to ensure my new AGM Die Hard (Odyssey) batteries would always be topped off. I picked up a 15W panel that I place on the dash when the truck sits. When I do drive the truck, I need to store the panel. A few quick measurements and I realized I could fit the panel on the back seat.
Okay, photos time!
From the factory, the cab controller had the T fittings pointing straight down. This was a problem when I tried to mount everything in the little storage area by my leg. I solved the problem by replumbing everything so it sat flush wit the bottom of the container without and 90 degree bends.
Another view so you can see how the air lines run parallel to floor.
The fittings for the air bags were only rated to 150psi. I added an inline regulator for the bags as well as any air tool that I might use.
I used over 40' of wire loom when everything was completed.
Mounting bracket for horns.
Silicone for good measure.
The front of the horns are mounted so they tilt downwards so water can drain.
Cat for size.
Horns mounted on driver side near fuel filter. Nothing was drilled into the frame. Solenoid was mounted to the cross brace using rivets.
Air compressor mounted on passenger side rail. Again, nothing drilled to the frame. Note the brake line, don't pinch this!
Air tank mounted on passenger side rail. I bought an extra set of solenoids and wired it up to the existing "ON/OFF" switch so I could drain the tank without crawling under the truck.
Air tank gauge, air tank purge, and individual bag control. I'll eventually cut some plastic to cover everything up. Good enough for government work!
Brackets are riveted to the seat frame and are used to hold the solar panel.
Bent back in to shape with some foam glued on for protection.
Manual inflation valve. The red cap is just to cover up the hole from when I removed the second inflation valve.
Each side of the truck has a pair of quick couplers. One is regulated, one is max PSI.
Black Flame Customs D2S projector retrofit. I'm using DDM ballasts with Osram bulbs.
Everything looks OEM!
#2
03-15-2015, 08:51 PM
#3
03-15-2015, 09:55 PM
#4
03-16-2015, 05:56 AM

Very good work there. I know how sore I get when doing all that stuff!
I've always mounted the air chuck at the rear next to my license plate. Makes it easy to reach trailers.
My air horn set is from the same company and they've been on the road for almost 6 years now. I'm not sure how to keep them nice but I spray wd-40 up into them periodically.
I've always mounted the air chuck at the rear next to my license plate. Makes it easy to reach trailers.
My air horn set is from the same company and they've been on the road for almost 6 years now. I'm not sure how to keep them nice but I spray wd-40 up into them periodically.
#6
03-16-2015, 08:12 AM
#7
08-08-2015, 02:38 PM
Trending Topics


#9
08-23-2015, 12:26 AM


I had the same problem with the firestone air bags, they always leaked, I like the air lifts much better. Never leaked down and lasted 7 years with moderate to occaisional heavy use. I found they centered the load over the springs better too. I had to put the 1/4" plastic line inside some 3/8" copper tubing where it ran near the exhaust because it would melt and rupture while sitting in traffic in the summer. I also found that on the 1/4" lines the pressure fitting with brass ferrell works the best as far as not leaking over time. I also had a set of hadley air horns mounted under the front bumper pointed down at a slight angle so the sound would bounce off of the pavement, but have them up on top of the new truck. I like your air tank set up I just has a 10 gal tank from harbor freight under the last truck. I have the system all inside the camper top on this truck, much easier setup, shorter air lines and no worry about the elements under the truck. Got a dually this time and don't need the air bags. Still have the large 12 volt puma compressor and the 50' hose reel in the bed though, comes in handy. Have had the compressor for 8 years now and still works great.
#10
08-23-2015, 07:20 AM
I would hesitate to blame air leaks on Firestone. Many of us that use them are leak free. I know my air bags will hold 40psi for a month or more. The only change in pressure I get is from night/day temperature swings.
My viair system does leak down though and I just give up on it. The bungs on the tank aren't threaded with enough precision and the powder coat paint messes them up as far as I can tell. Doesn't bother me at all though, I just need to pressurize the tank several times/day. No biggie.
My viair system does leak down though and I just give up on it. The bungs on the tank aren't threaded with enough precision and the powder coat paint messes them up as far as I can tell. Doesn't bother me at all though, I just need to pressurize the tank several times/day. No biggie.
#11
08-23-2015, 08:28 PM
#12
08-24-2015, 07:55 AM

#14
12-03-2015, 04:28 PM
Would you mind posting more info on the hardware for future reference?
#15
04-09-2019, 10:34 AM

UPDATE: Over the past year (almost) I have had zero problems. As expected system has continued to work as designed.
I did have one air leak that started ......... it was the quick connect fitting on the rear bumper. From experience I expect that fitting to be replaced about once a year.
I had considered getting the sockets to match the 4-way lug and keeping an pneumatic impact (with sockets) under the back seat. I was in Harbor Freight a few days ago and spotted some Universal Lug Impact socket set for $14.99. Just what I had been thinking about. The same day I was in Home Depot and picked up a Hushy plastic organizer case for $1.97. To much ....... I had my hole set with a case for about $17 bucks. The lug sockets are only 2 sockets that flip with an extension that connects into the middle of the socket. One metric, one standard.......4 sockets in 2.
I thought I had really stumbled onto something .......... but ...... these socket sets are a dime a dozen. I went on Amazon and found this:
I was just clueless (idiot) ........ had never seen these before. I posted that link for the other clueless idiots reading my dribble