No Heat - ’97 E250
#46
 01-03-2015, 07:06 PM


Could be---I've not been "rustic camping" since the early '80's, admittedly an SMB would have been quite glamorous by comparison. 
Good plan on ordering the motor, door and QD tools----when I did mine some years ago I even swapped a new heater core----and it was during the summer too so no huge rush to get 'er done!
Let us know how this turns out.
Oh BTW---that danged Phillips screw is just an amazing thing is it not?

Good plan on ordering the motor, door and QD tools----when I did mine some years ago I even swapped a new heater core----and it was during the summer too so no huge rush to get 'er done!
Let us know how this turns out.
Oh BTW---that danged Phillips screw is just an amazing thing is it not?
#47
01-03-2015, 08:46 PM
Could be---I've not been "rustic camping" since the early '80's, admittedly an SMB would have been quite glamorous by comparison.
Good plan on ordering the motor, door and QD tools----when I did mine some years ago I even swapped a new heater core----and it was during the summer too so no huge rush to get 'er done!
Let us know how this turns out.
Oh BTW---that danged Phillips screw is just an amazing thing is it not?
Good plan on ordering the motor, door and QD tools----when I did mine some years ago I even swapped a new heater core----and it was during the summer too so no huge rush to get 'er done!
Let us know how this turns out.
Oh BTW---that danged Phillips screw is just an amazing thing is it not?
Is there an easy way to test the flow through the core while I've got it out without having a shop do it? I'm pretty sure it's fine but if I could test it at home fairly easily...well, you know. Duct tape it to a garden hose type stuff?
That phillips screw is just a cruel joke by Ford. I tried your wrench and phillips bit method but my bit was just a little too long. As I pondered how fun it would be to Dremel it down so it would fit up in there, I decided to just try the long nose pliers. Thankfully that worked. I think the screw was already a little loose. Like you said, I might just "forget" to put it back in.
#48
01-04-2015, 06:30 AM
Even though there are quite a few spectacular photos and stories of SMB camping sadly its not something I'd want to do at this point in life. Two gals I date are definitely indoor women, their idea of being outside is maybe working o a tan. SMB is interesting because it seems most there are as interested in building, improving or maintaining their vehicles, some a bit more than actually using them as intended.
Flow wise for your core disconnecting the supply & return lines at the engine side and cobbling a garden hose connection to one side would be the easiest way I think. Frankly if you're buying the disconnect tools removing the core after the outer case is gone is fairly simple. Keep in mind the inlet/outlet tubes are (or should be) different sizes, just an FYI.
If the garden hose test is used you'll know pretty quickly if its flowing at full volume. I didn't notice your mileage listed but if its over 200K I'd just swap out the core and rest well knowing your front cabin heat is new through and through.
And yes that screw......... My '00 E250 came stock without the right side air bag there is max access to the area it typically occupies. Even with that out of the way parts of the dash superstructure still block a straight in shot to removing it.
I see the need for it but not to the point its buried so deeply and for the most part inaccessible. Interlocking "fingers" on the top duct portion and the outer evap case would make more sense, at least to me. Then again these parts and the heating/cooling system in general is so reliable its not something we need to do often, perhaps most owners never having an issue at all.
A length of mylar duct sealing tape would be easily fitted up there if leaks would be a concern. But then again any "leak" is still to the inside of the conditioned space so its not a huge deal.
Anyway keep us updated on your progress!
SMB is interesting because it seems most there are as interested in building, improving or maintaining their vehicles, some a bit more than actually using them as intended. Flow wise for your core disconnecting the supply & return lines at the engine side and cobbling a garden hose connection to one side would be the easiest way I think. Frankly if you're buying the disconnect tools removing the core after the outer case is gone is fairly simple. Keep in mind the inlet/outlet tubes are (or should be) different sizes, just an FYI.
If the garden hose test is used you'll know pretty quickly if its flowing at full volume. I didn't notice your mileage listed but if its over 200K I'd just swap out the core and rest well knowing your front cabin heat is new through and through.
And yes that screw.........
My '00 E250 came stock without the right side air bag there is max access to the area it typically occupies. Even with that out of the way parts of the dash superstructure still block a straight in shot to removing it. I see the need for it but not to the point its buried so deeply and for the most part inaccessible. Interlocking "fingers" on the top duct portion and the outer evap case would make more sense, at least to me. Then again these parts and the heating/cooling system in general is so reliable its not something we need to do often, perhaps most owners never having an issue at all.
A length of mylar duct sealing tape would be easily fitted up there if leaks would be a concern. But then again any "leak" is still to the inside of the conditioned space so its not a huge deal.
Anyway keep us updated on your progress!
#49
01-04-2015, 11:49 AM

#50
01-04-2015, 04:04 PM

Senior User
Chiming in late , about the flow.
I noticed in one of your pictures that the heater lines that head to the rear heating unit are looped as i asume the rear heating unit is no longer used.
What you want to do if you are not planing to use the rear heating unit is to take out the loop and cap each end.
Uncapped this loop is the lower resistent circut compared to the circut that contains the front heater core, the greater flow of coolant will be through the loop in proportion to the ratio of the resistence between the two circuts .
in electrical terms you have two paralle cicuits with different resistence the loop having much lower resistence compared to forcing fluid through a heater core
From the factory or outfitter the rear unit had a vacuum operated water controll valve to stop flow to the rear unit , this was done for two reasons to provide greater flow to the front heater core and if rear ac was used to increase the efficency of the evaporater.
happy new year
#51
01-04-2015, 09:21 PM
Chiming in late , about the flow.
I noticed in one of your pictures that the heater lines that head to the rear heating unit are looped as i asume the rear heating unit is no longer used.
What you want to do if you are not planing to use the rear heating unit is to take out the loop and cap each end.
Uncapped this loop is the lower resistent circut compared to the circut that contains the front heater core, the greater flow of coolant will be through the loop in proportion to the ratio of the resistence between the two circuts .
in electrical terms you have two paralle cicuits with different resistence the loop having much lower resistence compared to forcing fluid through a heater core
From the factory or outfitter the rear unit had a vacuum operated water controll valve to stop flow to the rear unit , this was done for two reasons to provide greater flow to the front heater core and if rear ac was used to increase the efficency of the evaporater.
happy new year
I noticed in one of your pictures that the heater lines that head to the rear heating unit are looped as i asume the rear heating unit is no longer used.
What you want to do if you are not planing to use the rear heating unit is to take out the loop and cap each end.
Uncapped this loop is the lower resistent circut compared to the circut that contains the front heater core, the greater flow of coolant will be through the loop in proportion to the ratio of the resistence between the two circuts .
in electrical terms you have two paralle cicuits with different resistence the loop having much lower resistence compared to forcing fluid through a heater core
From the factory or outfitter the rear unit had a vacuum operated water controll valve to stop flow to the rear unit , this was done for two reasons to provide greater flow to the front heater core and if rear ac was used to increase the efficency of the evaporater.
happy new year
Obviously, my first project is to get the heat working. After that, I have some decisions to make. The AC doesn't work either. Obviously, the van has the factory pipes run for rear AC and heat but neither were ever installed. The RV company put in a third party rear AC that's tied in directly to the front AC system...neither of which work at the moment.
Ideally, I get that system fixed and end up with front and rear AC and front heat. After that, I'll be pricing out an RV propane system that would run a propane stove and rear furnace. If that's too much, I may just add a heater in the rear using the lines you mention.
So much to think about. Where we live, we use heat a lot more than we do AC, but where we camp we might be using more AC than heat. So confusing

#52
01-05-2015, 06:21 AM
That's a great idea Richter----we may have touched upon that earlier---too many posts here I've lost track my own self.
Its entirely possible to "split" the heating system as now configured to have heat only to the front. Having that much uninsulated piping the coolant travels through before hitting the front core would reduce its temperature---not sure how much or if it would affect creature comfort but its a consideration.
I'd find where the "looped" lines exit and re-enter the engine and move the loop much closer to the engine. From the photos of the existing loop that would be easily enough accomplished.
Having rear A/C might require renewing the A/C plumbing to the rear unit along with determining if the rear unit is factory or aftermarket. Its possible existing plumbing is sound and solid enough to handle the pressures but it should be considered and budgeted if rear A/C becomes more important at some point.

#54
01-09-2015, 12:09 AM
Dorman actuator arrived today ($25). I assume it’s okay that the electrical connection is on the side, rather than on the top like the factory one. I recall that there should plenty of room to accommodate that.
Factory:
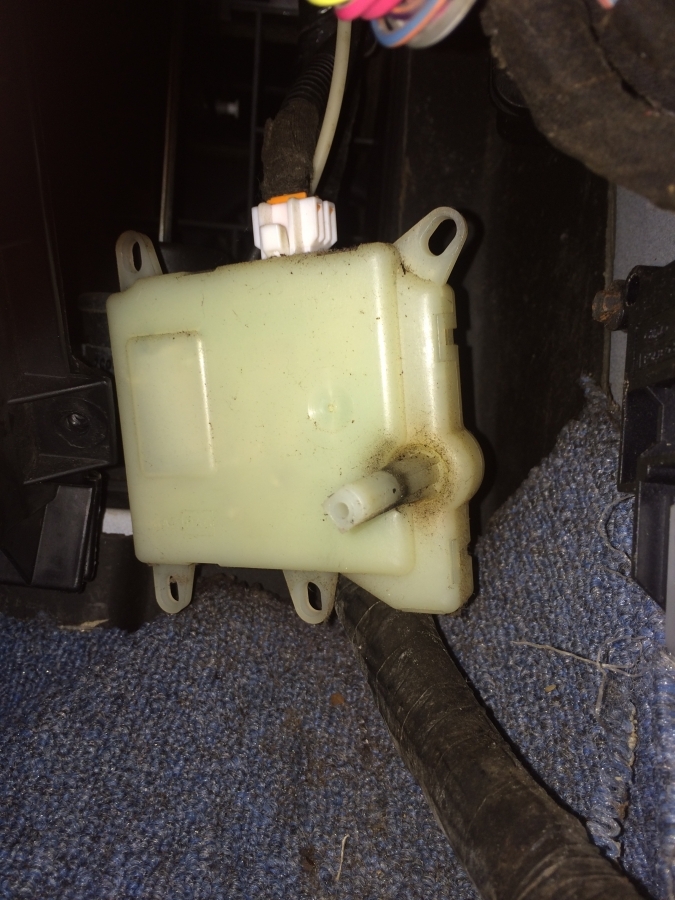
New Dorman:
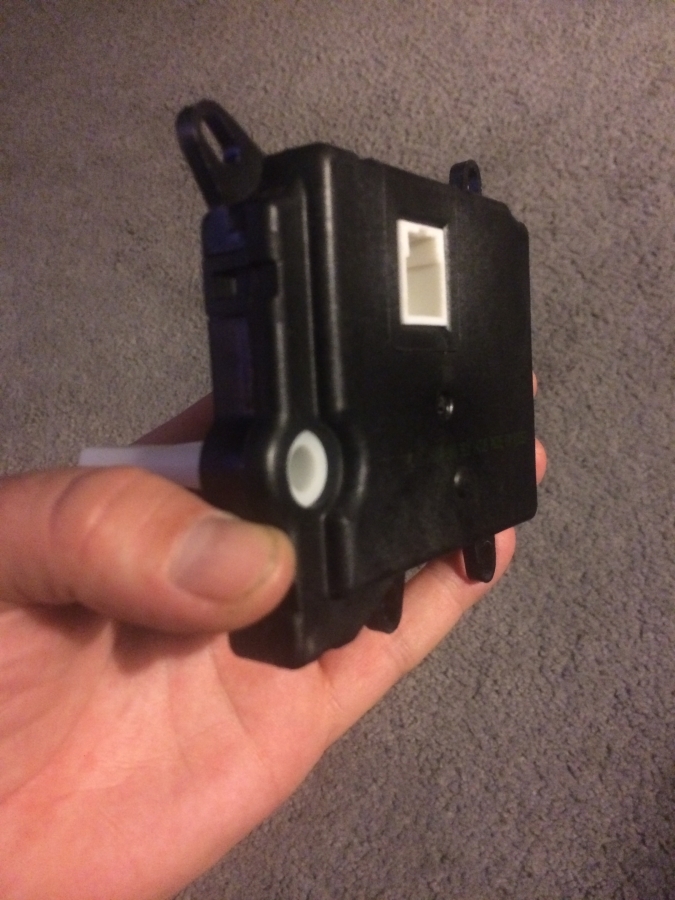
The rest of the parts should arrive tomorrow and I've got a date with a fellow Sportsmobile owner on Saturday to spend the day working on our vans. Planning to remove the aluminum running boards on my van and replace them with fiberglass boards, install a new 4D battery underneath his van since he just had wrist surgery, and hopefully get this heater project done at the same time. I'll be listening for that UPS truck all day tomorrow!
Factory:
New Dorman:
The rest of the parts should arrive tomorrow and I've got a date with a fellow Sportsmobile owner on Saturday to spend the day working on our vans. Planning to remove the aluminum running boards on my van and replace them with fiberglass boards, install a new 4D battery underneath his van since he just had wrist surgery, and hopefully get this heater project done at the same time. I'll be listening for that UPS truck all day tomorrow!
#55
01-09-2015, 06:25 AM
The connector looks to be even more convenient should disconnecting the drive motor again---as you mention there should be plenty of wire length to accommodate the difference.
Hope your parts do arrive and you get all this finished up over the weekend. You're over the hump or a learning curve removing the outer evap case so completing your heater rehad should go pretty easy from here.
Good of you to help your SMB buddy----swapping those batteries out can't be easy especially with a broken wrist.
#56
01-09-2015, 01:24 PM
The connector looks to be even more convenient should disconnecting the drive motor again---as you mention there should be plenty of wire length to accommodate the difference.
Hope your parts do arrive and you get all this finished up over the weekend. You're over the hump or a learning curve removing the outer evap case so completing your heater rehad should go pretty easy from here.
Good of you to help your SMB buddy----swapping those batteries out can't be easy especially with a broken wrist.
Hope your parts do arrive and you get all this finished up over the weekend. You're over the hump or a learning curve removing the outer evap case so completing your heater rehad should go pretty easy from here.
Good of you to help your SMB buddy----swapping those batteries out can't be easy especially with a broken wrist.
Definitely gotta help my buddy out. He gave me the fiberglass running boards for free and sold me this van at his cost when he could have easily flipped it for a nice profit
edit: Quick disconnect tools arrived. Didn't realize they were anodized aluminum. No wonder they cost what they did.
edit 2: Blend door arrived late today, but now I have a cold. Hopefully I feel up to doing this tomorrow.
#57
01-10-2015, 05:59 AM
#58
01-10-2015, 08:57 PM
Didn't manage to get the heater fixed today. The running boards took longer than we expected and ran out of time. We had to move the city water connection to get the boards on correctly.
Oh well, we'll try again next weekend.
#59
01-17-2015, 07:16 PM
Well, today turned out to be an epic fail. I drained the coolant and got to work on the heater core hoses. After a little while, I managed to get the top hose off using the quick disconnect tools. Unfortunately, I just cannot get the lower hose off. I also dropped two of the four quick disconnect tools down in the engine bay where I assume they'll just live forever. So, now the van just sits with no coolant and one hose still connected to the heater core 
#60
01-18-2015, 12:43 PM
Just fish around for the dropped tool----that set is anodized aluminum so should catch light shined in there.
Those lines can be quite the struggle especially first time working with them.
Don't forget to replace the O-rings and locking tabs for the hose Quick Connect fittings---most any parts store should have them in stock. Also keep in mind your year should have a 5/8" and 3/4" hose ID which also require different O-Rings and locking tabs.
You're close---keep at it.