
Removing the dash on my 91 xlt lariat f250
#16
 01-19-2015, 10:07 AM


decontaminated the cab and the dash. discovered a flex tubing duct that had been chewed through. tracking down a replacement. started installing sound deadener mat. my dash has a some nasty cracks on the bottom side which i will post pictures of. i want to repair these cracks before i reinstall the dash. maybe i can put fiberglass or bondo in these spots? in one area there is a hole about the size of half a penny.
#17
01-25-2015, 08:05 PM
there is a product that has several different names i would like to recommend when installing a new heater core. i used this product to get a good seal on the lid to the a/c box where the heater core is. i also used it as a adhesive to put the strip/pad back onto the new heater core. also using it to seal the firewall. I picked this up at a commercial glass shop. i know this can also be bought at westwood auto parts. the glass guys called it dope on a rope. it's also called windshield caulking. i've used this product when installing quarter glass on a g body monte carlo. i'm sure it has multiple uses. it is basically a string of black rubber compound wound up in a spiral. it has paper separating the caulking so that it doesn't stick together. the caulking does not dry and can be kneeded into any shape with your hands and won't stick to your hands but leaves a black residue. I also believe Eastwood sells this product at a inflated price.


#19
02-27-2015, 05:50 PM
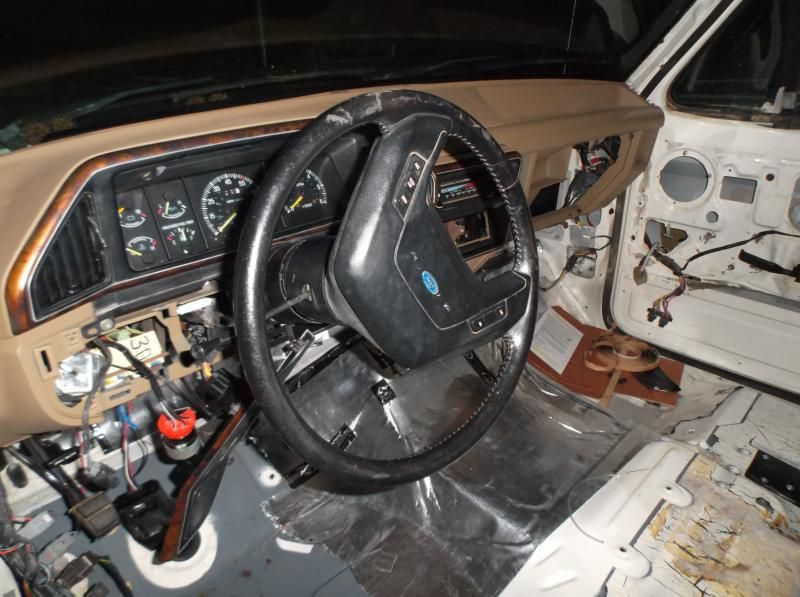
i got the new dash in. i'm still not done installing the darn thing though. there are so many friggin screws it's making my head spin. i got every pigtail reconnected though. i was about to give up on the dash when i found a box i forgot all about that has bags with labels on where all the tiny screws go in the gauge cluster area. i detailed the gauge cluster lense and the gauges. i just need another hour or two to get all the screws in there correct places. i actually need to remove some i put in the wrong places.
the worst thing about this is i take the pig tail from the heater control and run it to the pig tail on the new heater box and they don't match up. wtf?
now i got to go to the junk yard and chop a pig tail out of another truck that matches my heater control... this is so lame. i guess i ordered a year specific heater box or something. i'll post pics of what i'm dealing with tomorrow and pics of the dash in the truck. i was just hustling all day and didn't have time.
aaaaaaand i can't find my friggin glove box. it's gone. now i have to find another tan glove box at the junkyard and i never see tan interior 87-91s at the yard ever

#21
02-28-2015, 01:13 PM

#22
02-28-2015, 06:28 PM

well i got a good bit done today. i cut a vacuum pig tail from a heater box and adapted it to my heater box with some vinyl tubing. i then cranked the truck up for the first time in several months. looks like the horn in functioning again. and if it's good then i'm assuming the cruise control is back. it was probably a loose pig tail connection.
i tried to turn on the heat and nothing happened. i couldn't even get the blower motor to turn on. not sure whats going on there. more stuff to trouble shoot i guess. i'll check the fuses. hopefully that's all it is. it could be a loose or disconnected pig tail that i missed. or maybe the heater control that i pulled from the junkyard is bad. i had to replace my original because it was covered in rat funk.
i need to go back to the junkyard and find the metal head light and windshield wiper plate that both of the controls ***** slide through. mine is missing.
do any of you know where these two pig tails go to? these are the last two that i have to connect. i can't find where they go and i forgot


and if any of you have a tan glove box please hook me up. couldn't find one anywhere at the junkyard today. i can trade you some stuff. i have a full set of upper and lower door hinges. the uppers need to be rebushed. i have a gauge cluster lense that doesn't have the hole through it. i have some extra windshield trim... some things that i could trade

#23
03-01-2015, 03:37 PM

Cargo Master
#24
03-02-2015, 09:45 AM
 even the horn and cruise control and a/c and heat are functioning like they should.
and the funk has been eliminated.
so now i'm taking the truck to a friends shop who is going to smooth out the roof. one of the supports will need to be cut out and the roof massaged and then the support will need to be tacked back in a fortified. the roof has a bad bend in it. some idiot probably stood on it.
then i will finish sound deadening the cab.
then i will install the roof lights and then put in the rest of the interior.
#25
01-06-2016, 09:46 AM
Hello again community. I would like to give a shoutout to all of those who have helped me on this forum. Without you I would not be as far along as I've come on trying to bring what was initially a catastrophe of a truck destined for the scrapper to a working mans truck.
This thread has evolved from dash removal to my partial restoration thread. I have not posted in a long while. My steering column had some serious issues. I had to locate two other steering columns in order to rebuild mine. 6 months later the column rebuild has been complete.
Just to update I quickly list the items I have fixed and replaced thus far.
Rebuilt and rebalanced steering column with new u joints
transmission filter and gasket
new timing cover
front tank fuel sending unit
water pump
egr deletion with a shorter belt
new compressor and dryer with high tech residential refrigerant
master cylinder
power steering pump with filter- 4th pump! (3 bad out of the box in a row american quality manufacturing is dead)
starter
ford alternator
starter solenoid
custom built battery cables
3 batteries all under warranty! - 3rd battery from napa (american quality manufacturing is dead)
power window motors from rock auto
door lock actuators from rock auto
hood from a junk yard
tail gate from a junk yard and new components installed inside
in door speakers
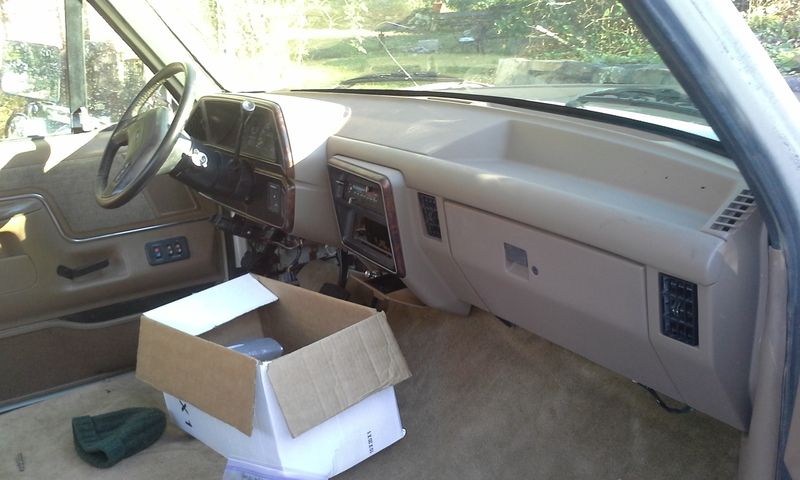
replaced dash with another dash and vinyl dyed the dash to match original color
shift indicator from another truck
a/c system beneath the dash
a/c controls
ford heater core
steering column rebuilt with 2 other salvaged columns
steering wheel
entire vehicle and interior pieces decontaminated with hydrogen peroxed/dishsoap/baking soda in a pump sprayer (will remove/ sterilize the smell of death - tip for all you mass murderers out there)
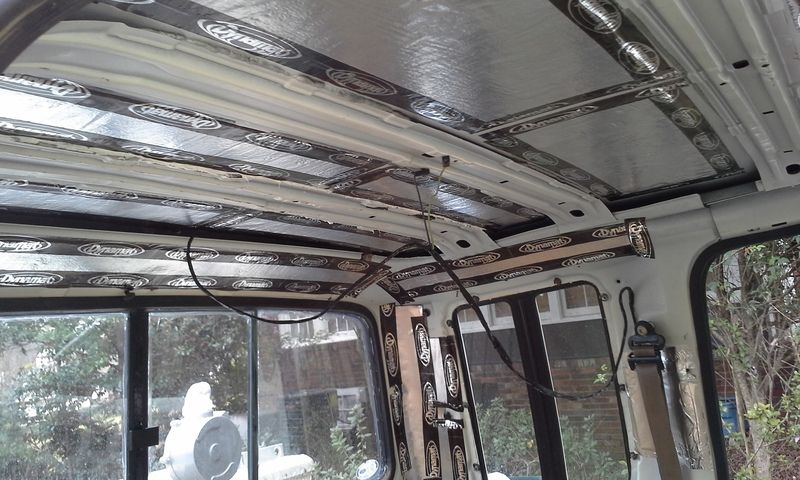
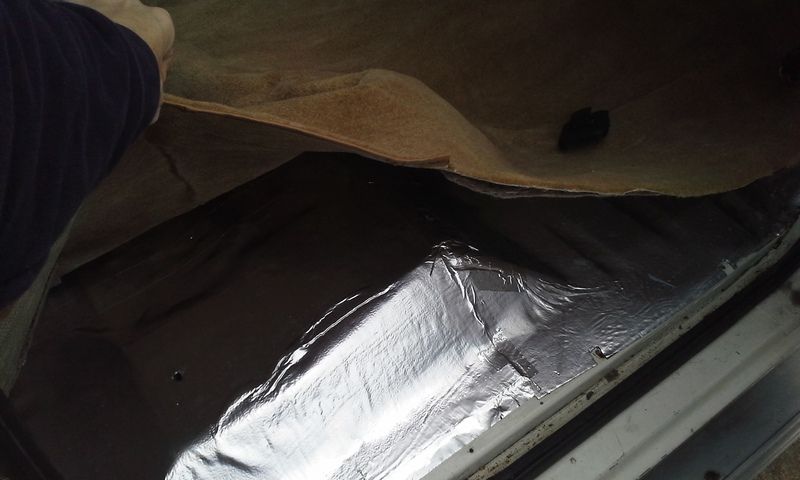
fat mat insulation on all surfaces including entire firewall
dyna tape (rip off) and hvac tape (ecomical and fiscal and just as good)
left over heat shield insulation from toyota dealership which I had to use on my prius (long story - had to decontaminate the prius too - had the same problem - a infestation!) which was installed on the back side of every single interior panel
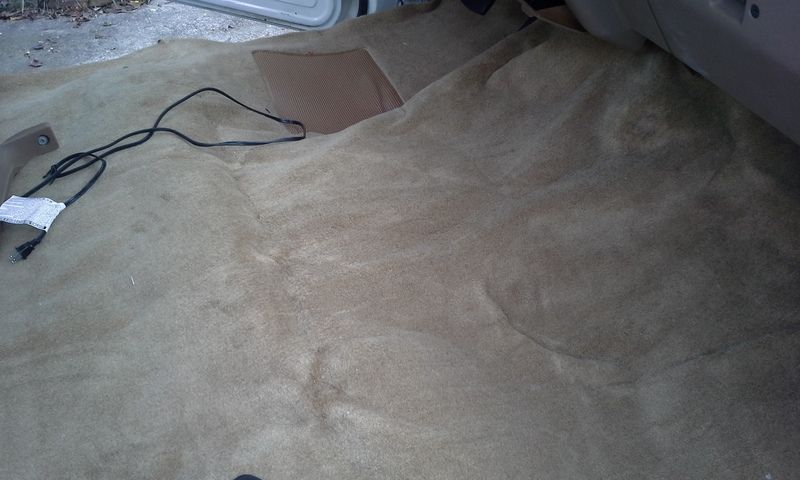
brand new carpet
brand new headliner
custom bench seat from a 99 dodge ram 1500
cab roof light kit installed on the roof
bumper
reese drop hitch modified and mounted to frame using high grade bolts
2 spare tires mounted in the bed
spare tire carrier beneath the bed restored and a 3rd tire installed
4 load rated tires
4 steel wheels with load rated tires bead blasted, sealed with self etching primer and white rustoleum enamel
true dual exhaust with flowmaster knockoffs installed and exhaust kicks out to either side of the spare tire and rear tank - sounds awesome!
removed the glued on side trim
realigned doors - one door received a new hinge - the other i salvaged a hinge from the junk yard and rebuild it with a pin kit
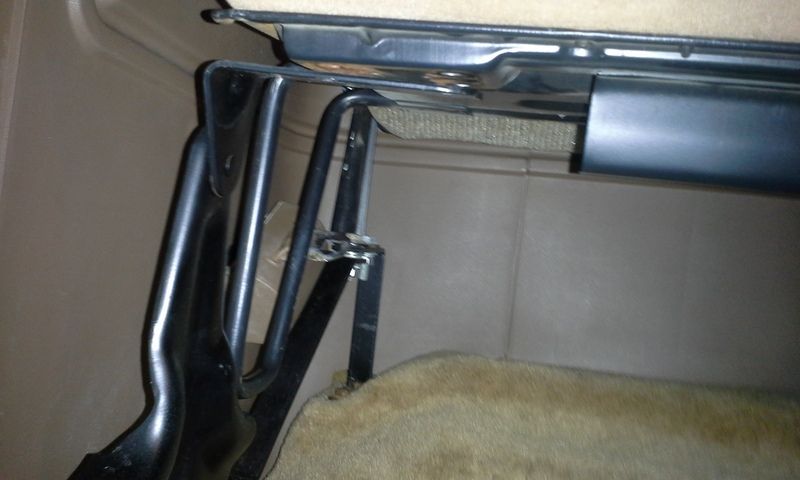
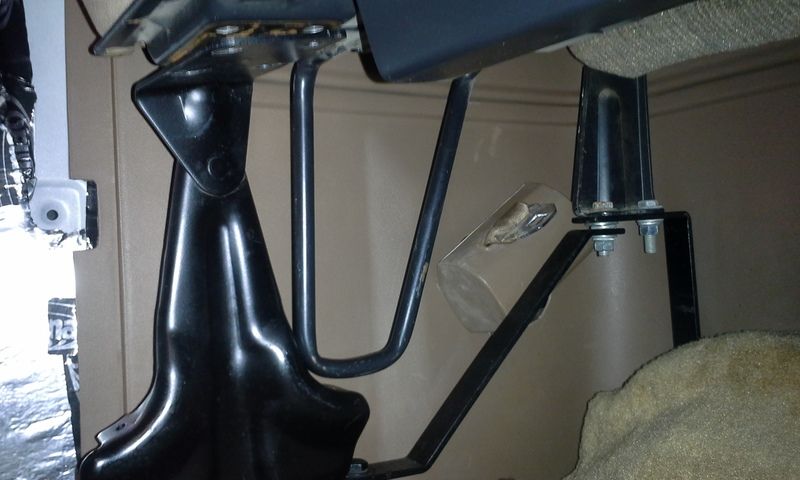
here are some of the latest pics. I should be finished installing the interior of the vehicle in the next two days. been slaving on this truck like a madman since the steering column situation had been solved


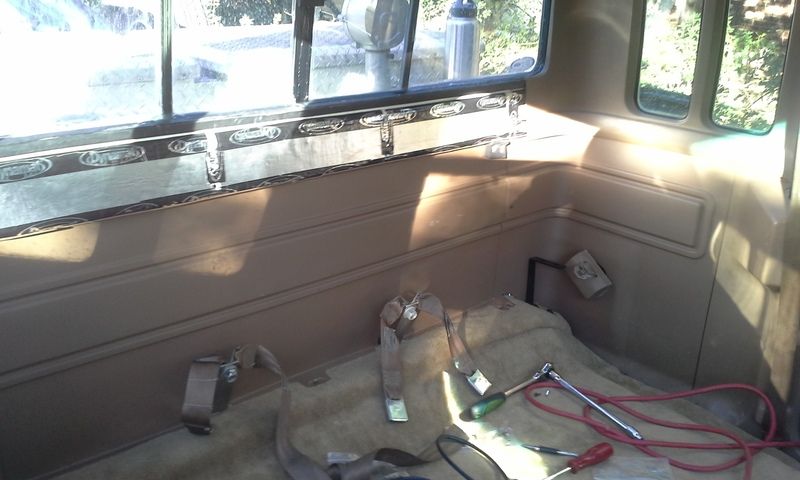
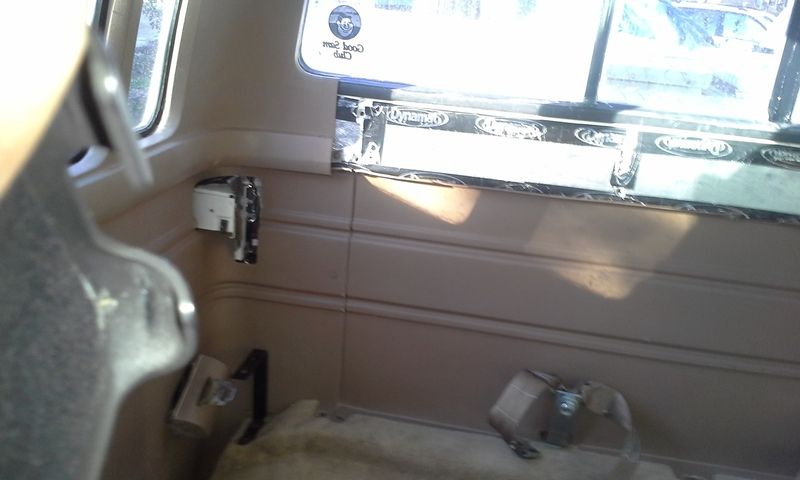
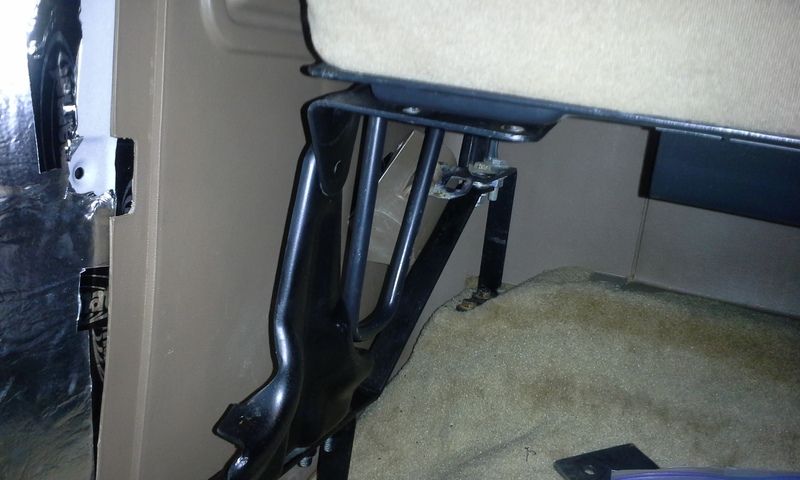
now these last couple of pics i'm including because i'm hitting a dead end. I can't remember how to properly install my rear seat brackets. I'm doing something wrong. can someone post a pic of their brackets or tell me what i'm doing wrong?! thanks!


This thread has evolved from dash removal to my partial restoration thread. I have not posted in a long while. My steering column had some serious issues. I had to locate two other steering columns in order to rebuild mine. 6 months later the column rebuild has been complete.
Just to update I quickly list the items I have fixed and replaced thus far.
Rebuilt and rebalanced steering column with new u joints
transmission filter and gasket
new timing cover
front tank fuel sending unit
water pump
egr deletion with a shorter belt
new compressor and dryer with high tech residential refrigerant
master cylinder
power steering pump with filter- 4th pump! (3 bad out of the box in a row american quality manufacturing is dead)
starter
ford alternator
starter solenoid
custom built battery cables
3 batteries all under warranty! - 3rd battery from napa (american quality manufacturing is dead)
power window motors from rock auto
door lock actuators from rock auto
hood from a junk yard
tail gate from a junk yard and new components installed inside
in door speakers
replaced dash with another dash and vinyl dyed the dash to match original color
shift indicator from another truck
a/c system beneath the dash
a/c controls
ford heater core
steering column rebuilt with 2 other salvaged columns
steering wheel
entire vehicle and interior pieces decontaminated with hydrogen peroxed/dishsoap/baking soda in a pump sprayer (will remove/ sterilize the smell of death - tip for all you mass murderers out there)
fat mat insulation on all surfaces including entire firewall
dyna tape (rip off) and hvac tape (ecomical and fiscal and just as good)
left over heat shield insulation from toyota dealership which I had to use on my prius (long story - had to decontaminate the prius too - had the same problem - a infestation!) which was installed on the back side of every single interior panel
brand new carpet
brand new headliner
custom bench seat from a 99 dodge ram 1500
cab roof light kit installed on the roof
bumper
reese drop hitch modified and mounted to frame using high grade bolts
2 spare tires mounted in the bed
spare tire carrier beneath the bed restored and a 3rd tire installed
4 load rated tires
4 steel wheels with load rated tires bead blasted, sealed with self etching primer and white rustoleum enamel
true dual exhaust with flowmaster knockoffs installed and exhaust kicks out to either side of the spare tire and rear tank - sounds awesome!
removed the glued on side trim
realigned doors - one door received a new hinge - the other i salvaged a hinge from the junk yard and rebuild it with a pin kit
here are some of the latest pics. I should be finished installing the interior of the vehicle in the next two days. been slaving on this truck like a madman since the steering column situation had been solved


now these last couple of pics i'm including because i'm hitting a dead end. I can't remember how to properly install my rear seat brackets. I'm doing something wrong. can someone post a pic of their brackets or tell me what i'm doing wrong?! thanks!


#26
01-06-2016, 11:44 AM
#28
10-21-2020, 01:36 PM

The harness stays with the dash. You first must disconnect the harness on the engine side. It has one 10mm bolt in the center, back that out and pull the plug away, then you push the white part thru from the engine side. Also there is a nut up underneath the steering column that bolts the dash to the pedal assy. Easy to miss.
#29
10-21-2020, 02:09 PM
Wow. It's been a long time since I have been on. I experienced some extreme financial hardships and health problems and lost alot of memory. In order to stay afloat and keep food on the table I sold the truck for $3500. I should have hung onto it as it would have sold for much more now.
I've had to sell every classic car I have owned thus far for all th same reasons. Now I'm down to my grandpa's f100 which I won't sell and my Tacoma.
That f250 was a great truck. The custom bench seat I adapted from a 95 dodge ram 1500 40/20/40 split bench was what really made it aside from completely gutting the interior.
Sorry to deliver the bad news but when I got a notification on a post a update.
As the world especially the United States becomes more orwellian and our rights are sold out from underneath us by the people that represent us in exchange for third world health care, neverending war, stagnant wages that don't rise with inflation rates, all in the name of the destruction of the family unit, look to classic cars. We all must do our best to preserve these machines. It is a opportunity for family to bond with one another and create something that can be enjoyed and passed down from generation to generation. In the end the most important thing you can have is your good memories and your family. Grow that and nurture the idea creating a classic automotive restoration with your family and you will cherish those moments for the rest of your life.
#30
10-21-2020, 09:20 PM
Lead Driver
I experienced some extreme financial hardships and health problems and lost alot of memory. In order to stay afloat and keep food on the table I sold the truck for $3500. I should have hung onto it as it would have sold for much more now.
As the world especially the United States becomes more orwellian and our rights are sold out from underneath us by the people that represent us in exchange for third world health care, neverending war, stagnant wages that don't rise with inflation rates, all in the name of the destruction of the family unit, look to classic cars.
As the world especially the United States becomes more orwellian and our rights are sold out from underneath us by the people that represent us in exchange for third world health care, neverending war, stagnant wages that don't rise with inflation rates, all in the name of the destruction of the family unit, look to classic cars.