Supercab on an F600
#16
 12-17-2014, 07:39 PM

If you are doing the hydraulic change, the master will be able to make it so that the linkage will no longer be in the way. You will still want to likely put the mater up directly in front of the clutch rod on the pedals.
Thanks for the info on SWAG too, been looking to get some kind of press brake like that for a while.
Thanks for the info on SWAG too, been looking to get some kind of press brake like that for a while.
#17
12-26-2014, 09:36 AM
Ah the holidays.. the world becomes quiet and I can get to the shop without distraction.. taking advantage of it not raining (finally)
So.. a little progress on the cab and radiator mounts
The radiator support mounts are done (well I have to weld the backside when they are removed) 3/16 x 4" tube and 3/16" flat plate which I broke into an L shape
And the rear cab mounts are done and installed
I worked on the front mounts and hope to have them done before the end of the year...they require extensive reworking from my orginal design....especially around the steering box. The rearmost steeering box bolt will be a part of the cab mount bolts.... the passenger side required me to remove two frame rivets and replace them with bolts that will go through the cab mount bracket... then Ill move to the steering column.. it is my intent to see if I can adapt the hd column to the light duty body by drilling the appropriate holes and swapping the column support.. thats the idea anyway.. bringing the hd swing pedals along for the ride
After that its full on disassembly time.. steam clean everything.. sandblast the entire project... pull every assembly for a complete rebuild .. paint and put back together as a rolling chassis.. then look for a sano supercab body. Its actually nice having a junk cab because Im not arfraid to scratch it.. or cut on it to see how things might work
Heres a couple of shots of the mounts...
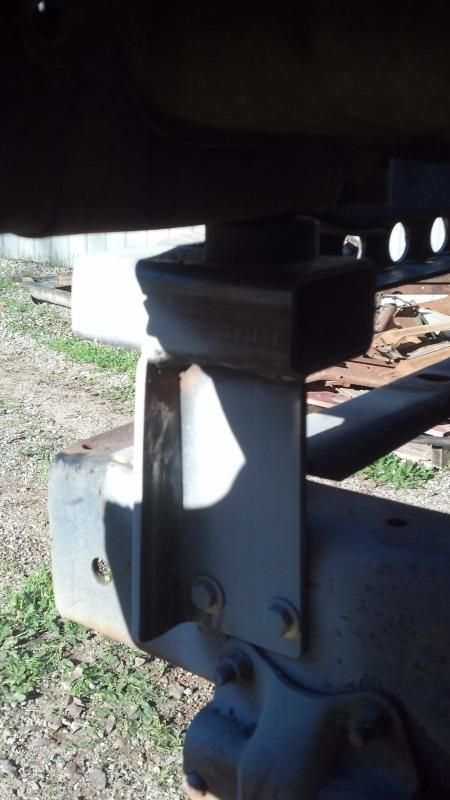
Radiator support side view
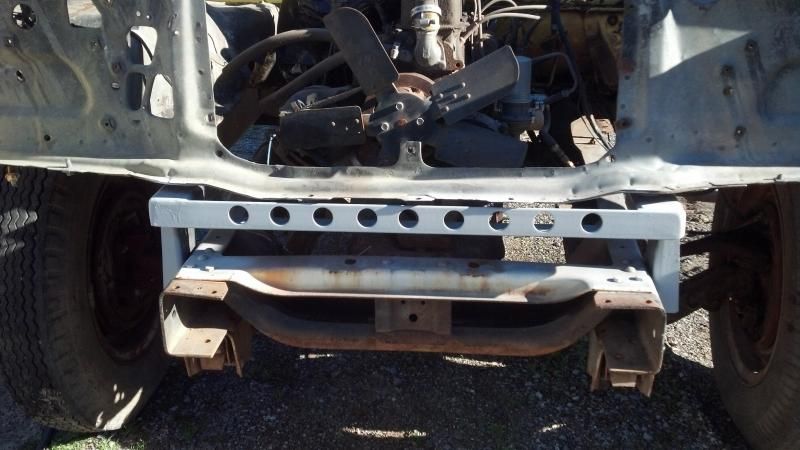
Radiator support-front view ( The Hd radiator sits deep down into the opening hence the holes to allow for airflow)
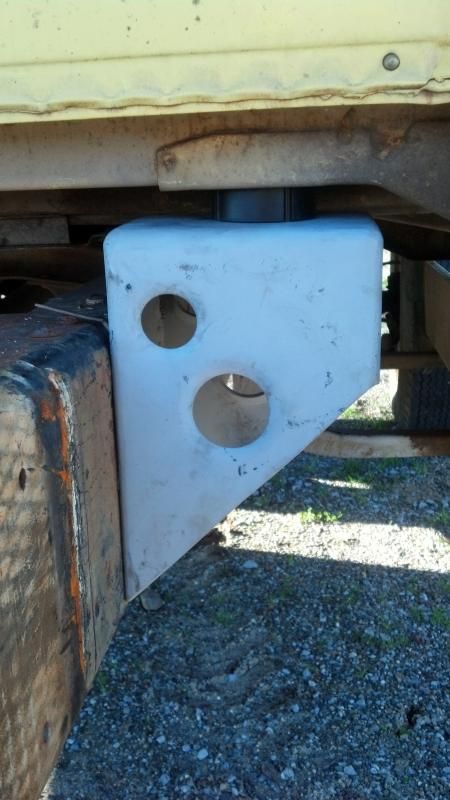
Rear cab mount (I bolted up the cab mount then clamped it to the frame for drilling.. I had pre-marked and drilled the holes in the bracket.. I ended up using 7/16 grd 8 1 1/4" bolts with washers and nylocs)
And a full view of both sides
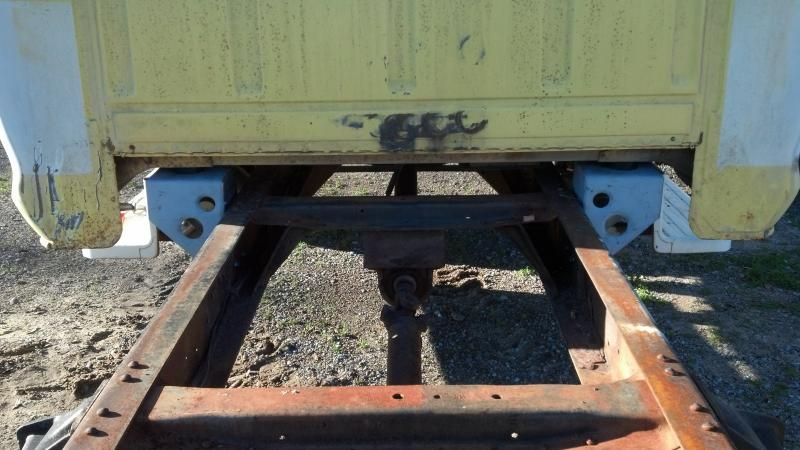
I used poly mounts...the factory bolts are 7/16 x 4.. I used 1/2 grade 8 because they fit and thats what I had in my bolt supply ... the poly mounts are smaller in diameter than the stock rubber mounts.. which is actually an advantage because they give me more mounting flexability with the front mounts where space is tight because of the large commerical tire diameter.. I love the dimpling.. once everything is painted a nice frame black they will stand out, The height of the cab off the frame was dictated where it get close to the frame more toward the front. The closest the body comes to the frame (crossmembers which arch up slightly) is about two inches which is plenty of clearance room. From the side it looks very natural in relation to the frame
People ask.. what am I going to do with this truck...
This is going to be a traveling truck... it will see yearly trips to Walt Disney World where we own Disney vacation club...
Its not being designed to be a puller.. It will never get loaded heavily.. think of it as an oversized HD extended cab pickup
Ill have a rear winch on it,,just in case I drive into something I shouldnt (theres also my f600 4 x 4 project waiting on the wings.. which Sam help me score a 300 for)
Ill probably single rear wheel convert it.. Im already looking at options on how to best accomplish this
Ill build a custom a flatbed with belly and top boxes (aluminum).. then find a contractor type shell for it. Im hoping once I build the motor properly I could potentially realize at least 12 mpg out of it driven conservatively... Ill get lots of use out of the 2 speed
Oh yes.. and it will need the most comfy interior possible.. maybe even air rides
My wife has already started calling it the "Disneymobile"
Get the wife involved and the budget gets better support !
So.. a little progress on the cab and radiator mounts
The radiator support mounts are done (well I have to weld the backside when they are removed) 3/16 x 4" tube and 3/16" flat plate which I broke into an L shape
And the rear cab mounts are done and installed
I worked on the front mounts and hope to have them done before the end of the year...they require extensive reworking from my orginal design....especially around the steering box. The rearmost steeering box bolt will be a part of the cab mount bolts.... the passenger side required me to remove two frame rivets and replace them with bolts that will go through the cab mount bracket... then Ill move to the steering column.. it is my intent to see if I can adapt the hd column to the light duty body by drilling the appropriate holes and swapping the column support.. thats the idea anyway.. bringing the hd swing pedals along for the ride
After that its full on disassembly time.. steam clean everything.. sandblast the entire project... pull every assembly for a complete rebuild .. paint and put back together as a rolling chassis.. then look for a sano supercab body. Its actually nice having a junk cab because Im not arfraid to scratch it.. or cut on it to see how things might work
Heres a couple of shots of the mounts...
Radiator support side view

Radiator support-front view ( The Hd radiator sits deep down into the opening hence the holes to allow for airflow)

Rear cab mount (I bolted up the cab mount then clamped it to the frame for drilling.. I had pre-marked and drilled the holes in the bracket.. I ended up using 7/16 grd 8 1 1/4" bolts with washers and nylocs)

And a full view of both sides

I used poly mounts...the factory bolts are 7/16 x 4.. I used 1/2 grade 8 because they fit and thats what I had in my bolt supply ... the poly mounts are smaller in diameter than the stock rubber mounts.. which is actually an advantage because they give me more mounting flexability with the front mounts where space is tight because of the large commerical tire diameter.. I love the dimpling.. once everything is painted a nice frame black they will stand out, The height of the cab off the frame was dictated where it get close to the frame more toward the front. The closest the body comes to the frame (crossmembers which arch up slightly) is about two inches which is plenty of clearance room. From the side it looks very natural in relation to the frame
People ask.. what am I going to do with this truck...
This is going to be a traveling truck... it will see yearly trips to Walt Disney World where we own Disney vacation club...
Its not being designed to be a puller.. It will never get loaded heavily.. think of it as an oversized HD extended cab pickup
Ill have a rear winch on it,,just in case I drive into something I shouldnt (theres also my f600 4 x 4 project waiting on the wings.. which Sam help me score a 300 for)
Ill probably single rear wheel convert it.. Im already looking at options on how to best accomplish this
Ill build a custom a flatbed with belly and top boxes (aluminum).. then find a contractor type shell for it. Im hoping once I build the motor properly I could potentially realize at least 12 mpg out of it driven conservatively... Ill get lots of use out of the 2 speed
Oh yes.. and it will need the most comfy interior possible.. maybe even air rides
My wife has already started calling it the "Disneymobile"
Get the wife involved and the budget gets better support !
#18
12-29-2014, 09:51 AM
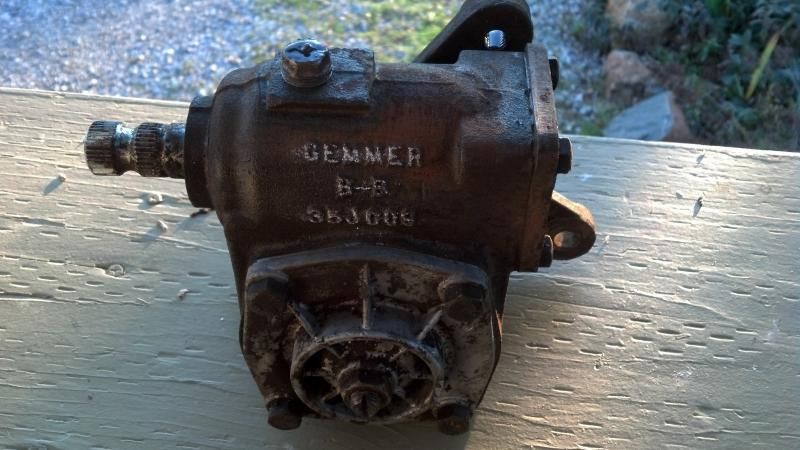
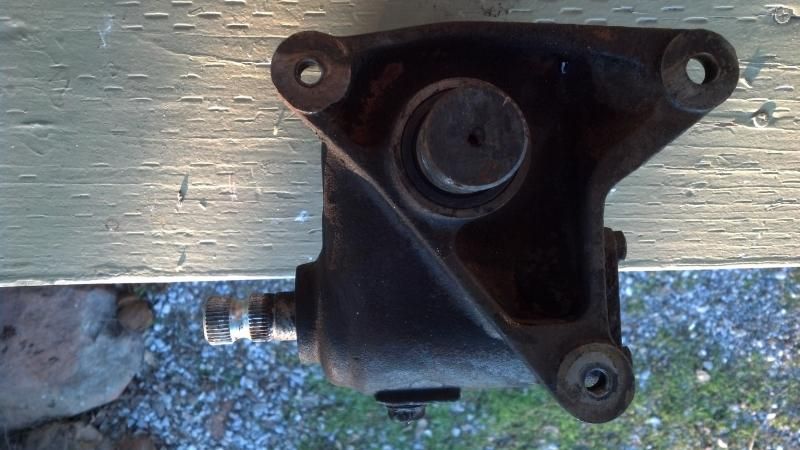
So.. I pulled the manaul steering box for a remanufacture of it (Im going to send it to Red-Head in Seattle)
If is a GEMMER #35JG09 manual steering box
I would love to find a power steering box that would work but the chances are ...next to zero..
If anyone has a source for a box please let me know. I tried the later PS box from a 73-79 f600 and it is massive in comparison.. and the shaft was larger

If is a GEMMER #35JG09 manual steering box
I would love to find a power steering box that would work but the chances are ...next to zero..
If anyone has a source for a box please let me know. I tried the later PS box from a 73-79 f600 and it is massive in comparison.. and the shaft was larger


#20
12-30-2014, 08:01 AM
Thanks
I spoke with red head about my box but they were going to send it to someone else... so I'll disassemble it myself... at least put a seal in it..
But I'm hoping I can find a power steering crossover so wife can drive on long trips as well
#21
01-01-2015, 09:21 PM
I'll have to get the pics loaded, as much help as they may be...
I did measure the steering arm shaft, and it was right about 1 1/2" diameter. If the numnber is in the same place as yours, it could be a pain to get to. I will see about that maybe Saturday before the snow starts hopefully... it's a dirty pig on the box.
I did measure the steering arm shaft, and it was right about 1 1/2" diameter. If the numnber is in the same place as yours, it could be a pain to get to. I will see about that maybe Saturday before the snow starts hopefully... it's a dirty pig on the box.
#22
02-11-2016, 12:28 PM

Elder User
Join Date: Dec 2010
Location: Liberty Hill, Tx
Posts: 618
Likes: 0
Received 0 Likes
on
0 Posts
#23
02-12-2016, 07:53 AM
#24
11-06-2016, 01:15 PM

Junior User
Join Date: Nov 2015
Location: Thunder Bay, Ontario
Posts: 60
Likes: 0
Received 0 Likes
on
0 Posts
#25
11-06-2016, 06:33 PM
Hi Josh
Its still sitting in the shop... Im so deep into the other trucks Im restoring I have no time for it yet
But its far from dead
I have all the mechanical parts sitting on pallets,, NP 435 ..300 forged sixes.. etc..
Maybe next year
Im just finishing up my f600 service truck..
It comes down to budget... most of my stuff is done low buck or on tradeouts...
Have to take momma to Disney regularly or she squeaks!
Thanks
I did rebuild the manual gemmer box.. saving the PS for the F600 4 x 4 sitting right next to it.
#27
11-12-2016, 06:48 AM
You remember the truck... it looks like this

And you all know what this is... a sacrificial frame slice off of a f600 that I scrapped out...
Are your heads spinning yet... what am I going to do with it...
Frame splice obviously...

So the truck is going from a SWB to a LWB..
Im going to use the 45 degree method...with welded diamond fish plates on the inner channel at the cuts... then bolted outer plates the entire length plus 24" on each end on the outer rails... and skip welded plating on the top and bottom rail.
Anyone like another method more than this one.. or see any issues I'm missing?
Now.. what am I going to do with it you ask?
In the back of my mind Ive always wanted a car carrier... I mean I have a F350 tow truck "son of mater" in resto process right now. I have amassed enough parts and trucks to build one out of an f350 .. and then I was thinking.. I have a gaggle of f600s sitting around and this supercab project (300 six 2 speed rear) and I got to thinking this would be the perfect chassis to build one out of...
So that's the plan
A couple of belly tool boxes... an open rail bed design..beavertail drop rear with shorty ramps. Im sure if I lll go steel or aluminum yet...simple yet functional. Big fuel tank and a killer winch.
The supercab lends itself to building an ultra comfy road truck.. who knows.. suspension seats..lots of sound mat... bed lined working man interior and exterior
Id like to figure out how to lower the truck.. Ive looked at it before with no really good plan... but a lo-pro design would be way cool and functional.. wheels could be designed in 19.5 but no good way I can see to lower the suspension and steering components
FTE is all about ideas.. mild to wild
#28
11-12-2016, 07:24 AM
You remember the truck... It started like this

And now it looks like this
Are your heads spinning yet... what am I going to do with it...
(BTW.. in the foreground in that picture is a stock expedition bumper.. and a severe duty rear tire carrier bumper I built to replace it... its going on the "Help me build my $200.00 Expedition" project I have going on in the 99-03 expedition forum)

And you all know what this is... a sacrificial frame slice off of a f600 that I scrapped out...
Cut at a 45...
So the truck is going from a SWB to a LWB..
Im going to use the 45 degree method...with welded diamond fishplates on the inner channel at the cuts... then bolted outer plates the entire length plus 24" on each end on the outer rails... and skip welded plating on the top and bottom rail.
Anyone like another method more than this one.. or see any issues Im missing?
Now.. what am I going to do with it you ask?
In the back of my mind Ive always wanted a car carrier... I mean I have a F350 tow truck "son of mater" in resto process right now.

I have amassed enough parts and trucks to build one out of an f350 .. and then I was thinking.. I have a gaggle of f600s sitting around and this supercab project (300 six 2 speed rear) and I got to thinking this would be the perfect chassis to build one out of...
So thats the plan
A couple of belly tool boxes... an open rail bed design..beavertail drop rear with shorty ramps. Im not sure if I lll go steel or aluminum yet...simple yet functional. Big fuel tank and a killer winch.
The supercab lends itself to building an ultra comfy road truck.. who knows.. suspension seats..lots of sound mat... bed lined working man interior and exterior
Id like to figure out how to lower the truck.. Ive looked at it before with no really good plan... but a lo-pro design would be way cool and functional.. wheels could be designed in 19.5 but no good way I can see to lower the suspension and steering components
FTE is all about ideas.. mild to wild
So far this F600 supercab project has been free.. all the parts and trucks utilized were bought and parted and I kept what I wanted
FREE IS GOOD
I have very adept truck critics watching me... here's a couple looking in while I make car carrier plans

This week Im scoring a light duty rust free Camper special... Im going to sell the bed which will pay for the truck. make it into a LWB and throw a service body on it that I have had laying around... like I need a seventh truck project

FTE makes me very sick... my wife has nicknamed me "Dr Truckenstein"

(This was my first attempt at sign making.. I just bought a 32 inch machine.. so I can make signs for all my trucks.. not real ones mind you..Im semi retired now,, but for the cool factor to personalize them)
To make amends for all my FTE sickness I had to stop and do a little project for her... mounted on the dash of the mommie truck...

Now.. dont tell me any of you manly men dont stop all projects in their tracks when mommie says.. "make me this whatever gismo art..doodle dust collector stuff junk"
You do.. you know you do... that is if you like to eat....and even more importantly dont find the recliner as your permanent place in the house


#30
11-12-2016, 10:09 AM
Gosh...good memory..we bought into Disney vacation club and have three months a year there to use in their resorts now .. it's our winter getaway..especially if we move
So..yes..while this truck is repurposed there is one last f600 I've been saving in the back of the shop..and that's my 79 f600 4 x 4... It's frame and axles are all restored... I'm going to look for a clean supercab for it ..using this current truck as a test bed... I still want to build an aluminum chassis mount cab over camper...same concept..but the last of the beasts...and the nicest components...
This project has already taught me the following... A supercab conversion in regards to body mount relocation isn't hard... Build a new rear cross member using standard light duty body mount... Poly...
The front mount doesn't require all the fab work I did.. you could easily repurpose the front f 600 cab mount ...the only thing you would have to do is
Reinforce the floor
Make a mount utilizing an OEM mount with appropriate spacer..aluminum perhaps to take up the inch or two of needed space..
Then you could drill out the spot welds on the light duty front cab body mount and remove it all together... This came to me today after looking at it probably a thousand times.. which would be easier than all the work I did...I may actually do it on this truck as the cab needs floors anyway
So..it's funny this came up in my consciousness today because the power nation trucks program did a segment on four linking and air bagging a Rockwell on today's show..the truck drops twelve inches to load their off road truck into... Definitely worth looking into abet probably 3k cost
They used this company's components for the air ride
https://accuair.com/classic/products/air-management
And BALLISTIC FAB for all the roc four link baby parts...since my roc is civilian I would have to design the roc carrier mount... But it's pretty basic.
I'm not sure if there would be any weight savings as the four links are .250 wall... And shocks get added..as well as .250 airbag mounts
Lots of steel...but oh the cool utility factor and comfort... Good enough for tractor trailers...
Lots of trucks in line right now.. from 15-95 percent done... Once I get some of them rolling who knows where I'll go with the Disney mobile project...I know one thing . I hate flying anymore..and I want to avoid it when I can...
Thanks