When you click on links to various merchants on this site and make a purchase, this can result in this site earning a commission. Affiliate programs and affiliations include, but are not limited to, the eBay Partner Network.
hello all... I just traded my 1930 pontiac hotrod I built for a 56 ford f100. Absolutely in love with the truck, it has a chevy motor /th350/ford 9", toyota power steering, and a disc brake conversion. most of the work is pretty clean, but the wiring seems to be a nightmare. this is also air over leaf in the rear, which I might 4link and maintain the air.
My major question is, how do I remove the ignition/interior light/headlight switches and cigarette lighter to aid in my rewiring of the truck? Seems a bit crazy to do all that work from the backside, do they come out easy?
Also, what causes the big door gap I have up top when the door is shut? Is there an easy place to adjust the striker?
Here are some pics of the truck. I just got paint to blend in the primer areas. I am a metal fab guy/metalshaper so none of the building/fab stuff scares me. Heres some pics of it.
That's a great looking truck! And your hotrod is nice also. That trade must have been a hard decision to make.
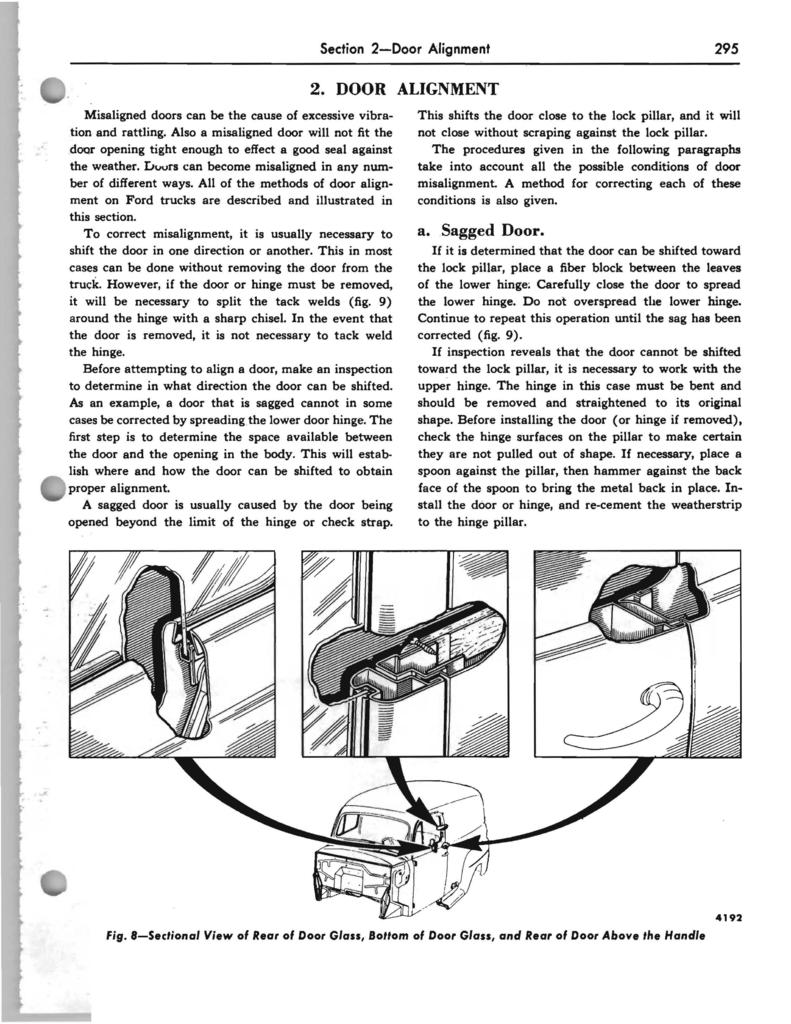
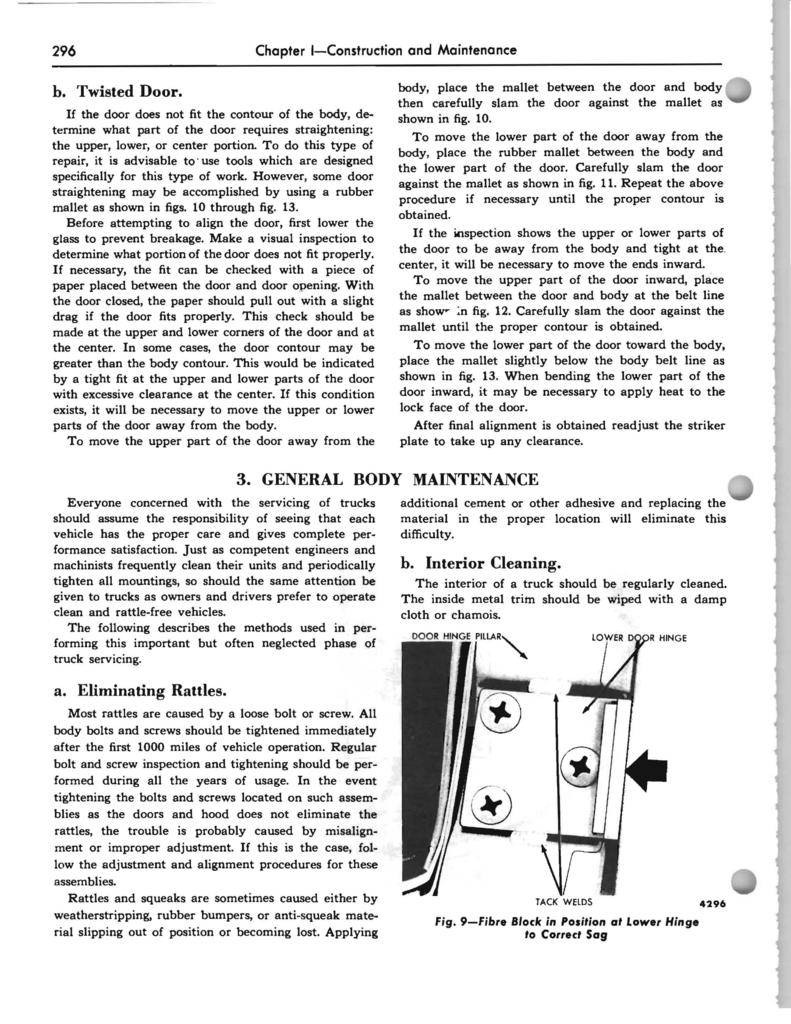
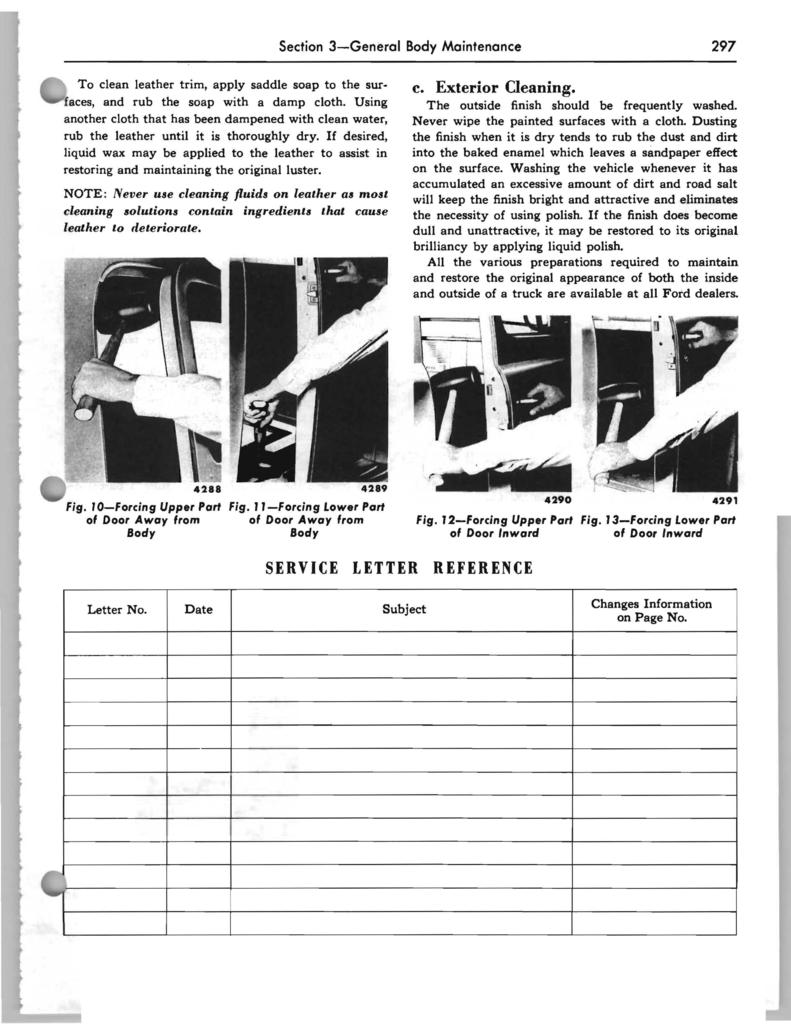
I am not familiar with the door adjustments on the "newer" trucks, but on the Bonus Builts, the adjustment in the Shop Manual is basically forcing the errant door into position by bracing against a mallet or such. For example, if the top is out too far, you stick a mallet head down low and force the door against it.
Here's the info from the 48-52 Shop Manual. You really should get one for your year.
Welcome! I'm not versed on the bezelyou have. The Bonus Built"s have quarter turn (counter clockwise) process. The light switch has a pressure clip relieved with a screw driver blade. The Shop Manual is a great resource for these type of questions.
On the switch itself, there is a button that you push to remove the "stalk". Reach behind the dash and push that button in and pull the **** and then the stalk comes right out. Then unscrew the bezel to get the switch off the dash.
To remove the post you must insert a small screwdriver through the slot to press in on the brass colored keeper pictured. The small slot is visible as you look up at it in the dash. The chrome bezel un screws.
Note: 48-52 use old technology/parts info not applicable to 53-56. I wrote a detailed response to this that went POOF! into cyberspace when I tried to post it and the forum once again decided I took too long to write it! THAT IS SO FRUSTRATING!!!
If I get enough time and over my aggravation I will rewrite the door adjustment part (you DONT bend the hinges on the 53-56 like in the 48-52 manual!), but to answer the dash **** question applicable to the 53-56:
Light switch: reach up to the top of the switch mechanism and find the spring loaded button near the dash. While holding it down, pull on the **** until the **** and shaft comes out of the dash.
Rest of *****: locate set screw on bottom of **** near dash. loosen set screw (don't remove or lose!) until **** can be pulled off switch or cable.
Bezels to free switch or cable: If you look there are two slots in bezel near center. You can buy a special spanner wrench to unscrew them or make your own by cutting a 3/4" deep notch of appropriate width in an appropriate width and thickness piece of light flat stock ~ 6" long. Put the last 3/8" of the notched end in a vise and bend to near right angle. Use as wrench in slots and unscrew bezel. Or finally if you don't plan on reusing them or are very careful you can place the end of a flat screwdriver in one of the slots at a shallow angle and tap with a light hammer to loosen/turn the bezel until it can be unscrewed by hand. Now the switch/cable can be removed from behind the dash.
Quality 12V universal color coded wire with the circuit name printed on the wire every 6" wiring harnesses can be obtained with 12-21 circuit fuse blocks for < 175.00 From EZ Wiring, Rebel, Speedway Motors and several others. It is not necessary to spend the "big bucks" from the heavily advertised "name" manufacturers. Wire is wire, let someone else pay for the advertising. It is a very good idea to replace all the 60 year old deteriorating wire and connectors with completely new, and it's not very difficult to do. Better and cheaper than breaking down on the side of the road or watching your truck burn to the ground when an old wire shorts out!
Note: 48-52 use old technology/parts info not applicable to 53-56. If I get enough time and over my aggravation I will rewrite the door adjustment part (you DONT bend the hinges on the 53-56 like in the 48-52 manual!)
I should stop trying to help guys with the newer trucks.
Note: 48-52 use old technology/parts info not applicable to 53-56. I wrote a detailed response to this that went POOF! into cyberspace when I tried to post it and the forum once again decided I took too long to write it! THAT IS SO FRUSTRATING!!!
If I get enough time and over my aggravation I will rewrite the door adjustment part (you DONT bend the hinges on the 53-56 like in the 48-52 manual!)!
AX
I find it best to write long comments in word, notepad etc. Once I'm done, checked it out, and make any adjustments I copy and paste it into a reply!
That's a great looking truck! those wide whites really set off the paint scheme.
When I wired up my truck I used a harness from EZ Wiring. I used the 21 circuit harness and was (am) very pleased with it. It was a reasonable price, very good quality, the wires are all color coded and labeled, etc. Well worth it.
Welcome to FTE
Great looking truck. And pictures so soon.
Agree that changing the 55 plus year old wiring is the way to go. And it's pretty simple. If you need parts MidFiftys is a good start. If your looking for wiring (Fle)eBay has several different sets most of the time. You might want to do a search as to who has the best tech staff. Enjoy the Ride
I prefer the panels that are not "prewired" so that you only have the wires there that you need, and you don't have to clip and terminate any that you don't.
 11-11-2014, 02:55 PM


 /th350/ford 9", toyota power steering, and a disc brake conversion. most of the work is pretty clean, but the wiring seems to be a nightmare. this is also air over leaf in the rear, which I might 4link and maintain the air.