When you click on links to various merchants on this site and make a purchase, this can result in this site earning a commission. Affiliate programs and affiliations include, but are not limited to, the eBay Partner Network.
Here is a story that I hope no one finds useful. The unfortunate fact is that, indeed, some will find it useful. Thus, I submit the following.
It involves a collision that causes significant damage to an 1976 F-150 rear wheel drive, including frame damage that we deal with first. If that can't be fixed, then nothing else matters. I hope that this will turn out well but I've just begun. So, on with the story.
We start with the purchase of a wrecked 1976 F-150 and the process of discovering just how bad the damage is. The hood and right front fender were untouched. That's the good news. The left front fender, grille and bumper are toast. Removing the mangled parts reveals that the front frame horns are in bad shape. So, off with the entire front clip so that the damage can be fully assessed. Here's what was discovered.
Damage assessment: 1976 F-150
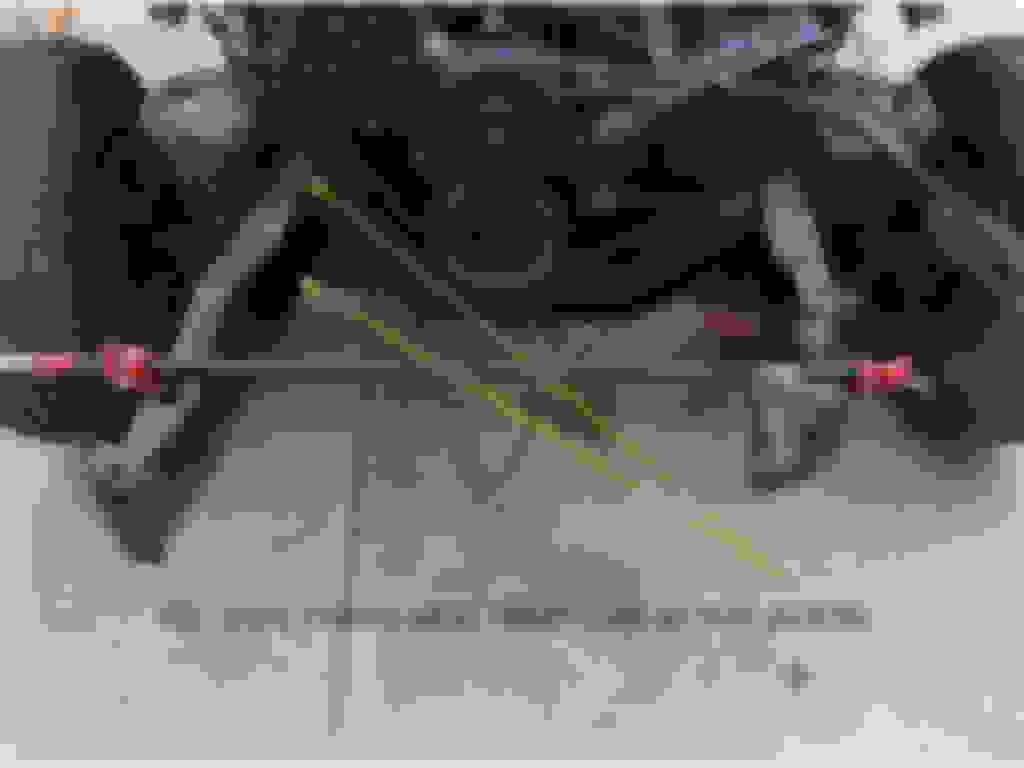
So what should it look like? Here's an analysis of the passenger side frame rail:
What it should look like.
Closeup of reference vehicle.
So, here comes the damage:
Closeup of break points (passenger side)
Where the frame rail was torn.
Upper and lower frame rail tears
Comparing the reference vehicle to the patient, we see a big difference on the passenger side.
What it is vs what it should be.
So the big and unanswered question is, "Can we fix this puppy?" I'm no automotive expert so the outcome is by no means assured. My last build was 30 years ago (1933 Chev street rod) and much has changed since then. This is the first of what I hope will be a long list of retirement projects.
I say "we" because I fervently hope to get lots of advice and counsel from the many wizened ones here.
I believe more measurements are required. We know the snout forward of of the front crossmember was moved to the right but what about the frame section behind it? Are the cab mounts still square?
Newton's first law of motion is that an object in motion continues in motion with the same speed and in the same direction unless acted upon by an external force (the law of inertia). Any shift of the cab when the moment suddenly changed direction? Any ripples or other deformities of the frame rails? Do you see parts of the crossmember their intersections with the frame that were not previously exposed?
I suggest putting the vehicle on a level surface and up on jack stands then hanging bobs (or what ever is handy like nuts tied to fishing line) from identical points on each frame rail and measure the diagonals to see if the frame is still square. Also measure the wheelbase. If the frame is bowed, then the passenger side will be shorter than the driver's side.
Keep fingers crossed.
EDIT.. okay, here's the hot rodder in me brainstorming... since the Dent's nose is wrecked, I would consider grafting (welding/finishing) the 92-96 F-series "aero" grill, core support, headlights, hood lip, and parts of front fenders to the truck.
Can it be fixed?....Maybe. Can it be done properly?...Maybe. Is it going to be quick, easy and or cheap?...No. Will it be cost effective? Probably not, but then again what is when your talking about restoring or hot rodding a vehicle to life. What I would recommend is that you either take it to a good frame shop for straightening(at least). Or if you have a friend or relative in the collision industry with frame straightening experience to do the work properly. The reason is just like HIO mentioned. You may have several areas of the frame that need repaired. Even if the frame is out of square (IE diamond) as it is referred to in the industry. It can be brought back into square. It can be quite simple to do, it just requires a lot of pulling force. But then again so will that front section. Also a good rule of thumb to keep in mind when it comes to repair vs. replace. Is the kink vs. bend rule. If a piece of metal is bent more then 90 degrees it should be replaced. Also when pulling a frame back into shape a lot of guys heat the metal cherry red. That is a no no. Don't do that as that will fatigue the metal, thus causing stress cracks later. Another thing that you'll want to be sure to inspect thoroughly are the motor mounts. They are often times over looked and are torn to shreds. I can tell just from looking at those pics. as well that the entire front section is not only crinkled, but it also has a side sway. That in it self can pose an even more fatal blow to being able to repair the frame. And that is the front cross member(aka engine cradle) could be bent as well. If that is the case then the frame is definitely junk and will need to be replaced. Sorry I forgot to mention that earlier. Just another reason to have it checked by a good frame tech. Hope this helps. And good luck with your project.
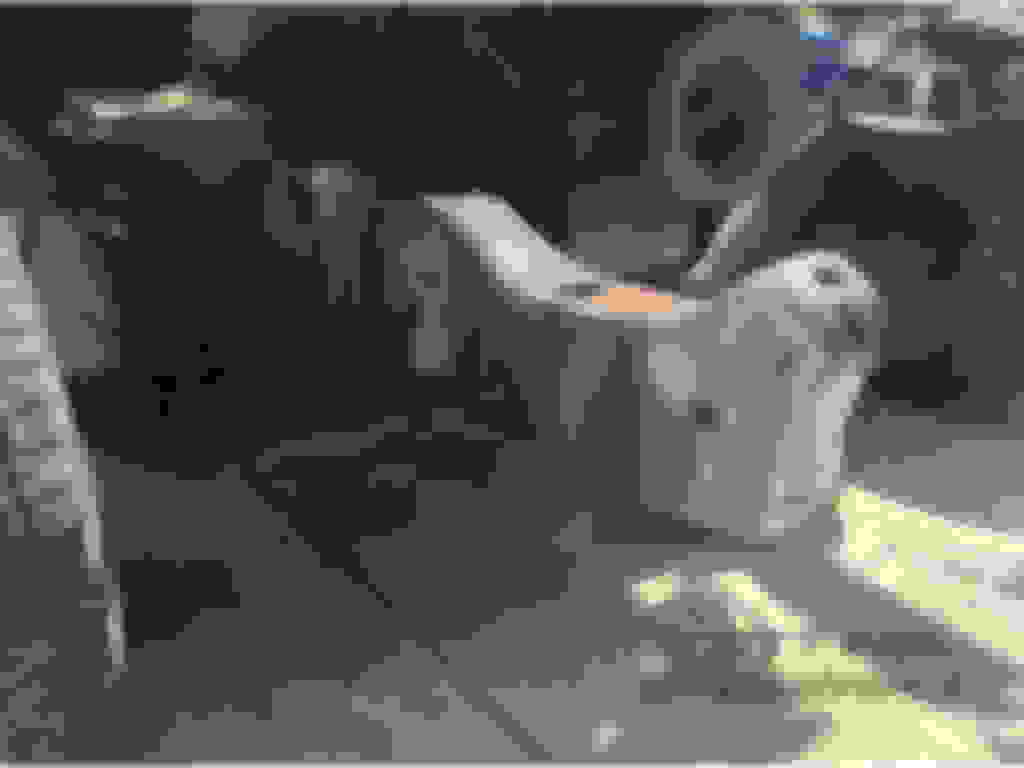
Here's a first pass on getting the passenger side frame horn roughly back to where it ought to be. Refinement can come later. As we saw, this rail was bent outward toward the passenger side wheel to the point where there was a small tear on the upper rail and a broken weld plus a small tear on the lower rail. So, I started by setting up a 48" pipe clamp and expanding those tears into relief cuts.
Here's a view of the lower rail relief cut from underneath. While there, we see a frame alignment pin. There are two of these ahead of the engine crossmember and two more on the centerline of the axles. I expect that these will be important reference points.
Next, I applied some heat using an acetylene torch. Heat, squeeze, heat, squeeze, reposition clamp, repeat, repeat, repeat. The pipe wrench helped me prevent the pipe from rotating during the tightening sequence.
As I worked the pipe clamp, it became necessary to expand the relief cut on the top rail.
Here's a better view of the distortion on the top rail. Eventually, this will need to be brought back down to the proper level and welded.
The lower farm rail did not distort as much. Here, a weld and a rivet provided more resistance than the top rail could muster.
Moving to the front of the passenger side frame rail where the bumper mount is folded in like a clenched fist, I placed a 4 ton hydraulic ram against the beefiest part of the engine crossmember. I wound up using two different ends to push the metal out. The key is to heat those areas that you want to move. Imagining the bending process during the collision helps one develop the tactics to reverse that process.
Here's another, closer view of the fixture used and its placement.
So, here I have a rough approximation of what this frame rail should look like.
Here is the view of the inside of this frame rail.
Next, I will try to get the driver's side frame rail roughed into position. That may be the bigger challenge. When and if both frame rails are roughly where they ought to be, I can start using some of those frame alignment suggestions. This part of the frame has two critical functions. Most importantly, locating the radiator crossmember. This is a key reference point for everything on the front clip.The second function is locating the bumper which is aesthetically important.
From what I see so far, the damage appears to stop at the engine crossmember. Careful measurements will confirm or deny that impression.
This truck was initially purchased as a parts source. It has a very fresh 390/C6 and a number of other nice parts that I was going to use with my F-100. After some thought though, I came to the conclusion that it would be a shame to part the F-150 out without first trying to fix it. On top of that, the plan for the F-100 had become more elaborate (bigger engine, IFS, etc.).
So we'll just have to wait and see how this turns out.
I just love how lately there has been what seems to be a growing number of newer users/members here that start posts like this one. Asking for advice and when given the advice they completely ignore it, and/or cop an attitude toward those that gave their advice. Not saying that this OP has copped an attitude. cause he hasn't. But yet at the same time he completely ignored the advice given and started his repair all the wrong way. I just don't get it.
I just love how lately there has been what seems to be a growing number of newer users/members here that start posts like this one. Asking for advice and when given the advice they completely ignore it, and/or cop an attitude toward those that gave their advice. Not saying that this OP has copped an attitude. cause he hasn't. But yet at the same time he completely ignored the advice given and started his repair all the wrong way. I just don't get it.
If it is still tweaked after the 'repair', then it would have been a TON of work for NOTHING.
Pesonally, I'd rather work with solid information and numbers knowing what I am working with and a planned action and courses of alternatives. Then there are this who would rather fly by the seat of their pants and use Kentucky windage (Take the president's foreign policy for example...)
You can lead a horse but if it don't drink at the trough, then maybe he does deserve a bullet between the eyes. Or something like that...
<snip> But yet at the same time he completely ignored the advice given and started his repair all the wrong way. I just don't get it.
I hope you don't think that I'm "copping an attitude" but let's look at the advice tendered so far:
@paredneck33: "take it to a good frame shop" Good advice if the damage is not confined to the front frame horns or if I doubt my ability to deal with that part of it. So far I don't think that either is the case. Subsequent events may prove otherwise and, so, I may wind up taking it to a "pro" in the end. For now, I'm enjoying the challenge.
@ TheStuffz: "get a new frame" This might be the best way to go if the frame is damaged further back than I think it is. Again, my current impression is that the damage is confined to the front frame horns.
@HIO Silver: measure (wheelbase, plum, etc.), plan, consult Ford's frame/body layout books for factory dimensions. All good advice. I did measure the wheelbase and its the same on both sides but I would like to do more and I will. I had previously consulted the chassis diagrams and found them wanting but on this recommendation visited them again in case I'd missed something. I hadn't. They just don't provide any usable dimensions for frame alignment. They don't even show the alignment pins. This critical data may be in an as yet unscanned document. This section is, after all, under construction. Fortunately, I have a perfectly undamaged F-100 partly disassembled so I can get the measurements that I need from it.
@HIO Silver also suggests customizing the front end and has some cool ideas on what he'd do. I think that I've collected all of the parts I need to restore (left fender, grille and bumper) so I'm not going to follow that suggestion. However, I do have a '77 sCab that I would like to mount on an '88 Aerostar frame making it a COE dent! Weird, right? That's a ways down the road though.
So, I'm grateful for all the advice so far and have considered it all carefully. The fact that I haven't followed every bit of it should't be a concern. For one thing, it would be impossible to do that. As for the effort involved, that's trivial to me. I'm enjoying the challenge and enjoying getting back to working on physical objects instead of abstract stuff.
Without updating us (not that it is a requirement per se) it kinda leaves us in the dark on what was evaluated, your thought process, and course of action. We're not there to directly observe so providing some background would help us understand better. And there's another truck from which to take measurements... Cool! I'd do the same thing.
And on the body mods... I've been jonesing for a 92-96 but can't bare to subject myself to CA's emissions testing. It's a friggin' hassle and takes the fun out of creativity... and my liberty. That was one way of getting the aero benefits.
flowney I don't think that you are copping an attitude. Nor did I mean to imply that you don't have the skills needed to do the repair. And for that I apologize. However there are other factors for my suggesting that you should take it to a good frame shop. And the speed of the repair is NOT one of them. But what is, is the fact that you are working with at least 35 year old fatigued metal. Which is part of the reason I instructed that you do NOT heat the metal. As this method no only promotes metal fatigue, but also now will promote rust faster. You may think that metal fatigue isn't important in that section of the frame, since it mainly just supports the rad. support and bumper. But here's something that you probably didn't consider. In the event that the truck gets hit in the front end again, that area will then crumple faster and more severe than it did the last time, and at a far more point then it was designed. Thus making the risk of occupant injury/death greater. And if you resell the truck after it is built you will now carry all the same liability for this happening as a collision and frame tech would have. You may not think that's a big deal. But think about this. There have been plenty of body and frame guys that have lost everything they own and spent time in prison for repairs that haven't been done correctly. Therefore the main reason that I suggested that you take the frame to a good frame shop is the fact that they have the equipment to make the necessary repairs with out having to use a oxy acetylene torch.
Believe me I'm all for people taking the initiative of trying new things. Especially when it comes to things that most everyone finds intimidating as this and other forms of metal work. Or even an engine or other driveline component rebuild. But at the same time I also believe that, that person should take the time to properly educate themselves so they can do the job correctly and safely. And that was the main point of my last couple posts in this thread.
It looks like the passenger side did not take much damage and you are headed down the right path for getting it back to square. For the driver side, it looks pretty mangled. Have you considered grafting a frame section from another truck onto your frame? Rather than dumping a hot of heat and time into it, just chop, measure and weld in the new section that you need

 08-28-2014, 06:36 PM