292 Revival
#166
 10-25-2015, 06:35 PM

I also doubted the holes somewhat as i had the engine idling at 600 in park when i first got the engine running. If the holes were the cause then i should have had this issue from the beginning. Just have had a lot of time to think on this.
#167
10-31-2015, 04:13 PM
well I found the problem. After I changed the two mounting gaskets as they were soaked in gasoline no difference was made. I turned the idle screw out some more no change then I grabbed the throttle and manually tugged on it and the engine idled down more. So my problem is the throttle shaft is sticking and wont return to full idle. That's why some times after reving the engine the idle speed actually drops more. I wont be replacing this carb as I had plans to put the holley 4000 back on with the original intake.
#168
11-08-2015, 10:09 PM
Just a post to share a video I took the other day after making my throttle bell crank adjustments. this video is at the exhaust, engine is in gear wheel chock and hand brake holding the car in place. Idle speed is 550 rpm. I need to idle it down a little bit more to 450 rpm but I haven't had the time to do that just yet.
#170
11-09-2015, 10:57 AM
Logistics Pro
#171
04-23-2016, 05:41 PM
Long time since I made a post in here. I got a little help from a old timer that works building engines next door at work to where I work at. He gave me some pointers as I told him I just cant seem to get carbs set right. To my ear I can turn them till they smooth out and keep turning them and they don't seem to change. He gave me a tip to turn each side in till the engine runs rough then turn out till the vacuum starts to drop off then turn back in to reach peak vacuum then leave it alone. Then reset idle speed then do other idle mixture.
I did this and I was able to get the engine to run a lot smoother. I am currently uploading three videos right now to YouTube. One is a full hot idle in park at 650 rpm, second video is full hot idle in gear at 550 rpm, and the third video is a hot restart without hitting the throttle from inside the car.
On a side note I played with the accelerator pump setting, to tune the carb better today, I noticed if you hit the throttle to the floor via pedal quickly theres like a hesitation in there. So I played with the position, I ended up settling on inside position on the accelerator pump arm and in hole #4 on the throttle adjustment. It was hole #2 at the bottom it just wasn't squirting much fuel.
I then did a road test, still cant drive the car on the road but I did a little quick drive on the street just to try things out. Just doesn't seem to have power but I did a scientific test by using my '82 truck parked in same spot and about the same throttle for a comparison. Seems the '56 at half to three quarter throttle will hit 20 mph in what I would guestimate to be about 90-95 feet. I used my '82 F150 and did about half to three quarter throttle from the same spot and stopping at the same spot and only reached a top speed of just at 15 mph. My truck seems to pull harder but the car just doesn't seem to pull.
Now the thing is you step down on the throttle to the floor just doesn't seem peppy and I never felt a transmission shift given I only got up to 20 mph at half to three quarter throttle. But I am seriously contemplating resetting my points so I can reset timing. I just have this gut feeling the timing is set at 8* btdc which is factory spec. I think I need to bump it up to 11*.
This is one thing the engine guy I talked to has stressed to me, he told me Ford doesn't like a whole lot of total timing to lock the dist to no more than 30 to 35 degrees of total advance. Given this is vacuum only advance unit which might not be functioning properly using a late model 2100 2bbl carb (don't worry I will be putting the correct dual can load o matic advance on the dist with the original Holley 4000 I think that's some of my performance problems). Another thing is he also told me it will bump up fuel economy as well as make the engine run cooler. This cooler part I need to investigate cause my temp got up to the 3/4 mark on the normal range. Up to now with the cooler weather can let her idle for an hour straight wont get past the 1/4 mark of the normal range.
Another thing to note is the last trial I did of flooring the throttle from a standstill for the so called "fast get away" first gear pull the carb popped back through it and stalled out. Cranked on it a bit to get it to start again. I might move the accelerator pump out to the outter hole on the pump lever as that's the last adjustment I have to spray more fuel. It was popping without aircleaner on when going wide open throttle quickly on a rev on the lower settings for the pump. But I still think its a timing issue and like to rule that out.
Just some stuff I need to check out. My cross member is rotten a little for the front mount for the lower control arm, but I hit the gutter pulling into the drive multiple times hard enough to rock the car side to side and no signs of give. Not the same as driving the car on crappy Houston roads at 35+ mph. But that gives some comfort to me that if I can get the title transfer done and get it registered as an antique I might take the back roads that is smoother to work just to drive her some.
I will do a follow up post to link the three videos here. I'm still not happy enough yet to make the videos searchable on YouTube but they will be eventually.
#172
04-23-2016, 07:04 PM
As was promised here are my uploads.
First video, full hot idle in park. Idle speed last time I checked it was at 650 rpm.
Second video, full hot idle in drive. Idle speed last time I checked it was at 550 rpm.
Final video, this is a hot restart taken after car has sat about 5 minutes after being shut off.
One thing I still need to fix is the ignition switch tumbler, thing wont go into accessory. I don't know why, I replaced the ignition switch but reused my old tumbler. I been meaning to purchase a whole complete lock set and taking the original ignition tumbler and having the door and ignition tumbler on the new set rekeyed to the original pattern for the car then having two reproduction keys made off the original pattern.
~Update~
I don't know if I ever posted photos of the car, but here are a few pictures taken recently. First two pictures is taken last Saturday after I replaced the last tire on the car that was a 30+ yo biasply tire. It was an Atlas brand.
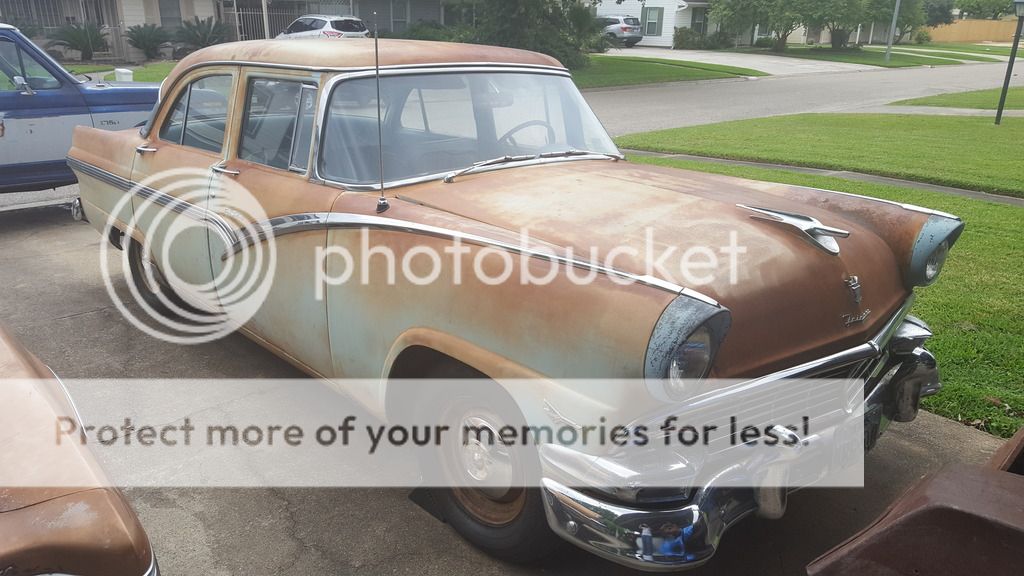
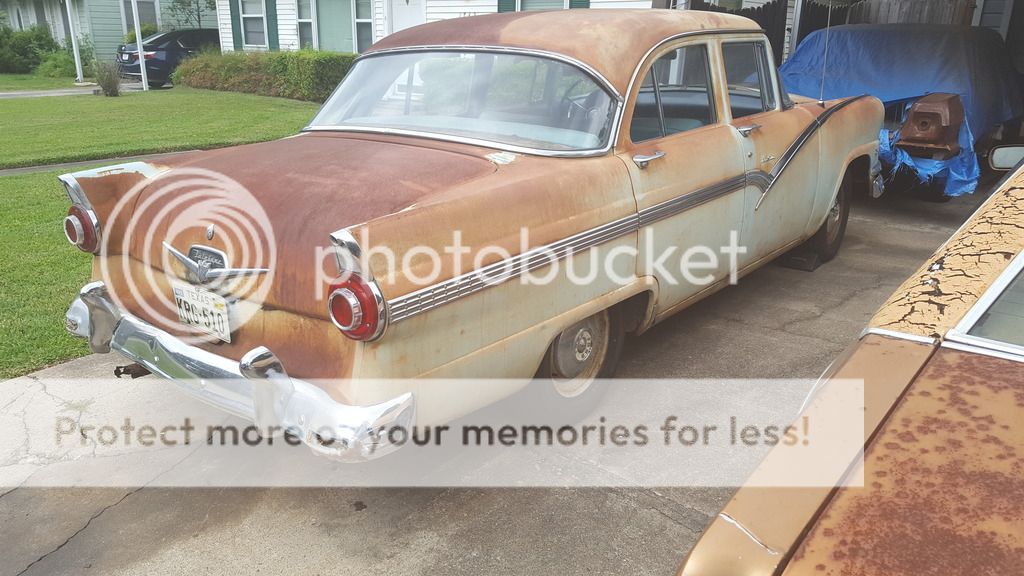
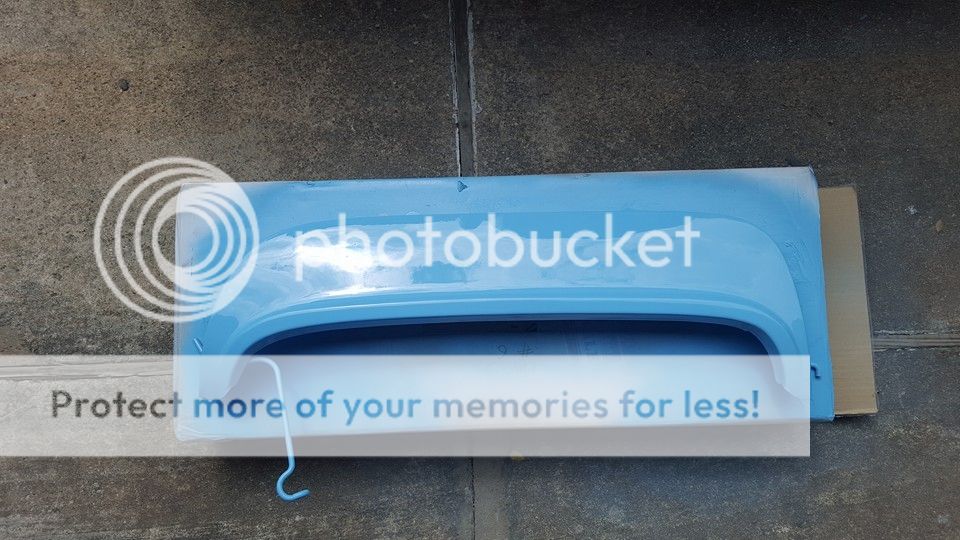
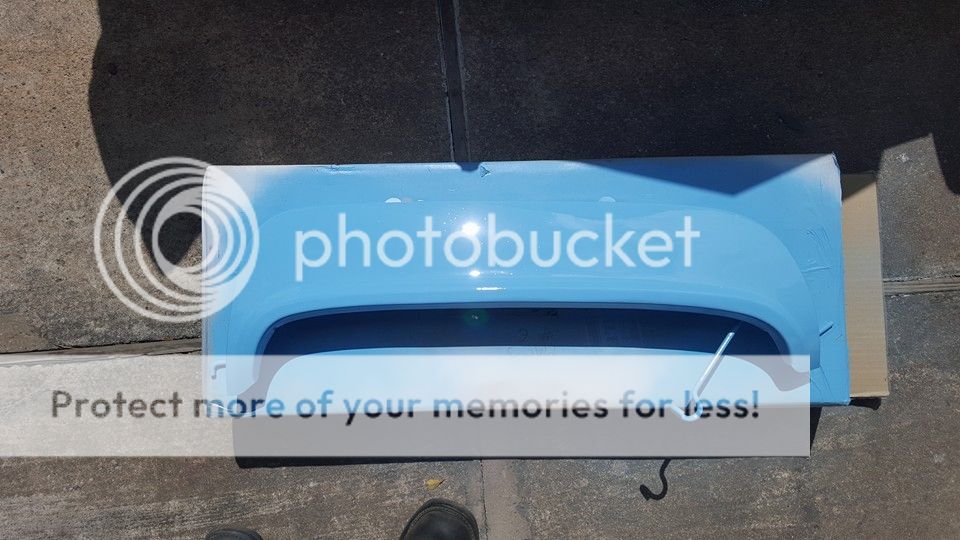
Next few pictures are reproduction fender skirts I bought for the car. I purchased theses as I bought a can of Diamond blue spray paint from "Automotive Touchup Paint" and I didn't want the paint to go to waste. The one can did both fender skirts both sides but I need to put more clear on them. Might have to redo them when the car is officially painted. But this is the correct color of the car as it was new. The variation in the color is based on light condition. Full sun, to partial sun in the shade to full on in the shade with a flash.


First video, full hot idle in park. Idle speed last time I checked it was at 650 rpm.
Second video, full hot idle in drive. Idle speed last time I checked it was at 550 rpm.
Final video, this is a hot restart taken after car has sat about 5 minutes after being shut off.
One thing I still need to fix is the ignition switch tumbler, thing wont go into accessory. I don't know why, I replaced the ignition switch but reused my old tumbler. I been meaning to purchase a whole complete lock set and taking the original ignition tumbler and having the door and ignition tumbler on the new set rekeyed to the original pattern for the car then having two reproduction keys made off the original pattern.
~Update~
I don't know if I ever posted photos of the car, but here are a few pictures taken recently. First two pictures is taken last Saturday after I replaced the last tire on the car that was a 30+ yo biasply tire. It was an Atlas brand.
Next few pictures are reproduction fender skirts I bought for the car. I purchased theses as I bought a can of Diamond blue spray paint from "Automotive Touchup Paint" and I didn't want the paint to go to waste. The one can did both fender skirts both sides but I need to put more clear on them. Might have to redo them when the car is officially painted. But this is the correct color of the car as it was new. The variation in the color is based on light condition. Full sun, to partial sun in the shade to full on in the shade with a flash.
#173
04-23-2016, 07:45 PM
Logistics Pro
#174
04-23-2016, 08:33 PM
Thanks, only thing that has me a little concerned is there is what sounds like a knock in the bottom end faintly but I don't think its a knock I think it could possibly be an exhaust leak. After all the exhaust pipe has holes in it up and down its length. It hasn't gotten worse sounding and with how much I have ran the car if it was a rod knock it should have gotten worse by now.
But the thing is a rod knock from my understanding it makes noise even at idle and its loud. This thing here seems to get quieter as the rpms drop. Seems more like exhaust related to me.
But I don't want to replace the exhaust yet as I plan on doing a body off restoration on this car. Then I will replace it with reproduction factory exhaust from this one company made out of stainless steel. I know aluminized steel will be just as good for durability but I rather pay more and not have to worry in 30 years.
I'm also finding out how to get in touch with Darryl at Darryls License Plate Restorations via email. His location to mine it would be phone tag if I tried to talk. But I really need to mail my two original 1956 Texas plates to him for restoration and have him make me two duplicate plates.
That way I can "trick" the DMV by showing them the original plates to issue to the car then I can install the duplicates and put the orignals up for safe keeping.
#175
04-23-2016, 08:34 PM

Cargo Master
Forget what your guy told you about maximum timing. I don't know which Ford he is talking about but Y-Blocks tend to like 36-38 degrees.
The part about running cooler with advanced timing is true.
One simple thing to know about cooling systems is if it is not boiling over, then it is not too hot. If your temperature is stable at the 3/4 mark, then all is well. However, if it continues to climb, or does become a problem as the temps get warmer, then you will need to address it.
If you do have a problem, the first thing to do is to make sure that the cooling system is generally in good condition. After that has been done and if there are still problems, I would install a smaller water pump pulley. That speeds up your pump, which increases coolant flow and speeds up the fan. One way to get an idea if a smaller pulley will help is to remove the radiator cap and observe the flow of coolant at idle. If it is only a trickle, then the pulley is too big and therefore coolant flow is too slow.
I think Ford chose that pulley size because cars were expected to be cruising, and traffic just wasn't as much of a factor back then. So they wouldn't spend much time idling and when they are cruising, the pump speed is more than adequate.
The trucks do, in fact, have smaller pulleys and I think the reason Ford did that is exactly opposite the reason for cars. They were used for work, on farms, and in situations where they may idle or operate at low speed for a long time and they need that additional low rpm pump speed for those circumstances.
Ideally, the pump pulley should be no bigger than the crank pulley. For street use, smaller is better but it needs to be large enough that the pump speed never exceeds 7000rpm - for your use, I don't think it is possible to have a pulley that small.
The bolt pattern is common, so a trip to the junkyard or a browse through the Summit catalog will probably find a pulley that will work. The truck pulley will not work because it has a larger pilot and different offset.
Trying to fix issues with the carburetor / distributor mismatch is a loosing battle. You simply are not getting correct timing with your current combo. That is a big portion of your performance problems.
It sounds pretty good at idle. Nothing is jumping out to me as a problem.
The skirts look great.
#176
04-23-2016, 08:43 PM
Thanks, I think I am doing a good job for the mismatch parts. The cooling system for the most part is new minus the engine. The radiator was rebuilt but I checked it the other day and see white calcium rocks in the top tank, will have to do something like a straight water mix with some CLR to help dissolve that as a flush one day. As of now it was fairly stable but today was like 80* or so temp wise but I wasn't really driving the car I did hold the throttle up some and it did seem the needle was trying to drop down. I just need to check timing as I don't know what the initial is set at.
On the timing our engine guy is talking about the Windsor engine family and newer. He didn't even want to go through my 292 just to see if it needs any parts replaced.
On the cooling system I don't think I would call it a trickle with the engine idling but that was at 800 rpm idle I need to check it again at a full 650 rpm idle the coolant had visable currents.
I agree on that, Ive been thinking about the fact this is a vacuum only advanced dist and it is getting different vacuum than it was designed for.
I will I think have to break down and purchase a Holley 4000 rebuild kit and purchase the proper dual advance assembly from I think its either Concours or Larrys to replace the single can and hook it up as the factory intended it to be.
Will have to also take my manifold to our engine guy to see if he can bead blast it to clean it up for paint as well. This would also fix my choke problem, with the late model intake manifold its a '62 year model 2bbl version it has no hot air choke passage, its in the exhaust manifold on the passengerside and Ive checked it but it has just one metal tube and I cant find any other opening for fresh air to be sucked through to heat it up so the choke doesn't really function like it should. Thankfully you can buy the passenger side dual exhaust manifolds as reproductions atleast I could last time I looked.
Thanks for the skirts as well, only thing I don't like about them is I was running out of clear so they didn't get as much as I would have liked for a crisp reflection. Great thing about clear though is I can always lightly sand it and spray some more clear on top to correct that.
Radiator is also not boiling over, I don't have the radiator cap on fully just to the first notch so it doesn't build full pressure. Reason for this is I have a core plug on the passenger side above the starter leaking. It drips more with pressure than without. So Ive been running it like this for the time being. I am still trying to finalize my move which I will then have a car lift which will make a core plug replacement with the engine in the car a breeze.
I forgot engine vacuum, I made a note on it this engine at full idle with the carb tuned at the power brake booster port I was pulling 18 inches in park at 650 rpm and 15 inches in drive at 550 rpm.
#177
04-24-2016, 12:00 PM
Well I am pricing out some parts I will need. I have the original carb and intake manifold that came off the car. I can get away with keeping the late model 292 passenger side exhaust manifold that has the hot air hook up I can pull the tube out. I did it once before to see if the opening was plugged.
Besides that I am looking at the following parts.
Dual can vacuum advance that I found at two places one has a price tag of $167.00 + $100 core. other place just simply says call for pricing.
Vacuum advance hardline kit, I found a few places that sell theses, wont be getting them from Larrys Tbird like the advance cause he doesn't sell it in kit form and the inlet tube in the photo that he sells looks incorrect and has a huge kink in it where they twisted the tube around.
Fuel pump line to carb, will need to replace this as original one was modified for use with a late model 2100 carb.
Holley 4000 master rebuild kit, will be getting this from the carb doctor as I like his kits I believe he is also who I got my fuel pump rebuild kit from his kit use ethanol safe rubber components.
I found a place that sells brass bushing kit for the throttle plates its a 5 piece set, I will be purchasing this as well. I figured if I am going to rebuild the carb I will knock the bushings out and install new. I want this carb to function like it did when it was first built.
Dashpot, I currently have a replacement style that is 30+ years old, I found one of my restoration sources that has limited stock of NOS dashpots going for $99.95 that I will be purchasing one of theses. I can get the replacement style but my goal is for the car to look when I am finished as if it just came from the dealership.
Have to get the proper double action fuel pump vacuum lines, Macs sells a set of three hardlines one of which is the fuel line.
I need to get the choke kit as the tubes are rotted out and broke when I removed the carb to try and clean up the intake manifold. There are complete kits out there that I will buy along with the stove tube removal tool to hammer out the old stove.
I'm also going to replace the brass float in the carb as well.
So as of now I am looking at the following pricing.
Carburetor master kit : $89.95
NOS Brass float Holley 2140/4000 : $49.00
Distributor advance hardline kit : $25.25
Carburetor primary throttle rod bushing kit Holley 4000 5 pieces : $22.25
NOS Dashpot : $99.95
Auto Choke tube set : $72.95
Choke tube removal tool : $12.95
Fuel & Vacuum line set : $32.95
Dual canister vacuum advance : $167.00 + $100 Core
Holley Distributor Manual : $18.70
So $690.95 is what I am looking at without figuring in s&h. Good thing I finally got approved for a creditcard after trying for so long. Will make this so much easier that I can just pay this on time vs having to wait till I had enough money saved up that it wouldn't put me in a bad place to make a purchase like this.
I am how ever contemplating if I should just buy a new distributor and replace it while I am at it as well. Car runs great so I should be fine just removing the single can vacuum advance and installing the dual can that is proper for the car.
#178
04-24-2016, 12:48 PM
Cargo Master
#179
04-24-2016, 03:01 PM
But what would I need or where would I buy the parts to rebuild the dist? Ive already rebuilt the fuel pump and vacuum pump on the car and I rebuilt the carb and will rebuild the original Holley 4000 myself. I planned on rebuilding the wiper motor myself as well but no parts available. So I am fully willing to pull the dist I have take it apart and rebuild it. After all I will be buying the Holley distributor manual to use for the rebuild as well.
That's one thing about this car, I am trying to do as much work myself as I can so it has more personal value to it than it does right now. Plus I know its being done right and not short cutted like Ive seen my boss do on one customer car.
Instead of buying a new loaded HEI dist for that 69 Camaro he gutted it and used guts from a used one in the back car came back 3 days later as the dist locked up and stalled out. The bushing was seized to the shaft. I want to avoid headache like that and do the job myself.
#180
04-24-2016, 03:15 PM
Sounds good. Nice steady idle, looks like you could balance a quarter on the manifold and it would stay. Starts good when warm? You're in there. If funds are somewhat limited it might be wise to focus on a new damper, as you talked about before. Brakes are another often neglected section. Just some thoughts. Great car, you're doing a great job.